The garage is the “home” of the car and the second home for its owner. The walls and roof of the garage protect the car from rain and wind, but the owner always has increased requirements for the floor, related to:
- with the strength of the coating, due to the mechanical impact of the car, the presence of heavy objects, cans, wheels in the garage;
- with inertness to chemical compounds, sometimes there are leaks of brake fluid or antifreeze when filling or changing oils, pouring fuel from one canister to another;
- with moisture resistance - when driving into the garage during rain, the car brings quite a lot of water, in addition, condensation from the car also gets on the floor.
Concrete floor in garage
Advantages of concreting
You can fill your garage floor with your own hands easily and efficiently. Do-it-yourself work will be cheaper, since hired workers and special equipment are not required. The concrete type of pouring has been proven over the years, it is very reliable and is often used in construction of any complexity.
Concrete screed in the garage has the following advantages:
- durable to use;
- resistant to mechanical stress;
- has high wear resistance;
- does not require additional care;
- Resistant to automobile oils.
The comfort of being in the garage largely depends on whether the floor is made correctly
Concrete floors can be painted or tiled. This finishing coating will reduce the formation of dust under the wheels of the car, because it settles throughout the garage and brings discomfort to the owner.
Video description
How to properly mix concrete mortar is shown in the video:
See also: Catalog of companies that specialize in small forms
A more convenient alternative to homemade concrete can be ready-made solutions delivered to the construction site by concrete mixers, as well as dry sand-concrete mixtures. They are formulated in the right proportion and already contain the necessary additives. Many of them contain plasticizers and even fiber fibers that increase the strength of the coating.
This product is produced in packaged form with a certain weight (25, 30, 40 or 50 kg), which is very convenient when determining the required amount of water. When mixing sand concrete, you can add crushed stone according to the instructions on the package.
But before you pour the floor in the garage, it’s worth calculating how much it will cost to purchase ready-made mixtures. This will be significantly more expensive than concrete made from individual ingredients. Therefore, they are usually purchased only for pouring the finishing layer, since sand concrete is more plastic and easy to level.
Dry sand concrete mixtures Source i.ytimg.com
Among the popular brands of sand concrete, which are of high quality, we can especially highlight such as AXTON, UNIX, Malachite, Etalon, Titan.
Reinforcement
In an actively used garage, it is advisable to reinforce the concrete floor to increase its strength. For this, a welded metal or fiberglass mesh with large cells measuring 10-15 cm and a thickness of 3-4 mm is used. Reinforcement is required if the thickness of the screed does not exceed 60-70 mm.
The mesh is laid so that there is a small gap between it and the waterproofing layer, for which purpose brick fragments, stones or special stands are placed under it. The reinforcement should be approximately in the middle of the concrete thickness. As with waterproofing, the mesh is laid out in parallel, overlapping rows so that there are no gaps between adjacent cards.
Mesh made of fiberglass reinforcement on stands Source i.ytimg.com
If the garage is heated in winter or is used as a workshop with the owner staying in it for a long time, it makes sense to insulate the floors by laying a layer of polystyrene foam on the waterproofing.
Preparing the base
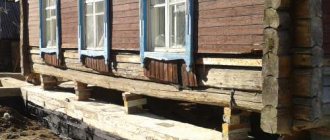
Before the concrete pouring of the floor, the owner had already built a strip foundation and walls. Inside the foundation, the top layer of soil is removed by 30-40 cm and the earth is compacted as much as possible. Preparing the pit takes some time, but this will allow you to remove all the fertile soil and move on to creating a cushion for the base.
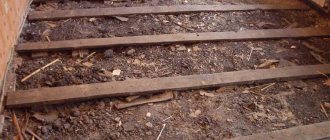
Special markings are made to evenly distribute the cushion of sand and crushed stone. For this purpose, wooden pegs or reinforcing rods and cord are used. Opposite rods are connected with a cord using the letter “X”.
Preliminary and mandatory work - removal of the fertile layer, down to clean soil
Materials
Concrete floors are most often installed on the ground. If there is a cellar in the garage, then the function of the floor is performed by a reinforced concrete slab, that is, an almost finished base.
Cushion or footing
When laying on the ground, it is necessary to install a cushion or footing. They level and strengthen the underlying layer and protect the concrete from excess moisture.
The cushion is a backfill of sand and crushed stone, which is compacted as much as possible using a tamper or vibrating plate. For the garage floor, it is optimal to arrange a crushed stone backfill with a small addition of sand, since crushed stone increases the strength of the base. Sand fills the pores between large stones and helps distribute the load evenly. The recommended crushed stone fraction is 20-40 mm, sand size is 2-3 mm, cushion thickness is 20-40 cm.
For backfilling, you can use gravel, which differs from crushed stone in having more rounded edges. In a compacted state, the load-bearing capacity of the gravel bed is almost the same. But adding gravel to concrete is not recommended due to low adhesion. It is too smooth and does not adhere well to the rest of the mixture. The footing is made of lean concrete - a mixture with a low content of cement and water. It is laid on the ground in a layer of 50-100 mm and compacted. Further work can be carried out without waiting for hardening.
Geotextiles, waterproofing
To prevent the cushion from becoming clogged with clay and to retain its drainage properties longer, geotextiles are used. This is a non-woven fabric with very small holes, made from synthetic threads.
Geotextiles are laid directly on the soil surface, and a cushion is placed on top. To withstand high loads, geofabric must be durable. The main characteristic by which one can judge the strength of a material is its density. It is measured in grams per square meter and can be from 100 to 800 g/m². For the garage floor, it is optimal to use geotextiles with a density of 250-350 g/m².
Waterproofing is designed to protect non-moisture resistant materials from water and effectively reduces corrosion of reinforcement and concrete. In floors on the ground, it is laid on a crushed stone-sand cushion. When pouring the solution, the insulation prevents early dehydration of the mixture, and during operation it prevents the concrete from becoming waterlogged.
Dense films with a thickness of at least 200 microns, rolled materials such as roofing felt, and also membranes are used as waterproofing for concrete floors over crushed stone backing. If the garage is partially buried, then all underground parts, including walls, require protection from moisture. In this case, coating materials and penetrating impregnations are used. It is desirable that the waterproofing be continuous and ensure the tightness of the circuit.
Armature
Steel mesh is used to reinforce the garage floor. They strengthen the base and distribute tensile loads to which concrete is not sufficiently resistant. In addition, the reinforcement prevents shrinkage and cracking.
The meshes are made from smooth or corrugated reinforcement with a diameter of 4-5 mm with a cell of 100x100 mm or thicker rods of 8-10 mm with a cell of 200x200 mm. You can buy ready-made meshes or make them yourself. The choice of rod size and mesh size depends on the expected loads.
The mesh rods are connected at the nodes with knitting wire. During installation, one frame must be laid on top of the other with an overlap of at least the width of the cell and twisted together with wire to prevent shifting.
When laying reinforcement, you need to ensure that a protective layer of at least 25-30 mm is provided. This prevents the metal from wetting and its subsequent corrosion. To fix the frames, plastic spacers are used; if they are not available, piles of mortar are used. It is prohibited to use crushed stone as gaskets. While pouring concrete, you need to walk on boards or boards so as not to deform the mesh. Near the side walls, the reinforcement is laid with a gap of at least 25-30 mm, which must be set aside from the damper tape or insulation strip.
If you plan to install a partition in the garage, a reinforcement frame of 4 rods with a diameter of 8-12 mm in two rows with clamps or jumpers must be placed in the floor slab. The stiffening rib should be directed downwards, so a recess is first made in the base.
Concrete
The mixture is made from Portland cement M400-M500, crushed stone, sand and water in the approximate proportion C:P:SH=1:3:5. Water is added based on the moisture content of the aggregates in the water-cement ratio W:C = 0.5-0.65. It is not recommended to increase it. Although more liquid concrete is more convenient to lay, when hardening it shrinks and cracks greatly.
The pouring thickness is taken based on the size of the loads and compliance with a minimum protective layer of 25 mm between the reinforcement frame and the surface of the concrete slab. Thus, the thickness is about 50 mm, but in most cases the floors are poured to a height of 80-100 mm.
Materials for damper gap
When fresh concrete hardens, it is prone to shrinkage, and with fluctuations in humidity and temperature, the reinforced concrete slab experiences significant temperature deformations. To avoid cracks, an expansion gap must be left around the perimeter of the garage. It is filled with elastic, moisture-resistant materials:
- special damper tape;
- strips of insulation;
- VEP plates;
- sealing mastic.
Thanks to their viscosity, they dampen not only temperature deformations, but also vibrations of structures, and reduce the noise level in the room. This is especially important if the garage is located in a residential building or nearby.
Tapes or strips are laid close to the walls. There must be a protective gap of at least 25 mm between the reinforcing mesh and damping materials.
Zero level mark
We received a shallow pit and marked it with a cord, which will allow us to evenly lay the cushion of sand and crushed stone. Before filling the pillow, you need to set the thickness to which the materials will be poured under the base of the screed. For this purpose, the zero floor level is determined. Often the floor screed is aligned with the gate threshold, this facilitates convenient entry of the car.
It is necessary to determine the thickness of the future concrete base and not occupy it before pouring. If you have chosen a screed with a thickness of 10 cm, then 10 cm is counted down from the gate threshold using a tape measure. After determination, the zero level is marked along the entire perimeter of the walls. To do this, builders use a laser level. It makes it easy and simple to mark the distance, but this process can also be done using a regular building level.
Waterproofing
Waterproofing the floor before screed
Everyone knows about the ability of water to go down, but water can also go up due to capillary rise. The insulator can be glass roofing material, roofing felt, foil insulation, waterproofing or polyethylene film with a thickness of 250–300 microns. The waterproofing strips are laid overlapping the sand layer, with an overlap of approximately 100–150 mm.
It is better to glue the joints of the canvases together with construction tape.
The material is laid carefully, in an even layer, so that there are no dents or folds. The edge of the canvas needs to be placed on the wall, slightly larger than the height of the future floor. So that when laying and pouring the floor, the edge of the waterproofing material does not interfere and is not accidentally damaged, it is better to fix it on the wall of the garage. It is forbidden to cut waterproofing material.
Waterproofing materials
Calculation of the thickness of ASG layers
After marking the zero level, it is important to determine the thickness of all layers in order to reach the desired marked level. On average the layers are:
- The minimum thickness of the concrete screed is about 7 cm. It is suitable for a light car; if there are several cars or heavy vehicles, the thickness of the solution should reach up to 15 cm.
- The layer of crushed stone can be from 5 to 10 cm. Instead of crushed stone, expanded clay can be used.
- The layer of river sand reaches from 5 to 10 cm.
The calculation of layer thickness is selected individually. This depends on the height of the foundation laid, the availability of building materials and the builder’s budget. A thickness of 2 cm is left for the layer of waterproofing materials; if thermal insulation of the floor is provided, space is left for it. The total thickness of the pit ranges from 30 to 40 cm.
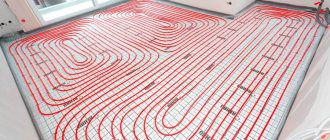
Insulation
If the owner of a car garage spends a lot of time in it, then it is necessary to take care of insulating the concrete floor. You can do the insulation work yourself, but you should remember that it is carried out before the foundation is poured. The floor will be warm if the concrete screed is poured over a layer of insulation material. Foam plastic, expanded clay or penoplex can be used as insulation (the use of mineral wool is not allowed). It is important to remember that when using insulation, the floor level will become higher.
Penoplex is a universal material that provides not only floor insulation, but also its waterproofing.
How to repair a concrete floor
It is necessary to repair a concrete floor even if a small crack appears. In order to remove a small crack, it is necessary to widen it slightly using a grinder with a diamond wheel to a width of 1-3 cm. Clean the entire area from dust (you can use a vacuum cleaner) and then apply a primer solution to the floor. To prepare the repair mixture, only washed sand should be used.
After this, the mixture is placed in the widened and treated cracks, but you should not sand the place where the crack appears until it dries completely, since the mixture tends to sink below the floor level. Grinding is carried out only after completion of work, and the finished surface is coated with a protective polymer composition.
Materials for backfill
The following materials can be used for backfill:
You can calculate how thick the layers are needed to reach the desired height
- river sand;
- a layer of crushed stone or a layer of expanded clay;
- gravel;
- Sand and gravel.
Each layer removes water from the concrete screed and is also used as a leveling layer. The crushed stone should be of a coarse fraction, 30–40 mm. Most often, river sand is used, but quarry sand can also be used. Expanded clay is laid only when it is necessary to level the base under the screed; it absorbs water and is not used to drain water. If the soil has a high groundwater level and the ground is wet, only sand and crushed stone are used.
All backfill materials must be well compacted. Broken bricks and used building materials cannot be used to create a pillow, since they cannot be compacted reliably. Some people, when pouring, make a slight slope of the floor in the garage by 2% in the direction of the gate to drain water. However, many builders refuse it, since in winter such water freezes and freezes to the gate.
Repairing a concrete floor using polyurethane paint
Input data.
I'm not a particularly handy craftsman. More precisely, I have never been involved in construction and finishing work at all. However, in the spring of this year I managed to buy a garage of 19 square meters. m. and, as it seemed to me at the time of purchase, it was in good condition. A car is regularly parked in the garage.
During operation, it became clear that the concrete floor is not a very reliable thing. It gets dusty, absorbs everything like a sponge and cracks. Moreover, it was uneven; it looked like the right side had sagged a few years ago.
I realized these things when it started to get colder, which meant there was little time left to work within the permissible temperature range.
After studying different methods of processing floors for technical rooms, I rejected the idea of using linoleum, tiles, and especially wood. The most profitable option in terms of money, ease of use and effect was to use paint. However, at first it confused me, because I had a hard time imagining how to just paint concrete. And then my friends suggested that I should pay attention to epoxy compounds for repairs. The products of “SdelaiPol” are now being actively promoted and they seem to be good, but they gave me a link to “Krasko” and it became clear that their products are somewhat more serious.
After consulting, I purchased: - Remosil - an epoxy-based composition to form a strengthening and leveling thick layer; - PS Grunt - primer over Remosil; — Polymerstone-1 is a finishing layer of chemical- and impact-resistant polyurethane paint.
Upon further delving into the topic, it became clear that deep cracks in the concrete needed to be repaired, and the gap near the right wall needed to be leveled with a screed.
A friend recommended the following technique. Take a grinder with a disc for working on concrete and saw through cracks of 3-5 centimeters. Be sure to have a good respirator. The concrete dust flying is simply terrifying.
Next, we vacuum and carefully pour a corrosion inhibitor, for example “Ifkhan 58”, into the cracks in order to minimally touch the walls of the slots. I used a syringe with a tube. This is useful for rebar or mesh in concrete to prevent it from corroding.
After a day, when the composition is saturated, you need to pour epoxy. The epoxy you choose should be the most liquid and have a curing period of about a day in order to be absorbed into the concrete as much as possible. For this purpose, I purchased SM Pro resin and OP 921 hardener.
I poured it in for the first time in the evening, then looked again in the morning.
As you would expect, in a number of places the glue went deep and I had to periodically refill it over the course of several days.
Where there were clearly deep cracks (near the walls) and the prospect of topping up was long, and there was not so much resin, I began to add dry sand to the glue.
These days it got colder and the glue almost stopped curing. I had to take the stove-gun from home and the matter was corrected.
When everything has frozen, it’s time to screed. I bought the cheapest screed in Leroy. The surface was first coated with concrete contact.
After leveling, I added water, as my friend advised me, and covered it with polyethylene for 3 days. When the time came, I took it off and liked the result: the edge in the center of the floor had a very smooth transition thanks to the finishing moisture.
I waited 2 weeks for this to dry. And I put Remosil on according to the instructions. That is, mixed with dry sand 1:1. It is worth noting that you need a classic mop or a wide spatula under a stick to distribute the composition over the surface in a thin layer. I barely had enough strength to “stretch” it to the entrance.
A day later, this layer hardened and began to apply PS Primer with a roller. This is probably the simplest stage in the whole story.