Have questions ? Call!
When it is planned to carry out major repairs in a Khrushchev-era building, many specific features of such houses should be taken into account. This article discusses them and reflects methods for updating the floors in these buildings of this type.
In the USSR, such houses were built en masse and were intended for temporary residence. And today, replacing wooden floors in Khrushchev-era apartment buildings is not just a modernization measure, but also an improvement in life safety.
Don't start renovating until you read this.
What floor to install in an apartment Warm floor in an apartment: a modern choice How to fill the floor in an apartment
What can the floors look like in an apartment in an old house?
The wooden floors here are formed of five layers:
- Lower. This is a reinforced concrete slab. It is covered by other layers. She doesn't need any special finishing.
- Waterproof layer. It spreads immediately to point 1. Usually this is rolled roofing felt. The method of laying it is an overlap of 10 cm. Another layer of waterproofing is placed on it - liquid bitumen mastic. It forms a solid layer of coverage. Waterproofing in bathrooms is being installed more carefully.
- Noise and thermal insulation. It covers point 2. It is usually represented by glass wool.
- Cement strainer. Located at point 4. It was designed to accommodate parquet, linoleum flooring or joists. Usually the floor in Khrushchev did not have it. And the plank structure was rough.
- Flooring. Usually, boards with a density of 2.5-4 cm were used.
In the kitchen areas, linoleum was laid in massive square-shaped pieces.
In the bathrooms, the floor was made of small ceramic tiles. Before this, a screed must be arranged.
The wooden floors gradually dried out and cracks formed in them. They could swell under the influence of moisture.
Leveling a wooden floor with plywood
Plywood allows you to level the floor and prepare it for subsequent installation of flooring. To do this, sheets of plywood are cut to fit the size of the room. Please note that there should be 3-4 mm gaps between the sheets.
The floor is lined with plywood sheets with a shift according to the principle of brickwork. In places where there are uneven spots on the floor, a backing is placed under the plywood sheet.
Reference! The joints of plywood boards should be in the middle of the joists
After installation, all that remains is to secure the sheets to the floor boards using self-tapping screws.
Features of repair and replacement of floors in Khrushchev
For your information
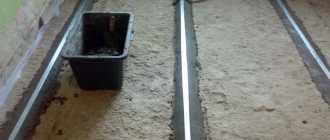
This process involves laying the beams needed for the joists. We also use sand here to level the tiled surfaces.
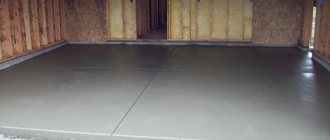
When replacing an old floor in a Khrushchev-era building, the differences even in tolerances reach 1-2 cm. If they are not met, the difference is more significant. Therefore, it is more logical to make a cement screed.
But before it, expanded clay is used as a heat and sound insulator.
Is a substrate needed?
Preparing the floor for linoleum does not always end with leveling. In some cases, it is necessary to additionally lay the substrate. This material is needed for sound and heat insulation. It is especially necessary if plywood is not laid on the flooring. The underlay can correct minor unevenness if there is no need or time to do a full leveling.
There are five types of substrates:
- Jute. They have the ability to absorb excess moisture. The material will provide excellent additional insulation. Jute is rot-resistant and does not grow mold. In addition, it has good fire resistance.
- Cork. If you do not plan to install heavy furniture in the room. Cork would be a great option. It becomes a good additional insulation, natural and safe for humans. Disadvantage: low strength. Also, the material may have a relatively high cost.
- Linen. If you need to prevent the occurrence of mold and mildew indoors, then flax will be the best material for the substrate. It is not susceptible to the influence of various microorganisms.
- Combined. There are substrates made from several materials: linen, wool, jute. They are dense and do their job well. But during operation, their quality decreases significantly.
- PVC. Suitable for different types of surface, low cost.
The simplest option, which allows you to simplify your work, is to buy linoleum with a backing already glued on (check with the store salesperson).
Proper dismantling procedure
What are the features of repairing and replacing floors in a Khrushchev-era building? The beginning here is formulaic. We dismantle the previous structure. We remove boards or parquet. Here we use a nail puller.
If there is an uneven or damaged layer of screed, carefully break it with a hammer. When there is insulation under it, then we pry it off from the bottom and crack it over the entire area. The elimination concerns all layers up to the slab.
We install waterproofing in the kitchen and bathroom. If necessary, we apply sound insulation to it.
If the customer’s apartment is located on the ground floor and there is no basement below, we provide thermal insulation. If it is available, the client himself determines what kind of insulation to install - sound or thermal, or both.
Question about screed
How to arrange it correctly? We upload it to:
- Floor slabs between floors.
- Expanded clay insulation layer.
- A layer of glass wool/basalt wool or polyurethane insulation.
Before pouring, we cover the cotton insulators with hydro- and vapor barrier sheets.
An alternative to them is a very dense polyethylene film.
When replacing the floor in an apartment, we prepare a screed from the following components:
- Cleaned sand.
- Cement.
- Special plasticizers.
- Modifiers.
- Water.
Make the composition quite liquid. And after pouring, it spreads over a horizontal surface.
On this layer we can lay:
— pipelines of the water-type “warm floor” system,
— cables of an electrical analogue of this technology.
We cover such communications with a second layer of identical screed. The next stage when replacing floors in an apartment is laying the selected coating.
Technology of work execution
There are three main ways to lay the material:
- without glue with fixation only on skirting boards for small rooms;
- on double-sided tape around the perimeter;
- on glue.
The latter method guarantees the greatest strength. It is especially relevant when covering large areas.
Fastening without glue:
- lay out the covering on the floor;
- wait a few days;
- fix it with baseboards, making sure there are no bubbles.
Fixing the canvas to the baseboard
Fastening with double-sided tape:
- glue tape around the perimeter of the wooden floor;
- lay linoleum, measure all dimensions again;
- roll the roll to the middle of the room;
- tear off the protective layer from the tape;
- unwind the roll, gluing it;
- control the absence of bubbles and irregularities;
- cut off the excess, install baseboards.
Fastening the canvas with tape
Fastening with glue:
- lay out the roll on the floor;
- cut the corners for a tight fit;
- roll half of the coating into a roll;
- gradually unroll the roll, applying glue to the surface (after applying the glue, you should wait 20 minutes, and only then fix the material on the flooring);
- repeat the work with the second half;
- cut off excess;
- install plinths.
When laying linoleum from two strips, tape or cold welding is used to connect them at the junction.
Before using cold welding, apply masking tape to the joint and cut it along the seam with a utility knife. This will prevent excess adhesive solution from getting onto the front side of the linoleum.
About rough and finishing coatings
This work cannot be done without lags - special beams. We put on them:
1. Rough coatings for laminates, linoleum, carpet, etc.
2. Finish coatings. Their material is pine or spruce boards. For effectiveness and durability, we coat them with colorless varnish.
For rough coatings we use the following options:
- OSB,
- Chipboard or fibreboard,
- plywood,
- MDF
A must read
What floor to install in an apartment Warm floor in an apartment: a modern choice How to fill the floor in an apartment
Types of flooring
If you want to turn a room into a luxurious hall in a classic style, to give the room harmony and attractive aesthetics, then it is difficult to imagine something better than parquet.
Types of parquet installation
Moreover, parquet today is laid not only in the standard way, boards of the same color, one shape, but they make composite compositions, even combining parquet boards with other types of flooring, which allows you to highlight several zones and give the room expression, style, and brightness. This option is especially good for the living room.
It is better to choose parquet boards from coniferous wood; they are characterized by increased hardness, durability and excellent appearance. Experts say that conifer boards are in no way inferior in strength even to ceramic tiles.
There are also plenty of options for parquet patterns: checkerboard pattern, “deck”, wicker, herringbone, etc. The advantages here are attractive appearance, reliability, and versatility. The disadvantages include instability to high humidity and sudden temperature changes, in particular, if something very hot falls on the parquet, marks will undoubtedly remain.
Parquet
Laminate has absorbed many of the advantages of parquet: it is also an aesthetic floor covering, quite durable, adding a touch of coziness to the atmosphere. Being a compressed layer of wood waste covered with a film, laminate is much easier to install than parquet boards and is resistant to external aggressive factors. But it is believed that this material is less environmentally friendly.
Laying laminate flooring in Khrushchev
Tiles are good in spacious living rooms and kitchens. At the same time, large plates with an original pattern, of which a great variety have appeared recently, look very good. These tiles can create the perfect baroque style that inspires big ideas. Unlike parquet, tiles are absolutely resistant to moisture and temperature changes; if a hot iron falls on the tile, if it is of high quality, no problems will arise. But it is less comfortable than parquet and, moreover, slippery.
Ceramic tile
The most popular, economical option for flooring in Khrushchev-era buildings is linoleum . This material is very easy to install, besides it is affordable, comes in a wide variety and is durable. But just like laminate, linoleum made from synthetic materials is not environmentally friendly.
Linoleum
In the last decade, a fashionable trend is the installation of the so-called “warm floor”, which is a complex structure. There are two types of heated floors: water or electric.
| Flooring | Prices, rub/m2 |
| Linoleum | 100-700 |
| Polyvinyl chloride coatings | On average from 1000 |
| Cork covering | On average from 1600 |
| Laminate | 170-1250 |
| Tile | 300-1500 |
| Carpets | 70-2000 |
| Parquet | 1000-2600 |
| Self-leveling floors | On average from 800-1000 |
Final coating
We lay it only on a rough base or screed.
To install parquet flooring, we use heat-resistant bitumen mastic or an adhesive mixture. What you should not do with parquet is install it directly on rough wood.
We first leave the linoleum on the floor unrolled for several hours. This is how the wrinkles come off. When varying it with an image, we move the joint areas until the patterns are harmonious. Trim if necessary to match the patterns. During the gluing process, eliminate bubbles and carefully glue all areas.
Important
We lay the laminate dry. Then we adjust the images on the panels. Next, carefully glue it on the basis of the drawing.
We glue cork tiles only on a thoroughly leveled and cleaned floor.
The permissible humidity of the rough base is a maximum of 5-6%, room temperature: +22.
We fix the skirting boards only on the wall.
We place the interlocking cork plates directly on the floor without gluing. Their installation is identical to working with laminate.
Preparing the base
The coating is characterized by high flexibility; over time, it will accurately follow the contours of the underlying layer. At the same time, problems arise with an aesthetic and practical component. It is not very pleasant to walk on a surface that has noticeable changes. Therefore, it is necessary to level the base.
At this stage, you will need to seal all the cracks, depressions and gaps between the wood flooring boards. It is also worth checking the fastening of the subfloor elements. After all, no one wants to lay a brand new flooring and find out that the boards squeak underneath it.
A well-laid subfloor does not creak, all elements are securely fixed. The wood should not be rotten or damp. It is also worth paying attention to the heads of nails and screws. If they stick out from the plane, then there is a high probability of damage to the linoleum. We recommend taking a hammer or screwdriver, walking across the entire width of the floor and pressing the caps into the wood. Read more about eliminating floor squeaks.
If the rough part contains damaged elements, they will have to be replaced. Irregularities are eliminated in several ways, depending on their scale.
To remove small cracks, crevices and gaps, you will need regular wood putty.
To fill cracks, use a special wood putty
For small unevenness of the base, it will be enough to go over it with a grinding machine or a hand plane. Read more about sanding wood floors.
It is most convenient to sand small irregularities using an angle grinder (“grinder”)
More serious preparation of a wooden floor for linoleum involves the use of plywood. In this way, significant differences in height are eliminated: a completely flat flooring is obtained for the floor covering. The plywood should first be laid out on the floor. This is necessary in order to fit the sheets. Along the edges the layer is not brought up to the walls by a few millimeters. The same rule applies to all sheets: there should be a small gap between them to allow for thermal expansion.
The sheets are laid out staggered. This is reminiscent of brickwork, where each subsequent row is offset from the previous one. Fastening is carried out using PVA glue. After it dries, additional fixation is used with self-tapping screws along the edges.
After completion of the work, the joints between the sheets are carefully sanded and the cracks are puttied. Before laying linoleum on a wooden floor, you will need to remove all debris generated during previous work. Read a detailed article about leveling the floor under linoleum.
Plywood will help create a smooth and durable surface if the old floor is very uneven
When using a floor, plywood performs several tasks at once:
- additional sound insulation;
- additional thermal insulation;
- alignment;
- preventing subsidence of the floor covering.
Overhaul. Khrushchev and Brezhnevka
Apartments of Khrushchev and Brezhnev models do not at all correspond to modern standards. And today these are far from hits in the real estate market. In Brezhnevka and Khrushchevka the parameters of the premises are quite small.
Often their residents want to redevelop them. And in this process we will definitely dismantle the old floor.
Next, we clean the concrete slabs and fill in any excess holes.
We carry out the operation of replacing a wooden floor in a Khrushchev building by pouring a screed. We lay waterproofing on the concrete base: a very dense polyethylene film. An alternative is a liquid type of mastic in 2-3 layers.
We cover it with expanded clay - this is a thermal insulator. And we fill it with a cement-sand composition.
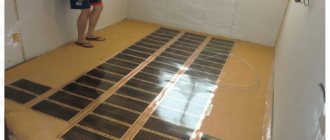
When installing screed in the bathroom and kitchen area, we immediately install the “warm floor” system. The owners themselves decide which variation to install: water or electric.
This is the most budget-friendly move in terms of re-laying the floors in the apartment. We create the subfloor from edged boards, moisture-resistant plywood and chipboard. We install them directly to the joists. We cover them with the coating chosen by the client.
When repairing and replacing floors in Khrushchev, the features of the work are as follows:
- The thickness of the film applied to the dry base is at least 1 mm.
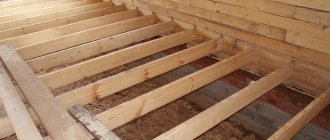
- We install the logs using a level over the entire surface area. Their distance from each other: 50-60 cm.
- We fill the voids between the joists with mineral wool or expanded clay.
- We attach boards, moisture-resistant plywood or chipboard to the joists (this is a raised floor). We retreat 1.5 cm from the walls.
- The created surface is covered with the final coating.
Replacing the old floor in such apartments, we come to the final phases: the final floor covering.
Today there is a huge range of materials on sale, and choosing original options is not difficult.
For residential premises, I recommend any of these five versions:
- parquet,
- carpet,
- linoleum,
- cork,
- laminate
The bathroom and kitchen are the places where we usually install tiles, self-leveling floors, linoleum, and also porcelain tiles.
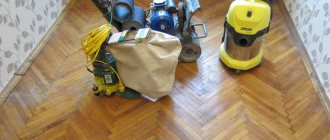
Surface grinding
Sanding of wooden surfaces is carried out using a sanding machine. This treatment will make the floor perfectly smooth and give the board an attractive appearance. For processing you will need two machines. One is for grinding the main surface, the other is for use in hard-to-reach places.
Grinding takes place in several stages:
- the room is cleared of furniture;
- curtain doorways with wet cloth;
- remove the baseboard;
- if necessary, repair the coating;
- hammer in visible nail heads;
- spray the surface with water;
- Rough scraping is carried out 2-4 times with abrasive No. 40;
- sequentially treated with abrasives No. 60 and No. 120;
- treat hard-to-reach places;
- remove remaining debris.
Replacing the floor in an apartment with your own hands
If you are thinking about replacing the floors in a Khrushchev building with your own hands, first you need to study their structure.
It has already been indicated above. This is five layers. Schematically, the picture looks like this:
Next, you must decide on the type of repair: cosmetic or major.
When implementing the first, the following operations are required:
Eliminating cracks.
- Dismantling the old covering.
- Installation of a new floor
Have questions ? Call!
Fighting small cracks
How to effectively eliminate such shortcomings? Putty and high-quality laminate will help here.
Work can be carried out without opening the coating. The cracks need to be thoroughly filled with putty. In this process, the boards should be looped. Upon completion of the operation, lay the underlay and lay the laminate.
Elimination of large gaps
These are what I call gaps exceeding 6 mm. This requires dismantling the floor plinth and floorboards.
Old wooden baseboards should be carefully removed around the entire perimeter of the room.
Carefully lift the boards with an axe. Pull out protruding parts.
Worn wood floors should also be removed. Before doing this, study the conditions of the lags. Replace damaged components.
Advice
Do the same with the boards. Replace defective parts with new ones. Install them tightly and mount them using self-tapping screws.
After which the baseboards return to their positions. You can lay linoleum or carpet.
Treat new supporting elements with an antiseptic.
↑ Which flooring to choose
You can choose any traditional or non-traditional materials for flooring, guided by your aesthetic preferences, budget, design and style of your future interior. It should be remembered that for any floor covering, in order for it to be well preserved and have a presentable appearance, you need a perfectly flat base, and the material itself must be of high quality. When choosing it, you should give preference to well-known manufacturers. Choosing cheaper material is not the best decision. Insulated linoleum is suitable for cold floors; tiles are suitable for kitchens and bathrooms. When choosing a laminate, make sure once again that the base for it is perfectly flat. When choosing a floor covering, listen to the opinions of experts who, with their professional advice, will help you choose the material that is suitable for your apartment.
The final decision on what kind of repair to do - major or cosmetic - should also be made after examination and consultation with a specialist. The ideal option would be to remove the floor and joists and clean the slabs from more than half a century of accumulation of debris, and even the remains of small animals and insects. This way you will not only clean the stoves, but also get rid of unpleasant odors. Despite the fact that this process is labor-intensive, a team of experienced specialists copes with it in the shortest possible time. If time is valuable to you, then it is better, of course, to turn to specialists who will do everything not only quickly, but also efficiently. We recommend watching the video - repairing a wooden floor in a Khrushchev building, which will help you solve the problem with a clear example. It is not for nothing that people say that it is better to see once than to hear a hundred times.
Eliminating squeaks
When the boards rub against each other, the floor creaks. We usually eliminate this dilemma by driving wedges directly into the cracks. We work in areas where squeaks appear.
The second option is talc.
If the floor creaks at the junction of the board and the joist, we make a special stretch of the floor. To do this, we drive in self-tapping screws designed specifically for wood.
The second option is polyurethane foam. We fill it in the area under the floor.
In general, the causes of this trouble are loose joists and rot in the boards.
We do this:
- We carefully analyze the floor. We replace boards with defects.
- If the condition of all elements is acceptable, then we strengthen their fastenings.
If the floor begins to spring back, it means that the quality of the previous work is rather modest. The floor needs to be re-laid.
We remove the flooring and study the distance between the joists. If it is significant, then this is the cause of the dilemma. Another reason could be the weak thickness of the boards.
Working with lags
Their correct location is:
If they are connected incorrectly, we correct this picture using competent options.
We place more pads under the joists. We fasten the joists only to the base.
We maintain a suitable gap - a maximum of 60 cm.
Important
If the previous workers left the parameters at 70-80 cm, we install another logs, and until the end of the covering. We cover its entire perimeter.
The final phase is laying the flooring. We secure the boards thoroughly.
The second option for strengthening the lags involves the use of crossbars.
.
You might be interested
What floor to install in an apartment Warm floor in an apartment: a modern choice How to fill the floor in an apartment
Cracks and chips
All remnants of old paint must be removed before laying linoleum.
Cracks and chips can form both directly in the floorboards and in the layers of paint covering them, which over repeated repainting can turn into a very noticeable layer.
Let's start with the last one. All remnants of old paint (even if it is not cracked) must be removed before laying linoleum. Although this process is quite long, it is nevertheless mandatory, since otherwise it will not be possible to qualitatively eliminate possible cracks in the boards, as well as treat the floor with an antiseptic.
The easiest way to remove paint from the floor is to use a hair dryer and a regular spatula. The heated paint is removed in just one or two movements.
The easiest way to remove paint from the floor is to use a hair dryer and a regular spatula.
As for the cracks in the boards themselves, eliminating them is also not difficult. To do this, just use the same spatula and a special putty for wood.
Major floor repairs
It is necessary when the condition of the floor becomes very bad, the boards creak, rot, crack, etc.
How to reinstall a wooden floor in an apartment in this situation? Work begins with dismantling the old coating.
Carefully remove the logs and all the boards with an ax. We throw them and their fasteners (nails, screws) away.
Create a horizontal line along the perimeter of the surface. This is a measure to achieve perfect floor levelness.
We measure the distance from this line to the floor. Determine the highest point. We make an indent from the floor by a parameter identical to the density of the log.
We make some more notations and measurements: from this mark to the horizontal line. We mark marks in all corners. We connect them with a line.
We beat off a horizontal line using the following methods:
- Using a hydraulic level.
- Working with a laser level.
- Using a level.
Application of hydraulic level
The main device here is a flexible tube. She has control flasks. This makes it easier to make digital markup.
The method is based on the characteristics of the contacting vessels. In them, we place water on a single horizontal designation.
Fill the hose with water. We raise its endings. The water in the flask will concentrate at a fixed level when the vessels are at an identical height.
We work in tandem. It is difficult for one employee to cope.
If air pockets appear, the work becomes more difficult. In this case, simply release the air from the hose and shake it.
The process goes like this: one worker applies one of the ends of the device to the extreme side of the wall. Definitely from the corner.
The assistant is at the other edge of the wall, marks the floor, and applies the second end of the hose to the wall.
The main goal here is to combine the level with the designation. This operation must be repeated at the first end of the water level.
The first worker makes a mark on the wall based on the level in his tube. Using the created mark, we mark a line along the entire perimeter of the room. Here we use the chop cord.
Working with a laser level
This innovative instrument projects a beam. Using it, you get a perfect horizontal line on the wall.
We work based on it; this is a fairly simple and effective way of leveling.
Have questions ? Call!
Leveling the floor and removing old paint
Removing the old layer of paint is required when it is necessary to change the color of the floor to match its interior or to level the surface for the subsequent installation of another covering.
When a floor is painted over a long period of time by applying a new layer of paint over the old one, it becomes uneven. In some places, the paint layer begins to bubble, peel off, or peel off. There are several ways to fix the problem.
Mechanical
The old coating is scraped off the surface of the board. For this, both hand and power tools are used. If we are talking about a large area and saving time, then it is more productive to use the latter. They make the process more convenient and faster. Hand tools are used for processing small areas and cleaning hard-to-reach places.
Electric Paint Removal Tools:
- milling cutter;
- drill with a metal brush;
- Grinder;
- grinder with a special attachment.
Reference! A router and sander do not always cope with oil-based paints. In such cases, it is more productive to use sandblasting to remove paint.
To remove paint manually use:
- putty knife;
- sandpaper;
- scraper;
- manual cycle;
- wire brush.
Chemical
There are a huge variety of paint removers on the market. These compounds are developed based on acids, alkalis and various solvents. They are quite easy to use. To remove a layer of paint, simply apply the liquid to the desired area and, after the time specified in the instructions, rinse with water. The remaining stains of softened paint are removed with a scraper.
The main advantage of such mixtures is the minimum effort spent on the procedure. Disadvantages include high cost and low efficiency on old coatings. Remover does not always cope with paint applied more than two years ago. In such cases, several treatments are usually required, which significantly increases the cost of cleaning.
Reference! When working with various washes, be sure to use personal protective equipment.
Sometimes improvised means are used as a wash. Some types of paint can be removed using mineral kerosene.
You can make your own wash using soda ash and lime. To do this, mix 3 parts quicklime with 1 part soda. Dilute with water to the consistency of sour cream. The resulting mixture is applied to the surface to be cleaned and left for 12 hours. During this time, the paint will become soft and can be removed with a regular scraper.
Thermal
This method is the optimal solution for removing old paint that chemicals have failed to remove. To do this you will need a hair dryer. With its help, the paint is softened, and then removed with a spatula. Some people use an iron and foil for these purposes. The surface is covered with foil and heated with an iron at maximum temperature.
The main disadvantage of the method is considered to be a high fire hazard. The advantages include that a new layer can be applied immediately after removing the old one.
Reference! If the paint is overheated and not removed from the surface in a timely manner, it will harden and removal will become problematic.
Installation of new boards
Before this stage we treat them with varnish. After complete drying, we install them on the joists. We fasten them tightly to each other.
When we re-lay the floors, we use dowels with parameters 10 x 1000. To improve the strength under the joists, we arrange supports every 50 cm. For this we use bars.
The positions of the lags in relation to the boards are perpendicular. The interval between adjacent logs is 50 cm.
Next, we check them for evenness using threads. We stretch each thread. There should be a millimeter gap between it and the lag.
We fasten the boards with self-tapping screws 6 cm long if the material density is 3.5 cm.
At the joint areas between the boards we keep tiny gaps. This prevents squeaking.
The final stage is laying the flooring. Its choice is made by clients based on their preferences.
When we carry out the indicated operations to re-lay the floors in a Khrushchev-type apartment, we usually end up laying linoleum. This option is chosen most often.
Video example of work - before and after
- Author: Alexey
Rate this article:
- 5
- 4
- 3
- 2
- 1
(6 votes, average: 4 out of 5)
Share with your friends!
Do-it-yourself floor repair: a guide to fixing all possible flooring
When can you renovate your apartment?
Stalin's buildings
They were erected back in the 50s of the last century. Their floors have a similar structure to the floors in Khrushchev's apartments.
Replacing the floor in a Stalinist building follows a similar algorithm. And the reasons for these operations are standard: the quality of the coating has weakened, there are creaks, noises, rotten areas, etc.
When you plan to replace the floor in a Stalin-era building, we take into account that a larger percentage of the coverings in such real estate are old parquet floors.
We study their condition in each individual case. We determine the type of parquet board used. We also analyze the layout of it.
As a rule, we replace the floors here with a screed with a self-leveling effect. We lay innovative coverings.
In Stalinka, the wooden floor is supported by beams. Concrete beams were placed above the bathroom and kitchen area. The rooms above the living areas are made of wood.
During major repairs, we perform a complete replacement of coatings, starting from the base. We install new logs, arrange all the necessary insulation, without using its artificial form.
In general, the working algorithm is as follows:
- Laying the joists in a perpendicular position to the blank walls.
- Installation of plywood or OSB boards.
- Frame assembly. We place it across the beams. The step is 4 m. We even out differences with pads.
- Arrangement of beacons by area: screw the screws into the beams. The thicker the plywood, the less often the logs go (maximum 35 cm).
- We install new logs flat. We use dry timber with a parameter of 5-10 cm. We treat it with a septic tank in advance. We attach the joists to the floor using glue or self-tapping screws. The width of the boards reaches 3-5 cm.
The butt sections of plywood are placed on joists. To begin with, we outline this material with chalk. We install logs along the line.
We lay the plywood in two layers after the glue has dried. We do not allow seams to match. The type of fastening of the material to the boards is self-tapping screws with a countersunk head.
The heads should not extrude the material. To do this, we drill them.
We use a hydraulic level to level the sheathing.
If linoleum is planned as a finishing coating, we sand the plywood along the seams with a special machine. Then we apply two layers of varnish on it.
If laminate is planned, then we make a backing of foamed polyethylene on the boards.
There is a second solution to reinstalling a wooden floor in an apartment of this type - we make a subfloor.
We lay the lags across the walls and in the direction along them. Between them we place insulation with sound insulation. Its most popular option is polyurethane foam.
Lay plywood on it - this is the backing for the main covering. We fill the space between the joists with expanded clay. This scheme is optimal for arranging parquet.
Types of linoleum
Linoleum is one of the first materials used for flooring; its ancestor was an oiled natural fiber, the production and use of which was noted in 1627. The official appearance of the material as a registered coating dates back to 1863 - at this time the English inventor Frederick Walton received a patent for the development of linoleum. The material received its name from a combination of Latin phrases: linum - flax, linen and oleum - oil, it corresponds to one of the modern types of environmentally friendly linoleum coating made from natural ingredients, which includes linseed oil and linen (tow) of natural origin.
According to the material of manufacture
Depending on the materials used in production, linoleum is divided into 5 categories:
Polyvinyl chloride (PVC) . The main type of coating, widely used in the field of civil, commercial and municipal construction, the main material of manufacture is foamed PVC. Polyvinyl chloride linoleum is produced on a woven and non-woven heat-insulating base, can be single-layer or multi-layer, and has the following properties:
- Decorative. It has a huge number of patterns, colors, reliefs, imitations of any natural materials (natural wood boards are especially popular), there is no type of linoleum on the market that would not suit any interior.
- Long service life. Polyvinyl chloride linoleum is produced in several classes of wear resistance; in commercial types, its service life reaches 50 years with high daily traffic.
Polyvinyl chloride floor covering
- Moisture resistance. PVC does not allow moisture to pass through and is not afraid of water; it can be safely laid on the floors of damp rooms - kitchens, balconies and loggias, basements. It should be borne in mind that due to the low vapor permeability of the PVC coating, the base underneath must allow air to pass through well, otherwise mold will appear under the linoleum and rotting processes will begin.
- Low thermal conductivity. Foamed PVC, like any materials with air in the structure, retains heat well, so when laid directly on a cement-sand screed or concrete, the floor will be warm. Also, PVC is dielectric in nature and does not accumulate electrostatic charge.
- Environmental Safety. PVC does not rot, resists the growth of bacteria and mold, and does not support combustion.
- Easy to install. A significant advantage of polyvinyl chloride linoleum is the ease of installation of the coating; any homeowner can handle the job alone; in many cases, the use of glue will not be necessary.
- Low cost. A wide range of PVC linoleum is supplied to the market with different manufacturing technologies and wear resistance classes, which are the main factors influencing the cost. Inexpensive household linoleum for rooms with low traffic (bedroom, living room) can be purchased for 150 rubles. per square meter, the average cost of semi-commercial types for objects with a higher load is from 300 rubles. per m2.
- The disadvantages of polyvinyl chloride materials include poor resistance to high temperatures.
Marmoleum
How to choose linoleum
Marmoleum . A natural coating, the main components of which are: flaxseed oil, wood or cork flour, resin, lime and color pigments, the base is jute fabric. Marmoleum contains only environmentally friendly natural materials, so it is purchased by people who pay increased attention to their health, people with allergies, asthmatics, and used as a covering for rooms where children live. Natural linoleum has the following qualities:
- It is resistant to abrasion, and in terms of durability it belongs to the semi-commercial and commercial types (operation period 50 years).
- The oil contained in marmoleum has bactericidal properties.
- It has a large number of colors, the dyes do not fade in sunlight.
- Does not support combustion processes, noise reduction level 5 dB.
- The material is mainly sold in rolls 2 m wide, tiles measuring 50x50 cm and panels 90x30 cm; it is quite fragile when laid, and it is not recommended to bend it.
- The cost of Marmoleum is an order of magnitude higher than that of the popular polyvinyl chloride linoleum; this coating is for wealthy people - the price of 1 m2 is 1100 - 2500 rubles.
- In apartments, Marmoleum is not recommended to be installed in damp balconies and kitchen areas, or on loggias.
- Marmoleum is not highly decorative; it is produced with a simple pattern and a small number of colors in one product, often with a monochromatic coating.
Alkyd and colloxin coating
Alkyd (glypthal) . It is made by spraying alkyd resin onto a fabric cord; it also contains mineral components and dyes. The thickness of the glypthal coating ranges from 2 to 5 mm, it is plain or with a certain pattern, the material is fragile, so it is not recommended to lay it on uneven surfaces or floors with large differences. Before laying it, it is necessary to maintain a certain time interval in a warm room in order to avoid changes in linear dimensions in length and width.
The advantages include good abrasion resistance and high heat and sound insulation qualities, the disadvantage is the difficulty of installation due to the fragility of the fabric.
Colloxin . Made from nitrocellulose, mostly without a base, the coating is highly elastic (flexible) and wear-resistant, waterproof and fire-resistant. The surface has a decorative shine, giving it an aesthetic appearance; disadvantages include a tendency to shrink and sensitivity to temperature changes.
Relin
Relin . In the production of this variety, technologies for recycling raw materials are used; the coating is two-layer, the base is a mixture of old crushed rubber with bitumen filler. The top layer is also made of technical rubber with a polymer filler and coloring pigments. The advantages of relin include high moisture resistance and plasticity, the disadvantage is the increased content of volatile substances harmful to health in the substrate, released during operation, therefore rubber linoleum is not recommended for laying in living rooms.
According to production technology (for PVC)
Polyvinyl chloride linoleum has no worthy competitors in terms of cost and physical parameters; it is produced using two main technologies:
Homogeneous. The material produced by this method is homogeneous in structure, has one polyvinyl chloride layer with a thickness of 2 mm or more. Homogeneous polyvinyl chloride has a uniform structure and pattern throughout its thickness, its high strength characteristics were initially designed for objects with high traffic, the main area of application is public and commercial buildings, where it has served for more than 25 years.
The product has all the advantages and disadvantages of polyvinyl chlorides; its distinctive feature is the ability to restore a damaged surface using mechanical methods by grinding and polishing the deformed area. In this way, they get rid of scratches, indelible dirt, and wear of the top layer during operation - after polishing, they get a renewed floor covering.
The homogeneous look has two main types of color design: imitation of natural stone (marble, granite) or plain color; to increase wear resistance and chemical protection, it is covered with a polyurethane protective film.
Homogeneous linoleum
Heterogeneous . Multilayer linoleum made using this technology is produced using the coating method with sequential application of layers to the base, the main of which are:
- Fiberglass. It is basic and is responsible for maintaining the linear dimensions of the coating.
- Primer. For high-quality uniform application of subsequent layers, the fiberglass is primed, and then a front layer of foamed polyvinyl chloride is applied to the primer.
- Facial. The main requirements for foamed PVC of this layer are a flat, smooth and white surface, on which the colors and geometry of the subsequently applied pattern will appear without distortion.
- Printed drawing. It is applied using engraved printing cylinders, each roller of which rolls one color and is responsible for the aesthetic appearance of the canvas.
- Protective. To protect the printed design from abrasion, a transparent film of purified PVC (transparent) is applied to it, which is responsible for the wear resistance of the product - the thicker it is, the longer the service life of the coating.
- The basis. After applying all the above layers, the canvas is turned over and the back side is covered with a thick layer of polyethylene foam, which is responsible for the main physical characteristics of the product: heat and noise insulation, elasticity, residual deformation (the degree of restoration of shape after compression).
- Compact. This is a leveling layer of foamed polyvinyl chloride, which is applied after fixing the base. The next cycle of production of multilayer linoleum is passing the roll after applying all the layers through a high-temperature oven (heat chamber), where foaming of the structural components of the canvas occurs.
- Protective. After passing through a high-temperature chamber, the canvas is coated with a protective varnish that closes the micropores of the film - this reduces the absorption of contaminants deep into the structure and makes cleaning easier.
- Back drawing. Facilitates product identification and simplifies cutting work for sellers thanks to the printed cutting grid.
Structure of heterogeneous coating
Production of linoleum and its types. Linoleum
According to wear resistance
The main criteria when choosing linoleum: its wear resistance and the type of premises in which it is intended for use, this data, in accordance with European standards with the article EN 685, in force since December 1995, is displayed in the product labeling and consists of two numbers. The classification applies to laminate, parquet boards, synthetic tiles made from a variety of materials. The first digit indicates the class of premises in which the flooring can be used:
- 2 - residential, these include rooms in apartment buildings and private houses, dachas with low traffic;
- 3 - service and office premises, include premises of administrative and office buildings, shopping centers, public catering facilities, preschools and schools, and healthcare institutions.
- 4 - production, the group includes premises on the territory of plants and factories in which people constantly work in a standing or sitting position and on the floors of which light vehicles move.
The second digit of the marking indicates the wear resistance of the coating: 1 - low; 2 - average; 3 - high; 4 - super durable.
Wear resistance classes and areas of application of floor coverings
In everyday life, linoleum is divided into the following groups:
- Domestic. Used for flooring in rooms with low traffic (bedroom, hallway), in communal apartments, private country houses and cottages, the thickness of the protective shell does not exceed 0.35 mm, the service life is 10-15 years. For installation in apartments, it is more rational to use classes 22, 23.
- Semi-commercial . They have a protective film from 0.35 to 0.6 mm, it is laid in office and service premises with average traffic, corridors and kitchens of apartments, country houses, the service life depends on the load and averages 20 years. For installation in residential premises, wear resistance classes 32 and 33 are sufficient.
- Commercial . It has a high class of wear resistance, is made of dense PVC with a protective layer of up to 0.6 mm, the cost is higher than other types, it is most often used in areas with heavy traffic (shopping facilities, public transport, healthcare institutions, schools). The service life of this type is up to 50 years.
There is a less common classification of linoleum coatings based on abrasion, consisting of the following classes: F - abrasionable; R - moderately abraded; M - slightly abraded; T – non-abrading.
Characteristics of class 21 linoleum coating, thickness of the protective layer for different classes
Panel buildings
They are much newer than Khrushchev and Stalin buildings. But the floor in them also has to be replaced and repaired.
In a panel house, the floor base is concrete. There is no such complex structure here. Therefore, if replacement is necessary, we remove the old coating and thoroughly clean the base.
Usually we create a screed here: dry, semi-dry or wet.
In the first option, expanded clay is used. We cover it with slabs with gypsum fibers.
In the second case, we mix the composition so that the proportions of water in it are very small.
In the third option, we use sand, cement and plasticizers, as well as insulation - expanded clay.
This is a popular method. But we don’t use it when the floor slabs are already heavily loaded.
Today, people are increasingly ordering self-leveling floors. They are easy to prepare and sell, both in panel houses and in older ones.
You might be interested
What floor to install in an apartment Warm floor in an apartment: a modern choice How to fill the floor in an apartment
Wide spacing between boards
You shouldn’t hope that linoleum will hide the wide gaps between the floorboards
You should not hope that linoleum will hide the wide gaps between the floorboards. Over time, he will definitely “fall through” them, only emphasizing this defect.
There are two ways to eliminate gaps between boards. The first is to remove all the boards and re-lay them close to each other. And the second, easier one - drive narrow wooden slats into the cracks between the boards, and seal the remaining cracks with wood putty.
For greater ease of operation, it is better to give the slats a trapezoidal shape.