Restoration of an old sideboard with before and after photos.
Everything new is well forgotten old. Few people have not heard the saying, and it can also be correlated with the restoration of old furniture. Vintage items, also known as antiques that have seen several generations of families, are becoming increasingly popular. However, in Soviet times, many items had the same appearance, since they were mass produced but were famous for their quality.
Restoration of an old kitchen cupboard
That is why most houses in the post-Soviet space are still filled with them. But it all depends on your desire: restoring your grandmother’s sideboard with your own hands will add originality to any interior.
Restoration of a kitchen buffet in shabby chic style
Decoupage on a kitchen cabinet - a beautiful handmade item
Painting polished furniture
The easiest way to remodel an old polished cabinet is to paint without sanding. For this you will need:
- Otex adhesive primer on an alkyd basis (or another similar composition for problematic and previously painted substrates);
- alkyd paint;
- varnish;
- White Spirit;
- brushes or foam roller;
- covering film;
- rag.
Work order:
- Cover the area around the furniture with covering film.
- Wipe down the cabinet, remove handles and remove drawers.
- Degrease the surface with white spirit.
- Apply primer evenly. Let the product dry. Apply a second coat of primer to the furniture.
- Apply paint. For uniform coverage, painting is done in 2 layers, allowing each layer to dry completely.
- Varnish the furniture.
Alkyd-based products have a strong, unpleasant odor. Therefore, during restoration work the room should be well ventilated.
How to cover an old cabinet with self-adhesive film
7 options for restoring an old sideboard
Using self-adhesive film, you can update the design of any furniture. The properties of the material imply its use for restoration purposes. They can replace cracked laminate and veneer, hide partially or completely damaged facades, completely cover an old cabinet (table) and give them a different look or improve their performance characteristics. The process of updating furniture using self-adhesive film is simple, but it requires some patience and knowledge of the sequence of how to cover an old cabinet with self-adhesive film and what tools will be needed.
Advantages
Restoring furniture yourself has a number of advantages.
These include the following:
- Saving money on purchasing new products. A restored wooden sideboard can last for many years, while buying antique furniture will cost a lot of money.
- To decorate wooden furniture, you can use available materials, especially for cosmetic repairs.
- Restoration allows you to restore the original color, eliminate chips, cracks, stains and other defects that appear due to negative external influences or during long-term use.
How to do it yourself?
Ideas for restoring an old cabinet with your own hands
Before you start decoupage, you need to choose the piece of furniture itself (in our case, it’s a chest of drawers). The selected piece of furniture must be suitable for the Provencal interior. It should have elaborate legs and carved elements. For work you will need to prepare the following materials and tools:
- detergent;
- degreasing liquid;
- primer;
- acrylic paints;
- tassels;
- sponges for painting;
- scissors;
- decoupage varnish;
- glue;
- napkins with floral patterns;
- craquelure varnish;
- baguette paste.
ATTENTION: the varnish for furniture decoration is chosen special, intended for decoupage. If this is not available, you can use wood varnish. It must be matte
It must be matte.
Most often, special decoupage napkins are used for gluing drawings, which can be purchased at handicraft stores. They consist of three layers and are sold individually. The range of these products is so wide that the buyer will definitely select the desired ornament for decoupage.
IMPORTANT
Special napkins for decoupage easily blend into work surfaces, and after sanding and applying several layers of varnish, their boundaries are not visible on objects.
Master class on chest of drawers decor
The following preparatory work is carried out:
- All surfaces are cleaned of dust using a damp sponge and detergent.
- After the chest of drawers has dried, the surfaces are sanded with sandpaper until they become perfectly even and smooth, and if necessary, the old layer of paint is removed from them.
- Surfaces are degreased and primed.
- After the primer has dried, the chest of drawers is painted in the main color with acrylic paints (in our case, a beige tone was chosen). To do this, paint is poured into a disposable plate and applied to the chest of drawers with a special velor roller or medium-sized brush. After the paint has dried, you can begin the decoupage technique itself.
- A design is cut out of napkins and laid out in the places where it will be located on the chest of drawers. The base of the chest of drawers is coated with glue in advance.
- The cut and glued napkins are carefully straightened with a brush, and another layer of glue is applied on top of them.
- The edges of the ornament are decorated with paint.
- The piece of furniture is set aside until all layers are completely dry. To speed up the process, you can use a hairdryer.
- Gray paint is used to paint the rims of the drawers and the sides of the chest of drawers.
- Craquelure varnish is applied on top of the beige base in two layers. Before each application, you must wait until the first layer has completely dried.
- The cracks caused by the varnish are filled with gold pigment.
- The entire chest of drawers is treated with aqualac.
- Next, monograms are drawn on the drawers and sides using baguette paste, which are then decorated with gilding.
- All edges of the furniture are treated with a sponge dipped in acrylic paints (gold, green, brown and black alternately).
- The chest of drawers is coated with finishing varnish.
IMPORTANT
The most difficult workflow in the decoupage technique is the careful application of napkins to the surface. They should not form wrinkles or bubbles from air and lumps of glue. When working, it is worth considering that napkins wet from glue are easily torn.
We restore an old cabinet: repainting, aging, decoupage
Before you start working, you need to figure out (or better yet, sketch in color) what the finished product will look like. Having considered this point, you can begin purchasing the necessary materials. We will need:
- synthetic paint brushes of medium hardness (one for paint and one for varnish - at least two centimeters wide);
- wood paint;
- sandpaper (harder and finer);
- water-based varnish for wood (matte or glossy - at your discretion);
- acrylic primer for wood;
- masking tape;
- paraffin candle;
- napkins for decoupage or drawings printed on thin paper;
- PVA glue;
- spray bottle with water.
Pneumatic airbrushes, spray guns, texture guns
Step-by-step instruction
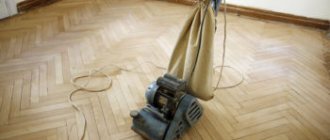
Step 1. First of all, you need to remove all the fittings, and you need to start work by cleaning the surface of the cabinet from old varnish. To make the work go faster, it is better to use a sander, but if you don’t have one, you can sand the cabinet manually.
To treat the surface of the wardrobe, a small round nozzle is enough
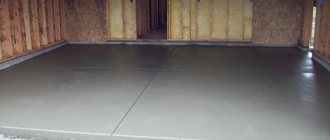
Step 2. The entire surface of the cabinet that is planned to be painted must be coated with a primer. You need to apply the composition with a brush in one layer, and then dry for the time recommended by the manufacturer (usually the primer dries for at least three hours).
The primer is usually colorless
Step 3. Cover with masking tape the parts that we do not plan to paint. We paint the remaining elements with a brush in one layer. Leave to dry, then, if necessary, cover the surface with a second layer of paint.
The first layer can be applied with white paint, the next layer is colored.
Step 4. Apply paraffin. We need to use a paraffin candle to treat those areas that we plan to make aged (for example, the side edges). This technique will allow you to remove part of the paint layer and expose the previous one. This achieves the “scuffed” effect that is relevant for old furniture.
Paraffin should be applied in a fairly dense layer.
Step 5. Next, the cabinet needs to be covered with another layer of paint - this time it should be slightly lighter than in the previous layer (you can add white paint and stir). Doors and protruding elements can be painted in a different shade or color if desired, after sealing the joint lines with masking tape.
Strips of tape will allow you to draw even boundaries between shades
Step 6. We decorate individual elements (in our case, drawers and door ends) using the decoupage technique. To do this, apply a napkin with a pattern to the surface of the cabinet, moisten it with water from a spray bottle, then smooth it with a brush. Afterwards, cover the napkin with a layer of PVA glue and wait for it to dry.
PVA glue dries in about 20-25 minutes
Step 7. We varnish the finished cabinet in two layers (each layer must be dried according to the instructions).
Result of work
How to renew old furniture with self-adhesive film? How to properly apply self-adhesive film?
Methods for restoring an old cabinet, how to do it yourself
But this part of the interior has its own characteristics, which must be taken into account both directly during preparation and during the process of pasting.
So, how to cover doors with self-adhesive tape efficiently and without extra effort? It is important to properly prepare the surface
- Clean the door from dirt and grease. If there is paint or its remains on it, be sure to sand the canvas using hard and then fine sandpaper. Make sure there are no scratches on it. When this job is done, wipe the door with a damp towel and then with soapy water. Doors made of chipboard or plywood can be additionally treated with an acrylic-based primer. After it dries, you need to sand the surface again.
- Remove the door for gluing from the hinges and use a plane to smooth the ends and the surface around the hinges. Place the door on its hinges and close. The distance between the self-adhesive and the door frame should be up to 2 mm. This will allow the film not to wear off when opening and closing doors.
- Cover the door by separating approximately 20 cm of film and smoothing it on the surface. You can start working from the end, bending the film 2 cm onto the door, and then paste over the main part, placing the film on the previously folded edge.
Caring for restored furniture
New life for an old sideboard with your own hands using the decoupage technique
Restoring an old sideboard has minor drawbacks, which, however, are no different from caring for new furniture. The surface should be carefully washed when dirty, ideally with clean water and a soft cloth, so the sideboard will not be scratched.
White buffet with old grandma's dishes
It is not recommended to place old refurbished furniture in areas of high humidity or heat generation. Next to the stove in the kitchen, near a radiator, or even just near a window, the condition of the paint can quickly deteriorate. You should also not leave the buffet on the veranda.
Unusual design of a Soviet buffet in the old Russian style
Restoring a sideboard with your own hands begins with inspection and repair, after which you can begin decorating the surface. This way you can give an old sideboard a completely new life and update your home interior.
New fittings
An important stage in the reconstruction of old furniture is the replacement of fittings
First of all, you should pay attention to the condition of the hinges. They need to be replaced if they are rusty or damaged.
The location of the hinges is changed if pieces of material are torn out at the places where they are attached. The resulting holes are sealed using putty or sawdust mixed with PVA glue.
It is also necessary to check the condition of the guides in the cabinets. If necessary, they can be replaced with higher quality fittings. The extension system can be roller or ball. The second type of guides is considered more reliable. They ensure silent drawer opening.
The last stage is replacing the handles. They should be chosen taking into account the design of the furniture. Handles can be completely metal or combined - with ceramic or glass elements. For antique furniture, bronze fittings are suitable.
How to disassemble a buffet
It must be said right away that the work ahead will not be easy and will take up a lot of your free time, but, as they say, the eyes are afraid, but the hands do. This vintage piece is a hybrid of a kitchen cabinet and nightstand.
Using various techniques, restoring an old sideboard with your own hands will only bring you pleasure.
The buffet is designed for storing dishes, bulk ingredients for cooking, kitchen and table linen. Before restoration, the surface of the old sideboard requires preliminary preparation.
The list of equipment and materials for restoration depends on the technique in which you want to decorate the buffet.
At the first stage, you need to disassemble it as much as possible, that is, free it from all separating elements:
- We remove shelves that are not secured from the shelf holders.
- We disassemble the fasteners of the fixed shelves and remove them.
- We take out all the boxes. If you plan to install sliding elements on roller guides, then you need to remove the old wooden support bars, having first removed the fastening screws from them.
- We unscrew the handles from the doors and drawer fronts.
- We remove the cabinet doors. To do this, use a screwdriver to unscrew the screws from the canopies on the doors and sides of the case.
- We remove the glass from the door grilles. If they do not give in, we leave them in place, but cover the surface with paper and masking tape to protect it from varnish, paint and mechanical damage.
It is better to have all the necessary tools at your fingertips.
Veneer removal
Veneer is a wood material in the form of a thin sheet that is glued to the surface of wooden furniture to give it strength and attractiveness. Over time, it ages, becomes cracked and peels off.
Veneer can only be glued by a specialist.
To remove old veneer you will need the following steps:
- To facilitate the operation, the surface to be cleaned should be well moistened. We generously moisten a piece of soft cloth in warm water, wring it out and spread it over the entire stripping area. Leave for 2-3 hours to weaken the material.
- We arm ourselves with a spatula and begin to clean the places where cracks, swellings have appeared or the edge has curled. The tool must be moved parallel to the surface.
- Old veneer can come off in strips if you pull up on its edge.
Tools for working with wood are required.
Gluing broken and old parts
Since we are restoring a sideboard, a time-worn product, it is possible that its individual elements may be damaged. Fractures, cracks, cracked and loose joints, all of this can be glued together, and after treatment such parts will serve no worse than new ones.
To seal cracks you will need PVA glue.
The main types of adhesives that can be used to restore the integrity of wooden products:
- based on epoxy resin;
- polyvinyl acetate (PVA) emulsion;
- BF-2 glue;
- carpentry, syndeticone glue;
- on a polyurethane basis.
If you do not have the opportunity to purchase an edge with an adhesive layer, you will have to buy glue along with the edge.
Master class - technology for gluing wood parts:
- We thoroughly clean the fracture site with an abrasive material to remove any remnants of old glue, varnish or paint.
- We clean the surfaces to be glued from dust and degrease.
- Apply glue to parts of the fracture or cracked joint. We make them up or insert them into a groove.
- The gluing area must be pressed firmly to enhance the adhesion effect. For this purpose, you can use a press, tightening belts, a clamp or other devices.
Furniture must be varnished according to certain rules.
Removing old varnish
Furniture that is not new requires gentle treatment, so the best option for cleaning the surface is to use a solvent remover. Acetone, special soluble powders, gels or denatured alcohol are suitable for this.
Use special tools for the job.
Armed with a brush, spatula and sponge, let's begin the work:
- Using a brush, apply the cleaning fluid to the surface.
- To prevent the liquid from quickly evaporating and to affect the coating for as long as possible, cover the surface with plastic wrap and leave for several hours.
- After time, swelling should appear on the surface and the liquid will turn dark brown.
- We clean off the old varnish with a spatula or scraper. Stripping must be done in the direction of the texture fibers.
- Wash off the remaining product with a sponge and water with the addition of vinegar, in a ratio of 1:5.
- Wipe the part with a soft, lint-free cloth and dry.
Use special techniques for painting furniture.
Replacement of accessories
Old furniture is distinguished not only by the originality of the facade decoration, but also by the elegance of its handles, decorative overlays, and locks on the doors. Unfortunately, time is merciless, the locks stop working, the shiny coating fades and peels off, the hinges become loose and creak.
Fittings and fasteners on chipboard furniture may also sometimes need restoration.
To restore old furniture, the fittings will most likely have to be replaced. The main thing is that new elements should not radically change the style of the sideboard and help it fit into the home interior. Specialized furniture stores offer a wide selection of handles, from modern designs to antique handles in the Baroque or Art Nouveau style.
Before restoration begins, the furniture is inspected and all fittings are removed.
Replacement will not create any difficulties; you only need a screwdriver to unscrew the fastening screws. When purchasing, pay attention to the condition that on the “bracket” type handles, with two mounting screws, the distance between the mounting holes coincides with the old ones on the doors or drawers of the sideboard.
Select fittings in accordance with the style of the furniture.
Broken awnings also do not add grace; the facade doors sag and do not close tightly. The choice of hinges is huge, but if we are talking about replacement, then for swing cabinet doors it is better to use adjustable hangers.
You can combine several of the described techniques or come up with your own version of how to update old furniture.
Decoration
To enliven your kitchen interior, you can resort to decorating the pantry doors and facade with drawings. This decor is applied using stencils. The color of the paint is selected to match the tone of the furniture, perhaps slightly darker or lighter. The stencil is placed on the surface where the pattern is applied.
It should fit tightly so that the paint does not spread beyond the contours; you can use masking tape for fastening. The consistency of the paint should not be liquid; it should be applied in an even thin layer using a foam sponge. After the paint has dried, the stencil is removed and the design is varnished.
Paint and varnish
You can give your furniture a fresh look by changing the paintwork. The original color scheme will be from the time the sideboard was manufactured. Back then, the trend was blue, light blue or white tones.
Before painting the chest of drawers, you need to prepare it.
Oil paint is suitable for painting. It should be applied to a prepared surface, cleaned of old coating layers, sanded and degreased.
It is better to apply the varnish with a soft cloth.
In order for the paint to lay down in an even layer, without smudges, it is best to spray it from a spray bottle. After the first coat of paint has dried, a second pass is necessary. The dried sideboard is covered with two layers of transparent furniture varnish.
You can paint it with a spray can.
Photo printing and photo wallpaper
The equipment is suitable for restoring a kitchen cabinet or buffet. Photo wallpaper can be purchased at the construction department or contact a printing house.
Printing centers will help:
- enlarge the image without losing the quality of the picture;
- make a collage of several photos or pictures;
- apply an image to a film for gluing to a specific type of surface.
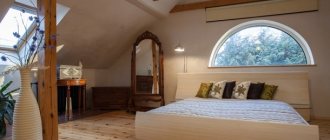
A boring three-leaf wardrobe has turned into a stylish and light wardrobe for the bedroom
Before applying photo wallpaper:
- Clean the doors (walls) from the old coating.
- Level the surface using sanding and priming.
- Paste the wallpaper. To secure the result, coat with clear or tinted varnish.
Expert opinion Anastasia Mikhaleva Furniture designer.
Note. The appearance of the photograph depends on the type of surface
The image applied to the glass will become glossy. When mounted on a chipboard facade, the image will become three-dimensional, as if printed on matte paper.
Removing chips and cracks
Therefore, if you are not sure that you will be able to carry out repairs at home, it is better to contact a specialist.
If you decide to do it yourself, you need to stock up on the necessary minimum tools:
- White spirit (nail polish remover);
- Stain of the desired shade;
- Wood primer;
- Fine sandpaper (100, 180, 300, 800, 1200 and 3000);
- Wood putty;
- Masking tape;
- Roller or brush.
Clean the damaged area from the varnish coating using white spirit, treat the wood with a primer, then putty.
After drying, level the putty with the surface using sandpaper. Remove dust with a damp cloth and apply stain to obtain the desired shade.
It is important to apply the stain exclusively to the putty area, without getting it on the wood. Otherwise, the wood will change color, and then major repairs will be impossible.
After complete drying, you can varnish. The varnish should be applied with a brush or roller, depending on the area of the area.
Each new layer can be applied only after the previous one has completely dried and preliminary sanding with sandpaper with a fraction of 600 or 800 units.
First at 1200, and then at 2500 or 3000. When finished, wipe with polish or furniture wax until a glossy surface is obtained.
Step-by-step instruction
To restore an old sideboard with your own hands, at the initial stage you need to dismantle as many of its parts as possible. This will allow restoration work to be carried out most effectively. This is especially true for the carved segment of the structure, the processing of which can be the most difficult.
To carry out dismantling manipulations, you can use the appropriate tools: a hammer, a nail puller, a chisel and others. At a professional level, this work is carried out using specialized tools that allow you to remove fasteners - for example, nails or metal staples - without damaging the surface of the wood or compromising the entire structural integrity of the product.
After maximum dismantling, it is necessary to sand the surfaces as much as the shape of each workpiece allows. This is necessary to remove particles from the surface of the top layer of wood that have become embedded in it over the years of use. These substances include fats, mold spores and other elements of pollution contained in the damp vapors of the room. Due to the presence of these substances, the surface of the sideboard may be darkened, sticky, and rough.
To sand parts, a specialized sanding machine is used, operating at low speeds and equipped with a shock-absorbing mechanism that prevents streaks from appearing on the surface of the wood.
After thorough sanding, you need to remove all dust and prime the surface. If there are chips, cracks or scratches, they must be repaired with wood putty. This putty can be selected to match the color of the paint coating that will be applied to the product in the future. A common problem in this case can be a color difference between the putty areas and the total surface area. In this case, it is recommended to take small sawdust, paint it in the desired color and mix it with putty. This will help reduce the difference in color combination.
Painting
Painting is carried out in accordance with the instructions specified by the manufacturer on the packaging of the paint and varnish material. The basic rules for painting state that it must be carried out in a well-ventilated area, using all personal protective equipment.
To achieve the best uniformity during application, it is recommended to use spray tools: an electric spray gun or a compressor. If they are unavailable, you can use a foam sponge, since its structure allows you to apply the coating without streaks. It is recommended to use brushes for painting only as a last resort: they leave streaks and lose lint, which can remain on the surface and spoil the appearance of the product.
Decoupage
This is a special decoration technique that can be used during restoration work. Its essence lies in attaching any pattern, stylistically similar to the design of the sideboard, to its surface. Paintings on canvas or paper can be used as a basis.
painting
When carrying out restoration at home, you can paint the surfaces of the sideboard using additional paints. In this case, they should be in harmony with the color of the main texture of the sideboard coating. The use of colors that do not belong to the same group will worsen the visual perception of the cabinet.
Varnishing
Applying varnish is necessary to prevent moisture from affecting the product. With its help you can give your buffet a glossy shine or a matte finish. Varnish is used in cases where painting is not used. The coating with this substance goes well with the natural wood color of the product.
Antique finish
Since the sideboards themselves are antique products, to enhance the effect of antiquity, you can resort to the use of various tinting agents and a combination of varnishes. The protruding parts of the product and the carved ornaments located on it are covered with stain or several layers of the same varnish, which makes them an order of magnitude darker than the recesses and smooth surfaces. This effect creates the illusion of antiquity.
From an old sideboard - an “antique” sideboard
Antique furniture is always in fashion - it adds an aristocratic touch to the entire interior. It’s nice that this technique can be done with your own hands, which means it’s cheap. There are several techniques for artificial aging, choose the one that suits you best.
Method 1 – craquelure varnish
Additionally, you should purchase craquelure varnish in specialized stores; all other materials were described above.
Description of works:
- After removing the old coating and sanding with sandpaper, apply a special craquelure varnish to the surface. It has the ability to transform the entire surface into a canvas cracked, as if from old age;
- After the previous composition has dried, you need to apply paint or clear varnish to the surface of the sideboard.
After all the procedures, you will receive an “antique” sideboard in a surprisingly short time. It should be noted that using paint in this method is more preferable - the effect will be brighter.
Method 2 – mechanical aging
For this method, you need to prepare two stains on different bases, a shellac primer and restoration wax.
Description of works:
- after cleaning the old varnish or paint, apply water-based stain as a base;
- lighten with a moistened sponge those places that are more visible;
- after drying, you need to sand the areas that will be darker;
- now apply the stain again with a different base;
- After the second layer of stain has dried, fill all places with shellac primer using a brush;
- using a wire brush, rub in the restoration wax, moving it along the fiber;
- After the wax has dried, wipe the sideboard with a soft cloth;
In fact, there are many more ways to age. Uniquely beautiful masterpieces are created using the “shashel” method, but this can be done by those who are familiar with carpentry.
We produce pasting
Collecting the necessary materials
Before you start work, you need to take care of the tools and material. Here's what we'll need:
- sandpaper (sandpaper), an appropriate attachment for a drill or grinder, to prepare the surface for pasting;
- in some cases a hair dryer, but not necessarily;
- measuring instruments - ruler, tape measure, corner;
- tools for markings and markings - pencil, pen, marker;
- cutting tool - knife, scissors;
- primer and wood putty for preparatory work;
- tools for applying compounds - roller, brush, spatula;
- rags for smoothing and removing glue;
- PVA glue.
Using a grinder to sand surfaces
As you can see, the list is quite impressive. If you don't have some materials, buy them. By the way, if the fittings of your furniture are worn out, then you can change them too. For example, a handle, a new handle for a cabinet will not cost much, but will add color to your newly made wallpapered furniture.
Preparatory work
Before wallpapering furniture, you need to take care of the surface on which you will apply the material. We need to make it suitable for such work, so we will perform the following manipulations:
Typical domestic kitchen cabinet after decoration
- To make it easier to work with a cabinet or bedside table, you need to disassemble it and remove all the fittings from it.
- The next step is to sand the decorative surface and remove the entire layer of varnish from it. This can be done using sandpaper, which is very labor-intensive; it will be easier to put the appropriate attachment on a drill, grinder or screwdriver and go over the varnish.
- If your furniture is made of solid wood and has not been treated with anything, then it is recommended to go over it with sandpaper to create some roughness.
- In the next step, we remove all dust from the skin using a damp cloth. Give the furniture some time to dry.
- After examining the dried surface for defects, we decide whether it needs to be puttied. If the cracks and grooves are not so large, and the wallpaper for pasting is embossed, you don’t have to do this. If the defects are deep, you will have to level the surface with putty, maybe even in several layers.
- As you probably already guessed, after the putty has dried, the putty areas must be treated and leveled with the general surface. This is also done with sandpaper.
- Now the surface of the cabinet is almost ready, all that remains is to prime it for better adhesion to the wallpaper.
Carrying out the preparatory work will ensure 80% of success, even if you cannot hang the wallpaper beautifully the first time, you will already have a basis for further experiments.
Pasting
Pasting furniture also takes place in several stages:
Furniture wallpapering work
- First of all, it’s worth making blanks from leftover wallpaper. To do this, the item is carefully measured and the dimensions are transferred to the wallpaper. Some patterns are cut out in accordance with the size of the closet or bedside table.
- Next, the prepared surfaces are coated with glue. You can use wallpaper glue, but it is better to use construction PVA, it will glue the materials together better. You need to carefully apply the cut pieces to the surface of the cabinet, trying to immediately level the canvas. This is not so difficult to do, since the patterns are small in size.
- It is recommended to stock up on a large number of dry rags or rags to smooth the sheets and remove any remaining glue from them. A special pressure roller will help to press the pieces more tightly.
- After wallpapering a cabinet or other furniture, you need to give the glue some time to dry, and only then screw on the fittings. Usually a few hours are enough, but in the case of large items, it may take a day.
As with standard wallpapering, try not to create drafts in the room; there is some chance that the sheets will not stick well.
Expression of imagination in the kitchen interior
Actually, this is the whole technology of decorating pieces of furniture with wallpaper. Definitely, after these manipulations, your cabinet will look better, certainly more interesting than if you painted it.
You can glue the cabinets yourself, as you can see, there is nothing complicated here, you just need to put in a little effort, patience and accuracy. In addition, restoring such items with your own hands will give you confidence in your own abilities and confirm your design abilities. Try it, maybe the world doesn’t yet know the name of the new, successful designer.
Main stages of work
To restore an old chipboard or solid wood cabinet, it is important to do the work in stages. The master will have to take the following steps: Preliminary determination of the final furniture style
Here you need to look around, evaluate the color scheme of the room. Understand her general style. After all, as a result, the furniture should fit into the overall interior.
Preliminary determination of the final furniture style. Here you need to look around, evaluate the color scheme of the room. Understand her general style. After all, as a result, the furniture should fit into the overall interior.
Dismantling an old cabinet. It is necessary if the doors do not fit tightly or sag. In addition, you will have to disassemble the furniture in order to change the drawer pull-out mechanisms and check the fastenings of the shelves. If necessary, change them too. In general, disassembly means removing all moving parts.
Minor repairs. At this stage, all elements of the cabinet need to be washed, cleaned of dirt, soot, and dust.
It is important to take the old fittings and go with it to the store to purchase new ones. Be sure to stick to the style you choose for your new cabinet.
As soon as the most difficult stages of repair are completed, you can begin decorating.
Repair techniques
The remodeling technique is chosen to suit the interior of the room. An old wardrobe looks good in a modern, country, or Provence setting. Completely restored models can be selected to suit any style.
Retouching techniques can be combined
There are different types of buffet restoration.
Buffet in Art Nouveau style
Complete restoration
Long restoration process. The quality result justifies the time spent. In the process, the old paint is removed and the buffet is cleaned down to its base. They change parts, fittings and decorations. You can also change the configuration of item placement:
- add or remove shelves;
- completely remove the doors;
- make the upper levels open;
- the upper part on the legs or stand is trimmed.
The finished design resembles a cabinet, or the same buffet. Item storage functions remain the same.
Partial restoration
This type of repair involves new painting and removal of defects in the swollen layer of wood. Sometimes the fittings or fastenings to the doors are replaced. During the first partial repair, materials used from the past are obtained from analogues.
Buffet in Provence style
Decoration
Here you can purchase a suitable design on stencils. Drawings that are a tone lighter or darker than the furniture fit not only into the image of the buffet, but also into the interior of the room. The stencil must fit tightly to the surface of the sideboard, so additionally use paper tape.
The wall decoration area is varnished
The consistency of paints should be of medium thickness and applied in a thin layer.
Decorated buffet
A thin layer of paint is applied without streaks with a foam sponge.
Decoupage
Buy napkins for decoupage. As a result, they can be varnished or the design can be left unprotected. The area for decoupage is treated with sandpaper, cracks and chips are covered. The napkins are covered with glue and applied to the marked places.
Decoupage of an old buffet
After applying the napkin, go over it with a rag or spatula so that there are no bubbles.
Material advantages
Self-adhesive decorative wood-look films are available in more than 70 options. They imitate both traditional patterns of oak and pine, and various exotic trees. For example, kitchens whose design is based on a combination of white film and wenge look very beautiful and stylish.
Wood-effect film always looks great on furniture. Using this material you can change the appearance of even the most outdated furniture beyond recognition. For example, by combining different lights and textures, you can make a unique and stylish piece of furniture from an ordinary chest of drawers.
Using self-adhesive film that imitates natural materials, you can easily create a country style indoors. As a rule, it is accentuated with massive furniture finished in stone or fabric.
Vinyl self-adhesive film is an environmentally friendly material, so it can be used for covering furniture in children's rooms. Moreover, this method allows you to easily change the interior, and, therefore, adapt it to the new hobbies of a growing child.
Most often, film with a pattern is used for children's rooms.
Restoration of wooden furniture. 12 cool ways to update old furniture.
Old furniture can be slightly changed in appearance and then it will fit perfectly into your intended interior.
What ways are there to update furniture?
1. Decor with paper.
Do you want to change the color of your furniture to an unusual, non-standard one? Old wallpaper and pieces of beautiful paper are perfect.
The paper is glued to the cleaned surface of the object using PVA glue or wallpaper glue.
The principle is the same as when gluing wallpaper - after applying the glue, leave the paper for a couple of minutes to get wet
It would be a good idea to update the furniture in the nursery using old maps.
The idea, by the way, is very popular.
Remnants of wallpaper and beautiful paper are also suitable for decorating furniture.
Great idea to update the sides of the drawers with paper. It turns out quite original.
2. There are ready-made stickers - sticky paper. With its help, you can update the surface of furniture with unusual patterns.
Old furniture is often updated with regular vinyl film.
People with imagination get creative with film. One drawback is that if it is not glued correctly, the film is short-lived in use.
But the film is good for beginner furniture renovators; it will cover all the imperfections and cracks.
There is a film with figures of various animals and flowers. Typically this film is used for a children's room.
3. Decorative elements.
If the furniture is boring, you can decorate it with plastic elements that are sold in construction or art stores.
You can also cut the elements out of plywood with a jigsaw if you don’t find any ready-made ones for sale.
4. Decor with fabric.
Furniture is still decorated with fabric today.
There is also a new technique for working with fabric, Patch decor.
Pieces of fabric soaked in PVA glue are used to paste furniture in different orders in the Patchwork style.
Patch decor uses not only fabric, but also various elements made of fabric and cord.
Selection of films for furniture
The composition of the film is determined by the type of the main polymer component, the plasticizer that gives it elasticity, pigments, and other additives depending on the type of material.
By type of outer surface
The surface of the film determines its use for furniture of different directions, rooms, achieving the desired effect in conjunction with the overall design as a whole.
Glossy is most appropriate in rooms without daylight, dimly lit rooms located on the north side.
Matte, on the contrary, will well complement the design of light and spacious rooms.
Transparent is used to protect against scratches, cuts, and for glass surfaces.
Holographic looks impressive in any room, creating a “play of light” effect. Shades change depending on the angle of illumination, as does its visually perceived volume.
A mirror is indispensable in small rooms, visually enlarging them. With the right combination of color and arrangement of interior items, you can achieve harmony and originality in the overall design.
By structure
Single-layer films are made from a combination of ingredients - various plasticizers, resins, pigments, stabilizers.
Double-layer - the name itself suggests the presence of two layers. The bottom (base) is made of paper or fabric. The top layer consists of a certain combination of polyvinyl chloride resins, where the design is applied.
Manufacturing is carried out using different methods. When gluing, the film is separated from the base and glued to the surface. How to properly glue self-adhesive film to furniture is described below.
By decoration
A huge range of this material has gained great consumer demand. Consumers are offered a wide selection of products for furnishing different rooms. A wide variety of colors and film types allows you to choose exactly your finishing option.
It is presented in the form:
- imitation of wood of different species;
- natural stone;
- ceramic tiles, mosaics;
- leather, fabric, velor, tapestry, cork, other materials;
- for gold, silver;
- children's motifs from fairy tales and cartoons.
There are many different options that could be listed. PVC film will help you dress your furniture in new clothes and give it an updated design, since it is recommended to glue it to furniture.
The main advantages of self-adhesive film
- Moisture resistance, which makes it possible to glue it in the bathroom, kitchen;
- Ability not to change at high temperatures (up to 80 degrees), resistance to mechanical stress;
- Has a low price;
- An extensive assortment, which makes it possible to create exactly your style;
- Versatility - it can be applied to furniture made of wood, plywood, plastic, metal, glass inserts;
- The sticker technology is simple, takes little time, and the application process does not create dirt or great inconvenience. If necessary, the self-adhesive can be quickly removed and a new one can be applied;
- Durability in operation;
- Easy to care for.
After getting acquainted with the types of film, we will move on to the question of how to properly glue self-adhesive film to furniture, and outline the sequence of work.
How to make a wardrobe or chest of drawers from a sideboard
The difference between a wardrobe and a sideboard is, perhaps, not so much external as functional.
A sideboard is usually understood as a cabinet in which dishes and kitchen textiles are stored. Personal belongings are stored in the closet. The top doors of sideboards traditionally have glass. The bottom of this piece of furniture consists of drawers. Cabinets are often made entirely of wood, although glass and stained glass are also used here.
- If you need to convert a sideboard into a cabinet, you can replace some of the glass elements with wood, or made of plywood, chipboard, etc.
- Another option is to transform the glass from transparent to colored and non-translucent using a special film.
- Also, most likely, you will have to change the color of the sideboard so that it fits seamlessly into the living room.
- It’s not uncommon lately to see master classes on converting old unnecessary sideboards from the Soviet era into multi-colored cabinets for children’s games.
- The chest of drawers is a vertical series of drawers. It is installed in bedrooms and living rooms, allowing you to store personal items and clothing out of prying eyes. If the lower part of the sideboard consists of drawers, depriving this item of the top, you can get a chest of drawers. In some furniture models, individual elements can be detached from the overall structure without problems, in other pieces you will have to use a saw.
So, as you can see, there are many ways to give old furniture a second life. The main thing is to have a desire to work with your hands, as well as a good imagination.
Are you wondering how to make a cabinet out of a sideboard? Then watch the following video, where a wardrobe will be made using the example of an old sideboard-chest of drawers:
https://youtube.com/watch?v=XDdWusGHOqE
Wardrobe pasting
The process of updating furniture using film is not difficult, but it requires patience and knowledge of how to cover a cabinet and what tools will be needed.
Required tools and materials
To start updating your cabinets, in addition to adhesive tape, you will need a number of available tools:
- ruler or tape measure;
- pencil or marker;
- scissors, stationery knife;
- silicone spatula or dry rag;
- spray bottle with soapy water;
- hairdryer
Preparation
Gluing a polished cabinet with self-adhesive film begins with preparing the surface. From the very beginning, all removable fittings are removed. For convenience, you can remove the doors from their hinges.
All furniture must be carefully inspected for protruding fasteners, chips and cracks in the coating, since all these defects will appear in the future. Self-tapping screws and bolts can be easily tightened with a screwdriver or wrench, but unevenness will be more difficult to deal with. You will have to level the surface with putty and then sand it with sandpaper.
After leveling, begin cleaning and degreasing using any detergent and ethyl alcohol.
If the cabinet is made of wood, MDF or chipboard without additional coating, you can apply a thin layer of furniture primer and let it dry to enhance adhesion.
Decorative elements
If the main covering of the buffet is in good condition (or, for example, you want to preserve the charm of antiquity, while only slightly updating the appearance of the item), you can add various decorative elements. The easiest way is to apply designs on the doors or walls of the buffet. For this, it is most convenient to use ready-made stencils (even a person who does not have any special talent for drawing can use this method).
However, some rules must be followed:
- Clean the area where the design is applied from dust and dirt, and coat with varnish.
- Place the stencil in the desired location and secure it.
- Dilute the paint to medium thickness (too thick or liquid composition will not work).
- The coating must be applied with a sponge in a thin layer 1-2 times.
- After the paint has dried, cover the finishing area with protective varnish.
Remaking an old sideboard with your own hands
To restore the appearance, eliminate defects and update an old sideboard, you can use one of the following methods:
- Decoupage. Its essence lies in sticking appliqués made of fabric or paper onto the surface of the sideboard. Very often, beautiful table napkins with a relief structure that can be preserved are used for work. Before gluing, the surface is degreased. The material is glued with decoupage glue or regular PVA, and after drying it is varnished.
- Painting. A pattern, ornament or design is applied with thin brushes to old sanded paint or a freshly painted surface. The last option is suitable if the painting area is small. You can use both acrylic paints and moisture-resistant tempera, which must be opened with a transparent varnish.
- Artificial aging. Quite a popular restoration method. It is easiest to implement on colored surfaces. You can use paint or a special varnish that cracks when dry.
- Repainting. The simplest option, for its high-quality implementation it is necessary to properly prepare the surface: clean it of old paint, sand it and prime it.
Pros and cons of restoration
Putting a Soviet sideboard in order is more difficult than a bedside table or armchair. First, they study all the information on this issue, only then decide to restore the sideboard themselves or outsource the work to craftsmen. The peculiarity of the restoration is that the antiques were mainly made from natural wood. Then not every paint or varnish is suitable for the job.
Wooden buffet
In the kitchen or living room, a cabinet serves a decorative or practical function for storing food. It is subjected to retouching in the following cases:
- deciding to change the interior of the kitchen or dining room;
- decline in appearance;
- peeling paint;
- finding traces of rodent teeth;
- presence of broken parts.
Among the disadvantages of the alteration, one can highlight the high cost of high-quality materials and the large volume of sideboards. Positive aspects after restoration of the sideboard:
- acquires an attractive appearance;
- fits into the interior;
- performs not only a storage function;
- the value of furniture rises;
- There is an opportunity to completely redesign the cabinet.
Budget restoration of products
You can turn old furniture into new without much investment. Desire, imagination, skill and knowledge of several methods of budget restoration. You already know about wallpapering, there are other techniques you can
- cover with fabric
- stencil paint,
- covered with artificial leather,
- use decoupage technique,
- stick photo wallpaper,
- use glass painting,
- apply decorative plaster,
- A convenient option is self-adhesive and stained glass film.
These methods are suitable not only for a wardrobe, they are used for chests of drawers, bedside tables, wardrobes, kitchen cabinets, bookcases, sideboards, for furniture located in the corridor, hallway.
Errors when pasting
You tried your best, but something went wrong. It doesn’t matter, almost everything can be fixed safely.
Bubbles? If they are small, then simply pierce them with a needle: squeeze out the air that gets in where it is not needed and carefully smooth the problem area with a cloth. With larger ones, an ordinary syringe will help - inserted inside, it will draw out all the air, and the hole will easily disappear when smoothed.
Folds? Whatever helps dry your hair will also work great on your hair. Run a hairdryer over the folds and they will smooth out. Don’t get too carried away, otherwise, by getting rid of one trouble, you will invite another.
Crooked? If you remember to leave a margin of 1 centimeter for each fragment when taking measurements, then you definitely won’t panic: an ordinary stationery knife will correct the situation, which can be used to remove the excess, and joining will easily cover the traces of your “cunning” operation.
Preparing the surface
Self-adhesive can be applied to almost all smooth surfaces, and anyone can independently cope with such a task as sticking a self-adhesive film. The only difficulty is to do the work well. Defects can ruin the appearance of furniture or walls. To prevent such incidents from happening, it is necessary to make thorough preparations.
If there is paint on the product, it should be sanded off with sandpaper, and then the surface should be degreased. This can be done by applying solvent, gasoline, soapy water, or a weak solution of vinegar or detergent to a rag. Before gluing the self-adhesive, the surfaces are primed. For example, untreated boards, plywood, and drywall have a rough structure. To make them smooth, use a primer, polyester varnish or wallpaper glue.
Any furniture must be cleaned of dust, dirt and grease. The paper does not stick to the concrete window sill. It must first be painted with oil paint. Also, if a wall or other surface has cracks or old coating, then the latter must be removed and the defects repaired with latex-free plaster. Vinyl doesn't stick to it.
In order for the final result to be beautiful and durable, it is necessary to adhere to the technology of applying paper to a plane.
Required materials and tools
You will have to spend money on high-quality materials, otherwise the restored sideboard will not last long. Household tools are suitable for restoration; some items can be purchased in addition. When working you will need:
- spatula, coarse and medium sandpaper;
- furniture scraper, foam sponge;
- a set of brushes, paint, water-repellent varnish;
- wax, stain or acrylic if you are going to age the structure;
- wood clamps;
- glue, high-quality paint remover;
- caliper, marker;
- drawing for new parts;
- new fittings, electric jigsaw.
To clean distant and hard-to-reach corners, use a vacuum cleaner or an old toothbrush.
Decoupage furniture
You can also make your own wardrobe decor from fabric. To add harmony and elegance to the interior of the room, fabrics are selected that match the color pattern with the tone of the wallpaper. The texture of the fabric should be dense to prevent deformation when stretched. Thin foam rubber can serve as the basis for the fabric upholstery of a wardrobe. The fabric must be secured to the back of the doors or the inside of the cabinet with a furniture stapler or liquid nails.
It is not difficult to decorate a wardrobe with your own hands using antique decoupage. Furniture is removed from paint using a sanding machine. Then the surfaces are degreased with a solvent, followed by a layer of primer. To age furniture, you don’t have to resort to scratching, creating cracks, etc. Modern chemistry can handle this perfectly. To create the effect of cracks, craquelure varnish is applied to the primed base.
Coniferous wood wardrobes are updated using the following technology. The surface is treated with a metal brush to give the wood structure characteristic stripes. After this, the wood should be coated with dark paint. Without waiting for the paint layer to dry, they pass a cloth over the painted surface of the wardrobe. After applying the varnish, the restoration is complete.
Beautiful examples
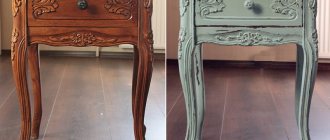
This photo shows a buffet restored in the Provence style using decoupage. The combination of two non-standard colors (lilac and pale green) creates the effect of ease of perception. This color scheme has a positive effect on the mood of the beholder and evokes a positive emotional response.
Here is a sideboard that has been restored while maintaining the natural wood tone. This solution makes it possible to bring its visual design closer to the original and helps the observer to feel the presence of antiquity. A similar effect is achieved thanks to the tinting paint coating and darkening the protruding parts.