Here you will learn:
- How does a heat exchanger work?
- Disturbances in the operation of the column and their elimination
- Reasons for heat exchanger failure
- How to solder a geyser heat exchanger
- How to solder a geyser radiator if the fistula is in a place inaccessible for soldering
- Restoring geyser pipe flanges by soldering
- Repair of a geyser heat exchanger due to scale formation
To learn how to repair a gas water heater, you must first understand how it is designed and how it works.
Units can be of the following types:
- With an open combustion chamber or atmospheric.
- With a closed combustion chamber or turbocharged. They are also called inflatable.
The air required for gas combustion enters the atmospheric column from the environment naturally. It enters the device through an opening located at the bottom of the column. To remove combustion products, a chimney with natural draft is installed.
Turbocharged or inflatable speakers differ from atmospheric ones in one feature: their combustion chamber is closed, and a built-in fan provides forced draft. Air inflow and exhaustion is carried out forcibly through a coaxial chimney (double-walled).
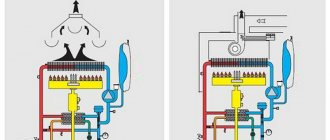
You can familiarize yourself with the structure of a gas water heater in general terms by looking at the following illustration.
The photo shows the structure of a typical gas water heater. A design feature of this water heater is piezo ignition of the burner. Also, batteries (or from a 220 V network), a hydraulic turbine can be used to ignite various models
Below is the operating principle of a modern gas burner with an automatic ignition system:
- The column starts working when the mixer tap is opened. The water flow passes through the water supply unit and the heat exchanger of the gas device.
- Inside the column body there is a water regulator membrane, which pushes the rod under the influence of pressure arising from the water. This allows the rod to compress the spring of the mechanical gas valve in the block to allow fuel to reach the burner itself.
- At this stage, the solenoid valve circuit is closed, which occurs when the microswitch button is released by the rod. The valve provokes the release of gas into a special tube, which is a supply tube. Gas flows to the already open spring valve.
- The pulse device is triggered. It delivers a discharge to the electrodes that are located next to the burner. Sparks are formed, as a result of which ignition begins. This allows the water passing through the heat exchanger to be heated.
The electromagnetic circuit consists of 3 sensors that are switched on in series. These include a draft, overheating and flame sensor. When the last element of the chain fixes the fire, at this moment the formation of sparks ends.
We discussed the operating principle of the column in more detail in this material.
Old gas water heaters had one contact and a constantly working igniter. Now they are making devices with two electrodes that ignite the burner
How does a heat exchanger work?
A heat exchanger, or radiator, is designed to heat water from the burner. The flow flows through the coil tubes, instantly warming up from the burning fuel. Most often the block is steel or copper. How much does the device weigh? Copper device - from 3 to 3.5 kg. The steel apparatus is much heavier, for this reason it has lower efficiency.
Features of steel product:
- Lower cost compared to copper.
- Due to the plasticity of the material, heating does not harm the surface.
- It is resistant to corrosion.
Copper device:
- It has high efficiency and fast heating.
- Products that contain additional impurities are cheaper.
- Corrosion resistance.
- Light weight if it is pure copper.
Trying to reduce the cost of production, manufacturing companies add impurities to copper. Because of this, the radiator heats up unevenly, which leads to burnout of individual parts. Some people coat the surface with heat-resistant paint, but this brings little results. The service life does not exceed 2-3 years.
Copper is more resistant to corrosion than steel. Most manufacturers do not indicate how much copper is used to produce the product, convincing them that the heat exchanger is made of a thick layer.
To extend the life of the device, install water filters. They soften and clean the liquid from impurities that settle on parts in the form of scale.
How much does it cost to replace a gas boiler radiator? If you take into account the purchase of a new device, delivery and installation, it will be cheaper to repair the heat exchanger.
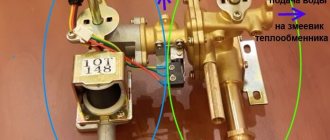
We service the igniter and water intake unit
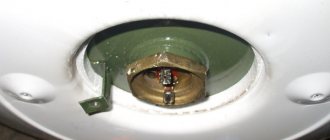
If there is a need to clean the water unit, do not rush to disassemble the entire device. Take a look at the operating instructions for the water heater, find the “frog” in the diagram and follow the following algorithm:
- Remove the adjuster knobs and front cover.
- Dismantle the water unit by disconnecting the pipes.
- Unscrew the screws holding the cover, remove it and get to the membrane.
- Clean the filter - mesh and water holes in the frog body using a wooden stick or soft copper wire. Remove scale with a brush.
- Rinse the parts with water and assemble the assembly. Replace damaged or cracked membrane immediately.
Clean the pilot burner jet (wick) with thin copper wire or a toothpick moistened with alcohol. Wipe the ignition electrodes and the flask of the flame sensor (thermocouple) thoroughly from soot, otherwise over time the column will begin to turn off spontaneously.
Disturbances in the operation of the column and their elimination
If your water heater suddenly leaks, sometimes the reason is worn out gaskets. When removing the casing, it becomes clear whether this assumption was justified. Having found a fistula in the heat exchanger, many consumers are interested in how to replace the problematic part. But the difficulty is that the price of spare parts reaches 30% of the price for a completely new heater.
It is much more practical to solder a mechanical defect using a soldering iron. Solder melts at about 200 degrees. The exact value is determined by the brand of the specific part. Even if the water boils for a long time, it will not damage the integrity of the “patch.” This solution is equally relevant for Russian and foreign speakers. After all, the risk of breakdown is present everywhere, only the service life differs, but defects will still appear in any model.
Model differences
Please note that different models of geysers may differ significantly in their design - this must be taken into account if you plan to independently repair the water heater. So, Chinese geysers of the Vector brand are not worth soldering at all. The fact is that the radiators in them are formed from very thin copper tubes, in which new fistulas are formed during the soldering process. Thus, if you have a cheap column, it is best to replace the heat exchanger in it with a new one rather than repair it.
From the point of view of reliability and quality, among the best representatives of speakers are Oasis brand products from a German manufacturer. They are equipped with heat exchangers that have a long service life. Since the components for such equipment are quite expensive, repairs will be advisable. Soldering leaks on the heat exchanger of the Oasis column will allow you to use it for a long time.
In the middle price segment there are gas water heaters from the Swedish company Electrolux and domestic Niva. In such products, heat exchangers with anti-corrosion protection are installed, the soldering of which will significantly extend their service life.
Reasons for heat exchanger failure
The period of operation is determined primarily by how the water in the city water supply is disinfected. In Russia, either pure chlorine or chlorine dioxide is used. When the water flowing through the copper tube heats up, it causes a violent chemical reaction. Copper chloride is inferior to pure metal in strength, and therefore fistulas appear quite quickly. The luckiest people are residents of cities where tap water is ozonated.
But there are still very few such settlements. The high cost of the modern solution does not allow us to count on the rapid spread of ozonation. Moreover, now manufacturers have begun to save in every possible way. And if previously troubles happened quite rarely with thick tubes of heat exchangers, now thin, low-quality copper is used everywhere. The service life of products has significantly decreased.
Methods for cleaning an instantaneous water heater
Cleaning a gas water heater does not always mean complete disassembly, down to the screw. But one issue is the prevention of a completely serviceable unit, and a completely different one is the removal of many years of scale from the coil and soot from the burner. A instantaneous water heater can be serviced in the following ways:
- completely disassemble the column, clean the gas burner device and rinse the copper heat exchanger;
- flush the radiator without disassembling;
- clean the working elements of the unit from soot and contaminants - igniter, electrodes, water unit (in common parlance - “frog”).
Note. The passage holes of the “frog” become clogged quite rarely. Usually they are cleaned when it is necessary to disassemble and repair the water unit, for example, to replace an unusable membrane. The design and principle of operation of the elements of a water heating column are described in detail on this page.
If the device has been operated for many years without maintenance, the channels are half clogged with scale, and the flame of the gas burner has turned yellow from blockages, then the first option is definitely implemented - complete disassembly. A similar decision is made when it is necessary to solder a leaky radiator.
Preventative flushing of the heat exchanger of a household water heater is carried out without dismantling (method No. 2). Local soot removal (option No. 3) is carried out when the ignition system malfunctions - the igniter barely burns, there is no spark at the electrodes, loud pops are heard in the combustion chamber when the burner starts.
How to solder a geyser heat exchanger
Preparation for soldering
First of all, you need to remove the casing from the column. This must be done carefully, first disconnecting the wires from the display. In some models of water heaters, for example Neva 4510, the gas and pressure regulators must be removed before doing this.
Next, turn on the water and locate the leak. Often it is located on the bend of the heat exchanger pipes near the sheathing. If it is easily accessible, it will be possible to seal the fistula without removing the column.
If there is no direct access, and the fistula is located from inside the radiator, you will need to disassemble the column and remove the heat exchanger.
After this, the gas is turned off and water is drained from the column. To do this, open the hot water tap and unscrew the union nut from the cold water inlet. Under the influence of gravity, the water will flow out.
Modern dispensers have a special plug for draining water, after opening which the liquid is poured into a substitute container. Remaining moisture is blown out with a compressor or vacuum cleaner.
This is important because during soldering the liquid will boil and evaporate, creating pressure and blowing the solder through the fistula.
The last stage of preparation is cleaning and degreasing the leak area. This is done using fine-grained sandpaper. You need to clean it carefully so as not to make a through hole, since the pipes in the heat exchanger can be very thin. After this, the cleaned tube is wiped with any solvent or white spirit to remove any remaining dirt and grease.
Soldering methods
There are three ways to solder the geyser heat exchanger:
Powerful soldering iron
To solder the fistula site with your own hands, you will need a soldering iron with a power of about 110 W, flux and solder.
The first stage of soldering is applying flux. This is a substance that cleans the surface of the material from oxides and allows the solder to spread more evenly. Flux paste containing copper is best. If it is not available, you can use regular rosin or an aspirin tablet.
After this, the soldering iron is applied to the tube in which the hole is and solder is applied. It is important that the solder melts from the pipe, and not from the soldering iron. A thin layer of solder is applied and the thickness is gradually increased to 1-2 mm. This is enough to prevent hot water from leaking under pressure.
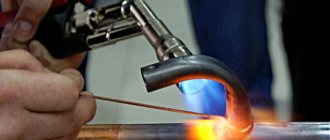
Burner with gas cylinder
You will need a burner, a small gas cylinder, flux, and solder. The burner is connected to the cylinder and ignited. You need to choose a not very strong flame so as not to damage the column radiator.
First, the leak site warms up well. This is done to ensure that any remaining moisture in the pipes evaporates. After this, the pipe is heated and solder is supplied to it.
After soldering, it is imperative to remove any remaining flux, because it contains acid and can subsequently corrode the walls of the heat exchanger pipes.
Cold welding
It is important to choose a cold weld that will not melt from hot water. All actions must be carried out wearing protective gloves. A small amount of cold welding comes out of the package. You need to knead it in your hands for about three minutes. As soon as the material begins to harden, you need to apply it to the site of the fistula and hold it tightly until it hardens completely.
If there are several fistulas nearby on the heat exchanger tube or there is a large hole in the tube, you need to solder a copper patch. You can also make soldering from a piece of copper pipe.
How to check for leaks
After soldering the geysers, you need to check the tightness of all pipes. To do this, they are carefully examined to see even the smallest fistulas - their presence is indicated by small green spots. To avoid re-disassembling the column in the near future, these defects are also cleaned and soldered.
After this, you need to connect water to the gas water heater with a soldered heat exchanger and open the tap.
Water is supplied slowly and gradually so that it displaces the air from the column. Once the entire heating system has been filled, the tap can be opened to full capacity. In this way, the strength of soldering joints is checked under maximum water pressure. At the same time, the soldered joints are re-inspected for water leaks.
At the very end, the boiler with a gas water heater is turned on to check its performance when in contact with hot water. In this case, the soldered areas can be wiped with a dry cloth to detect the slightest signs of moisture.
Preliminary preparation
During the work you will need the following tools and materials:
- soldering iron with a power of more than 100 W;
- fine sandpaper or metal brush;
- lead-tin alloy solder;
- flux - rosin or crushed aspirin will be enough.
After this, you can proceed to inspect the gas water heater to determine the location of the leak. Do not rush to turn off the water supply.
First, remove the outer casing from the device; if necessary, unscrew the bolts. Open the water and inspect the heat exchange element of the column to identify the location of the leak. If the hole (fistula) is easy to reach, then the heat exchanger can be soldered right on the spot without removing the entire gas column.
To work in a hard-to-reach place, you will need to dismantle the water heater, so turn off the tap on the gas pipe, drain all the coolant from the heat exchanger of the column by opening the hot tap and unscrewing the nut on the cold water pipe. It is even easier to drain water from modern models of dispensers with plugs - you need to open the plug so that the water flows out by gravity.
Please note that before moving on to the work of soldering the fistulas, the heat exchanger should be dried - you can use a vacuum cleaner or compressor. Otherwise, the brazed heat exchanger will soon start leaking again as the leak will soon recur.
The area of the heat exchanger where a leak was discovered should be cleaned with a metal brush or fine sandpaper. Often, characteristic green spots appear on damaged areas, indicating copper oxidation.
Stripping must be done carefully as the thin copper tubes are easily damaged. Upon completion of this procedure, the work area should be degreased with a special alcohol-based composition or any other.
How to solder a geyser radiator if the fistula is in a place inaccessible for soldering
If the location of the water leak occurs on the wall of the heat exchanger adjacent to the base of the gas water heater, then repairing the heat exchanger by soldering on site is impossible, and it must be removed from the gas water heater. The designers of NEVA LUX-5013 did their best. To remove the heat exchanger for repairs, you need to disassemble almost the entire gas water heater and, most unpleasantly, disconnect the gas pipe. I didn’t want to mess with gas pipes, as it’s dangerous.
The removal of the heat exchanger for repair was hampered by an umbrella for removing gas combustion products, secured with four aluminum rivets to the base of the gas water heater. I had to drill out these rivets with an electric drill, remove the umbrella, and only then did it become possible to remove the heat exchanger. During assembly, instead of rivets, the umbrella was secured to the base with two M4 screws. If the wall does not interfere, you can secure the umbrella with self-tapping screws.
Next, the repair of the gas water heater was carried out using the technology described above. Over the past two years, I have had to repair the heat exchanger, soldering the fistulas, five times. The last time, water began to leak from the side adjacent to the wall of the heat exchanger, and I decided to buy a new one, which I did. I'm going to repair the old heat exchanger of the geyser, I'll tin and solder the tube along its entire length. Photo of the heat exchanger from the side attached to the base.
When purchasing a heat exchanger for a geyser, I was surprised to find that they gave me not a new one, but an already repaired one. The heat exchanger tube had the same soldering that I did when repairing my old heat exchanger. As a result, out of four available in the store, only one heat exchanger was not soldered. It turns out that the plant ships repaired heat exchangers for spare parts that failed during the warranty period. They seal fistulas in them and sell them again. The heat exchanger has a warranty period of only 1 month. It turns out that in a few months the gas water heater will have to be repaired again!
If you have to buy a heat exchanger for a gas column, inspect it carefully. If soldering is detected, it is better to refuse the purchase. If you replace a heat exchanger in a gas water heater under warranty, make sure that you are not getting a refurbished heat exchanger that was in use, but a new one.
The gas makes a loud noise when burning in the wick.
After installing the Neva-3208 gas water heater, an unpleasant phenomenon appeared that did not affect the quality of the water heater. When the gas burned in the wick in standby mode, it produced a rather loud sound, which was unpleasant to the ear and created discomfort. After some thought and experimentation, I managed to get rid of the noise in a simple way. He assumed that a stream of gas in the burner under pressure, escaping from the nozzle and hitting the wall at the bend of the burner, creates conditions for noisy combustion.
To test this assumption, I inserted a strip of tin approximately 3 cm long and 5 mm wide into the burner, the main thing being that it fit inside the burner. The noise disappeared. If your gas water heater is also noisy, then you can take any metal strip, for example, cut it from a tin can, make a hole in it at the edge, put the strip on a straightened paperclip bent at the end and put it into the burner. The result will be something like a fishing lure. The paperclip is needed so that you can remove the strip of metal back from the burner if the noise does not disappear, although if it burns normally, you don’t have to remove it. This experiment can be carried out without even removing the casing from the gas water heater.
Restoring geyser pipe flanges by soldering
Somehow my eye caught two pieces of copper tubes with flanges, onto which American union nuts were put on. These parts are designed for installing a water supply system made of copper pipes.
When soldering the heat exchanger of the gas water heater, I remembered them, and the idea arose to restore the previously cracked copper pipe connecting the outlet pipe of the heat exchanger to the hot water supply, soldering to them new flanges that had been collecting dust on the shelf. The task was somewhat more complicated, since the copper tube for the available parts was bent at a right angle. I had to take a hacksaw for metal.
First, a part of the tube with a flange was sawed off at the place where the bend begins. Next, the expanded part of the tube was sawed off from the opposite end for further use as a connecting ring. If the tube were straight, there would be no need to saw. The result was two pieces of tube about a centimeter long.
The next step is sawing off the cracked flange from the pipe. The sawn piece of pipe should be equal in length to the section of pipe with a flange prepared for repair in the previous step.
As you can see in the photo, the sawn-off piece of the gas water heater pipe had many cracks at the place where the flange formed.
The photograph shows parts prepared for soldering. On the left is the end of the gas water heater pipe, on the right is a new flange with a union nut, in the middle is a connecting ring.
Before soldering, you need to check how the prepared parts fit together. The pipes of the nozzle should fit into the ring easily, with a small gap.
Before joining by soldering, the mating surfaces of the tubes and rings must first be cleaned with fine sandpaper to remove the oxide layer. It is convenient to clean the inside of the ring by wrapping sandpaper around a round rod, such as the handle of a small screwdriver. Next, the cleaned surfaces must be tinned with a thin layer of POS-61 tin-lead solder using a soldering iron with a power of 60-100 watts. As a flux, it is best to use acidic zinc chloride flux, in other words, hydrochloric acid slaked with zinc. Since copper parts are soldered, rosin or aspirin will also work.
When soldering, you need to ensure that the joint of the pipes is approximately in the middle inside the ring. If after tinning the tubes do not want to fit into the ring, then you need to heat them with a soldering iron, the solder will melt and the tubes will fit. Do not forget to put a union nut on the tube before soldering the pipe.
Once the tubes are joined, all that remains is to fill the gap with molten solder. As you can see in the photo, the result is a completely sealed and mechanically strong connection. The pipe has been repaired, and you can install it in place in the gas water heater; it will serve no worse than new.
The check showed that the pipe was tight at the soldering point, but a leak arose at its other end, and a microcrack appeared for the same reason. I had to repair the other end of the pipe in the same way. The geyser has been working with the repaired pipe for more than a year. No water leaks were observed.
Using this technology, it is possible to restore the tightness of not only copper and brass tubes, but also stainless steel and iron tubes. The technology is applicable not only for repairing geysers, but also for repairing other devices and machines, including cars.
Device structure
In order to be able to diagnose device malfunctions without the help of a geyser technician, you need to have a general understanding of their structure, because this is what determines how the repair work will be carried out. There is no need to delve into the intricacies of assembling many different models, because... most of them are similar. Therefore, we can limit ourselves to only familiarizing ourselves with the general principles of operation of such devices.
By historical standards, hot water supply appeared in homes not so long ago. Water was heated using various methods, but the easiest way to do this was using a solid fuel heater. Usually it was heated with coal, less often wood or fuel oil was used. In order to have enough hot water to take a bath, you had to spend quite a lot of time heating it up - from 2 hours or more. Of course, this is not entirely convenient, and geysers were created to solve the problem.
You can see the design of a gas water heater in this video:
This device is designed to increase the temperature of water using gas from the city mains. To speed up the heating process, heat exchangers were built into the equipment - it is in them that moisture is distributed through a system of thin tubes located above the gas burner. Due to this feature, the column is able to heat water quite quickly and does not require filling a large tank.
Geyser - equipment that allows you to heat water using gas
This is the main principle of operation of all gas appliances; the rest of the technical filling is designed to ignite, maintain the flame, regulate the heating temperature, and also ensure safety during operation. Ignition of the main component - the burner - can occur:
- From the igniter. It is lit manually using a match, a special lighter, or turned on with a button (automatic or mechanical). The first options are considered outdated, so such speakers are unlikely to be found on sale.
- Without igniter (piezo ignition).
- Using electronics. This method works the same way as igniting cars.
The security system blocks the flow of gas to the burner if water gets inside
Most modern speakers are equipped with a mechanical security system. Even devices with electronic filling have this type of protection, located between the membrane in the device for receiving water and the valve of the gas pipe. The system works on the following principle: the valve stops interfering with the flow of natural fuel into the device only if the water pressure presses on the membrane with the required force. Everything can be explained even simpler: gas is not supplied to the burner if water does not enter the column.