To supply water to a private house or summer cottage, two methods are usually used: first - digging a well, second - well drilling. Both of them have a number of pros and cons. Often, the owners of dachas or small country houses decide, for convenience, to provide water supply not only to the house itself, but also to the existing technical premises: a barn or garage. If they have their own car, then it must be washed. And for this purpose, they provide an autonomous source so that you can care for the vehicle right on the spot. This will save money and not pay for car wash services.
What are water supply wells and what types do they come in?
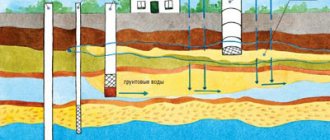
There are 3 types of wells for water supply: Abyssinian , filter and artesian . They differ from each other in depth, performance, and design elements.
Each owner of his own garage can install a well in it . Such work can be carried out in any season of the year. It does not require very large expenses. And having a water supply in the garage will significantly increase convenience. In this case, there is no need to carry out thermal insulation and extend pipes to the room. Most often, Abyssinian wells are installed in garages. They are sources of medium depth. And in all seasons of the year, water will be supplied in sufficient quantities.
The easiest way to carry out such work is in the garage during construction, or more precisely, at its initial stage. At this time, you can choose a place for water supply, as well as for the necessary inventory and equipment.
If there is a need to drill a well in an already built permanent garage, then a number of parameters need to be taken into account. The area of the room must be at least 2×2 meters , height – 3 m .
Starting and checking the system operation
At the final stage, the operation of the entire system is regulated. After drilling is completed, muddy water appears.
Initially, before installing the filter, the well is pumped. A vibration pump will be needed. It is also important to decide where the dirty water will be drained:
- The pump is lowered into the hole, turned on and pumping water begins.
- After some time, the pump is pulled out and washed in clean water.
- The washed device is lowered into the well again.
- The procedure is repeated until clean water appears.
After the water becomes clear, the pump is changed to a well centrifugal type.
To ensure uninterrupted operation of the well, a pressure switch, expansion and storage tank, and filters are additionally installed.
Advantages
A well in a garage has many positive aspects. In particular, the following:
- The main advantage is that it will provide water constantly , because it does not depend in any way on the central water supply. And even if for some reason there is a water outage in the central system, then in a garage with a well it will always be available, without any problems; it is impossible to turn it off. In this case, the water quality will be quite satisfactory. After all, surface water, various debris and impurities will not get inside the well.
- Convenience . Thanks to it, you can wash your car at any time, there is no need to go to a car wash and pay for such a service. You can also always wash your hands after work, tidy up, etc. Water supply in the garage will save money and make it easier to care for your car.
- The well will provide the owner with water in almost unlimited quantities . And he will not have to worry that there may not be enough water for any work. On the contrary, you can, if you wish, allow even your neighbors to use the well for a fee. The source will not become scarce. And weather conditions do not in any way affect the water content in the well, i.e., in both heat and cold, it will be possible to obtain water in any volume.
- When installing a well in a garage, you will not need to carry out additional work for insulation . A certain temperature is maintained in the garage, so there is no need for such manipulations.
- A well can serve for a very long time, this period is more than 50 years . If the well equipment is cleaned in a timely manner, the water will fully comply with quality standards.
- The quality of the water is high , because various wastewater and dangerous impurities do not get into it. In this case, the main thing is to build a well in places where the soil is not contaminated by industrial waste and wastewater.
- All work on arranging water supply does not require much time . They can be completed in 1 day.
Creative process
First you need to find the lowest point in the hole or cellar. This is easy to do with a level. I had a one and a half meter long device. Less is worse, more is better and it’s easier to calculate the slope.
Once I've found the lowest point, a shovel comes to the rescue. We dig a hole with a diameter of approximately 50 centimeters to the maximum possible depth, as much as the handle of the shovel allows.
The essence of this manipulation is as follows: under our feet there is not a continuous aquifer layer, but it alternates with others - less saturated with moisture - into which our waters will go.
Simply put, under the aquifer, which is conventionally located in our cellar or inspection hole, there is clay or loam, which is a water-resistant layer, due to which the water stagnates.
And underneath there is sand, where I will direct the excess water.
Alternatively, you can dig up old tires and fill them with crushed stone. In theory it should work
I want to admit that the deeper the hole, the more masterly use of a shovel needs to be demonstrated. I even had to experiment with the cutting, cutting it out of a curved tree, so as not to lose the sand trapped at the bottom while pulling it out.
The final stage of my engineering structure will be filling the dug pit and the bottom of the inspection hole with crushed stone. A 3-5 cm layer along the bottom of the inspection hole is sufficient.
The crushed stone will not allow our pit to crumble and be washed away and at the same time will allow us not to notice how the emerging water has gone into another layer of soil.
Flaws
However, despite all their advantages, wells in the garage also have a number of disadvantages that also need to be taken into account:
- Difficulty in maintenance . Over time, it will certainly be necessary to carry out cleaning work, since silt and all kinds of debris inevitably accumulate in the ducts. And for this you will need to completely free up space in the garage. Otherwise, it will be impossible to clean properly. The same applies to well repair if necessary.
- High price . To install a well, it is necessary to purchase quite expensive pieces of equipment, including special filters for water purification. However, in order to save money, you can do the drilling yourself by renting a special drilling rig. This work is not particularly difficult, and there is not always a need to resort to the services of professionals. By following the detailed instructions, you can install a water supply system in your garage on your own. However, if there is a complete lack of skills in handling such equipment, it is still better to invite experienced craftsmen.
- Dependence of water supply on electricity supply.
- The need to drill to a sufficiently large depth - at least 8 m .
- This type of well is not suitable for areas with deep groundwater.
Step-by-step construction with your own hands
To conduct water into the garage, you need free space in the room for work and placement of equipment. Therefore, it is ideal to carry out work at the stage of constructing the garage during the construction of the foundation. At this stage it is easier to plan the location of the source and install the necessary equipment:
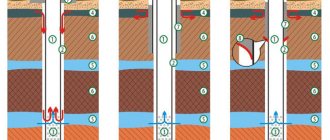
- At the first stage, a borehole is made. Dig a hole in the shape of a square.
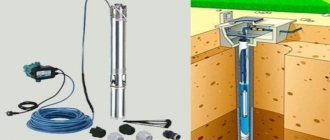
- A drilling rig is used to create a well. It is a tripod made of timber or tubes. If the soil is soft, it is enough to hammer the pipe with a sledgehammer.
- A wellpoint filter is installed in the hole made and immersed in the ground.
Having the necessary material, instructions and tools at hand, creating a water supply system will not be difficult.
Necessary materials and equipment
To carry out work on installing an Abyssinian well, the following materials will be required:
- PVC pipes;
- steel pipes;
- needle filter;
- hand drill;
- bolts, screws, nuts;
- steel tape;
- metal grid;
- couplings for connecting pipes;
- pump.
With the right tools, working is much faster and easier. You need to prepare a grinder, a drill, a welding machine, a sledgehammer, keys, and a hammer drill.
Design and calculation of measurements
The prepared pipes must be driven into the ground to a depth of 9 meters:
- The pipes are connected to each other with threaded fittings.
- A filter with a needle is constructed at the base. The needle is a cone-shaped tip. It is very durable and penetrates the soil easily.
- Then comes the filter section. Holes are made along the pipe meter. The pipe section is wrapped with metal mesh and wire.
The design calculations take into account the parameters of the well flow rate, the depth of lowering the pump, the diameter of the surface and internal surface of the pipe.
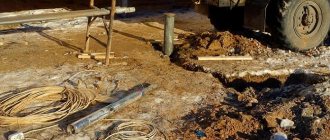
Installation and excavation work
The plan according to which the Abyssinian well is drilled:
- determine the location of the work and purchase the necessary materials;
- form a needle and filter;
- in the intended location, dig a hole with a diameter of 100 cm and a depth of 55 cm;
- use a drill to make a hole;
- install several parts of the pipe with a needle;
- install a homemade driving tool;
- a pipe is placed in the ground and new parts are welded as work progresses;
- work is carried out until signs of water appear;
- the hole is washed and left for a day;
- It is advisable to concrete the area around the pipe;
- at the final stage, connect the pump.
To arrange a water supply source in the garage, you will also need to purchase a pressure switch, a hydraulic accumulator, tees, a pressure gauge, hoses, taps, sealants and electrodes.
Installation of taps
In order to control the flow of water, ball valves are installed. The tap hole must match the diameter of the pipe:
- The pipe at the installation site of the tap is cut and threaded.
- The tap is screwed in using an adjustable wrench. Do not over-press the structure.
- A sealant is wound onto the threads of the tap in several layers.
After screwing on the tap, you should check the connection location. If water leaks out, the structure is disassembled again and the parts are checked for serviceability.
Filtration system
The filter is an important element of the well. To make it you need to take a pipe 1.5 meters long:
- On a segment equal to one meter, holes with a diameter of 9 mm are made in a checkerboard pattern.
- A cone is welded at the end of the pipe for better penetration into the ground.
- A winding is made from wire, which is installed between the pipe and the filter mesh.
- The filter mesh is chosen with a special galloon weave. The cells of the mesh are diamond-shaped, so they do not become clogged with grains of sand.
The water level is controlled by specially installed sensors. Sensors can be upper and lower level.
Recommendations
Before you begin work on arranging a well for water supply in the garage, you should definitely find out the approximate depth of water in the area. It is also necessary to determine the nature of the soil. This indicator is decisive when choosing the appropriate type of drill for such work.
It is imperative to take into account that it is extremely undesirable to install a well for water supply near garbage dumps, drainage pits, cemeteries, and places where animal corpses are buried. After all, hazardous substances can get into the water, and it cannot be used for drinking. In the garage, before starting work, it is imperative to ensure that all existing electrical wires are waterproofed in order to prevent a short circuit in the event of an accident.
Types of waterproofing work in a garage basement
- Non-pressure . Protects the basement from floods in the spring, as well as during heavy rains. Bitumen mastic is used for work.
- Anti-pressure . Protects the garage pit from groundwater seepage. For this purpose, a cushion is made from slurry solution, which is laid in three layers, as well as bitumen mastic.
- Anticapillary . Protects against moisture seepage through capillaries inside concrete. Work is carried out to treat seams and cracks using a penetrating mixture or injection solutions.
Special components are added to the concrete solution to increase its waterproofing properties.
- Sealing . Promote the formation of crystals that do not dissolve in water. The components increase the density and extend the service life of concrete. These include resins that dissolve in water, iron, aluminum and calcium salts. In addition, such additives increase resistance to frost.
- Hydrophobizing . These are sodium and potassium soaps of petroleum, fatty and resin acids that dissolve in water. The components themselves do not have water-repellent properties, but manifest their qualities in the process of reaction with cement mortar. Due to a chemical reaction, the components settle on the walls of the capillaries in the form of microscopic droplets and form a hydrophobic coating. As a result, with such contact, surface tension forces push moisture out of the pores. These additives make the structure of concrete homogeneous, pores are reduced, and are evenly distributed in the material.
Share the post “How to waterproof a hole in a garage against groundwater with your own hands? Step by step - Review + Video" by copying the link: https://kaksdelatsvoimirukami.ru/kak-sdelat-gidroizolyaciyu-yamy-v-garazhe-ot-gruntovyx-vod-svoimi-rukami-poshagovo-obzor-video/
How to get rid of water in the cellar
When a flooding problem occurs, you need to find out the reasons in order to plan further actions.
There are a number of reasons why a cellar floods
Causes of flooding:
- high lying groundwater;
- accumulation of precipitation after prolonged rains in the absence of a drainage system;
- leakage of melt water through cracks in walls and foundations. Often found in lowlands;
- water breakthrough from a pipe located in the basement;
- poor ventilation, which contributes to the appearance of condensation and dampness.
Read more: do-it-yourself ventilation in the cellar.
How to remove water?
There are several ways to remove it. Options for getting rid of water in the cellar:
- installation of a drainage system;
- automatic water pumping system;
- We remove it using waterproofing.
In this video you will learn more about drainage: The drainage system consists of pipes, trenches and a well. Installed during the construction of the house. The basis of the system is a pipe with a diameter of at least 100 mm. There are holes on the pipe. Through the holes, water enters the pipe and accumulates in the collector. 3 types of drainage system:
- Wall-mounted (if there is a basement or plinth).
- Plastic (used in the construction of a house from slabs).
- Ring (trench). The most common type. You can do it yourself.
Operating conditions of the drainage system:
- The sloped trench located around the basement should be below floor level.
- Protecting the pipe from leakage is the use of filter materials. These are crushed stone and geotextiles.
- Drainage must be carried out to the central sewerage system.
If it is impossible to create a drainage system, you can get rid of moisture by automatic pumping.
To get rid of water, you need:
- prepare a hole in the basement measuring at least 50x50x50 centimeters;
- line the hole with bricks to strengthen it;
- pour 10 centimeters of gravel into it;
- buy an automatic pump.
Indoor waterproofing protects against water permeability, making the concrete stronger.
Compound:
- 1 layer – penetrating waterproofing;
- 2nd layer – bitumen mastic;
- layer - plaster.
Apply above the expected flood level.
What you need for waterproofing:
- prepare the necessary materials and tools;
- prepare the basement: pump out the water, clean the walls and floor from dirt, scrub the seams and cracks with a brush.
Garage
Many garage owners have an inspection hole. This is a basement room located under the garage. It is needed for a better inspection of the car and repairs.
Don't forget about waterproofing the room
The appearance of moisture in the underground causes problems, primarily corrosion on the car. Therefore, waterproofing is needed in the garage in the cellar. There are 2 ways:
- protection during garage construction;
- creating waterproofing in a finished garage.
During construction, much attention is paid to the walls, floor and closing lid. Methods for waterproofing a garage pit:
- By creating a drainage system (without laying pipes, with laying pipes).
- For the inner surface of the walls - penetrating waterproofing (composition of sand, cement and chemicals). The solution penetrates deeply into the pores and cracks of the walls.
- Other methods are also used for interior wall treatment: liquid rubber, plaster with moisture protection.
- For the outer surface of the walls, roofing felt and bitumen mastic, slate are used.
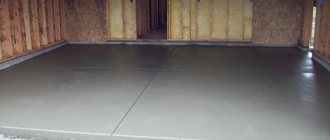
- For the floor - reinforced concrete.
- A wooden cover is installed on the pit as additional protection.
What is the danger to the home?
If the garage is located near the house, and water from the basement penetrates into the ground, then flooding can negatively affect the residential building. The main consequences of high humidity include:
- Foundation destruction. With prolonged contact, the foundation of the building gradually collapses. Under the influence of moisture, the concrete surface loses its strength, which leads to the appearance of cracks. In winter, water that has penetrated into the foundation expands under the influence of low temperatures and destroys concrete many times faster.
- Deterioration of the bearing capacity of the soil. If water accumulates under the house, the soil will begin to erode. This will cause the surface on which the residential building stands to become less durable. Due to erosion of the soil, cracks appear on the walls and flooring.
- Destruction of walls. The accumulation of water under the house leads to increased humidity inside. Due to constant dampness, wallpaper, plaster and other finishing materials come off the walls. If the structure is made of logs, the lower part of its walls begins to rot faster.
- The appearance of mold. In conditions of high humidity and dampness, mold and fungi multiply on the ceiling, walls and floors, which negatively affect the health of people living in the house.