A swimming pool is a complex hydraulic structure that includes a bowl filled with water, a filtration system, lighting equipment and sometimes even heating. A separate, but often necessary addition is the roof.
With it, the tank remains clean longer, and owners can take water treatments during rain. There are several ways to make an indoor pool at your dacha with your own hands. Each type of canopy has its own advantages and installation nuances.
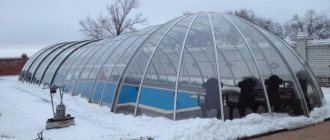
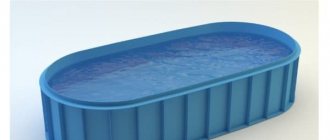
Swimming pool under a telescopic roof
What are the advantages of greenhouse pools
In our latitudes, the swimming season does not last long, and there are not suitable bodies of water within walking distance everywhere. Therefore, swimming pools become a real salvation for summer residents in the heat and an excellent way to entertain and strengthen the children. But all owners of such structures, including even the most modest inflatable pools, are aware of the problems associated with their operation. A polycarbonate pool greenhouse will help solve complex problems:
- insects, leaves, fluff, dust and other contaminants will no longer get into the water;
- it will heat up faster and maintain a comfortable temperature;
- You can swim in any weather, without fear of strong wind, rain, or scorching sun;
- when installing heaters in a greenhouse, the swimming season can open earlier and end much later than usual;
- Maintaining the tank will become easier, you will have to clean it and change the water less often;
- When leaving the dacha for a while, you can lock the greenhouse and not worry about the safety and serviceability of the pool itself and the equipment.
If desired and possible, the pool can be made all-season. Source koffkindom.ru
Such an indoor structure does not necessarily require large financial investments, especially if it is planned to be used only in the summer. You can install a ready-made frame or inflatable pool in a greenhouse made of a wooden frame and film, and enjoy all the benefits listed above. But it’s better to spare no time and money and install a permanent pavilion covered with polycarbonate. It will last much longer, without requiring dismantling for the winter.
Frame making
Truss frame
After that, it's time to make the frame, which will eventually be covered with polycarbonate. It will be made from a profile pipe, which must be treated with an anti-corrosion agent before use. The roof can be made flat or arched. In this case, the profile should be cut in three places, bent and welded with a welding machine. If you are not confident in your abilities, it is better to entrust such work to a professional.
- First you need to install support pillars in increments of about 1 m. They either go deep into the ground or are attached to the foundation with anchor bolts. The top is tied.
- Now you need to weld or bolt cross-sections, flat or arched, to the frame and install stiffeners between them.
Another frame option
Which design you have depends on your choice. Its size and design are selected personally by you. It is important to adhere to exact dimensions and check the evenness of your structure.
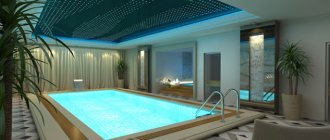
What should a pool cover look like?
When planning to install an indoor pool on a site, it is important to think through the design of the “dome” down to the smallest detail: where to place it, what to make it from, what shape and size to choose.
Materials for production
If you want to have a comfortable and low-maintenance pool, the greenhouse above it should be made of moisture-resistant materials, allow light and heat to pass through well, be easy to clean and be durable - resistant to wind, snow and mechanical loads.
Therefore, it is advisable not to make the frame from wood, which will quickly rot from high humidity, or ordinary steel, which is easily susceptible to corrosion.
Wood can be used subject to high-quality antiseptic impregnation and regular renewal of the protective coating Source odstroy.ru
See also: Catalog of companies that specialize in engineering systems (heating, water supply, sewerage and others) and related work
These problems will not arise if you install a frame made of galvanized or protected with high-quality powder coating steel pipes. Stainless steel and aluminum alloys are also resistant to corrosion, but are more expensive. A lightweight portable frame can be made using polypropylene water pipes.
It is best to choose cellular polycarbonate as a coating. The film is short-lived and retains heat less well in cool weather, and glass is too fragile a material for a structure such as a swimming pool. Especially if children will be frolicking in it.
A greenhouse pool with a polycarbonate cover has many advantages. This material:
- lightweight yet durable;
- flexible, easy to install and create complex shapes;
- transparent enough for sunlight, but scattering it, making it softer;
- polycarbonate with a special UV coating protects against harmful radiation;
- not afraid of moisture and temperature changes;
- easy to care for;
- It can be not only transparent, but also colored.
A colored dome looks more interesting Source kraskomposit.rf
Shapes and sizes
The greenhouse for the pool must be resistant to strong winds and withstand snow loads. Therefore, it can be given a standard shape - arched or gable. Such structures have been tested for years, but they look too simple and unpresentable. If there are no special complaints about the appearance of the swimming complex, it is quite possible to use ready-made greenhouses, choosing the appropriate size.
You can emphasize the special purpose of the greenhouse and set it apart from a number of garden structures with non-standard forms - domed, asymmetrical or combined. For example, with a straight facade wall and a semi-arched roof. You can attach a lean-to structure to the wall of the house.
This design is difficult to confuse with a regular greenhouse Source masterspa39.ru
Planning and preparation for construction
The first thing you need to do if you want to build such a shelter: the type, shape, height, design and purpose of the building - all this needs to be thought out in advance. For small pools, a stationary canopy is suitable, which will cover it in bad weather and protect swimmers from the scorching sun. If the size is large and the area allows you to place a pavilion, then you can build it. It all depends on your choice and needs.
Canopy drawing
It is advisable to design the future canopy, indicating the dimensions and all the features in order to be guided during construction. This can be done either on paper by drawing a detailed diagram, or by creating a project using a construction program on a computer. Then you can calculate the approximate consumption of materials. If you are not very good at it, look for detailed plans on the world wide web and choose the one that suits you best.
Now is the time to put everything on paper into practice. As an example, we will look at how to build a permanent pool cover. To do this you will need the following tools and materials:
- material that will serve as a coating;
- profile pipe with square or rectangular cross-section;
- concrete solution;
- bolts and screws;
- shovel;
- sand and crushed stone;
- rope and stakes;
- welding machine;
- concrete mixer;
- tape measure and level;
- perforator;
- screwdriver;
- metal hacksaw and jigsaw;
- ceramic tile.
Ready-made polycarbonate canopy
It is better to use polycarbonate sheets as a coating material. It is becoming increasingly popular and is often used to make pool covers. And this is no accident, since it has a number of advantages:
- Light weight and durable.
- Easy to maintain and durable material.
- Resistance to corrosion and various weather conditions.
- Fire safety.
- The ability to transmit sunlight by scattering it.
- Democratic price.
When you have prepared the material and all the necessary tools, you can begin work on the construction of your polycarbonate coating.
Video description
This video provides an overview of a low sliding pavilion made of monolithic polycarbonate:
- Stationary greenhouses are made tall, in which you can walk around the pool at full height.
On a note! Greenhouses with straight vertical walls are much more convenient and spacious; arched structures have to be made larger in area due to the loss of height on the sides.
It is better to select the dimensions of the structure in accordance with the parameters and method of installing the pool bowl. For tanks sunk into the ground, the height of the shelter can be made smaller. It is advisable to leave at least 30-40 cm of free space around the entire perimeter between the sides of the pool and the walls of the greenhouse, otherwise you will only have to dive into it through the door.
This option is also acceptable, but less convenient Source stroy-rossiya.rf
Sheathing the frame with polycarbonate
The last, final stage of canopy construction is its cladding. To complete it, you must:
- Mark the polycarbonate sheets, making notes where it will connect to the frame itself. In those places you need to drill holes for screws. Do not remove the film from the material yet, so as not to damage it. The hole for the screw should be slightly larger than the screw itself. This is done because polycarbonate can expand when exposed to heat; if you make a hole the same diameter as the screw, the material can crack when it expands in the sun.
- Now you need to sheathe the frame (roof) with sheets, butt-to-edge. Using a screwdriver, connect the sheets using self-tapping screws. Be sure to place galvanized washers under their caps to close the holes.
- Treat the sheet joints and fastening points with silicone sealant.
Polycarbonate fastening
Now your pool and you are protected from the effects of rain and sun. But what if you need to completely cover your tank so that it is protected from debris, wind and is protected from all sides? We need to make a pavilion. The manufacturing principle is similar. The only difference is that more material is needed, since the frame must be completely sheathed. It can be of any height and shape, depending on your desire.
Cutting polycarbonate
Anyone can build such a canopy; the main thing is to show imagination, make a detailed drawing, purchase materials and follow the recommendations for construction. To summarize, all work can be divided into the following stages:
- Selection of design and preparation of plan.
- Procurement of materials and tools.
- Preparing the base.
- Frame construction.
- Covering the frame with the material of your choice.
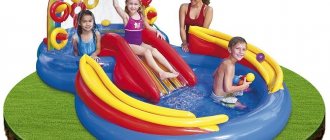
Types of pool bowls
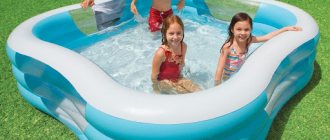
The pool bowl can be surface or buried. The easiest way is to install a frame pool in a polycarbonate greenhouse, creating a flat platform for it from compacted fine sand or dense wooden flooring. Inflatable tanks are rarely of such a large volume and size that they require a permanent shelter.
Excellent place for children's recreation Source na-dache.pro
Recessed bowls are more difficult to install and maintain and require more attention to water supply, cleaning and drainage systems. But such structures are much more comfortable.
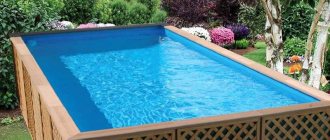
The most practical and quick-to-implement solution would be to install a finished pool bowl made of composite materials or polypropylene. Such products come in different shapes and sizes, and they are also made to order. They have smooth and “warm” sealed walls, are easy to clean and disinfect, and do not crack from frost.
Recessed structures that are more difficult to manufacture include concrete bowls and prefabricated tanks made of polystyrene foam blocks. Making them with your own hands is difficult and time consuming, and ordering such a pool in a greenhouse at a turnkey dacha will be expensive. Especially considering that it needs to be finished with ceramic tiles or other waterproof materials.
Canopy base
Concrete frame post
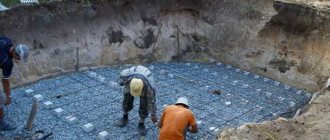
Despite the fact that polycarbonate is a fairly light material, the entire structure will have a decent weight. Therefore, it is better to install such a canopy on a solid concrete foundation, the depth of which is 50 cm and the thickness is 20 cm. A frame will be installed on such a blind area. Then you can tile the edges to make everything more attractive and protect the base from moisture.
You will need a shovel, tape measure, level, rope and pegs. First, mark the area using pegs and rope. Stick to exact measurements. Along the perimeter, focusing on the markings, you need to dig a trench 60 cm deep. Make sure that the bottom of the trench and the walls are even. After this, pour sand into the bottom with a layer of 5–10 cm, tamp it down and again pour a layer of crushed stone and sand 5–10 cm deep. Make formwork, the height of which is a multiple of one or two ceramic tiles (depending on their size), which will cover the blind area. Now mix the concrete mortar and pour the foundation. All that remains is to wait until the concrete gains strength, namely 1 month.
Another option for the foundation is when the support pillars are simply dug into the ground, then there is no need to make a foundation. This type is suitable in cases where the soil is quite dense. The pillars need to be deepened by at least 60 cm.
Briefly about the main thing
Greenhouse conditions are liked not only by heat-loving plants. People also need comfort and warmth, especially when they come to relax at their dacha. The weather is not always pleasant with warm days and is conducive to swimming. But if you install a frame pool in a greenhouse, you can use it in any weather without first heating the water and without catching leaves and insects from it. The shelter can be either a standard ready-made greenhouse or a custom-made polycarbonate structure on a durable, moisture-resistant frame.
Ratings 0
Service
Maintenance of a wooden canopy consists of monitoring the condition of the wooden parts and timely repair or replacement of damaged elements.
In addition, you need to monitor the cleanliness of the transparent coating and periodically water it with water from a hose.
Every year, at the end of the winter season, the wooden frame is covered with a fresh layer of paint, having previously cleaned it of dust and dirt that has settled on the surface during the winter.
Preponderance of pros or cons?
The owners, who have already installed a greenhouse on the property above the pool, speak only positively about the structure. If we talk about advantages, then the “bouquet” includes:
- availability of materials for the structure, the possibility of its independent construction;
- an alternative way to get what you want is to buy a ready-made greenhouse; even a novice greenhouse master can assemble it;
- a harmonious ensemble with its “colleagues” who perform their direct duties, since they often use the same covering material for all similar objects;
- great financial savings due to the absence of the need to heat water, which in the summer in the greenhouse is always at a suitable - pleasant - temperature;
- comfort - protection from precipitation, wind, insects, foliage, pollen.
In addition to these advantages, one more can be noted - low evaporation of water. There are only two disadvantages, but they are significant. This is labor intensive and quite a large investment if we compare the construction of a covered structure with the construction of a conventional, “naked” artificial reservoir.
Do you need a fence?
A roof for a round pool also requires a certain safety zone, that is, an area around the pool with protective nets or walls - primarily for the safe stay of children in the area next to the pond. And if you decide to protect your children from unplanned diving into the pool, then it is advisable to at least erect a mesh barrier around the fence.
The design of a lightweight fence consists of several metal sections consisting of a frame frame on which a galvanized metal mesh with a rectangular cell is stretched. You choose the sizes yourself. The material should be made of stainless steel, preferably metal pipes of round and rectangular cross-section.
After digging shallow trenches on the ground, concrete blocks are installed across the fence. The barrier pins are inserted into holes in these concrete blocks.
What kind of design is this?
When opened, a sliding canopy is no different from a pavilion.
Its feature is the division of the roof into sections that can be folded while moving along guides. The sliding structure opens fully or partially. This is very convenient - it helps regulate the temperature and humidity inside. The main construction material is polycarbonate. In rare cases, glass is used. Rails (guides) are made mainly of aluminum alloys, painted or anodized. There are structures made of steel profiles and wood.
The number of rails varies from 2 to 10 . To prevent the sections from moving out, install linings in the form of brackets or stopper rods.
How to do it yourself?
The high cost of purchased models pushes craftsmen to look for alternatives.
The option made of plastic pipes, when assembled correctly, looks neat and fits into the country landscape. This design is suitable for frame pools, because... The plastic base of the tent is attached to metal pipes.
Tools and materials
The budget for a homemade dome is approximately 3,500 rubles. The manufacturing kit includes:
- PVC pipes with a diameter of 2.5 mm, a length of 4 m - from 12 to 15 pcs. (the quantity depends on the number of pool posts);
- double film 12 m long, 1.5 m wide;
- pipe clips;
- plastic clamps;
- star structure of 12-15 metal pipes with a diameter of 15-20 mm.
If you don’t have a welding machine, you can make a “snowflake” out of pipes like this: cut the hollow tubes into pieces, flatten them in the middle, drill them and connect them with a bolt.
(function (w) { function start() { w.removeEventListener("YaMarketAffiliateLoad", start); w.YaMarketAffiliate.createWidget({type:"models", containerId:"marketWidget", fallback:false, params:{clid: 2378357, vid:"902″, searchText:"dome for frame pool", themeId:1 } }); } w.YaMarketAffiliate ? start() : w.addEventListener("YaMarketAffiliateLoad", start); })(window);
Process of creation
Operating procedure:
- Pass the plastic pipe from the inside into the technological hole, which is provided for assembling the metal base of the pool.
- Secure each pipe to a metal support using clamps at the top and bottom.
- Place a ladder in the center of the pool bowl and place the pipes one by one on the rays of the metal “snowflake”. To avoid damaging the bottom, you need to use the ladder that comes with the pool.
- Cut the film in half and lengthwise. The result will be 2 cuts 6 m long and 3 m wide.
- Connect 2 pieces of film along the long side using a stapler or solder with an iron.
- Attach the film with clips to the pipes. The resulting folds need to be placed in the fastening points with clips, then the structure will look neat.
- Make an entrance hole. The distance between the 2 vertical cuts should be greater than the width of the stairs. Select the height individually.
To prevent insects from getting inside the shelter, you can make an overlapping “door” from an additional piece of film.