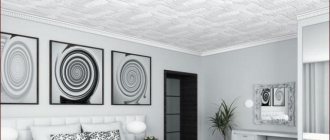
The times when beams on the ceiling were exclusively in rural houses are long gone. In addition, it is worth noting that today they perform not only the role of support for the roof, but also a decorative function. It is because of the latter that many people prefer to install decorative beams not only in country houses, but also in city apartments. They will look original and unusual, but only if they are played correctly. We will tell you in this article exactly how to decorate beams on the ceiling in an apartment or an old house.
Decorative beams
To complement the interior, it is absolutely not necessary to redo the roof and undertake expensive repairs; it will be enough to buy decorative beams and install them on the ceiling. In a specialized store you can find three types of beams:
- wooden;
- metal;
- made of polyurethane.
The classic option is wooden beams for the ceiling. They are made from ash, pine and oak. They can be solid or hollow inside, which will allow you to hide various communications.
Made from polyurethane
Previously, beams were masked, but now designers include them in the interior of various rooms, where they fit organically. It can be:
- kitchen;
- living room;
- bedroom;
- cabinet;
- corridor.
You can zone the room
Another original solution would be zoning the room. This is especially true for a studio apartment or a country house with large rooms. It is enough to correctly position the beams on the ceiling. If we consider the styles in which wooden decorative elements occupy a leading position, then we can highlight:
- Scandinavian;
- rustic;
- country;
- eco;
- Provence;
- Mediterranean.
Chandeliers with chains can be mounted on beams
You can also attach lamps or chandeliers with chains to the beams.
What is needed to repair a wooden ceiling?
Repairing a wooden ceiling is done with your own hands using tools familiar to every owner. Expensive and professional ones are not required. To work with wood you need:
- screwdriver (preferably battery-powered);
- jigsaw;
- plane (it is better to have an electric one);
- screwdrivers;
- hammer;
- wood hacksaw;
- mount;
- pliers.
If the renovation is large-scale and the ceiling is covered with planed boards, a surface thicknesser . Using this tool, all structural elements are aligned so that they have the correct geometric shape and are the same size .
In the case of wooden ceilings, this will greatly simplify the work. By running the boards through a thicknesser, a thin layer of shavings is removed from them, and they become as good as new. But those that do not have cracks or holes from fallen knots . After disassembling the structure, you can always find wood suitable for reassembly. This will help significantly save on lumber.
Design Features
Brushing
When planning the interior, you need to pay attention to all the details, even the most insignificant ones. When it comes to beams, there are several options: to beat the entire surface or to decorate it partially, making strict structures. You can lay beams in a wide variety of ways, relying on your own taste and discretion, so you shouldn’t be limited by the rules.
Aging
There are several current ways to finish wood beams on the ceiling:
- Brushing. This technology will highlight the wood texture. Masters even imitate marks from the bark beetle. As a result, the beams are transformed beyond recognition, and outwardly it will seem that the residents are in an old house that is more than 200 years old.
- Fire treatment. This is a technology for artificial aging of wood. For this method you will need a blowtorch and special brushes.
- Vintage style. You can make a ceiling with load-bearing beams look like an old one using special paints and varnishes.
- Ethnic style. It is necessary to include forged elements and twine in the interior.
- Traditional style. A distinctive feature is simplicity, this is what allows you to create an atmosphere of comfort and warmth.
Triangular Beam Designs
Some designs involve transitions from ceilings to walls. At the same time, beams can give a refined European style to the room.
Advantages and disadvantages
A ceiling structure based on wooden slats has a number of advantages:
- excellent thermal insulation and sound absorption properties;
- a wide variety of options for installing ceiling finishes, which expands the possibilities when choosing the required design solution;
- low cost of the source material and its environmental friendliness, as well as the ability to improve the microclimate in a residential area;
- ease of installation of lightweight and small-sized slats and durability of the ceiling covering obtained from them.
Wood material attracts home owners with the ability to give the surface being formed the desired shade, emphasizing the structure of the workpieces used. To realize the benefits of wooden planks, special paint and varnish coatings will be required.
Before proceeding with the installation of the ceiling, it is necessary to take into account its disadvantages, which are manifested in the following:
- wooden slats on the ceiling perfectly absorb moisture, which negatively affects the durability of the material used. To avoid the appearance of mold and mildew, it is necessary to pre-treat it with an antiseptic composition;
- wood is a fire-hazardous building material that requires additional treatment with special fire retardants - fire retardants;
- the lathing for slats somewhat reduces the height of the room, which limits the scope of application of this finishing option (it is not suitable for small rooms).
Under the influence of moist fumes, which are always observed in residential spaces, wood can be arbitrarily deformed. For this reason, before fastening, wooden planks should be treated with special moisture-repellent compounds.
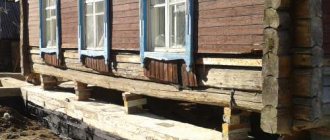
In an old house
Quite often, in country houses that are used seasonally (in summer), the finishing quickly deteriorates and loses its attractive appearance. This happens especially often in a wooden house, since the wood is exposed to moisture and dampness. To return the beams to a presentable appearance, you can:
- dismantle old beams and install false beams made of polyurethane (this material imitates the texture of wood well);
- decorate the structure with ropes, creating an interior in a marine style;
- hide imperfections on the surface with paint or varnish;
- if the defects are too obvious, putty and prime the surface, after which paint should be applied;
- not just paint the beams, but also paint them manually or using stencils.
Can be painted or varnished
There are also several recommendations regarding the interior style of the room. For example, the high-tech style goes well with metallic shades; wires that are not hidden and simple light bulbs for lighting will add originality. If we talk about country or Provence style, then a whitewashed ceiling against a background of bright beams would be most appropriate.
When painting beams, it is not necessary to give preference to natural (brown) and pastel shades. By choosing bright colors, you can get a bright accent on the ceiling.
The management authority must carry out routine repairs of common property regardless of the need for major repairs
The cornice is part of the common property of an apartment building, which must be maintained in proper condition: to ensure compliance with the reliability and safety characteristics of the apartment building, safety for the life and health of citizens, and the safety of their property (clause 10 of RF PP No. 491).
After signing a management agreement with the owners of the premises, the management organization is responsible for the condition of the common property, including responsibility for its improper maintenance and failure to eliminate violations and damage (Part 2 of Article 162 of the Housing Code of the Russian Federation).
Clause 4.6.1.2 of Rules No. 170 imposes on the management organization the responsibility to eliminate deformation in roof load-bearing structures. The eaves of a house are a roof element that affects the insulation and strength of the roof; it protects the walls of the house from moisture.
The court did not accept the management organization’s argument that major work was needed to repair this element as a basis for declaring the order of the State Housing Inspectorate body illegal. The agency demanded that the management organization eliminate the violations, but the organization decides for itself how to comply with the order.
The need for major repairs in itself is not a circumstance that excludes the obligation to maintain the common property of the house in proper condition and carry out routine repairs. This position coincides with the conclusions of other courts in similar cases, for example, No. A17-6634/2017.
The fact that the house is included in the short-term capital repair plan does not relieve the MA from its obligations to properly maintain the common property of the house in order to ensure safe and favorable living conditions.
Masking a concrete beam
Now let's look at the basic methods of how you can beat the beams on the ceiling in a house in different situations.
Used for hanging dishes
Beams in the kitchen. In this case, you can proceed as follows: the beams are lowered below the ceiling level and fixed in a stationary state. The structure is secured with hooks on which you can hang dishes, kitchen utensils, food (garlic, onions or hot peppers), aromatic herbs, dried flowers and much more. This will look especially good in a house with high ceilings.
Attaching a hanging chair
If the beam is in good condition, then you can attach a hanging chair or swing to it. They will fit perfectly into the living room interior. It is important to remember that if we are talking about imitation, then this option is unacceptable.
Beams with spotlights
Lighting system. In this case, you place antique-style lamps; for example, a chandelier in the form of a wheel with light sources in the form of candles will look original in a large hall. You can also abandon the central light source and use spotlights that are mounted on all beams or through one.- LED Strip Light. This is a chic and modern option. LED strips are mounted at the junction of the beam and ceiling to make them less noticeable. This way you can get the effect of a ceiling floating in the air.
- False beams. When one or more elements have lost their attractiveness and their structure is completely destroyed, you can replace them with cheaper polyurethane analogues. They imitate the structure of wood well.
- Textile. When it comes to decorating the ceiling in the bedroom, beams can be used to form a canopy. The most common options are suitable here: cornice, rings and ropes. The material can be hung in a chaotic manner or in a planned pattern, for example, around a bed. This method will add a feeling of lightness, weightlessness and romance.
- Decoration with rope. If other options cannot be implemented, then decorative ropes can be secured along the contour of the concrete beam.
Illuminated by LED strip
The option of installing LED strips is suitable for a modern style or for a teenager’s room.
What to do if you can’t disguise a concrete beam? In this case, you should make a suspended structure from plasterboard or stretch ceiling. You can make a box in the shape of the letter “P” from drywall. Such a box should be fixed directly to the ceiling and adjacent wall. It is not recommended to drill into the beam, as it may lose its technical characteristics.
Moreover, if the concrete beam is located vertically, then this disadvantage can be turned into an advantage. For example, make a built-in wardrobe. This will completely hide the existing beam while creating plenty of storage space.
Manufacturing technology
Before installing the slatted ceiling, it is necessary to prepare the wood and protect the products from the negative effects of moisture. To do this, all slats are treated with antiseptic compounds. After this, your ceiling will be reliably protected from rot and mold.
Tools and materials for work
To make a ceiling from wooden slats with your own hands, stock up on the following materials and tools:
- perforator;
- screwdriver;
- construction level (water or laser);
- tape measure, pencil, ruler;
- wooden slats;
- wires;
- lighting;
- self-tapping screws;
- stringers for suspended rack structures;
Surface preparation
The surface of the base ceiling does not require special preparation, leveling or cleaning. The old coating is removed only if there is a risk of it falling off. If you are making an open slatted ceiling, then the old ceiling should be thoroughly cleaned of the previous finish and plastered. The plastered ceiling is painted to give it an aesthetic appearance.
Step-by-step installation instructions
The installation sequence for the slatted ceiling is as follows:
- Measure the height of the room and decide on the mark at which the suspended ceiling will be installed. If you plan to install spotlights, then the distance from the base surface should be at least 1 cm greater than the height of the spot.
- In the lowest corner of the room we mark the installation point for the suspended ceiling. Using a level, we transfer this mark to other corners. We connect all the marks with lines.
- Using the marks on the walls, we attach the wall profile for the suspended ceiling. The installation step of fasteners is 30-40 cm.
- After this, we install stringers for the slatted ceiling structure. The pitch of the stringers is 80 cm. We retreat from the wall by 20 cm. The stringers are mounted in the wall corners and secured with hangers that regulate the installation height of the sheathing.
- We lay electrical cables in special channels. They are attached to the ceiling surface.
- Next, we attach the wooden strips to the stringer clamps using special locks. If necessary, we install decorative inserts in the gaps between the slats.
Full or partial camouflage
Quite often, owners decide to completely hide the beams from view, but you can only close the space between the beams by making a ceiling. In this case, the following types of ceilings and materials are used:
- tension;
- plasterboard;
- caisson;
- lining.
Coffered ceiling
The most expensive and sophisticated is the coffered ceiling. In addition to beams, this design involves the creation of other elements, for example, cells, recesses and cornices. The cassettes can be of any shape:
- polygon;
- rhombus;
- square.
Using partial masking, you can hide flaws and defects on the ceiling and at the same time leave beams in the interior of the room.
If your home has ceiling beams, then getting rid of them would be the worst decision. After all, you can add zest to the interior of a room with minimal financial and time costs, just by correctly playing with the existing design features.
Recommendations for carrying out repair work
If you decide to cover the ceiling with clapboard, the first thing you need to do is choose the right type of wood and type of profile . There are only three standardized grades: A, B and C. If financial capabilities do not allow you to buy the first grade (A), you can choose the second (B). They differ mainly in the number and size of knots.
There are lumber manufacturers who offer “Extra” . You should know that this variety is not included in the state standard. It (the grade) was invented by manufacturers in order to sell high-quality lumber that does not meet the requirements of the first grade.
It is recommended to choose wood with a low degree of resin content . For an economy option, the best choice is spruce. This lining is distinguished by its light color, beautiful texture and durability. Spruce boards have much fewer knots than other coniferous trees.
Nuances
The effectiveness of sound insulation depends on the correct selection of materials, compliance with installation features, and adherence to basic rules. Among the latter are:
- The insulation should not place excessive load on the floors, but should be reliable and effective.
- To avoid violations of the hygiene of premises, environmentally friendly materials are installed. Low quality insulation affects the comfort of staying in the room.
- Achieving this goal is possible only if the sound insulation installation technology is followed. Neglecting installation nuances can affect the quality of noise absorption.
Assessing the feasibility of sound insulation, competent selection of materials, and correct installation guarantee effective protection of a house with wooden floors from unwanted background noise.