The cost of heating a private home forces owners to be more attentive and careful about the heat-saving capabilities of their housing. Thermal energy leaks most often occur through the floor on the first floor. However, costs can be reduced if the necessary measures are taken and thermal insulation is installed. Before insulating the floor in a wooden house, you should choose a suitable installation method and insulation to be installed as a cut-off.
Purpose of floor insulation
In houses with wooden floors on the lower floor, a boundary is created between the cold outside and warm indoor air. Despite the fact that wood itself is a good insulator, exposure to low temperatures has a sharply negative effect on the ceiling.
A cold floor is a surface on which condensation settles. In winter, the wooden flooring gets wet and the wood begins to swell. The surface goes hump, the boards begin to stick out. When it gets warmer, the wood dries out and begins to warp. Cracks appear and the planks are pulled apart by a screw. In addition, mold and mildew appear on the underside of the decking. Over time, the boards begin to rot and require replacement.
The solution to this problem is to install a heat insulator. It forms a cut-off layer separating the heated and cold rooms. The risk of destruction of the ceiling is eliminated. In addition, thermal energy losses are reduced and fuel consumption for heating the house is reduced. It is necessary to take into account that the insulation layer can be installed both under the flooring and on top of it.
The choice of the appropriate option is determined by several factors:
- floor design;
- presence of a basement;
- type of insulation.
Before you insulate a wooden floor in a private house, you need to find out all the operating points and select the optimal type of thermal insulation.
Materials, their characteristics
In order to decide what is the best way to insulate the floor in a wooden house, you need to carefully study the properties of existing materials. There are different types of insulation on sale, each with its own physical and performance properties. Any of them can be placed under the boardwalk or installed on top of it without disassembling the old covering. Let's look at the most popular options:
Expanded clay
Bulk material in the form of round granules. Made from baked clay. It has a porous structure, but the surface of each pellet is covered with a sealed film of melt. The main advantage of expanded clay is its durability. The backfill layer can be used several times on different objects, and the material will not lose its qualities. In addition, the advantages of insulation are considered:
- light weight. Due to the porous structure, the mass of the granules is small. This eliminates unnecessary load on supporting structures even when creating a thick layer of insulation;
- low thermal conductivity;
- resistance to temperature changes;
- expanded clay does not burn;
- strength, resistance to mechanical loads;
- installation is not difficult and can be easily done with your own hands.
To install, you just need to fill in a lot of material and level the surface, giving the layer the same thickness. However, to obtain the desired effect, a fairly large backfill thickness is required - experts recommend laying a layer of insulation of at least 25-30 cm. In addition, you need to monitor the condition of the granules. They themselves are sealed and not afraid of moisture, but the water that penetrates into the thickness does not dry out for a long time.
Mineral wool
A popular and sought-after insulation material used everywhere. Mineral wool is the collective name for a group of materials that consists of:
- stone (basalt) wool;
- glass wool;
- slag, etc.
Most often, basalt wool is used, which has the most successful set of qualities. Advantages of mineral wool:
- high thermal insulation qualities;
- light weight;
- resistance to fire or high temperatures;
- There are roll and slab forms of the material, expanding the choice;
- durability.
However, there are also disadvantages:
- the ability to absorb moisture, after which the insulation significantly changes its qualities;
- Support structures are required for installation, which complicates the insulation process.
During installation, the mineral wool has to be cut off on both sides from possible contact with steam or liquid water. For this, a waterproofing film is used. The waterproofing layer creates an additional operation during installation, but it cannot be excluded from the technological process. Wet mineral wool ceases to be a heat insulator and begins to destroy all structures with which it is in contact.
Penoplex
The technical name of this insulation is extruded polystyrene foam. It is a frozen mass, similar in texture to polyurethane foam. Has high performance qualities. Advantages of penoplex:
- complete impermeability to moisture in any form;
- low thermal conductivity, the ability to create a thermal cutoff even with a small layer thickness;
- light weight;
- does not support combustion;
- durability.
A distinctive feature of penoplex is its rigidity. Installation can be performed either with additional supporting elements or with a solid sheet. The only drawback is considered to be the relatively high price, although today the cost of penoplex is noticeably lower than several years ago.
Sawdust
Sawmill waste can be purchased for literally pennies. They are often given away for free, just so that the surplus can be taken away. Cheapness attracts some owners of wooden houses who try to insulate the floor in this way. However, this option has noticeable disadvantages:
- instability to moisture;
- the ability to rot, rot, the possibility of mold or mildew;
- sawdust may harbor insects or rodents;
- the material cakes and loses its qualities.
To compensate for these shortcomings, sawdust is mixed with lime, clay or cement mortar. Installation is simple - a thick layer is poured onto the wooden floor and the surface is leveled. Sometimes slabs are made consisting of cement mortar and a large amount of sawdust. The briquettes are laid tightly, without cracks or gaps, forming a continuous sheet. The overall effect of using sawdust is low, so in today's practice this option is quite rare.
Mineral wool - fiber insulator
Mineral wool is a building insulation material consisting of many fibers, presented in three separate types: glass; stone or basalt; slags For working with the floor, basalt cloth is preferable, because... it is easiest to install under the floor structure. Of the two options - rolled and mats in the form of slabs - choose the second one, because... it holds its shape well. Advantages:
- good level of thermal insulation;
- simple installation technology;
- relatively low level of perception of moisture from the environment;
- reasonable price;
- heat resistance and fire safety;
- The material does not harbor bacteria, mold or mildew.
Flaws:
- When laying with your own hands, you must use special protection - gloves, clothing, a respirator, glasses, because... there will be many particles of fibers and dust in the air, causing irritation to the skin and respiratory system;
- protection from moisture is required, because the structure is susceptible to vapor absorption;
- If installed incorrectly, severe shrinkage may occur;
- when laying between the joists, you need to leave a gap of 5 centimeters to the main structure.
Floor insulation with mineral
wool If you decide to choose mineral fiber, select the material of the required thickness. Specific data depend on the climatic zone, for example, for central Russia, an indicator of 100-150 millimeters is suitable. Basalt wool is suitable for all types of floors, including attics.
Insulation forms
All existing types of insulation can be divided into groups based on the shape of the material. Each of them has its own advantages in certain conditions. Let's take a closer look at them:
Liquid heat insulator
Liquid thermal insulation is a material that is applied by pouring or spraying. In air they harden or (more often) foam, forming a continuous sealed canvas. The disadvantage of such materials is the need to use special equipment. However, there is an important advantage - liquid materials can be applied to any surface with a large number of small parts, potholes or other flaws. In any case, the coating will be smooth and airtight. In addition, the thickness of the layer is relatively small and does not create excessive load on the supporting structures.
Main stages of work
Insulation of a wooden floor in a private house is carried out in stages. You need to do the following:
- carry out an inspection of the condition of the subfloor and supporting structures (lag);
- choose a method of insulation, decide which insulation is best to use;
- purchase the necessary materials and equipment;
- carry out preparatory work;
- install waterproofing, insulation and related materials on the subfloor;
- lay a layer of sheathing and a finished floor covering on the floor.
The main task is the correct choice of installation method and insulation. If the house uses an old floor, you need to decide whether it can be continued to be used, or whether a complete replacement of the floor is needed. In addition, you need to determine the direction of installation - from below or from above. All subsequent actions depend on what decisions are made.
Installation technology - how to preserve heat quickly and efficiently?
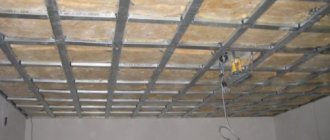
Mineral wool and polystyrene foam, in the form of slabs, are installed on the “underside” of the floor from the basement side using the same technology. Attach bars with a cross-section from 50 to 100 millimeters to the rack-beams from below. Place a layer of thermal insulation material on top, like on shelves. The beams should be located under the “top” floor at such a distance that there are a few centimeters between it and the top surface for ventilation. Hem the bottom of the heat-insulating “pie” with boards, apply waterproofing to prevent vapors from penetrating into the material from the basement.
Installation of floor insulation
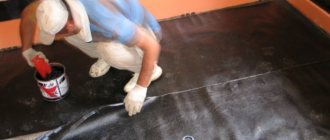
The waterproofing function can be performed by ordinary polyethylene film - this is the cheapest and most convenient option. A moisture-proof membrane will cost more - it is stronger and does not prevent air movement, unlike cellophane. In order for the materials to last longer, the top surface of the main thermal insulation will need to be covered with film. The order of all layers from top to bottom will be as follows:
- flooring;
- concrete screed or expanded clay;
- overlap;
- vapor barrier from the side of the room;
- a layer of mineral wool or foam;
- waterproofing from the basement;
- holding boards.
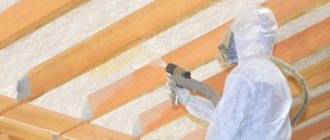
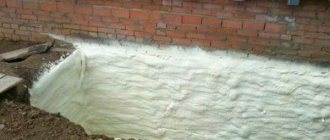
The application of polyurethane foam is carried out on a specially prepared floor surface; it is necessary to remove dust and debris from it and make sure that it is completely dry and free of grease. Foam does not adhere to polyethylene and fatty compounds. The procedure can be carried out at temperatures above 10 degrees, otherwise the material will not stick to the ceiling as it should.
To work, you will need a high-pressure apparatus - it is very expensive to buy, you can rent it from specialized companies. It is connected to two containers with the first and second components. When you press the start button, the compounds are combined in a vortex chamber, then they are sprayed in the form of a small and light mass. The pressure in the car must be at least 140 atmospheres. When choosing equipment, pay attention to the current source - the required one must match your home network.
Apply polyurethane foam evenly, after putting on protective equipment - goggles, respirator, gloves. The procedure to perform it by a professional takes about an hour, if you are confident in your abilities, you can try it yourself, but it will take more time due to insufficient experience. Apply polyurethane foam not only to the space between the joists, but also to the joists themselves - this will protect them from rising steam from the ground.
After applying a layer of about 10 centimeters, turn off the device and leave the room to dry. Complete hardening of the material and its ideal adhesion is achieved in two days. There is no need to specially treat the bottom layer, because it is not exposed to moisture and holds well to the top of the floor.
Features of insulation
Before insulating the floor of a wooden house, it is necessary to find out the specifics of the location of the ceiling. The technology for performing the work depends on the type of foundation, the design of the basement level and the presence of a basement. It is most convenient to install the heat insulator from inside the room, i.e. above. However, this method is not suitable for all floors. If you act without opening the old flooring, the floor level will rise noticeably. The doors will no longer open and all units will need to be reinstalled.
Before insulating the floor in a wooden house without dismantling the floor, you should walk around the entire floor and draw up a diagram indicating openings, stairs and other elements adjacent to the ceiling. If there are too many of them, it is easier to find another installation option.
Let's look at how to insulate floors in a wooden house with different types of subfloors. For each method, brief step-by-step instructions will be provided:
Above the cellar
For floor insulation in a house with an unheated basement, two options are suitable:
- installing a layer of insulation from below, on the ceiling of the cellar;
- laying the material on the floor from above.
The choice of the desired option is made based on ease of use. The effectiveness of the result in both cases is approximately the same and depends on the properties of the selected material. Procedure for installation from below:
- preparation of the ceiling surface. Cleaning, removing foreign objects - lamps, hooks, brackets;
- slats 1.5-2 cm thick are stuffed onto the ceiling. A continuous sheet of waterproofing film is installed on top. The strips are laid with an overlap of 10-15 cm and taped with special tape. The canvas is attached to the slats using a stapler;
- installation of sheathing. This is a system of strips, the thickness of which is slightly greater than the size of the insulation. The distance between the planks (sheathing pitch) must be equal to the width of the slabs or rolls;
- Insulation is installed between the slats. It is recommended to use slab material that is rigid and easy to work with from below. Installation is carried out as tightly as possible, without gaps or cracks. If they appear, they are immediately filled with polyurethane foam;
- installation of a second layer of waterproofing. It is attached in the same way to the sheathing strips;
- covering the ceiling slab with sheet materials - plywood, OSB, chipboard or the like.
It is necessary to ensure complete insulation of the insulation using two layers of film. If air comes in from outside, the insulation will gradually become wet and stop working.
With low underground
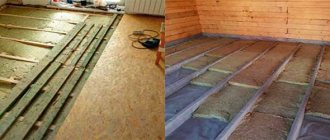
If the house has a low underground floor, you will have to think about how to insulate the floor in a wooden house without dismantling the floor. This method is best implemented using thin and moisture-proof materials - isolon or penofol. In order to be able to walk on the floor without compromising the integrity of the insulation, a hard floor covering such as laminate will need to be installed on top.
Before insulating wooden floors in a private house over boards, you will need to prepare the surface. Procedure:
- removal of floor covering and all foreign elements. Sealing cracks and gaps (if any);
- installation of the support system. These are wooden planks arranged so that the insulation fits tightly between them. Their thickness should be slightly greater than that of the insulation;
- laying roll insulation;
- the entire floor area is covered with sheet materials (plywood, OSB, etc.);
- laying the underlay and laminate layer
Step-by-step instruction
The insulation is placed between the joists.
Before starting repairs, you need to draw up a competent diagram. It will help you complete the job accurately and in the required sequence.
Step-by-step instructions for insulation:
- Laying rough boards on the joists. They will be the basis and support for all subsequent layers. The cracks are sealed with polyurethane foam or tape.
- Laying a vapor-permeable membrane. It is necessary to remove moisture generated in the room. The fabric is fastened using a manual stapler with 6 mm staples.
- Creating a frame. The height of its walls should correspond to the thickness of the insulation. If mortar or bulk material is used, its layer must be at least 20 cm.
- Installation of thermal insulation. This procedure is performed in accordance with technology that is valid for each type of material. You should pay attention to the absence of cracks.
- Installation of waterproofing. For this purpose, fabrics that conduct moisture in one direction are best suited. The strips are overlapped with an overlap of 15-20 cm. The joints are fixed with tape.
- Laying the finished floor. The choice is determined by the type of finish. For linoleum, parquet and carpet, it is better to take inexpensive sheets of waterproof plywood 16-25 mm thick. Solid boards can be laid directly on the frame. In this case, you should take slats with selected edges so that there are no through gaps in the surface.
Since the main advantage of a wooden structure is its ventilation qualities, the finishing coating must be selected in a similar manner.
Possible mistakes
Often, insulating the floor in a private house with your own hands does not give the expected effect. The reason for this is errors made by the owner during the preparation or installation of the cutoff. Among them are:
- misunderstanding of the meaning of the entire procedure. Most users are sure that floor insulation is done in order to increase the air temperature. People do not know that the main task is to prevent condensation;
- installation of hygroscopic materials without a waterproofing cocoon. In a fairly short time, instead of insulation, you get mold, mildew and bad odors from under the floor;
- Insulation of a wooden floor in a private house must be combined with the organization of high-quality air exchange. Otherwise, water vapor, which is in excess in the atmosphere of residential premises, will be absorbed into other surfaces;
- It is important to choose the right way to insulate the floor, take into account the design features of the basement or plinth, and other factors. Mistakes at the preparation stage are extremely difficult to correct later.
It is not difficult to insulate a wooden floor in a private house with your own hands. The main thing is to understand the physical meaning of this event and follow the rules for using the selected heat insulator. Then the result will be a long service life of the ceiling and a reduction in the cost of heating the home.
Formation of products
An integral characteristic of high-quality insulation of a wooden house is ventilation of the lower point of the “pie”, a ventilation system for the underground space. The better the ventilation scheme is thought out, the better the insulation and logs are protected from waterlogging as a result of condensation (dew point)
Ventilation also prevents radon gas, which is harmful to human health, from accumulating under the house.
The area of the underground vents is 1/400 of the total underground area. For example, to make proper insulation with your own hands for a house of 100 square meters. m., you will need 14 ventilation pipes with a diameter of 150 mm.
It is advisable to make a foundation at least 40 cm high for better ventilation. Additional moisture insulation is achieved by laying a vapor barrier on the open ground under the house and sprinkling it with a 100 mm layer of sand.