Residents of private houses often get very cold in winter. After all, heat escapes through windows and doorways, cracks in the floor, as well as walls. To solve this problem, mineral wool for insulating the ceiling helps a lot.
Below in the article a video of do-it-yourself ceiling insulation with mineral wool is published, as well as the main nuances of installing this building material.
Selection of mineral wool
Among materials for insulation, mineral wool is in increasingly growing demand. This is no coincidence. Let's start with the fact that this is an environmentally friendly material, safe for the environment and humans. Mineral wool has a high heat retention class, absorbs sounds well, is not afraid of rotting, open fire, and is not interesting to rodents and insects. Increased elasticity and dimensional stability predetermine easy installation without fasteners. Mineral wool does not break, crumble, or slide over time, providing reliable thermal protection for up to 50 years.
These characteristics are fully inherent in insulation based on Izover Profi mineral wool. It consists of long slabs in rolls, which are equally suitable for the entire house - ceiling, walls, flat (in frame structures) and pitched roofs (attics), balconies, interior partitions, ceilings above the basement. The improved thermal conductivity coefficient (0.037) will save up to 67% on heating costs when compared with uninsulated spaces. As is known, ordinary mineral wool suffers even when slightly wet - drops of water displace air from the fibers and are difficult to weather, which can lead to a decrease in thermal insulation properties over time. Thanks to the special AquaProtect technology, Izover Profi repels water well and dries much faster due to optimal vapor permeability.
Insulation with mineral wool
Buy at isover market
A nice bonus is savings on transportation and storage due to the increased compression ratio in the packaging - it can be easily loaded into a passenger car, taking up 3 times less space compared to conventional basalt slabs (35 sq. m Isover Pro versus 6 sq. m of ordinary mineral wool, The same amount can be placed on the roof rack if you load an Isover module from several packages there, compressed with high-strength film at the factory). We will consider insulation technology in detail below.
Features of ceiling thermal insulation with mineral wool
The stages of insulation and thickness directly depend on which ceiling needs to be insulated: under a heated or unheated room, in contact with external cold (in the attic, attic). In addition, the climatic zone of the region and the building structure (floors, walls) are important. Taking these parameters into account, before calculating the cost of mineral wool insulation, its thickness is selected.
Insulation thickness
For a ceiling inside a heated building, as a rule, 50-100 mm is sufficient, and if the ceiling is directly adjacent to a cold attic or roof covering with a slight slope, it is better to focus on 150-250 mm. In the northern region, this figure will have to be increased to 2 times, but in any case, before making the final choice, you need to check whether the planned insulation thickness meets the requirements of your region (in the next section we will look at how this can be done). In the case of reinforced concrete floors, the recommended value is at least 100-150 mm. The Izover Profi packaging contains two slabs, each 50 mm thick, 1220 mm wide, 4100 mm long, which will allow you to vary the degree of thermal protection at your destination based on one product. There is Izover Profi, already cut in half during production: the package contains 4 long slabs 610 x 4100 x 50 mm.
The Isover smart calculator will help you calculate the quantity and required thickness of the material that is optimal for insulating your home.
Material calculation
The peculiarity of the calculator is that it will help you calculate the required amount of insulation, and at the same time the benefits that await you in the short and long term. You only need to fill in the design parameters of the house, its location (region), heating source, and comfortable temperature. As a result, you will receive a detailed calculation of the cost of thermal insulation and how you will save on heating (monthly and annually) and how quickly you will recoup the costs. For example, just by changing the thickness of mineral wool, you can increase the energy efficiency and comfort of staying in your home: from class B with a layer of 50-150 mm (comfort in the off-season, protection from overheating in summer) to the highest class A+++ (at 200 -250 mm), adopted in Norway and Finland for permanent residence and allowing to minimize heating costs. Using the Isover calculator you can easily calculate the thermal insulation of floors, walls, roofs, ceilings, as well as apartments and balconies. In this case, the calculator will redirect you to the online aggregator, where you can place an order from the official distributor.
Benefits of using mineral wool
When choosing insulation for a residential property, first of all, you need it to be an environmentally friendly, durable and fire-resistant material. The range of heat insulators on the market is huge, but mineral wool meets all of the above requirements. It is ideal for insulating ceilings, walls, flooring and loggias.
Before insulating the ceiling in a house with mineral wool, you need to take into account its main advantages:
- environmentally friendly material that does not emit harmful components;
- insects and rodents do not settle in cotton wool;
- it is not subject to rotting processes;
- excellent fire resistance;
- excellent heat and sound insulation qualities;
- affordable price, so it is available to all categories of consumers.
There are also disadvantages. If you choose stone wool or mineral wool for the ceiling, you need to take into account that these heat insulators strongly absorb moisture, and when they get wet, they will lose their original qualities.
In this case, it all depends on how correctly the installation was done. If the ceiling is improperly insulated with mineral wool in a private house or apartment, it loses up to 40% of its thermal insulation properties during the first year of operation. Therefore, it is important to know how to attach insulation to the ceiling so that you don’t have to redo everything later.
If you use a device called a thermal imager, you can easily and clearly determine whether the thermal insulation is done correctly and whether the installed insulation has already sagged. If the mineral wool has lost its qualities, all heat loss will be shown on the screen in red.
Among the wide range, it is not easy to determine which mineral wool is better for the ceiling in an apartment, and which one is better for insulating a private house. In fact, the easiest way to navigate is by taking into account the type of packaging and layer thickness. Mineral wool in cylinders is used for thermal insulation of ventilation pipes, mats are used for external insulation of foundations and floors in basements, and for residential properties, rolls are the best choice.
As for the required thickness of mineral insulation, it will be different for private houses and apartments. In the first case, this figure should be at least 15 centimeters. For apartments, the thickness of mineral wool for ceiling insulation can be only 5 centimeters, but the material must be purchased with greater density.
Ceiling insulation technology
How to insulate a ceiling correctly? The process of thermal insulation of a ceiling in a wooden house consists of three main stages.
Waterproofing
Since wooden floors and the insulation itself can be damaged by moisture, it is first necessary to prevent their contact with water. To do this, all wooden surfaces are first treated with an antiseptic or a complex fire-bioprotective composition with mandatory drying. Then a vapor-permeable barrier is created under the roof - it will become waterproofing, which, without letting in drops of water from condensation or possible leaks, should freely release steam into a ventilated gap of 40-50 mm. Thus, wind-hydroprotection Izover Vetranet (AM), thanks to its three-layer structure, will reliably protect the structure from external moisture, the building from heat loss (blowing), and will not allow condensation to accumulate due to a special “breathable” membrane between the two protective layers. If you are sure that the roof will be used in a cold version (that is, the attic space is low, suitable only for storage), then you can use Isover Hydranet (D) vapor barrier as a moisture barrier, but do not forget about sufficient ventilation and a high-quality vapor barrier installed with sides of the lower warm floor. If you plan to insulate the roof in the future, then vapor-waterproofing (D) will not suit you and can cause harm; for waterproofing a warm roof, it is permissible to use only a “breathing” membrane - Vetranet (AM). It is waterproof and will last at least 50 years. The roll rolls out from left to right. Laying is carried out from below with an overlap (10-15 cm), a construction stapler will be useful. Easy cutting is ensured by convenient factory markings. To prevent water from leaking in, the joints are sealed with specialized adhesive tapes.
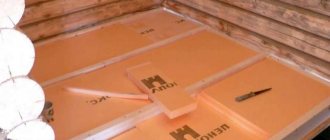
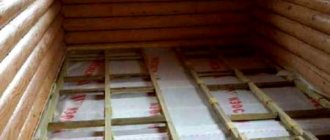
Laying mineral wool
Izover Profi in the 610 by 4100 mm format is ready for installation with a standard frame pitch of 600 mm in clearance. When choosing a product with a width of 1200 mm, you will need to cut the roll in half or to the desired dimensions. With a standard beam spacing, installation does not require fasteners - the long slab stands securely in place without cold bridges for at least 50 years. The product is produced in thicknesses of 100 mm or 50 mm (in a package there are either 2 or 4 slabs), allowing you to change the number of layers depending on the location of the ceiling - under a heated room or under the roof. A prerequisite for proper installation is that the width of the slab should be 1-2 cm wider than the pitch of the rafters/beams. Then it will not sag or, conversely, will not be overly compressed. Long slabs mean fewer gaps, joints, and cracks (after all, they increase heat loss by up to 50%). If necessary, the slabs are cut into the required sheets with a knife with a blade length of 15 cm. As a result, insulating the ceiling with Izover Profi mineral wool will take 2 times less time than installing conventional basalt slabs. And its installation can be carried out by one person per work shift.
Vapor barrier
The ceiling is the most vulnerable place to moisture, because this is where all the steam in the room accumulates. Moisture, as we already know, negatively affects the heat-shielding properties of mineral wool, and the structure itself as a whole. Therefore, after installing thermal insulation, reliable insulation technology requires a sealed vapor barrier layer. The Izover Paranet membrane serves these purposes. It is placed overlapping (10-15 cm), completely covering the mineral wool, attached to the rafters with a construction stapler, and then fixed with pressure bars. The joints are sealed (glued) with special adhesive tape Isover Paranet (CL). As a result, the ceiling will be protected from moisture, as well as from the possible formation of mold and mildew.
Please note that insulation with mineral wool should begin on the side farthest from the exit. Gradually move towards the door. Try to avoid gaps, cracks, and a large number of joints. Bends and pinching are fraught with a decrease in the working thickness of the thermal insulation layer, which can lead to heat loss and further freezing of the structure.
Which ceiling insulation to choose
Glass wool has fibers no more than 14 microns thick. These are tiny glass needles. The main qualities inherent in this type are increased strength and elasticity. It is important to remember that when working with glass wool, it is necessary to use personal protective equipment - a glove, a mask, thick clothing, since glass fiber particles, when they get on the skin, cause irritation.
Another advantage of glass wool is that it can withstand very high (up to 450 degrees) and low (up to 50 degrees) temperatures due to its good thermal conductivity coefficient.
Slag wool is made from blast furnace slag, the maximum fiber thickness of which is no more than 20 microns, and the length is 1.5 mm.
Slag is unstable in an acidic environment, so its use on metal surfaces in construction is limited. The high hygroscopicity characteristic of this type does not allow the use of slag wool for insulating the facades of houses or other external elements, and its fragility does not allow it to be used for insulating pipelines and communication systems.
The maximum temperature that slag wool can withstand is 300 degrees. Increasing the heat above the specified level reduces the physical characteristics of the material. The main advantage of slag wool is that its cost is an order of magnitude lower than other mineral analogues.
Basalt (stone) mineral wool has fibers of the same length and size as slag wool. But this material does not cause allergic reactions or skin irritation and is widely known for its insulating properties. High thermal insulation properties and preservation of the declared characteristics at 1000 degrees of heat and 200 degrees of frost influence the fact that to a greater extent the insulation of ceilings is carried out with stone wool.
Basalt wool is produced in the form of rolls or slabs, which facilitates its installation and prevents deformation. Therefore, it is best to choose this type of mineral wool if you need to insulate the ceiling in a private house.
DIY ceiling insulation
There are three methods of insulation depending on the building design:
- external (from the attic or attic);
- internal (in the presence of high ceilings, since it can take away from 150 to 350 mm of the room’s height);
- combined method (used more often for baths, saunas, where exits and communication openings are provided in the ceiling).
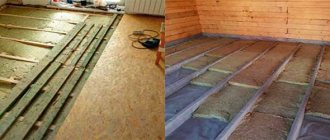
If it is necessary to insulate the space under the summer attic (cold or insufficiently insulated), and the ceiling height is small, it is better to thermally insulate not the ceiling, but the floor in the upper room (make sure in advance that the vapor barrier layer on the ceiling of the warm room is present and sealed). The process follows a pattern already familiar to us. You must first clean the floor and, if necessary, cover it hermetically with a vapor barrier (do not forget to seal the joints with special adhesive tape). Then comes the mineral wool between the additionally installed joists. On top there is a waterproofing film and a subfloor.
Tools and materials
Waterproofing film
For installation work, in addition to the insulation itself, you will need:
- waterproofing and vapor barrier film;
- plastic umbrella dowels;
- profile and hangers for it;
- wooden slats;
- self-tapping screws
Tools you will need are a sharp knife, metal scissors or a jigsaw, and a stapler.
When working with mineral wool, you need to use personal protective equipment - glasses, clothing, a respirator and gloves.
Insulation from the inside
If it is necessary to thermally insulate the ceiling with mineral wool inside the house, we proceed according to the scheme described in the previous chapter, from top to bottom: waterproofing - mineral wool - vapor barrier. Under a heated floor, a minimum layer (100-150 mm) is often sufficient, including for basic sound insulation of rooms (a greater sound insulation effect is achievable if the frame space is completely filled and both sides are covered with sheet panels - GSP and moisture-resistant plywood or OSB). Under a cold floor or attic you will have to construct a serious barrier. The order of work and materials for insulation are the same, from top to bottom: waterproofing membrane - special frame (in the absence of beams) - increased layer of mineral wool (determined by calculation) - vapor barrier on the side of the warm room. After this, the ceiling is covered with any sheet panels (for example, Aqua Strong gypsum board) - now it is ready for finishing work.