The question of how to make a shower stall in a wooden house yourself worries many residents of such a building. In order to properly arrange your shower corner in a wooden building, it is important to pay special attention to its waterproofing and ventilation system. Let's look at the technology for installing a shower in a wooden home and advise which design is best to choose.
A simpler option is a do-it-yourself shower
Premises requirements
External walls in a bathroom in a wooden house are usually load-bearing. Exposure to steam and high humidity can cause their destruction. The following requirements apply to rooms with high humidity:
- It is important to provide high protection from environmental humidity and temperature changes. To do this, all planes of the room are isolated from water. The best material to protect against moisture is a waterproofing membrane. At the junction of walls and ceiling, walls and floor, 2 layers of sealant are laid;
- you need to pay attention to the type of wood from which the walls and ceiling in the bathroom are made. Usually coniferous wood is used, as well as aspen and linden. These trees can withstand high and low temperatures and smell pleasant;
- A good ventilation system will also help stabilize the temperature in the bathroom. Circulating air in the bathroom will reduce humidity;
- it is necessary to prepare a water supply and drainage system. You can install a leak sensor.
Joining the floor to the wall in the bathroom
Moisture protection products
All materials can be divided into two categories. The first category creates a protective layer when applied to wood. The second category is compositions for impregnating wood fibers and giving them the appropriate qualities.
Waterproofing materials that protect wood from moisture:
- Rolled and sheet materials on a backing, impregnated with bitumen compounds. Based on cellulose fiber.
- Bitumen coatings.
- Polymer films, membranes.
- Polymer painting and coating compositions.
Impregnation compositions include:
- Oil impregnations. They can be produced on the basis of natural oil or on a synthetic basis;
- Varnishes, stains based on polymer resins, organic solvents, fillers;
- Hydrophobic compounds. When they are applied, a film is formed on the surface that repels water, and the surface retains the structure of the wood.
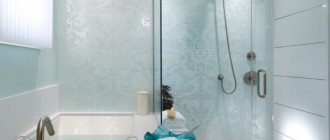
Tips for choosing a shower cabin
To properly install a shower in a wooden house with your own hands, you need to choose the appropriate model.
When choosing a cabin, look at its dimensions. The minimum size of a shower for a bathroom is 80x80 cm. A smaller design will cause a lot of inconvenience during washing. The most popular sizes are 90x90 cm and 100x100 cm, but you can take a cabin up to 170 cm long.
The shower cabin comes with or without a tray. A shower without a tray is installed for small spaces.
Option for a shower cabin with a high acrylic tray
Pallets are:
- acrylic. They have a pleasant appearance and anti-slip coating. Such pallets can withstand significant loads, are easy to clean, and are easy to transport;
- cast iron ones weigh a lot, so they are difficult to transport. When exposed to water they become slippery. The enamel may be damaged during use. The cost is high;
- steel. This is a short-lived material that bends under the weight of a heavy person.
Steel pallet - a budget solution
Shower cabins can be open or closed. Open models have no ceiling. A good ventilation system is necessary for their arrangement. The accumulated steam rises to the top, and the air in the cabin cools down.
Closed models have a ceiling and a built-in fan. With its help, the air comes out. To install this shower option, you only need to mount the drain and attach it to the walls.
Shower cabins have a movable wall. It is made from different materials.
- The best material for doors is tempered glass. It is strong, reliable, shockproof.
- Regular glass is fragile. To prevent it from breaking into small pieces from an impact, it is covered with a self-adhesive transparent film. The thickness of ordinary glass for cabin doors should not be less than 6mm.
- Acrylic and polycarbonate are also used for shower doors. The doors are framed with aluminum profiles. This is the most common option.
- The movable wall can also be in the form of a plastic curtain.
Cabin with low acrylic tray
Choice of material, shape and functionality
- The most important thing is to choose the right pallet
It can be cast iron or acrylic; we do not recommend considering other options. Cast iron will withstand any load and will last a very long time. Acrylic enjoys good recommendations from buyers and consumers. It heats up instantly and makes staying in the box comfortable; moreover, it does not deteriorate from constant contact with water, maintaining a beautiful appearance. Provided that the acrylic tray is of high quality, it will be quite wear-resistant. At the same time, it is very light, so it will not put much load on the floor and will make installation easier.
The depth of the tray is of great importance - some can easily pass for a children's bathtub. If you have children, we recommend choosing a deep tray - then a shower cabin or box can perfectly cope with the functions of a children's bathroom.
- Doors
This is also of great importance - after all, replacing parts in shower structures is quite a troublesome thing. We recommend choosing glass doors. They are quite durable, do not lose their appearance over time, do not rub off or turn yellow. Moreover, their cost is much higher than that of doors made of plastic or polystyrene.
Step-by-step instructions for installing a shower cabin with your own hands
A do-it-yourself shower cabin in a wooden house is installed in stages:
- first of all, a ventilation system is installed that will ensure the free movement of air masses, a healthy microclimate in the room, and eliminate excess moisture;
- drainage and sewerage are installed;
- comprehensive waterproofing of surfaces and shower cabins is carried out;
- a shower cabin is installed;
- the completed shower is lined with finishing materials.
When assembling the cabin, it is important to align the pallet strictly level
Materials for arranging waterproofing
For each specific building, with its own architecture and layout, specialists select the optimal waterproofing scheme for a bathroom in a wooden house. There is no universal recipe, therefore, to build effective protection, several types of insulating materials have been developed, each of which has its own advantages and disadvantages:
- Bituminous and mastic coating compositions. Waterproofing is carried out by applying viscous bitumen mastic to all main elements of wooden structures. After drying, a dense elastic layer of bitumen modified with butyl-styrene copolymer is formed;
- Deeply impregnated painting materials, most often organic-based. Apply with a spray or brush to the surface of wooden structures of the floor and walls of the building. They give the wood water-repellent properties and at the same time protect it from pathogenic microflora and insects;
- Rolled materials based on fiberglass and bitumen. Used only as an intermediate waterproofing on concrete or panel surfaces;
- Elastic membranes based on polyurethanes and polyurea. According to sanitary standards, such a coating can be used as waterproofing of any interior of a wooden house.
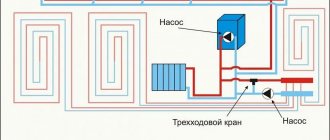
Ventilation in a log cabin bathroom
Many people believe that a full ventilation system in a wooden house is not necessary. The reason for this statement is the ability of wood to breathe and allow air to pass through micropores.
But wood not only has low thermal conductivity and high breathability, but also absorbs and releases moisture. In rooms with high humidity (bathroom, bathroom, kitchen), there is a danger of mold and mildew, and putrefactive processes that will lead to damage to the wood and destruction of the house. To prevent the appearance of pathogenic microorganisms in a log building, additional air outflow is necessary. If the house is small, then a passive ventilation system is sufficient.
Air circulation in such a system occurs due to the difference in pressure and temperature outside and inside. Cold air masses enter the house, heat up and rise upward, exiting through exhaust holes in the wall in rooms with high humidity. The exhaust pipe should extend 50 cm outward. To prevent oxygen from entering during a fire, a fire damper is installed in the ventilation shaft in the shower room. Insulating the air duct from the outside will help prevent the formation of condensation.
There are ready-made solutions for shower cabins with built-in ventilation; you just need to connect the corrugated pipe and take it outside.
To increase air exchange, use an exhaust fan.
- To do this, connect an electrical cable to the exhaust vent in the bathroom.
- Make markings for the fan.
- Mark the places where it will be attached to the wall.
- Drill holes for dowels.
- Attach the device body to the wall.
- Connect it to the cable.
- Close with a lid.
Sewerage
A wooden house shrinks, so when choosing water supply and sewerage pipes, you should pay attention to the material from which they are made. It must be wear-resistant and impact-resistant. Plastic and polyethylene are resistant to mechanical stress.
The pipe connection must be movable to prevent damage if the house shrinks. The drain is installed at a slope of one in ten.
To clear the drain hole in case of blockage, you should provide free access to it. A special audit is being carried out. The drain hole is connected to a common sewer pipe. The pipe leading to the toilet has a diameter of 100 mm. Pipes with a diameter of 50 mm are used for the shower and washbasin.
Preparing the subfloor
The floor under the shower stall in a wooden house needs to be strengthened. To do this, during the construction period, additional supports are installed in the place where it is planned to install a shower stall.
The floor is prepared in a certain sequence:
- the wooden covering is cleaned of dust, dirt, stains;
- the floor is treated with hydrophobic and antiseptic compounds;
- waterproofing is installed in the form of a rubberized membrane or NO WATER waterproofing mastic from Ceresit;
- the drain is closed with a drain;
- the floor is filled with a sand-polymer mortar 50 mm thick with reinforcement with a masonry mesh 5Вр150х150 mm, you can use a ready-made solution from Ceresit, a waterproofing mixture CR 65 WATERPROOF;
- After the screed has gained strength, it is treated with Ceresit CL51 EXPRESS and tiles or porcelain tiles are laid.
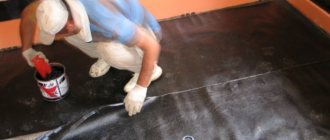
Applying waterproofing mastic in the shower
Tools
To equip the shower you will need the following tools:
- Measuring instruments;
- Spatula and trowel;
- Containers for stirring grout, solutions and glue;
- Hammer, drill, screwdriver;
- Hammer and screwdrivers of different sizes;
- Grinder, hand saw or jigsaw;
- Spanners.
Complex waterproofing of a shower in a wooden house
Complex work begins with waterproofing the floor. For this:
- dismantling the boardwalk;
- arrange a drain;
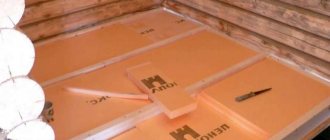
- Expanded clay is placed between the lags;
- the logs are covered with plastic film;
- concrete is poured;
- Fiberglass mesh is laid at the junctions between the walls and the floor;
- after the concrete mixture has dried, a rough plywood flooring is installed;
- primed with bitumen mastic;
- You need to lay a waterproofing membrane on the plywood, extending 15-20 cm onto the walls. The membrane strips are installed overlapping, covering the joints with a special waterproof tape for sealing the seams, for example Ceresit CL 152. The membrane is laid in two layers. The second layer should lie across the first;
- a concrete screed 5 cm thick is poured on top;
- After the screed has dried, the finished floor is sanded, a polymer mass is applied to install elastic waterproof coatings under the Ceresit CL51 EXPRESS tile cladding and the tiles are glued.
The floor in the bathroom should be 5-7 cm below the floor level in the rooms, so that in case of emergency the pipes do not flood them.
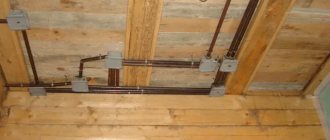
Then the walls are waterproofed. First, sheathing under plasterboard is installed on the walls. If the sheathing is made of wood, the bars are treated with antiseptic agents. A membrane film is mounted on the sheathing with the fleecy side inward. It is fixed to the sheathing with a construction stapler. Sheets of moisture-resistant plasterboard are attached to the frame. The joints between the sheets are puttied. You can treat the joints with silicone sealant, and the drywall with penetrating waterproofing.
Before laying the finishing material, the surface of the walls is primed. The primer is applied in 2-3 layers. Each previous layer must dry. If plastic panels are installed, then the edges near the ceiling and floor are protected with polymer mastic. The tiles are glued to the wall using crosses to ensure the same distance between them. The seams are sealed with waterproof grout. You can use Ceresit CE 40/2 Aquastatic Grout. Its excess is removed with a damp sponge.
Before waterproofing, the ceiling is primed. A vapor barrier film is attached to it using a construction stapler. The fastening points are sealed with polymer mastic. The film strips are overlapped by 10-15 cm, securing them with tape. They install the sheathing and cover it with plasterboard. The ventilated zone between the film and the drywall prevents the formation of condensation. One option is plastic panels. They are mounted with a tongue-and-groove locking connection.
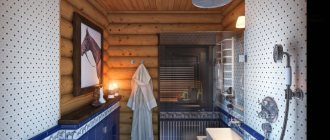
Wall and ceiling finishing
To finish the ceiling with plastic panels, first install a starting profile around the perimeter of the cladding. Instead of a profile, you can attach a plinth if it has a mounting groove. The plinth is attached to the ceiling with brackets.
Then the tenon of the first plank is inserted into the groove into the starting profile and pressed against it, fastened with self-tapping screws. Other plastic panels are attached in the same way. The last strip is cut and inserted into the starting profile.
The ceiling and walls can be left wooden, or they can use tiles, marble, or mosaics for decoration. A sheathing is installed under the tiles and plasterboard is mounted, and cladding is installed on it. A frame is not made for plastic panels.
Installation and connection of a shower cabin
If the shower cabin is ready-made, purchased in a store, then you need to act according to the detailed instructions that come with the product:
- prepare the premises;
- wooden walls are treated with antiseptic and moisture-proof compounds;
- if the shower does not have a back curtain and the cabin will be in contact with the wall, then the wood must be protected by covering it with tiles or installing a glass or polycarbonate screen.
- legs are attached to the pallet, adjusting its horizontal position using special screws;
- The sewer pipe is placed over the drain hole. For connection, you can use flexible corrugation;
- Door guides are installed in the pallet. Scroll them with screws;
- the joints are treated with silicone sealant;
- fix the back of the shower stall to the bathroom wall;
- connect plumbing, if necessary - power supply for radio, fan, heater;
- install vertical supports;
- glazing of fixed frames;
- install the hinges on which the doors are hung.
If you decide to make a pallet yourself, rather than buy a finished product in a store, then you need to mount the cabin a little differently. Also, as in the first case, the place for installing the shower cabin is prepared: dust and dirt are removed, the wood is treated, a water-repellent film is glued to it, covered with moisture-resistant plasterboard and tiles are glued.
Then they begin to lay the walls of the pallet made of bricks or fill them with concrete. The pallet will be protected from moisture by waterproofing mastic, for example, a one-component polymer mass for installing elastic waterproof coatings under tile cladding Ceresit CL51 EXPRESS, which can be coated on all sides.
The cheapest option is a frame for a pallet made of planed timber
The tiles used to cover the pallet should be rough and abrasive. It has an anti-slip effect. A drain is placed on the sewer pipe at a slope, a faucet is put on and a shower is installed. The frames of the structure are attached to the vertical posts, glass is inserted, and doors are attached.
Suitable installation locations
When installing a finished shower stall, you need to choose the right location. Preference is often given to corner models. Pipes and electrical wires are pulled to the installation site. The cabin is located above floor level, which ensures efficient water drainage. When choosing a place to install a plumbing fixture, take into account the following nuances:
- The surface on which the cabin is installed must be strictly horizontal. Failure to comply with this rule leads to interruptions in the supply or drainage of water. If necessary, the pallet can be placed on supports.
- The floor covering must not have any recesses. The sections of the wall in contact with the cabin must form a right angle. Otherwise, during installation, the side elements of the shower may be damaged.
- The size of the outlet of the cabin drainage system must match the diameter of the sewer pipe.
- The siphon is placed above the level of the sewer line. This helps drain water from the pan faster.
- The drain is sealed after installing the sump pump. The shower hose is installed after all work is completed.
DIY shower.