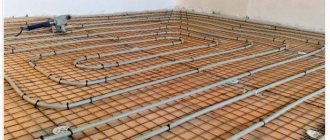
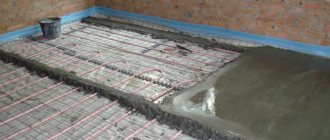
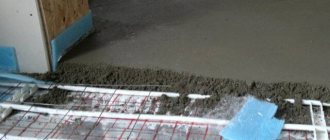
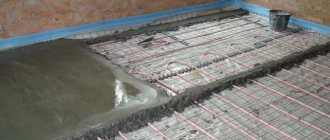
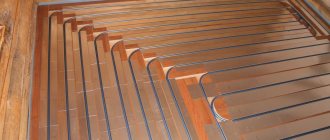
In house construction, especially wood construction, several types of flooring are used to install heated floors: slatted and modular. With the modular method, a heated floor under chipboard is formed into modules. The chipboard panel contains channels for the pipeline contour. With the rack method, pipes are placed on the surface of chipboard of the required width, and metal strips are placed in the grooves, where a traditional heating circuit is then placed. A specialized condensate-absorbing gasket is laid on the pipeline and the final floor covering is laid.
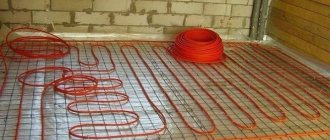
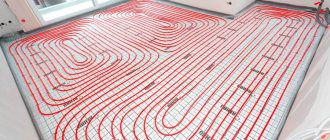
Guides for heated floor pipes under chipboard
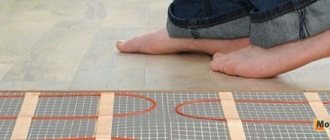
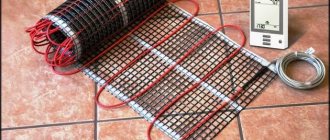
Options for using material for laying heated floors under chipboard, OSB: water, electric
When building a house, especially a wooden one, two types of flooring are used to install a heated floor: slatted and modular. With the modular method, the heated floor under the chipboard is formed into modules. Channels are made in the chipboard for the pipeline contour. With the rack method, the pipes are placed on the surface of the chipboard of the required width, and aluminum strips are placed in the grooves, where the water heating circuit is then laid. A special condensate-absorbing gasket is placed on the pipeline and the finishing floor covering is laid.
Conclusion
DSP is not a one-size-fits-all answer to how to level a floor or how to bring it to the required thickness. However, the use of slabs allows you to save time and the video in this article will help you correctly carry out all the work on installing the DSP.” width=”640″ height=”480″ frameborder=”0″ allowfullscreen=”allowfullscreen”>
The distance between the pieces of material and the dents from the heads of the screws must be covered with putty or mastic using a spatula. After the seams have dried, the floor surface can only be primed and the finishing coat can be laid. This instruction provides basic recommendations that will help you make a high-quality floor yourself.
Advantages of OSB boards
Oriented strand boards are quite in demand; they are used to level curved surfaces. Laying slabs on a wooden surface makes the floor covering stronger and warmer. Any floor covering can be installed on such a base. Oriented strand boards are also used for electric floors.
Boards Oriented Strand Boards
The advantages of the material include the following characteristics:
- High density OSB;
- Resistance to moisture, which allows use in rooms with high humidity;
- Excellent pressing, thanks to this the material does not crumble;
- Protection from biological factors;
- Environmental safety;
- Not a difficult installation process;
- Financial savings: you only need a little bit, but it covers a large area;
- Reliability: withstands mechanical loads, lasts a long time;
- Possibility to use all kinds of means for finishing work.
Difficulties in working with OSB
However, when finishing work with OSB, you need to follow a number of rules so that the results do not disappoint you.
It must be remembered that the base of the OSB board consists of wood. Consequently, the slab tends to absorb moisture, which leads to its swelling and deformation.
Like any wooden surfaces, OSB panels have poor adhesion to cement-based adhesives, so most tile adhesives will not be able to ensure reliable adhesion of the tiles to the particle board surface. To do this, a number of works should be carried out to increase the adhesion of the bearing surface.
Another feature of OSB is its flexibility, which prevents the panel from cracking under physical stress. Under the weight of people moving around the room, the slab will bend slightly.
Compared to OSB, tiles are almost incapable of bending. As a result, the tiled flooring will inevitably peel off from the base, and the seams between the tiles will crack.
To avoid this, you will have to make the surface of the slab as hard as possible.
Historical reference
For the first time, invisible radiation located beyond the red part of the spectrum was discovered by the British astronomer with German roots, William Herschel, in 1800. A little over a century later, our compatriot, physicist A. A. Glagolyeva-Arkadyeva, experimentally obtained a radio wave, the length of which corresponded to the range of infrared radiation. This proved that infrared radiation is a type of electromagnetic waves, it is as natural as the light and radio waves that surround us. Infrared radiation (IR) is electromagnetic radiation with shorter wavelengths than visible light (from 0.8 microns to 1-2 mm). Infrared waves are emitted by any heated bodies; in theory, they are understood as bodies with a temperature higher than absolute zero (-273.15⁰С), therefore IR radiation is thermal. However, some substances do not transmit this type of rays, for example, water. Infrared radiation is divided into several regions according to wavelength, and the wavelength depends on the temperature of the emitter (heated object):
As for the relationship between theory and practice, it is direct - the heating elements of an infrared heated floor do not heat up to 100⁰ and produce safe long waves. Therefore, the categorical statements of opponents of this system about its harmfulness are groundless. But marketing praises about the undoubted benefits are also far from the truth - the useful range will dampen most floor coverings. Infrared heated floor is an alternative heating system with its own advantages and disadvantages, and not a way to turn a house into a physiotherapy room.
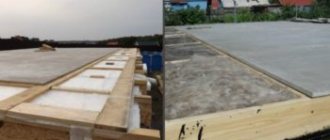
Laying OSB on a wooden floor
Initially, the surface is localized, and existing irregularities are noted. In addition, if there are creaking and wobbly elements, they are attracted to the joists using screws. Replacing lags is used very rarely. After this, the surface of the boards is treated with a special tool that removes paint, varnish and levels the surface.
OSB boards are laid offset, with a gap of three millimeters provided between them. There should be about 12 millimeters of free space from the wall to the outer slab. Each slab is attached to the floor along the entire perimeter with self-tapping screws over 45 millimeters long. In some cases, a second layer of OSB is installed, which makes the coating more durable. Combining seams of two layers is not allowed. After the polyurethane foam has dried in the grooves, you can begin finishing.
Another way to install the material is to lay it on wooden logs, under which there is a concrete base. Such a floor can be additionally insulated using special materials laid between concrete and OSB.
The height between the floor and the lower edge of the OSB boards is filled with steam and thermal insulation. The presence of a moisture-proofing layer is especially important if there is a fairly damp basement. As with other methods, it is not recommended to lay OSB sheets close to the walls and to each other.
Fixing the material to the joists is done with nails or self-tapping screws. Along the perimeter of the installation, the pitch is 15 millimeters, and it is recommended to screw self-tapping screws into the additional supports with a pitch of about 30 millimeters. The length of the screws should be 2.5 times the thickness of the material.
OSB boards have gained great popularity in a fairly short period of time. With their help, you can prepare the floor for laying any finishing coating. Moreover, the technology is quite simple and does not require special knowledge and experience. In terms of its characteristics, the material is superior to its analogues, which explains the high demand for it.
This material is universal
OSB boards of different classes are suitable for the following applications:
Tip: For rough finishing of floors, OSB-3 should be used. The material is universal and affordable. It can be used in fairly humid conditions.
The thickness of the coating is selected based on the characteristics of the existing floor. If there are minor irregularities, then the surface can be leveled using slabs no more than 10 millimeters thick. The surface with holes and potholes of sufficient depth is leveled with material up to 15 millimeters thick. If OSB is laid on logs, its thickness varies from 15 to 25 millimeters.
Very often the concrete screed does not have a smooth surface. In addition, the heat and sound insulation characteristics of such a coating leave much to be desired. Therefore, leveling a concrete base using OSB boards is a fairly popular procedure.
- The concrete base is freed from dust and debris. It is desirable that the surface is perfectly clean. Only in this case is it possible to achieve maximum adhesion of the adhesive layer.
- Priming the surface further enhances the adhesion characteristics of the adhesive and the floor. The primer spreads over the concrete in an even thin layer.
- Next, the OSB boards are laid. To cut them and level them to size, use a power saw or jigsaw. In this case, the lower surface of the material is treated with a special adhesive composition made on the basis of rubber. As a result, the sheets are quite securely fixed to the floor.
- For reliability, the sheets are fastened to the base using dowels. Fixation is performed around the perimeter at intervals of 200-300 millimeters.
- The gap between the plates is three millimeters. And the distance between the slab and the wall is 12 millimeters. The material may expand and swell during use. The presence of seams guarantees protection against swelling at the joints.
- Upon completion of installation, debris and dust are removed, and the joints between the slabs are treated with polyurethane foam. After three hours, the foam dries, its remains are removed, and the surface is ready for finishing.
Creating a subfloor from OSB on joists
Laying OSB on wooden joists is the easiest way to get a durable and reliable subfloor. This technology is especially appropriate for existing columnar, pile, or pile-screw foundations. Work order:
- Logs are installed on the foundation. The lag pitch must correspond to the thickness of the OSB boards used (the larger the pitch, the greater the thickness).
- Perform rough rolling of the floor. To do this, retaining bars are nailed along the joists, and OSB boards are laid and secured on them. The surface facing the ground is covered with waterproofing preparations, for example, bitumen mastic.
- A layer of vapor barrier is laid on top of the OSB.
- Thermal insulation material is laid, for example, polystyrene foam, mineral wool slabs, ecowool, etc.
- Cover the insulation with another layer of OSB. Fastening is carried out in the same way as when laying OSB on logs on an existing concrete base (the technology is described in the previous paragraph).
At this point the work process is considered completed.
Installation
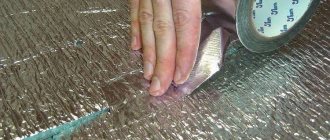
Regardless of the type of infrared floor, it needs a properly prepared base, the surface must be strong and smooth, a difference of no more than 3 mm per m² is allowed. A heat-insulating substrate is laid on top of the clean subfloor with the foil part facing out, the overlaps are sealed with tape (aluminum), it will prevent radiation from penetrating downwards. The film, mats, and cable are laid at a certain distance; overlaps of emitters are unacceptable. The method of fastening the elements of the system depends on its type; double-sided or special tape, plastic ties or improvised devices are used.
Forum member Kotoffey fixed the IR cable this way.
Why choose OSB-3
Increased moisture resistance is mainly achieved by using phenol-formaldehyde as a binder and adhesive material. But these materials are not recommended for indoor use. Moreover, in European countries the production of materials using formaldehyde is prohibited. Manufacturers have developed binders for gluing and pressing chips based on polyurethane resins. OSB-3 Bolderaja ECO is produced in Europe, which uses these safe resins. The material complies with the European product standard EN 300. True, such material is more expensive than usual, but is it necessary to save on health?
For flooring, manufacturers produce slabs with a tongue-and-groove edge, which ensure a tighter fit of the slabs to each other. And to the question whether it is possible to lay OSB on the floor, the manufacturer gives an affirmative answer, offering consumers materials of varying thickness and moisture resistance.
On video : characteristics and features of the use of the material
Some rules for greater safety
The first time (about six to seven months) after installation, the most intense release of harmful fumes occurs. If you regularly ventilate the room, the negative impact on the body will soon begin to subside. But for greater safety, additional processing of the slabs is carried out.
If the work takes place in a children's room, then compositions with detoxifying properties are chosen as a primer. For common areas, simple water-dispersed paints, varnishes, wax, and penetrating primer are suitable.
Particular attention is paid to the ends. It is through them that the main amount of harmful substances is released
It is enough to saturate them with varnish or primer.
Priming is one of the safety measures that allows you to reduce the amount of harmful substances released
It should be taken into account that the rate of release of toxic elements is affected by temperature. The higher the indicator, the more formaldehyde in the air. The norm is considered to be 30 °C.
In general, there are two main ways that allow, without making excessive efforts, to rid the room of chemical components and saturate it with oxygen. Namely, frequent ventilation and the presence of indoor flowers.
OSB is not recommended for use in rooms where temperatures exceed 30 °C
Any modern building or finishing material that is made using chemical components can emit harmful substances. But manufacturers are constantly trying to keep these figures to a minimum.
Laying technology
Various rough coatings or structures can be used as the basis for installing OSB. Each type has its own styling features.
Dry screed
The possibility of arranging a floor without dampness and a long wait for the wet coating to dry forces homeowners to pay attention to dry screed. As such, fine expanded clay is often used, when leveling it it is customary to use unique beacons that allow you to indicate the level of installation.
OSB boards are laid on the prepared surface, pressed tightly into the expanded clay, after which a finishing coating is attached to them. This method can only be used in utility rooms (in the attic of a private house).
Concrete screed
In the case where it is intended to install OSB slabs on a concrete screed, it is recommended to adhere to the following sequence of actions:
- Special marks or beacons are installed that record the required filling level (the distance between them is selected based on the convenience of leveling the future coating, that is, approximately 50–60 cm).
- The correct installation of the marks is checked using a building level (if there are deviations, they should be leveled in the horizontal plane).
- You can proceed to preparing the solution, which must have the appropriate condition (not too thick and not very liquid).
- The prepared composition is poured into the place intended for forming the screed, after which it is carefully leveled.
Which OSB board should be placed on a concrete surface?
According to the European classification (EN-300), OSB panels have 4 classes, differing in bending strength parameters along the transverse and longitudinal axes, and moisture resistance. To cover concrete surfaces indoors, it is advisable to use floor slabs of at least OSB2 class. Type OSB1 is used in furniture production and is not suitable for finishing work; OSB4 is intended for external cladding. For laying OSB on a concrete floor, sheets of the third class are suitable; the fourth provides an additional margin of safety, but is rarely found on sale. OSB boards produced in the USA are also presented in Russia. The classification includes 3 types: Interior, Exposure 1, Exterior. When purchasing a foreign sheet, it is worth considering that in relation to European standards, products of the Exposure 1 class will be similar to the OSB3 type. American OSB floor boards are usually of higher quality compared to Russian ones.
Minimum thickness, composition and characteristics
OSB boards are made from wood fragments pressed at high compression and temperature - aspen chips up to 9 cm in size and waste from softwood production. Boric acid and artificial wax are used as binding components. The chips in the outer layer of the slab are located parallel to the longitudinal axis, in the inner layer - at a ninety-degree angle; this design gives OSB panels wear resistance and flexibility over a wide range. Products are tested in a laboratory, which minimizes material defects. When installed on a concrete surface using logs, the interval between the installed supports determines the thickness of the OSB board.
If the subfloor has already been installed along the joists, it is permissible to use sheets with a thickness of 10-12 mm. The choice of value is calculated based on the expected load; in an apartment it is advisable to lay sheets of greater thickness; in a country house, if there are no plans for placing heavy furniture, you can limit yourself to thin ones.
The modern market offers several options for oriented strand boards, which have different thicknesses, technical characteristics, functions, etc. The sheets may contain harmful impurities, and therefore such boards are prohibited from being used in residential premises due to the danger to human health and life.
- The highest quality slabs produced by North American (Canadian, first of all) and European companies are considered. The slabs are produced in strict compliance with the requirements of modern norms and technologies; they comply with the requirements and standards (primarily E1), including environmental safety.
- For floors, OSB-3 boards are best suited - the most common option, which guarantees a reliable base structure due to a high level of protection from moisture and high density.
- Much depends on whether the slabs are laid on wooden joists or a concrete screed. Wood requires more massive sheets with a thickness of 15-18 millimeters in increments of up to half a meter or 22-25 millimeters in increments of up to 60 centimeters. For concrete, slabs up to 10 millimeters thick are suitable.
- The size of the slab according to the standard is 2.44x1.22 meters. The required number of slabs is calculated taking into account their location and attempts to leave as little waste as possible. The slabs can be easily cut to the required dimensions using a circular saw.
System components
The basis of all IR underfloor heating systems is the ability of certain carbon-containing substances to release heat in the infrared range when current passes through them. What is typical is that radiation heats not only the air, as in the case of other systems, but also objects, which, in turn, also give off heat. By the way, the positioned “newest” technology was successfully used by the domestic automobile industry at the end of the last century, as noted by portal user Aleks074.
Well, they created some uniqueness here; back in the six-wheel basins of the eighties, this technology was used to heat the rear windows.
Today, there are three ways to organize underfloor heating using infrared radiation, depending on the emitters used.
Film flooring is intended for installation under floor coverings without “wet” processes - laminate, linoleum, carpet and the like. On the one hand, this is a plus - there are a minimum of problems with installation, on the other hand, you cannot put it under tiles, which are especially popular in technical rooms.
Rod mats are designed for laying in a screed, and if the base is flat, you can immediately install the tiles on the glue, without an additional layer, but the total thickness of the coated glue should not be less than 2 cm. Our forum members use both films and cables.
Film TP is good because it can be laid on parquet boards. This is how I did it, no matter how you look at it, no coating is completely “transparent”. And everything that passes through heats objects: a table, stairs, walls, that’s the whole point. You open the windows wide, ventilate, and when you close everything, it’s warm again. Because not only the air is warm, but everything around it.
I bought five hundred meters of such cable, three thermostats. Fifty meters of tile adhesive under the porcelain tiles, one hundred and thirty-two meters laid under the laminate, checked, everything is warm. At a height of one and a half meters from the laminate, thermal radiation from the floor is felt. The cable was cut into sections of eleven meters, this way it warms up better, but the electricity consumption also increases.
IR heated floors operate from a power supply voltage of 220 - 230 Volts (50 Hz), the system includes not only an emitter in the form of film, mats or cable, but also a temperature sensor and thermostat. These devices provide optimal heating of the room with minimal energy consumption. The system will maintain the set parameters, increasing or decreasing heating as needed. Depending on the type of infrared floor and the energy-saving characteristics of the room, a system with a power of 150 W/m² to 200 W/m² is installed. If the floor is used as auxiliary heating, a minimum power is sufficient; if it is used as the main heating, you will have to use the maximum.
The heated floor should occupy 60–80% of the floor surface in the room, but the exact numbers will depend on the power of the specific brand and the characteristics of the room. Typically, selling companies themselves calculate the coverage area based on the data provided by the buyer.
Painting OSB panels
The final stage of finishing the OSB surface will be the application of parquet varnish or painting in several layers with paint for wooden surfaces. The paint coating must be applied following the manufacturer's recommendations, including the use of a primer recommended by the manufacturer of the parquet varnish, in order to avoid incompatibility of components. The plinth is attached last and if it is made of wood, it must be painted in the desired color or varnished in advance. You can secure the plinth in several ways - fastening with glue or self-tapping screws. To prevent the plinth from bursting, a through hole is drilled in the places where it is attached; a recess can also be made with a drill of a smaller diameter for the self-tapping screw and under the head, and upon completion of installation, all holes in the plinth are closed with putty, sanded and repainted. As you know, there are nuances in installing oriented strand boards to a concrete base, but if you follow the sequence of work and recommendations, laying a finished OSB floor with your own hands is quite simple.
vote
Article rating