Until recently, there was practically no alternative to the traditional cement-sand screed, but now many other methods of leveling the floor have appeared, and one of them is leveling with a semi-dry screed. In this case, a cement-sand mortar with a minimum amount of water is used to level the surface , and its high strength is achieved by adding fiber fiber or using a reinforcing mesh.
This option is perfect for creating a floor in a garage, and knowing the technology for laying it, you can do all the work yourself. If, after laying a traditional sand-cement screed, it can be used no earlier than 28-30 days, then in this case, the coating gains strength within 4-5 days.
Design features of a garage entrance
There are recommended garage driveway dimensions. Its width should be 30 cm greater than the width of the gate. This is the minimum size. In this case, the platform or path, it all depends on the length, should expand away from the garage. This is not a mandatory requirement, but an expanded entrance at the very beginning makes it easier for the car to move.
The length of the entrance varies in the range of 3-5 m. But this is not a strict requirement.
Now about the materials from which the site will be formed. Typically, three options are used for this:
- concrete;
- asphalt;
- paving slabs or paving stones.
The first one is the most commonly used. Inexpensive, with high performance characteristics and long-term operation.
There is also a drawback - incorrectly laid concrete solution, that is, with violations of the technological process, reduces the service life of the path. Therefore, my advice is to use the services of professionals rather than turn to gray teams.
Concrete surfaces will have to be maintained periodically. Over time, its surface wears out and becomes cracked, so you will have to invest a certain amount of money.
Concrete platform in front of the garage Source masterstroy24.ru
In terms of maintenance, the least problematic option is asphalt. It will last longer than a concrete base. The technology for laying it is simple, the cost is the same as that of concrete.
The third option is the most expensive. But in beauty and design content it surpasses the first two many times. Plus - high strength, minimal abrasion, long service life, high maintainability.
Therefore, before you check into the garage, make the right choice taking into account your financial capabilities.
Now let’s look at the technologies for forming a garage entrance, taking into account each of the designated building materials.
Entering the garage made of paving stones Source ivd.ru
Advantages and disadvantages
Concrete is characterized by high strength and fire resistance.
The main advantages of concrete are strength and durability . These are undeniable advantages that have ensured the widespread use of this building material. In a garage, such a floor is convenient due to its resistance to various types of oils, solvents and flammable liquids. Other benefits include:
- fire safety;
- easy to clean surface;
- ability to withstand significant, including uneven, weight loads.
The disadvantages of concrete pavement include:
- damage from blows from sharp, heavy objects;
- long period of gaining brand strength (at least 28 days);
- difficulty of dismantling.
Concrete garage entrance
Like many construction processes, this one is divided into two stages: preparatory and pouring concrete.
Preparation
Everything here is quite simple and prosaic.
- In front of the garage door, markings are applied using chalk or pegs with string stretched between them.
- According to the markings, a pit is dug 40-50 cm deep.
- The bottom is leveled and filled with coarse sand, which is compacted. It is better to tamp with water, which is poured over the sand layer. The thickness of the compacted layer is 15 cm.
- Geotextiles are laid on top, which will separate the layers of backfilled building materials. You can use polymer film or any other dense roll material.
- Next, crushed stone of small or medium fraction is poured, which is also leveled and compacted. Layer thickness – 10-15 cm.
The next operation may not be performed. But it is present in the technological map. This is insulation of the entrance to the garage. For this purpose, today they use polystyrene foam plates 5 cm thick. They are laid on a prepared pillow with the plates offset relative to each other by exactly half. After which the thermal insulation layer is waterproofed using polymer films. And at this point the preparatory stage can be considered complete.
Insulation of garage entrance Source ad-cd.net
Pouring concrete solution
Before you fill the entrance to the garage, you need to understand that this area is subject to quite heavy loads. Therefore, M200 grade concrete is used to fill it. For its production, cement grade M400 is used, which is mixed with sand and crushed stone in a ratio of 1:3:5. To make a concrete mixture you will need a concrete mixer.
There are no special nuances in how to fill the area in front of the garage. The finished solution is poured into the pit, evenly distributed over the entire area with a thickness of 10-15 cm. Then a reinforcing frame is laid on it. This can be a grid of reinforcing bars or a mesh of steel wire with cells of 50x50 mm.
The reinforcement grid is assembled from reinforcement with a diameter of 10-12 mm. The rods are tied together with wire. Cell size – 20x20 cm.
Reinforcing frame made of reinforcement Source ad-cd.net
See also: Catalog of companies that specialize in the design and construction of small architectural forms, including garages.
Another layer of concrete 10-15 cm thick is poured onto the laid reinforcing frame, which is leveled according to the rule. And the last stage in the process of pouring a concrete platform in front of the garage is cementing. To do this, you need to sprinkle the wet concrete surface of the entrance with cement and rub it into the concrete. The surface becomes stronger and smoother.
Concrete platform with cementation of the upper surface Source twimg.com
And a few nuances:
- You can use the entrance to the garage after pouring concrete after 28 days. This is the period for the solution to gain brand strength.
- If the platform rises above the ground to a certain height, then formwork made of boards or other flat material is installed around the perimeter. In this case, it is optimal if the upper edges of the formwork serve as a guide for the upper plane of the site.
- The ideal option is the entrance in front of the garage, located on a slope. That is, the garage is located just above the site. This is a guarantee that water from precipitation will not penetrate into the room.
The last position slightly changes the technology of forming the entrance. Therefore, before pouring the entrance to the garage on a slope, it is necessary to correctly form the formwork and pour two supporting walls. They are formed at an angle, and after the concrete mass has set and the formwork has been dismantled, the space between the supporting walls is filled, followed by concrete pouring. Let us add that the walls must be made according to all the rules for the manufacture of concrete structures. That is, with reinforcement and vibration of concrete. The photo below shows the sloped entrance to the garage well.
Entrance to the garage located at an angle Source yandex.net
Implementation methods
As practice shows, only a concrete floor can withstand such loads. It can be created in two ways:
- Lay the reinforced concrete floor slab.
- Pour a thick concrete screed (up to 10 cm) over the ground.
Let's just say that the first option is faster, but more expensive. The floor slab is not cheap; its installation can only be done with the help of a crane, for which you will have to pay for its services. But even a beginner can do concreting on the ground with his own hands. The main thing is to know the technology and nuances of the process.
Asphalt entrance to the garage
The technology is quite simple.
- A pit is dug for a platform 10-15 cm deep.
- Crushed stone is poured to the upper edges of the pit. The material is leveled and compacted.
- Asphalt is poured and compacted with a roller.
There is no need to strengthen the structure. The main thing is that the thickness of the asphalt layer should not be less than 5 cm.
Entrance to the garage made of asphalt Source rabotai-sam.ru
A few important final recommendations
In Soviet times, every car owner did not think much about the thickness of the concrete floor in the garage. Building materials cost pennies, so they were not spared, and energy-saving technologies were unheard of then. Since then the situation has changed significantly. Therefore, when calculating the total thickness of the “pie,” we must take into account what kind of room we are dealing with—a “cold” or a heated one.
If it is heated, it would be more advisable to insulate the floors, for example, with expanded polystyrene (which will make the “pie” slightly higher). If it is unheated, then there is no need to insulate it.
Waterproofing does not affect the thickness of the layer, but it should be laid with a fold over the walls. Use damper tape around the perimeter of the garage.
And finally, the last thing. You need to make sure that the concrete floor in the garage is grooved or at least rough: the slopes need a sufficient degree of friction.
Entrance to the garage made of paving slabs
In principle, any area finished with paving slabs is formed in the same way. First of all, prepare the site itself:
- They mark and dig a pit.
- Fine crushed stone 10-15 cm thick is poured into it, which is leveled and compacted.
- A cutting material is laid on top of the crushed stone layer: geotextiles, polymer film, roofing felt or other rolled materials.
- Fill the sand with a layer of 10-15 cm. It is also leveled and compacted, pouring water.
- Then they move on to laying paving slabs.
Attention! For the garage entrance, you must use tiles with a minimum thickness of 60 mm. It is laid only on a cement-sand mixture, which is prepared in proportions of 1:3.
Paving slabs 60 mm thick Source stpulscen.ru
Important points when laying paving slabs:
- the sand cushion is moistened before installation;
- masonry mortar is applied 1-2 cm thick;
- the tiles are leveled, leveling is also done between the cladding elements using the rule;
- leveling is carried out by hitting a rubber hammer; if one of the tiles is located lower than the others, a bonding solution of greater thickness is placed under it;
- installation is carried out from the garage door towards you.
The last stage is sealing the seams between the paving slabs. To do this, use the same masonry mortar.
The area in front of the garage made of paving slabs Source han-stroy.ru
Different combination - does it change the concept?
In various instructions you can see different versions of laying this type of floor - in most cases, the only difference between these theories is the sequence of stages of laying the floor. Some people's eyes widen, but in their heads there is the same, very adequate question - is there a fundamental difference between the numerous options for the sequence of laying layers and is there a most successful option?
The answer is simple - consistency does not play a huge role. It is much more important to adhere to the norms of layer thickness of one level or another.
An example of arranging a floor on the ground. Scheme
Other options
In fact, the question of how to make a garage entrance with a lift is not limited to concrete, asphalt and tiles. There are other alternative solutions.
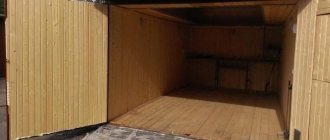
The wooden ramp shown in the photo does exist. This is the cheapest and easiest option to form an access structure. True, it is not as durable as the types described above. But it will last for several years without problems. And if it is made from good material, then you can count on it to last for a couple of decades.
Typically, such a structure is made from only boards or a combination of boards and thick plywood. The truss configuration is a triangle. There are two or three of them, covered on top with boards 50 mm thick or plywood 22 mm thick at least. It is better to use moisture-resistant plywood. The entire structure must be treated with antiseptic compounds and painted.
Wooden entrance to the garage Source ytimg.com
The second option is metal. This is almost the same design as a wooden one. Only instead of lumber, a metal profile is used here. A more expensive modification, but with a longer service life, not inferior to concrete. A ramp made of wood or metal does not have to be the entire width of the garage. Two small elements just for the wheels are enough, as shown in the photo below.
Metal structure for entering a garage Source ytimg.com
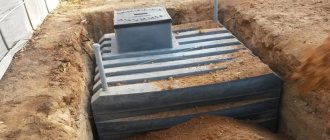
"Floating" dry screed
It differs from the classic dry screed in that it has a base - an additional layer of thermal insulation materials is placed under the backfill: EPS boards or mineral wool (hard). The screed is called a floating screed because the backfill is isolated from the base by a layer of insulation, and from the walls by a damper tape, and due to the absence of a rigid ligament, it is not subject to deformation. This cake allows you to maximally soundproof the room, which is especially important in high-rise buildings or private houses for children's rooms and bedrooms.
The installation of a floating dry screed is no different from the installation of a classic one, only the installation of insulation is added, it is laid closely, the seams are taped. Forum member Alexcrab used a floating screed specifically to drown out extraneous sounds.
Alexcrab FORUMHOUSE Member
There is a reinforced concrete floor, the main purpose of the screed is sound insulation. There will be a dry screed throughout the apartment (except for the kitchen), I will make a “floating” screed on extruded polystyrene foam, 30 mm thick. There is also wiring running along the floor, high-power - in corrugated pipes, low-power - without, all wiring is laid with a reserve cross-section.
Considering that the main purpose of the slabs is insulation, such a screed is indispensable in cold regions or when the slab is laid directly on the ground, or dampness and cold are drawn from the basement.
Briefly about the main thing
There are several popular and affordable ways to arrange a garage entrance - fill the area in front of it with concrete, roll it with asphalt or lay it with paving slabs.
The easiest way to make a concrete platform, the least amount of effort will be required to maintain asphalt, and the surface paved with paving stones is the most beautiful.
You can also consider using wooden or metal platforms. With proper manufacturing and care, they will last quite a long time.
Ratings 0
Conclusion
In some situations, the only correct solution was and remains a conventional screed using the wet method as it best meets the conditions of use. And nothing can be done about the phlegm, dirt and other associated inconveniences. In places where increased loads and dancing for days on end are not envisaged, dry screed and its variations can be a worthy alternative.
Dry screed is one of the suitable types of base for an infrared film floor, which is described in the article “Infrared heated floor - from theory to practice.” To prevent the heat retained by the floor from escaping through the windows, read the article about do-it-yourself wooden Euro-windows. In a video about working with floors and walls, a specialist will demonstrate a light screed device.
Subscribe to our Telegram channel Exclusive posts every week
Installation of formwork
The next step is installation of formwork. On the side of the garage door it should correspond to the level of the threshold, and on the reverse side - to the ground level.
The construction of formwork occurs in the following sequence:
- Wooden pegs are driven into all four corners of the prepared area;
- Boards are nailed to the pegs;
- On each side (besides the foundation side), install one more peg in the middle of the boards for additional reinforcement.
When the formwork is ready, a waterproofing and insulating layer is laid sequentially. Linocrom, armored roof and other options that are often used in roofing are suitable as waterproofing materials.
And as insulation - extruded polystyrene foam with a thickness of 5 centimeters. Then a reinforcement frame is installed - a stainless steel mesh with a diameter of 2.5 mm.
How to make a concrete screed with expanded clay or expanded clay concrete
Before laying a concrete screed with expanded clay, it is necessary to determine the unevenness of the floor.
For this:
- Take a regular two-meter level in your hands, place points in the corners of the garage and find the centers of the lines where the walls and floor meet.
- The space is divided into segments and each part is checked separately.
The resulting curvature of the floor makes it possible to choose the thickness of the new screed. The solution is prepared correctly.
For this:
- The granules are poured into a large metal container, water is poured in so that its level is half a hand higher than the expanded clay level.
- Expanded clay is mixed with water until the mixture acquires the desired shade.
- Sand and cement are added.
- Expanded clay concrete is distributed between the lighthouses.
- It is carefully leveled and dries within about two days.
- Another similar layer is made.
- The floor is being finished.
Concreting the structure
Filling the entrance is carried out in several stages:
- The main layer is poured, the thickness of which is approximately 15 centimeters;
- A reinforcement mesh of 50×50 centimeters is laid;
- The finishing screed is poured. In this case, a solution is prepared without crushed stone. The proportions of cement and sand should be 1:4;
- The screed is leveled using a flat board or rule.
When the screed has been standing for some time, a little dry cement is poured on top of it - this will improve the waterproofing properties.
After pouring, the driveway cannot be used for at least a day, even if it seems strong enough after a few hours. This is necessary for complete polymerization and drying of the solution. The formwork can only be dismantled after the concrete has completely hardened.
The final stage of entry is trimming the protruding areas using a grinding machine and improving the overall appearance.