The pump, or in other words the drain pump for a washing machine, is one of the main technical components that ensures the normal operation of the entire mechanism, and in order to determine the cause of the breakdown, you need to understand the following points:
- pump composition;
- types of pumps;
- differences in their work;
- nuances of service.
Usually a part that has failed cannot be repaired, and therefore in this situation you have to buy a new spare part and install it. To do this, you need to carefully disconnect the faulty pump and put a new one in its place, following all the rules so as not to completely break the unit. Each brand has its own important nuances, so if the user is not confident in his abilities, it is better to turn to specialists.
The principle of operation of the pump, its application and location
During operation of the washing machine, water is supplied inside the device under pressure, that is, the intake occurs automatically as soon as the necessary programs are selected and the “START” button is pressed. The process then proceeds according to the following scenario:
- the solenoid valve is brought to the open position;
- a pressure switch (sensor for monitoring the liquid level in the tank) measures the required volume of water;
- the path of the liquid runs through the compartments where the necessary detergents (washing powder) are located, water mixes with them, and thus enters the tank in dissolved form;
- the liquid under pressure enters in the required volume into the chamber where the laundry is stored.
During the process and completion of the wash, the water pump comes into play. It is he who drains and pumps out dirty waste liquid after washing or excess water after rinsing. The pump is involved in almost all washing modes!
As soon as a signal from the electronic module is sent to the pump, waste water will begin to be pumped into the sewer due to the impeller of the device. The fluid path is as follows:
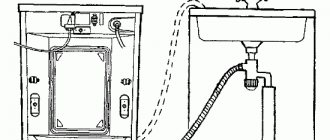
- Water enters through a rubber pipe, which is connected to the tank and volute using special clamps
- Next, the liquid enters the pump through a special filter located in the volute; it protects the pump impeller from debris, to avoid jamming of the impeller.
- Next, the liquid comes out through the drain hose, which is connected to the volute. The dirty liquid phase is pumped out until the waste liquid is completely pumped out of the washing machine tank.
During washing, the water is already in the lower part of the unit, which is why the end of the drain hose must be secured above the drain pump, since if this is not observed, the water will begin to drain from the machine by gravity. The drain hose must be installed at least 80 cm along its entire length!
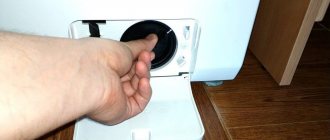
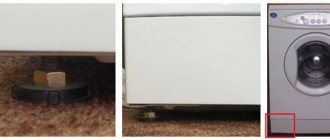
The electric drain pump is located at the bottom of the unit under the tank. It is attached to a plastic volute, usually with three screws, and the volute, in turn, is attached to the body of the unit from the front side. This arrangement is convenient for quick access to it, if, for example, you need to clean it of debris or drain liquid from the system.
There are two types of pumps used in washing machines:
- The circulation type of pump is used in conjunction with a conventional pump; they are used in new models of premium class machines such as Indesit, Ariston, etc. This option supplies water directly to the washing area and circulates throughout the system, which improves washing efficiency.
- machines from a more budget type or not of a new generation, such as the Daewoo bubble machine (Daewoo), are equipped with a simple pump, for example from Askoll, which simply drains the waste liquid into the sewer.
Repair of the drain pump of a washing machine, as a rule, is not carried out; most likely, spare parts in such devices will have to be replaced. That is, you will have to completely replace the broken pump with a new one.
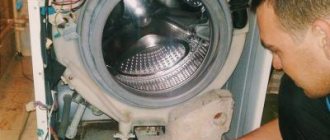
ATTENTION! You can also inspect the device yourself for blockages or pump failure. But when inspecting the internal mechanism, you must first disconnect the equipment from electricity. Using a special device, such as a multi-mmmeter, check the contacts going to the pump and make sure there is no voltage, and only then continue working. All these precautions are necessary because the work is carried out near an open source of water.
Diagnostics
The first stage of diagnosis is to check for signs of incorrect pump operation. Before disassembling the structure, you need to make sure that the malfunction is related to the pump. A breakdown can be identified by the following symptoms:
- the water drainage mode has been activated, but the pumping system is not functioning;
- during the draining process, loud noise and buzzing are heard;
- the pump pumps out water, but more slowly than initially;
- During washing, the machine turns off spontaneously;
- You can hear the hum of the pump motor, but the water does not drain.
If one of the listed breakdowns is present, the pump will most likely need to be repaired. Before proceeding with dismantling and repair, you need to carry out diagnostic steps. To check, remove and clean the drain hose to get rid of the blockage, and then wash the filter. Next, include a test wash in the rinse and drain mode, and if the steps performed did not help eliminate the problem, you should proceed to repair work.
Types of washing machine pumps
Washing machines use more than fifty types of pumps, each with one or another design difference.
All of them are divided into two types:
- Circulating. Provide water movement in the machine. Installed on expensive devices, for example, Bosch, Siemens and Hansa.
- Drain. Pump out the water after each washing stage and after rinsing.
Many popular models use a single pump that performs pumping and draining functions. Pumps for pumping/circulating/draining water are made on an electromagnetic basis. In addition to them, washer-dryers also have pumps made in the form of a small engine with an impeller (fan).
The design of the pump is quite simple, consisting of a stator, rotor and impeller. The rotor rotates in one direction or the other, so when the impeller is blocked by foreign objects, it jerks in different directions. The most reliable are synchronous pumps with a magnetic rotor, characterized by high power and miniature dimensions.
The pump is considered one of the most important elements of the washing mechanism. Its type may vary depending on the manufacturer’s brand and design features
Structurally, the drain pump or pump, as it is also called, is a unit consisting of two units. One of them is a motor with an impeller, the second is a plastic pipe called a volute. On one side of the pipe there is a seat for the engine, on the other there is a recess for the filter cover. When used correctly, the volute, unlike a motor with an impeller, is almost resistant to wear.
In older models, the pump has two impellers: one of them is used to cool the engine, the second is used to circulate water. A special feature of these devices is the oil seal, which prevents water from flowing from the snail into the motor. Modern machines have one impeller and no seals, since the electrical and mechanical parts are separated.
The average lifespan of a pump is 3-7 years, but the problem can arise even earlier. This happens when a household appliance is used incorrectly, when various small objects get into it. They stop the impeller, which leads to pump failure
Particularly costly will be repairs after the electronic control module burns out due to a short circuit in the winding. Pump breakdown is a standard situation that occurs during a long service life of the unit and intensive frequency of operation of the device.
Drain pump device
The drain pump for a washing machine has the following technical characteristics:
- power consumption - usually from 25 to 40 W;
- type of fastening to the volute - screw or fastening with latches;
- contact arrangement - paired or separate;
ATTENTION! When choosing a new pump, be sure to pay attention to the type and technical characteristics of the old pump, since the new one may not be suitable for some of the above parameters.
The pump in the washing machine differs not only in appearance, but also in the type of “snail” filter installed inside them. Very often the filter becomes clogged, and in this case the water is not completely drained from the chamber, then the dirty liquid stagnates and an unpleasant odor appears inside the drainage system. In this case, it is necessary to check the condition of the filter. You will need some tools, since the device cannot be removed with bare hands. The filter can be cleaned and the problem may be resolved.
The internal structure looks something like this:
The pump rotor is a permanent magnet in the form of a cylinder, which is located in a plastic casing. When the system starts up, the rotor first turns on, then the impeller, located on the shaft at an angle of 180 degrees, begins to move. The impeller relative to the armature should have a small stroke; this is necessary for normal engine starting, since there is a load due to water.
The rod, or otherwise the magnetic core, has two insulating windings that are connected to each other. The whole design is similar to an asynchronous motor, where there is also a moving and a stationary part. The moving part is a rotor in the form of a cylinder, and the stationary part is a magnetic core with windings.
This is how a simple washing machine pump works.
For example, if the impeller of the impeller falls off from the pump, this will inevitably lead to the need to replace the pump, since it cannot be repaired.
The washing machine's circular pump only allows liquid to flow in one direction.
For example, in the pump of a Samsung washing machine, a sealing collar is used to block the independent entry of liquid. This is necessary to prevent water from leaking into the bearing. Also, such mechanisms are equipped with a rotor shaft, which passes through a central collar bushing, which is crimped in the form of a spring ring.
Before the cuff is secured in the desired bushing, it must be lubricated with a special technical lubricant. The product is applied in a thick layer so that when starting work it gets into all the necessary gaps. This action has a positive effect on the operation of the mechanism and significantly increases its service life.
What are the requirements?
Sunflower or other household oil is not suitable here. The substance used to lubricate the sealing ring has special requirements.
- High moisture resistance. Otherwise it will quickly wash out.
- No aggression towards rubber - it should not corrode or soften. By choosing the wrong substance, you will shorten the life of the seal.
- Heat resistance. Due to the friction of the shaft and the operation of the bearing unit, the rubber heats up. Hot water should also not affect the properties of the sealing element.
- Sufficient thickness. Liquid consistency is not suitable - it will leak out after some time.
Possible causes of pump malfunctions
Problems with LG washing machine pumps must be corrected. To do this correctly and not harm household appliances, it is very important to identify the true cause of the problem.
In most cases, the following facts lead to pump malfunctions:
- Breakdown is often caused by a serious blockage in the drainage system of the machine. This process involves the pipe, the filter and the pump itself.
- Breakdowns also occur due to severe blockage of the sewer system.
- If there are defects in electrical contacts and important connections.
Before you rush to replace the washing machine pump yourself, you should rule out other equipment problems that may occur.
How and what to replace
If the problems are more serious and regular cleaning of contaminated parts cannot be avoided, then you will have to resort to replacing the washing machine pump. It is not at all necessary to completely disassemble the equipment for this. In the case of LG machines, all stages of work can be carried out through the bottom.
The algorithm of actions will be as follows.
- Drain all the water from the tank, remember to turn off the water supply.
- To make the replacement process more convenient, it is better to place the device on its side so that the drain pump is on top. If you don’t want to stain the floor finish, then you should spread something like an old and unnecessary sheet under the machine.
- Next you will need to remove the bottom panel. You can do this with literally a single click. If the machine is an old model, where the panel needs to be unscrewed, then you will need to disassemble this part very carefully.
- Unscrew the pump from the base. It is usually attached to screws located on the outside, near the drain valve.
- Pressing the machine pump from the side of the drain valve, pull it towards you.
- Disconnect all wires from the pump.
- It is imperative that you drain all remaining water from the pump, if there is still any there. Take any container for this. Slightly loosen the clamps holding the drain pipe.
- After you remove the nipple and drain hose, get rid of any remaining fluid.
- If the “snail” is in good condition, there is no point in spending money on a new one. You will need to insert the old part, but with a brand new pump.
- To remove the snail, you will need to unscrew the bolts that secure it, and then unscrew the screws connecting the snail and the pump.
- Do not rush to attach the new pump to the cochlea. First, the latter must be thoroughly cleaned of dirt and accumulated mucus. Pay special attention to the area where the new pump will “sit”. It should be clean there too.
- Attach the cleaned “snail” to the new pump, but in the reverse order. The next step is to connect the pipes. Don't forget about connecting the wires.
Cleaning internal contaminants
To do this, use a screwdriver to pry the latch on the motor body on both sides and remove it from the reel.
There are also so-called “non-separable” motors, but they can also be “treated”.
After disconnecting the body with the blades from the coil, we will see a monolithic part. The crosspiece seems impossible to remove. But there is a little trick.
- Take a regular hair dryer, set it to the lowest temperature, put on gloves, and start heating the shank of the part (its long part). Do this with care.
- After a while, when the shank has warmed up well, pry up the crosspiece with a screwdriver and carefully remove it (along with the magnet) from the body.
There may be a lot of dirt on the magnet and in the area from which it was removed. Everything needs to be thoroughly cleaned, after which you can remove the magnet itself from the shaft. You will see a bearing that requires cleaning and lubrication, respectively. Also lubricate the bearing on the bottom of the housing.
Then insert everything into place, with slight pressure until it clicks. The O-ring located under the blades should fit tightly into place.
The figure below shows a dirty motor from an Indesit brand machine.
In motors of this type, in addition to the above procedures, it may be necessary to replace the seals.
What you need
To repair an LG washing machine yourself, you will need to prepare all the necessary tools. You will also need spare parts for the device.
Tools
To carry out all the necessary work you will need the following devices:
- screwdriver;
- tool with a blunt blade;
- penknife;
- multimeter;
- pliers.
Spare parts
Repairing a branded washing machine in the event of a pump breakdown must be carried out armed with a number of spare parts. In this case, the following units will be needed:
- new drain pump;
- impeller;
- axis;
- contacts;
- pump sensor;
- cuff;
- special rubber gasket;
- closet.
When selecting the necessary replacement elements, you need to take into account that they must be ideal for the LG washing machine.
Ideally, you will need to remove the old drain and contact the store salesperson for help. The store employee should help you find suitable analogues. You can also navigate the selection of spare parts by finding out the serial numbers of the parts. They must be applied to all components of the pump located in the washing machine.
Diagnostics
Most modern models of Bosch washing machines, for example the Maxx 5-6-7 series, are equipped with a self-diagnosis system, which greatly simplifies the identification of faults. In order to establish the nature of the breakdown, it is not necessary to contact the service center; it is enough to perform a few manipulations, and your machine itself will “tell” what the problem is. So, let's start performing the service test:
- Close the sunroof, move the program selector to the “Off” position.
- Pause for 2-3 seconds, move the switch to “Spin” (clockwise).
- When the Start LED flashes, press and hold the Mode Speed button. Watch "Start" - it should start flashing again.
- Turn the switch to "Drain" (clockwise).
- Release “Revolution Mode” (you didn’t forget to hold this position, did you?).
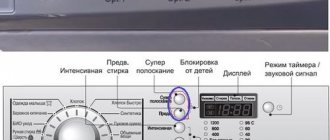
- Next, put the switch in the position corresponding to testing any component of the washing machine (3 – motor, 4 – drain pump, 5 – tubular electric heater (TEH), 8 – main wash water inlet valve, 14, 15 – quick automatic test). Below is a diagram of the switch and the location of the numbers that correspond to the position of its handle.
Here is a schematic image of the switch and an explanation of the positions of its handle.
Some models differ in the numbering of commands: for example, in the Bosch Logixx 8 washing machine, the motor is checked in the 4th position (by the way, in this washing machine you can carry out quick diagnostics by setting the switch to number 3). When the test is completed, an error code will appear on the display, which the instructions will help you decipher. In older models without a display, the error can be recognized by the glow of the LEDs, after which you can begin to repair the Bosch washing machine.
The photo shows the control panel of the Bosch Logixx 8 washing machine; Diagnostics of breakdowns in it is carried out according to the Bosch Maxx principle, only the numbering of commands is slightly different
It is somewhat more difficult for owners of older generation models - they will have to determine the breakdown based on its symptoms.
Signs of malfunctions and their causes
Devices from earlier years, for example Bosch WFT 2830 or Bosch WFF 1201, cannot independently diagnose problems, so the user will have to do this based on their characteristic symptoms:
- Water is collected slowly or not at all. This occurs due to the accumulation of debris in the inlet filter or a malfunction of the fill valve. The culprit of the breakdown may also be the water level sensor - pressure switch;
- water does not drain well. The problem most often lies in a clogged drain filter, failure of the drain pump or pressure switch;
- the water does not heat up. The heating element is almost always to blame for this. The heating element burns out for two reasons - natural wear or scale formation. Sometimes there is no heating due to problems with the control board or a malfunction of the temperature sensor;
- The drum does not spin. A belt drive transmits torque from the engine to the drum. If the belt falls off or breaks, the drum will not move. A more serious option is engine failure;
- loud noise during spin cycle. The reason usually lies in the destruction of the bearings.
In the photo Bosch Maxx 4 WFC 2060 is a model equipped with a self-diagnosis function
Any of the listed problems can be caused by a failure of the control module (electronic controller). Unfortunately, it is very difficult to repair this unit yourself; it is better not to try. Contact a service that provides repair services for Bosch washing machines at home. Specialists will resolder the board or replace it with a new one.
Repair stages
Often the pumps in the design of LG washing machines stop working properly due to simple contamination. You should not immediately run to the store for a new pump, because there is a possibility that the old part just needs to be cleaned. For these types of repairs, the DIYer will need a spare container, a rag, and a brush.
Work order.
- Start the drum rotation mode of the machine. A couple of minutes will be enough to successfully drain all the water from the device.
- Be sure to unplug the machine from the electrical outlet. Open the cover at the back. Find where the special drainage hose is located and pull it towards you.
- Hold the hose over the prepared empty container. Drain all remaining liquid there.
- With extreme care, turn the fitting in a counterclockwise direction. Remove the drain filter.
- Using a brush, very carefully and carefully clean both the inner and outer surfaces of the filter part. At the end of your actions, do not forget to rinse this element under water.
- After completing all of the above steps, install the filter in its original position. Next, fix the hose in reverse order and reinsert it into the machine. Close the unit cover.
Dismantling the unit
The liquid pumping unit is built between the drain channel from the tank and the volute - the socket into which the filter is screwed. In LG, as in washing machines of other brands, the pump is located at the bottom of the case. It consists of an impeller enclosed in a casing and a motor. To get to the pump unit, you need to perform the following steps:
- Disconnect the machine from electricity, water, and sewerage.
- Drain the contaminated liquid from the tank through the emergency hose or filter socket.
- Move the device, lay it on its left side: through the open bottom of the case, an overview of the pump and associated parts will open.
- Unscrew 2-3 mounting screws, loosen both clamps, remove the pipes. Disconnect the wires and remove the pump.
All of the above work can be done with your own hands. In more complex models with a drum for 8 kg of dry laundry, the bottom of the machine body is closed, there are additional shock absorbers and sensors. It is better to entrust such devices to specialists - they will be able to repair SMA with a guarantee for up to one year.
How to disassemble the pump
The reasons for pump repair can be a series of events: wear of the oil seal - subsidence of the bushing and shaft - axial play of the impeller - hooking of the housing - shearing of the pin. As a result, the turntable rotates freely on the drive shaft from the motor. Electric pump disassembly sequence:
- To remove the snail, turn the lid counterclockwise. If the mount is bolted, unscrew the screws.
- Pry the case latches and disconnect it.
- Release the magnet with the impeller and remove any accumulated dirt.
- Lubricate the bearings (there are 2 of them) or replace them with new ones if they are damaged.
If the problem turns out to be a broken gasket, install a new one. Depending on the condition of the impeller, further repair actions will be determined.
After the picture becomes clear with the mechanical part, we move on to the electrical half of the pump. Inspect the integrity of the coils: whether there is any burning on them from breakdown, breakage of copper wires. If defects are found in the electrical system, the entire pump is replaced.
Repair
There are LG models equipped with a non-separable type pump. For an untrained person, trying to fix a pump of this design is just a waste of time. Approximately the same situation arises when, after opening the pumping device, it turns out that the impeller is partially destroyed.
It will not be possible to restore the part at home. It is not advisable to buy separately: there are many types of electric pumps, the price is low. It makes direct sense not to restore a worn-out pump, but to replace it with a new one.
How to choose a new pump
When going to the store to buy the required pump, it is useful to know about the method of connecting the plastic pipe (volute) to the drain filter: for LG, Zanussi models - with 8 latches.
You can also order the part from the device manufacturer. In order not to make a mistake with your choice, you need to be careful and know the information about the item you are purchasing:
- the best way is to show the seller the old hydraulic pump;
- rewrite the serial number of the part and model of the SMA;
- pay attention to how the wires are connected, where the contact group is located (front or rear).
The pump power is indicated on the label; it is approximately the same for different models and does not have a decisive influence on the choice. Advice from a knowledgeable specialist when purchasing will be useful.
Installation
Before installing a new pump, you need to clean all parts of the drain assembly: pipes, volute, socket and the filter itself. After preparing the system elements and seats, they proceed to installation work. Assembly order:
- Attach the hydraulic pump to the volute.
- Install and secure the pipes and pump.
- Connect the wires to the motor terminals.
- Return the machine to an upright position.
- The SMA repair has been completed. All that remains is to connect the device to water and sewerage, insert the cord plug into the socket, and do a test run.
How to clean the pump
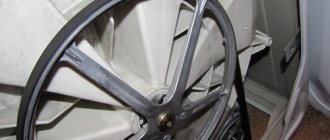
The pump cleaning operation consists of the fact that you will need to very carefully clean one component of the pump - the impeller. To fully clean the impeller, it will also need to be removed.
The process of removing the impeller is simple: using a screwdriver, you need to remove the screws that connect the 2 parts of the pump. When these parts are separated, you will see a small head. This will be the impeller. During operation of the unit, this head rotates, due to which water is drained.
Clean it of dirt, wool fibers, hair, threads and other debris and wipe the inner snail of the element. At the end of the event, assemble the pump, install it in place, also assemble and properly secure the other removed elements. When the device is finally assembled, perform a test wash. If water is filled and drained in accordance with the norm, and no knocks or noises are heard when the device is operating, then you have done everything correctly.
Don't forget about the filter. Not every time the pump is the cause of a water drainage failure. The machine may refuse to drain water due to a clogged drain filter.
You can clean the washing machine pump filter while dismantling the pump, since when you get to this element, you will still be removing the filter plug. Simply immediately remove all debris and foreign objects from it, and then remove the pump itself.
Lubricant selection
Immediately remove the following message: you cannot skimp on processing lubricants for oil seals. Go to the store and choose. Good material in the store is expensive and you have to agree with this. Another thing is how to choose a reliable and durable one from the abundance of expensive products.
Let's try to conduct a short review of the materials. When visiting a store, you need to remember that some products can be replaced, and some can be completely removed from the agenda. The top five best impregnations for SMA oil seals include the class of silicone lubricants.
Prevention of breakdowns
To avoid having to frequently repair an LG washing machine with your own hands, you should take preventive measures. Let's get to know them.
- Always inspect your laundry very carefully after washing. Try to ensure that small parts do not penetrate into the drum of the machine - they can cause subsequent breakdowns and malfunctions.
- You should not send overly dirty items to the wash. It is advisable to soak them in advance, and only after that use the washing machine.
- Items that are likely to cause serious blockage in household appliances (with long threads, pellets or bulky pile) must be washed exclusively in special bags, sold in many stores.
- A washing machine made by LG must be treated with the utmost care and precision, as is the case with other equipment. In this way, you can easily and simply avoid many problems with such a useful and necessary unit.
When to contact specialists
If you notice signs of a malfunction, it is better not to delay solving the problem and immediately check the equipment for pump failure. Otherwise, there is a risk of worsening the situation, reducing the efficiency of the washing machine and causing additional malfunctions.
If the typical symptoms of a breakdown do not coincide with the existing problem, it is recommended to seek professional help from a service center in order to be sure to get rid of the breakdown and extend the service life of the equipment. Specialists will help you repair or replace the pump, regardless of the model of the washing machine.
How to extend the life of the pump
Advice from household appliance service technicians will help you extend the operating time of your washing machine, reduce the likelihood of breakdowns, and save on repairs. Many recommendations overlap with the requirements of the SMA operating instructions. Trouble-free operation of the device is facilitated by the following actions:
- Before washing, empty clothing pockets of small objects, pre-clean fabrics from dried dirt and pet hair;
- use laundry bags for items with beads, appliqués, and other decorations;
- pay attention and respond in a timely manner to leaks and extraneous sounds when the machine is operating.
The cause of failure is also increased vibrations of the case - the wires powering the pump can fray. Therefore, you must initially install the unit in accordance with the standards. Sometimes the SMA control unit fails.
If trouble does occur, you should not use parts purchased from random sellers or used parts. Such repairs will not last long; they will lead to even greater damage.
Why did the blockage happen?
During the operation of the SMA, alarming signs may appear:
- Water drainage is unusually slow.
- A buzzing sound is heard when pumping. The efforts of a device that wears out do not lead to results.
The diagnosis is clear - the pump is clogged. Causes of clogging:
- Debris and contaminants that come with water from water pipes.
- Debris and small objects that fall into the drum along with clothes placed in the wash.
- Poor-quality detergents - they clog the drain if they do not dissolve completely.
It happens that owners of automatic washing machines never clean the drain when using them. But no matter how “smart” and efficient the machine is, no matter what famous brand it represents - Samsung, Ariston, Electrolux or Indesit, they all need regular cleaning of all parts that come into contact with water. Cleaning the drain assembly is difficult because you still need to get to it.
What determines the cost of repairs?
When calculating the cost of services for replacing the drain pump, we take into account:
- Car model;
- Pump type;
- Scale of work.
The average cost of services is from 700 rubles. To find out the price in advance, please contact us with details.
The cost of replacing the pump
| Washing machine brand | Replacement cost* (without spare part) |
| Visit of the master | For free |
| Bosch washing machine | from 900 ₽ |
| Washing machine Indesit | from 850 ₽ |
| Samsung washing machine | from 950 ₽ |
| LG washing machine | from 950 ₽ |
| Ariston washing machine | from 850 ₽ |
| Washing machine Candy | from 900 ₽ |
| Electrolux washing machine | from 900 ₽ |
| Washing machine Zanussi | from 1000 ₽ |
| Miele washing machine | from 1350 ₽ |
| Whirlpool washing machine | from 1150 ₽ |
| BEKO washing machine | from 850 ₽ |
| Washing machine Siemens | from 950 ₽ |
| Washing machine Ardo | from 950 ₽ |
| Washing machine AEG | from 1200 ₽ |
| Brandt washing machine | from 1050 ₽ |
| Washing machine Atlant | from 950 ₽ |
| Washing machine Gorenje | from 1050 ₽ |
| Hotpoint Ariston washing machine | from 1000 ₽ |
| Other brand | from 800 ₽ |
Useful tips and tricks
If you decide to repair your LG washing machine yourself due to problems with the pump, then you should take on board some useful tips.
- Additional parts for repairing the machine can be ordered from the online store, but in this case you must check them with the serial numbers of all components, both the pump and the LG model itself.
- If you are a beginner master and have not encountered such work before, it is better to record all stages of your actions in a photo. This way you can get a kind of visual instruction with which you can avoid many mistakes.
- In order to easily disassemble the washing machine, carry out high-quality repairs or replace the necessary parts, it is important to follow all the necessary stages of work. None of the actions should be neglected.
- LG washing machines are of excellent quality, but they are technically complex devices, so repairing them often turns out to be just as difficult. If you doubt your own abilities or are afraid of damaging household appliances, then it is better to entrust its repair to specialists with the appropriate knowledge and experience. This way you will protect yourself from making serious mistakes and shortcomings.