Recently, consumers often prefer not the usual bathtub, but a shower stall in which they see more advantages. But when installing it, not everyone follows the recommendations of specialists.
This is where problems arise: mold forms at the joints soap stains appear , and water does not drain well.
In our article we will give 3 effective ways to eliminate the problem of slow drainage caused by improper installation of the shower stall.
Design features of shower cabins
The assembly of the shower cabin itself (the lessons will help you understand the process) is largely predetermined by the type and features of different cabin models.
Main components of shower cabins:
- Pallet (usually equipped with a special frame).
- Doors (check for special fasteners and rollers).
- Cabin cover (also called a ceiling panel; it is not always included in the equipment package).
- Side panels and cabin wall (also depends on the model configuration).
The simplest installation of shower cabins, models of which do not have walls or panels (this is the minimum configuration).
To install such a cabin, you will need two walls and a corner in the bathroom - they will serve as the walls of the shower cabin.
All other models of shower cabins are much more difficult to install. Instructions for installing a shower cabin are usually developed by each manufacturer.
But if you purchase a budget model made in China, you cannot count on a detailed description. Therefore, we will use the advice of experienced craftsmen.
A little advice: do the “pre-assembly” in a large room (for example, in a room), where it will be convenient to lay out and assemble everything.
“Preliminary” assembly of the shower cabin with your own hands will help you figure out all the components (it may happen that they are missing, then you will have to buy more), determine the dimensions of the equipment and view their actual location in a permanent place.
Only after you have “tested” everything with your own hands can you begin to install the shower stall in a permanent place.
Increase the length of the studs
Raising the cabin by 10 cm is often not enough. The legs are not adjustable enough to provide the desired drain speed. The only option is to install other legs.
Replacement sequence:
- Find a suitable stud in a hardware store, observing the parameters of the thread and section size.
- Calculate the length of the future leg with an increase for raising the cabin.
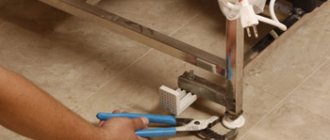
- Cut equal lengths of the stud with a hacksaw.
- Install new legs by unscrewing the old ones. The upper end of the pin must fit into the frame structure, the lower end into the plastic or rubber layer in contact with the floor.
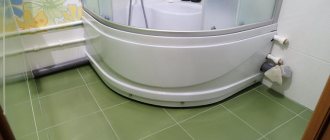
With such changes, the result is not the most aesthetic clearance above the floor from the bottom of the shower. It will become easier to clean the bathroom, but it will damage the appearance of the room. If desired, you can hide the repair environment with decor on the pallet.
Important! Long legs support less weight than short legs. It is not advisable to increase them longer than 15-17 cm.
Manufacturing materials
In fact, absolutely any materials can be used to create a podium, but you should remember the requirements for the design, namely: it must be durable, and accordingly, the materials must be chosen that are durable and reliable.
In addition to the materials for the podium themselves, you will need some construction tools: a tape measure, a spatula, a marker, a knife, and so on. Consumables such as crushed stone, sand, cement, tile adhesive, tiles, and aluminum profiles for corners will definitely come in handy.
Often the following types of building materials are used to create a podium:
Wooden podium
The main advantage of a wooden podium is its speed of production and low cost. Building such a structure from wooden blocks will not be difficult and will not hurt your pocket, but you should also remember the disadvantages of such a design.
Before assembly, the wood must be coated with an antiseptic and then with drying oil or paint so that the material is resistant to an aggressive environment - moisture and mold.
After assembling the podium and installing the shower cabin on it, there is a large gap between the floor and the cabin tray that needs to be closed with something. For these purposes, you can use plastic panels or tiles, securing the material with glue or silicone.
It should be noted that wood does deteriorate over time, even despite the reliability of the structure and the quality of the protective coating, so a wooden podium is a temporary solution.
Brick podium
Another opportunity to make a reliable podium for a shower stall is to use brick. This is a long-proven material, durable and inexpensive, which is resistant to high humidity. It also has a longer service life than wood.
The brick is installed on a sand-cement mortar, and the geometry and level must be observed to prevent tilts and distortions. You definitely need to let the cement mixture harden, it usually takes 2 days, so you will have to wait a little while installing the cabin.
Using bricks it is convenient to make steps for the podium, which will increase ease of use.
The final stage of creation is finishing. The brick podium is covered only with tiles or mosaics, which is precisely the main finishing material in the bathroom.
Raising to your feet
Often, factory bathtubs come with specialized legs that are attached specifically to the plumbing system. But their length may not always be enough. What to do if the factory legs for the bathtub are quite short? It's quite simple: you should purchase new, longer screws.
At home, you collect 1 leg, and then with it, as an example, you go to a nearby plumbing supply store, or to the market. There you search for and purchase screws with the length and thread size that suits you. Then, upon returning home, you simply replace the purchased screws with factory ones and install them on the bathtub.
When purchasing, attention should be paid to the quality of the product. Do not forget about the load that the legs will hold - this is a bathtub filled with water in which a person is sitting
For excellent durability of the bath, and the safety of your loved ones, you should select only products from trusted companies.
This option will give you the opportunity to raise not only ordinary bathtubs, but also unusual models with artistic legs. Raising the bathtub this way is not difficult, and the new screws will be virtually invisible.
Podium for a shower cabin made of brick
Another way to make a reliable pedestal for a shower device is to use brick. This is an affordable and durable material that can withstand high humidity and looks good indoors. Creating a brick podium does not require a lot of strength, skill and skill. Most often, this design has a stepped structure, convenient for lifting into the shower stall when using it.
During the construction process, the brick is laid on cement mortar. Then you should wait until it is well fixed and the solution dries and hardens. Using bricks, you can give the elevation any shape and provide any number of steps. In order for such a podium to fit organically into the surrounding environment, it is faced with tiles and mosaics in the general style.
Essential requirements for installing an elevation
Before making a shower stall podium, you need to consider certain points. First of all, you should calculate the distance from the plane of the future structure to the drain pipe. It does not have to be more than 6 centimeters. The height of the elevation must be necessary to ensure that water leaves through the sewer; otherwise, stagnation cannot be avoided
It is also important to leave enough free space between the shower ceiling and the shower stall.
Whether the podium will be closely adjacent to the wall depends on the version and type of cabin model, and the specifics of the room where the system is installed. A weighty device will then be placed on its surface, and therefore the podium must be strong. It is better to cover the part on top with tiles to avoid damage and scratches on the surface of the tray and shower cabin.
Requirements for installing a podium
The convenience and comfort that installation of a shower cabin provides is an indisputable fact. But at the implementation stage of this project, certain difficulties may arise. The fact is that the tee on the sewer pipe is most often installed quite high (9-15 cm from the floor level), and to ensure high-quality drainage it is necessary to maintain an inclination angle of the horizontal section of at least 3°.
One solution to this problem is to build a podium.
When calculating the design of the podium, one should assume that the distance from its surface to the drain pipe should be 5-6 cm.
Pallet structure: siphon, screed, outlet, waterproofing.
This is necessary to avoid creating a siphon effect, which will lead to constant stagnation of water in the pan and rapid clogging of the drain.
It is also necessary to provide a minimum distance to the ceiling. Installation of the structure should assume a distance from the ceiling of 20 cm. The distance from the walls should correspond to the structural features of the shower stall specified in the assembly instructions. Taking these indicators into account, the shape and design of the podium is calculated.
Due to the fact that the load on the podium will be quite serious (the weight of the shower cabin is about 100 kg, the weight of a person and water in the tray), the structure must be strong and stable. It is recommended to lay out the surface of the podium with tiles.
Installing a podium with your own hands can be done by using:
- wooden blocks and plastic;
- concrete mortar;
- brickwork.
To create a podium, we will need the following materials and tools:
- brick;
- fittings;
- boards for formwork;
- metal profiles;
- beam;
- tes;
- building level;
- roulette;
- sand;
- cement;
- crushed stone;
- silicone sealant;
- marker;
- tile.
DIY drain installation
Installing a water drainage system into a sewer involves sequentially completing the tasks of installing pipes, a siphon and a drainage system.
Shower channel
The installation of the siphon to the shower tray is carried out before the base is leveled to the floor. The upper part of the drainage fittings is attached to the inside of the pan, fixed with a bolt in the center (pre-treat with sealant).
Drainage drain
Installation is carried out using a channel-type siphon. You can additionally install a drain in front of the installed shower stall to avoid leakage beyond the required limits, but such a system is rarely used.
Siphon on the cabin tray
If there is an overflow, first install the tube in the siphon, and only then attach it to the sewer.
Assembling drainage fittings is not difficult, the main thing is to follow the instructions and carefully treat the joints of the parts with sealant. The pipe is connected on one side to the sewer outlet, and on the other side it is attached to the drain of the shower stall.
Recommendations
In order for drainage fittings to work for a long time, it is important to use high-quality sealants that are resistant to high temperatures. You should also not use inexpensive plastic siphons to provide hot water drainage; it is better to purchase stainless steel models that will last longer. Other recommendations:
Using a drain
The use of an additional drainage system is relevant if the shower stall is of a combined or open type.
Then there is a risk of water getting beyond the sides. If the cabin has a high tray, then this application is not relevant.
To save money, you can install a double siphon, which will receive water from the shower tray and drain. You need to choose stainless steel models.
Construction of a pallet
Any pallet, regardless of its manufacturer, consists of such parts as a siphon, outlet, screed and waterproofing. This is required to ensure that there is no effect of constant stagnation of water and rapid clogging of the drain.
In addition, do not forget about the minimum distance to the ceiling. The construction of such a structure should guarantee a retreat of about 20 cm. At the same time, the distance to the wall should be maintained in accordance with the structural requirements of the cabin itself. They are usually indicated in the corresponding instructions for assembling the shower cabin. In accordance with these indicators, the characteristics of the podium are calculated, including its design solution.
Since the load on the podium itself under the shower cabin will be quite serious, since it includes the weight of the shower cabin, the weight of a person and the water used in the tray, the design of the tray should be strong and stable.
In this case, tiles for the podium surface are the most suitable material option.
When installing a podium under a shower stall on your own, you should use such available tools as:
- wooden blocks and plastic;
- concrete solution;
- brickwork.
Drain care
The rules for operating a siphon are ensuring a constant temperature in the room, cleaning pipes and monitoring the temperature of drained water:
How to disassemble the siphon for cleaning
Sometimes additional cleaning of the siphon is required.
To do this, you do not need to have professional skills, follow the recommendations: A malfunction of the siphon is easy to identify - if it is clogged, the water flows more slowly, and you will notice the smell of the sewer. If any part of the device is deformed, then a leak forms, water stands under the tray, and a wet spot is visible after taking a shower.
Choosing a high-quality and reliable siphon for a shower stall is not a problem, knowing what to look for. Recommendations for choosing the required system should be considered individually, since the design of the tray, as well as the overflow itself, is different. Therefore, when purchasing a booth, you must immediately decide on the choice of siphon.
Raising the shower drain level
In old houses, sewer backing was a problem. Cast iron pipes quickly became overgrown with plaque. The resistance to fluid flow in this case is high due to the significant roughness of the metal. It’s hard to imagine smooth cast iron, and even harder to imagine that someone at a factory would specifically polish the pipes from the inside. In the case of plastic, the situation has changed dramatically.
According to GOST 6942, there are no cast iron sewer pipes with a bore diameter of less than 50 mm, while plastic ones are sold with 40 and 32 mm. This fact alone speaks volumes. Why beat around the bush when siphons for shower trays have a diameter of outlet into the sewer system from 32 to 40 mm. They are in principle incompatible with cast iron.
Shower drain pipes
Why is all this being said? Moreover, the laws of hydraulics in plastic are completely different. In practice, this means that the water will drain better, therefore a high podium for the shower stall is not needed. The law of universal gravitation applies in the bathroom. Therefore, the level of the drain hole should not be lower than the location of the sewer branch from the riser in the apartment. But! Not so simple.
Let's assume that the diameter of the inlet pipe on the riser is 70 mm. The sewer riser runs vertically. By definition, nothing will flow inside from it. But to make sure of this, we mount an eccentric adapter with 40 mm or some other suitable size. At the same time, few people think about why the manufacturers did it this way. Why is the adapter eccentric? We explain:
- In an eccentric adapter, the narrower hole is always located at the edge of the larger diameter.
- The installation is carried out in such a way that a threshold is created. The narrower diameter is at the top.
- When sewage flows through a riser, it has a choice: to splash out into the apartment or go down.
- The drain meets the threshold, and our opening here is narrow. Due to this, the drain prefers to fall down and does not clog our sewer pipe inside the apartment.
At the same time, the old school of masters continues to claim that a high podium is needed for the shower tray. At the same time, they give the following figures: for every meter of sewer length, you need to maintain a 3 cm descent into the riser area. Where did all this come from? With the adapter we have already created a difference of at least 3 cm instantly. Now we immediately install a sink in the bathroom, which has two purposes at once:
- Wash basin.
- Washing dishes.
Raised shower podium
Yes, the kitchen sink should not be placed in rooms without natural light, but nothing is said about the dishwasher. What is the connection with the sewer and the podium? The most direct one. It is from food waste that the most important traffic jams on the line are formed. Because it is recommended to place the toilet on a different pipe and, if possible, closer to the riser. On the other branch there are (according to the degree of distance from the riser):
- Adapter from 70 to 40 mm to create a sharp increase in resistance in the path of drains tending to come from outside.
- Sink for washing dishes in the bathroom. It is still better to dry it in the kitchen. There are a lot of devices where you can put the entire set of plates.
- Another adapter from 40 to 32 mm (because a significant part of siphon showers have this exact outlet diameter).
- Shower cabin with podium and tray, drain, siphon, corner, etc.
- There is a kitchen sink across the wall, where we just get water. And if we drain it, then only liquid waste, so as not to clog anything.
Follow this diagram, and the height of the podium for the shower stall can be minimal. In fact, it should only exceed the level of the lower edge of the smaller hole of the first eccentric adapter. That's all! No 3 cm per meter. This rule is taken from the arrangement of underground sewers of private households without a pump to the sewer pit. The length of an ordinary bathroom does not exceed three meters and all sinks will stretch this distance without slope. As for the shower stall, if there is a negative area in front of it, it will even be good that the water stagnates here. Because it will serve as a stopper, preventing someone falling from above from entering the room and filling it with specific odors.
Shower cabin on the podium
What should the actual height be? Old cast iron bathtubs in Soviet-built houses are kept literally 5 cm above the top cut of the sewer pipe. But every bathtub has a water seal. That is, a small water plug that prevents bad odors from entering the room. Think about it: in modern homes, the shower siphon has a water seal, and all the sinks inevitably stink. Why?
Pallet arrangement options
Depending on how the bathroom is arranged (combined bathroom), one of the types of shower compartment is selected:
- occupying all the space between the walls in the far part of a rectangular or irregularly shaped bathroom;
- located in a niche, and the niche may be part of the original layout of the room. Another option is to create a niche specifically for convenient arrangement of the shower;
- located in the corner of the room;
- located near one of the walls;
- separate standing.
It should be noted that only tall shower trays can be located separately (in the middle of the room), since otherwise it is difficult to ensure that the floor slopes in the desired direction throughout the entire bathroom. This is usually done with closed industrial cabins or a mini-pool with a ceiling shower is arranged (as in the illustration). This option is only suitable for very spacious bathrooms.
It is most rational to arrange a shower corner with a tray so that it is limited on at least one side (or better on two or three) by a main wall or partition. This simplifies the issue of waterproofing the rest of the room - the water suspension during a shower is limited to a relatively closed space. An additional plus is that you can arrange not four, but three/two/one walls of the shower compartment.
High, low, sloped floor
A shower tray in a bathroom can be:
- high – with a height along the upper edge of the side of 40 cm or more. In this case, the height of the walls in relation to the bottom is at least 20 cm. Such pallets can be additionally equipped with a seat;
- small - up to 40 cm in height. The height of the sides varies from 5 to 20 cm;
- without lifting above floor level. Such a tray is a platform without sides or with a side 2...7 cm high, evenly buried towards the drain.
In addition to height, homemade pallets differ in the type of drainage device. The drain located in the center or offset to one of the corners of the shower compartment can be supplemented or replaced with a shower drain(s). This drain option differs from the standard one in the increased area of the inlet opening (usually covered with a grate or plate with a slot around the perimeter).
In addition to drains with small-sized external gratings (10x10, 10x20, 10x40 cm), they also produce products that can replace up to half the floor area in the shower.
It should be noted that the dimensions of the outer part of the shower drain are usually a multiple of the dimensions of standard tiles.
The choice of a high or low shower podium depends on the capabilities of the users:
- high sides are inconvenient for people with limited mobility;
- for non-ambulatory patients, sitting may be necessary;
- If there are small children in the house, a deep tray is convenient as a replacement for a bathtub.
Also, the preference for a high or low tray depends on how the sewer pipes are laid (riser pipes, sun loungers) and how much it is necessary to raise the shower podium to ensure normal water flow.
Tile style
A large selection of cladding in stores makes it possible to realize the most interesting ideas. To decorate a bathroom, you can buy not only simple or colored tiles, but also mirror or stone mosaics, coatings with a golden or silver sheen, sets of panels with a pattern, pebble flooring and other beautiful materials. Specialists can offer design photos and ideas.
Choosing a color
A design sketch in color is drawn up at the design stage. You can highlight the shower room with a contrasting color or choose a shade from the overall range. The finishing of the box can be done with the same tiles as the entire bathroom: this will create the appearance of a seamless space when using curtains or a transparent wall.
Choosing the color scheme of the shower stall.
The floor covering is chosen according to the same principle. Tile rulers allow you to select similar or matching parts in shade and style for walls and floors.
Ceramic
Ceramics without glaze are often used only for floor finishing. But in modern interiors, waterproof brick-like tiles can also be used to make a wall in the bathroom where the shower box is located. Warm shades and a velvety surface, pleasant to the touch, will create additional comfort in the shower.
Ceramic tiles for shower.
Mosaic
There are so many options for mosaic coverings that you can choose any shade and any material (glass, tile, natural stone). Often, a mosaic coating consists of many colored pixels located randomly. You can choose a panel with a simple pattern or assemble it yourself, cutting out parts from a mosaic on a grid. Mosaic tiles are suitable for decorating walls and floors.
Porcelain tiles
Laying porcelain tiles on a bathroom floor is as easy as laying tiles. Large slabs allow you to get the job done quickly, and the moisture resistance characteristics are not inferior to glazed ceramics. When working with porcelain stoneware, difficulties will arise when finishing the inclined parts of the shower: the slabs will have to be trimmed and adjusted. It is better to entrust this operation to professionals and order cutting in a workshop.
Porcelain tiles are as easy to use as tiles.
Porcelain tiles allow you to imitate finishing with expensive types of natural stone (marble, gabbro-diabase, etc.).
Other types
Wall tiles can also be made from other materials: glass, acrylic, and other types of plastic. These are less expensive options. Decorating the walls with such materials will allow you to create an unusual bathroom with beautiful decor. These materials are not used for flooring: they become slippery when wet.
Ready-made design solutions
There are many options for improving the appearance of the structure. Modern designers use not only the usual tiles for decoration. Mosaic looks good in the bathroom. It is easy to install on any base. The sheet is bent in the desired way, after which it is fixed to the surface with glue or other means. An economical option for repairing the podium is cladding with PVC panels. They are bent by heating with a hair dryer. Ready-made versions of designer shower cabins with a podium can be seen in the photo.
Common installation mistakes and ways to prevent them
An incorrect pipe laying plan can ruin all your efforts. It would not be superfluous to add a water seal to the drainage system, protecting the bathroom from the appearance of unexpected odors.
If the drain is clogged or the volume of pipes under the pan is insufficient for quick flushing, there is a risk of again encountering problems with stagnant water and flooding the floor.
You need to make sure that the walls and floor of the bathroom are level. Otherwise, during installation you may end up with unintended gaps between the tiles and the sides of the cabin.