For any motorist, a garage with an inspection hole is a place where he can disappear for hours, or even days. Cook the bottom, check for new holes in the muffler, find out where the oil is coming from. Where would we be without a hole? You need to examine your swallow from all sides. And a basement wouldn't hurt either.
Reliable storage for canned food and vegetables. So, if you are going to build a garage, then you need to squeeze as much benefit out of this idea as possible. Drawing up a competent project is the first and most important step towards its successful implementation.
Potbelly stove in the garage
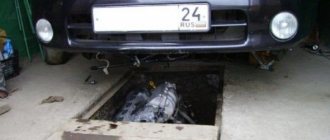
There is a 5*6 garage with a full floor basement. Height approximately 2.5-3 m + 2 m basement. There is a homemade potbelly stove, approximately 50 liters in volume. I don’t really want to install it inside the garage itself, because... There isn't really enough space. So I wondered. What if you install a stove in the basement? Here are the advantages I see (in theory): 1. Dry basement (most likely it will be drier than it is, as it seems to me, because everything will warm up.) 2. More uniform heating of the main garage room (after all, warm air still rushes upward, so why not to lose it under the ceiling, but to be able to pass it throughout the entire area.) 3. Greatest fire safety (nothing is stored in the basement except brick walls and sand) 4. Reasonable use of free space.
List of tools and equipment
You cannot make such an object as an underground garage with your bare hands. You need tools, and at certain stages you will even have to use special equipment. Therefore, we provide you with a list of everything you need to prepare for each stage of building a garage under the roof of a private house on the ground floor.
Tools:
- one drill with various attachments;
- mallet for laying tiles;
- scraper for leveling concrete;
- level.
Special equipment for garage construction
Special equipment:
- excavator;
- a truck crane or similar lifting equipment capable of laying slabs;
- vehicles for transporting everything you need.
Materials:
- reinforced concrete slabs;
- roofing felt;
- reinforced concrete floor;
- light reinforcement mesh;
- plaster;
- crushed stone;
- concrete;
- paving slabs;
- anti-slip strips;
- brick;
- sewer grate;
- metal supports and ceilings for the roof;
- slate.
Making a GARAGE out of a garage - Part 16 - Upgrading the stove and pit opening
Now the time has come to tell you about the most “delicious” =)) As some of you may remember, in Part 01 I installed a regular potbelly stove. Everything would be fine, but time passed and the horizontal section of the pipe was slowly overgrown with soot. And as a result, the stove began to smoke more and more often, and in the winter it was covered with frost a couple of times so that we had to heat it with the door open to melt the snow in the chimney))) This is where we had to film the cartoon “hedgehog in the fog” =) ) And once again, poking around on the Internet, I came across this site bullerjan.su. I was interested in this copy - bullerjan.su/order/4. I read about these stoves in general and decided to take a look around the local stores to get a price estimate. And not in vain, because. The same stove in retail cost us almost 13 thousand, and when ordering from the website (at the time of purchase 7600) + delivery by Business Lines it came out to 8 thousand. I ordered it, it was delivered, and it stayed with me for almost six months. Now her time has come. Since I already had a hole for the pipe to the basement, all that remained was to make it in the roof. Due to the fact that, according to the recommendations, a chimney needs to be at least 4 meters in order to have draft, I coped with this parameter with a bang and the total height was 6 meters, i.e. four meter and two meter sandwich pipes. Sandwich pipes are needed for the outdoor part of the chimney so that less condensate accumulates. And so, the hammer drill of course “sweated” a couple of times, but it ate through the slab
The diameter of the hole turned out to be more than 200mm, so that there was still room for the solution. Because of the roof, we had to move the hole a little to the side, because... The center of the pipe in a horizontal position extended along the very edge (second photo), but this is not critical. First, I assembled the chimney “in weight” in order to center the pipes and estimate the height of the pipe relative to the roof ridge. I fixed the sandwich pipe in the slab and filled it with solution.
When the solution had set, I coated the joints with heat-resistant sealant and put everything back together. But before putting the stove in place, I whipped up a stand for it, because... The oven should not be placed directly on the floor. I blew it out with oven paint.
Depending on the configuration of the stove, because There is one with a chimney outlet at the top and at the back, mine is at the back, the chimney is installed in different ways. In my case, a tee is first put on the stove outlet, on the bottom side of which a plug is placed with a faucet to drain the condensate, and the chimney itself is raised from the top. So I did. That's actually the culprit
On the street side I stuck a second sandwich pipe and an umbrella with wind protection
I also decided to completely fill the hole between the garage and the basement.
Well, what can I say based on first impressions. An ordinary potbelly stove, it warms you as you heat it, but with a couple of bonuses! The first is convection. Maybe it’s not so noticeable, or maybe I haven’t realized it yet, but it cooks well from the pipes, the traction is there. True, I didn’t find technical data with information about the volume of pumped air, but I think a lot depends on the temperature in the firebox. And the second bonus is the burning duration. This is where she really made me happy! A real example: while tinkering in the garage, I lit the stove, before leaving at the beginning of the first night, I put on a full firebox, put it in smoldering mode (this is when all the valves are closed) and left. Arriving at the garage at the beginning of the second day (!), I went down to the garage and realized that it was somehow too warm (usually by this time the room had time to cool down. I went up to the stove to break the unsmoldered coals and realized that warmth was wafting from the stove. I felt and really! It's still warm, not hot, but warm! Without hesitation, I chopped some wood chips, threw them in, opened the valves, the draft started, the coals got hot, the wood chips caught fire and I threw in more wood...beauty))) On average, the firebox lasts for 5 hours , but it all depends on the firewood: how dry it is, the type of wood (birch, coniferous or cutting boards), the temperature in the room, etc. In terms of temperature, I can say that it catches up quite quickly if you fire it up to full capacity, comparable to a regular potbelly stove, and in smoldering mode, for example, yesterday it smoldered for about 4 hours; the thermometer in the basement was +20, and in the garage itself it was +18, and this is at taking into account that the garage door was open 70% of the time. Overall I'm happy. Yes, not budget, but very convenient! Wow, well, I wrote it down)) But there is one more question on the recording agenda! More precisely, the solution is the hole opening. The fact is that initially two corner frames were stuck in the opening, the first one held the garage floor itself, and the second one was made for the “second” floor, for the purpose of thermal insulation from the basement. But because The meaning in it disappeared, then I decided to dismantle the frame of the “second” floor. And at the same time raise the corner of the main one, because Apparently, when they laid the boards, they were raised too high in level, I struggled with this in the last post. Because of this, the boards lay too low relative to the main floor and a rather noticeable step was obtained. I lifted the corner, drilled holes in it and leveled it with the boards
But I had to raise it almost 2-3 cm and in this position I secured it with self-tapping screws at the end of the board
Because the frame consisted of two C-shaped parts; I welded them together at one end, at the same time making a side for the solution that was poured in the previous part.
And I covered this entire gap with mortar so that the corner would not “play” when hit by a wheel.
Now it’s not perfectly level, but the step is much smaller! And I put the frame from the “second” floor on the edge of the jamb, all from the same previous entry))) And in addition to modernization, the stairs to the basement were modernized. Increased the steps! I solved a channel that had been lying around for a long time and welded it to the existing steps.
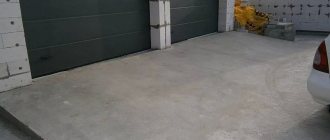
Construction of the entrance road in stages
- First you need to make a dirt path along which the car will move. It is carried out without any addition of soil - it is better to make an embankment and then cut it to the required level. This approach helps prevent possible failures in this coating layer.
- Afterwards, each section of the road is covered with crushed stone. Its layer should be approximately 15 cm, and this is after it has been leveled and compacted.
- Then you need to make a supporting layer of concrete (we suggest B10, but you can choose any other viscosity similar to it). The thickness of this layer should still be the same 15 cm. And do not forget to protect the concrete immediately after setting so that the sun's rays do not fall on it.
- The finishing coating must be laid on the supporting layer. We suggest making it from paving slabs (asphalt is an alternative) because it looks more aesthetically pleasing without being too slippery. This finishing coating can be laid using a regular mallet, without waiting for the concrete to dry, immediately after it sets. It is only important that the tiles fit snugly against each other and form an even coating (use a level to check this).
Paving tiles at the entrance to the garage
It is also worth making supporting walls on the sides of the entrance and a roof on top. This will be a practical solution, the costs of which will be recouped by the longer service life of the entrance road. The roof will ensure that the entry road remains dry in rain and snow, and the walls will prevent landslides and subsequent destruction. Lay the walls out of brick, attach metal supports and ceilings to them (the easiest way is to immediately order a U-shaped welded structure), lay slate and secure it with self-tapping screws.
As you can see, making a garage on the ground floor is not so difficult, because much of the work can be done yourself. And the benefits of such a room, located under the same roof as the house, will be invaluable. you will get a parking area, a personal auto repair shop and just another room for practicing hobbies.
Correct installation of the stove in the garage
For proper operation of the stove, for the entire period of its operational life, you need to know how to properly install the stove in the garage. For reliable protection against a possible fire, you need to carefully determine the placement location, the method of outlet of the chimney, and study some installation rules.
Content:
Fire safety rules
Many people ignore safe installation rules, thereby endangering people and property around them. To ensure safety during operation of the stove, you should strictly adhere to fire protection rules and observe the correct installation of the stove in the garage.
To avoid a possible fire, you should adhere to the rules given below:
- The floor and nearby walls must be made of non-combustible material: concrete, brick, metal or ceramics. Special heat-resistant plates made of fire-resistant material are also used.
- The stove itself must be made of reliable and proven materials.
- Under no circumstances should there be any substances or materials near the stove that are easily flammable or may explode.
- The garage must have normal ventilation to ensure removal of combustion products in case of smoke.
- You should not install the stove close to the car; the distance should be no less than 1.5 meters.
In fact, garage ventilation should be a top priority. Due to insufficient oxygen, a fire can burn weakly, causing serious carbon monoxide poisoning or other serious and tragic consequences.
Exhaust ventilation must be present and in good condition. This will protect the garage from fire and prevent people present from getting hurt.
Where is the best place to install a stove in the garage?
When choosing the best place to install it in the garage, you should choose to place it in the corner of the garage, preferably on the opposite side of the gate.
This placement will allow for more efficient heating of the entire garage area and prevents the garage from quickly cooling when the door is opened. For safety, the chimney pipe running along the walls should be located at least 0.5 meters from the wall.
If the wall in the garage is built of wood, then the distance should be increased to a meter, and the wood should be protected with any fire-resistant material.
If installed near a gate, the installed stove should be no closer than 1 meter from the gate; this is necessary to ensure safety if the casing is made of wood.
How to properly install a stove in a garage?
After choosing the installation location, before starting installation, you need to protect the base from accidental loss of coals by placing a steel sheet under the stove, or erecting a brick base. If a concrete floor has been screeded, the stove can be installed directly on it.
To increase heat transfer time and at the same time safety, red brick walls are built around the stove. This increases the operating time of the stove, it cools down much more slowly, allowing you to receive heat after complete combustion of the fuel. This method is used mainly for square-shaped stoves; in round stoves, radiator plates are used throughout the body.
Let's take a closer look at how to properly install a stove in a garage:
- When you have decided on the installation location, you need to prepare the foundation for its installation; the weight of steel furnaces is small, but the foundation must be strong enough. Under the installation site, soil is selected to a depth of 40-50 centimeters, the dimensions are calculated based on the stove itself (15-20 centimeters wider).
- Next, the dug hole is filled with a cushion of sand and crushed stone and compacted well.
- After which a wooden formwork is constructed and securely fastened.
- Next, a cement-sand mortar with crushed stone is prepared and concreted.
- When the base has hardened, we install the oven itself, according to the provided calculation.
- If necessary, we make a protective screen around the stove.
- Depending on the conditions, we make a passage hole for the chimney pipe in the wall or in the roof.
- The last stage of installing the stove will be the installation of the chimney (this will be discussed later).
Chimney outlet through the wall
There are two options for venting the chimney: through the garage roof or through the wall. Now we will consider both options in detail.
Exiting the chimney through the wall has a number of advantages:
- It does not require high-quality waterproofing of the pipe passage, unlike the passage through the roof.
- Relatively simple and convenient installation.
The disadvantages include:
- Worse draft compared to direct installation of the chimney.
- The presence of turns and bends makes cleaning difficult.
- It needs more insulation.
Schemes for installing a garage stove through the wall (2 options):
Installation Tips:
- Chimney installation begins with the stove. After preliminary assembly, the location of the chimney passage in the wall is marked. Next, the technological hole itself is prepared. Afterwards, the final installation of the pipes is carried out in the garage with the elbow or tee leading out to the street.
- It is advisable to use a tee with an inspection removable cover for ease of cleaning. It is worth noting that if the walls of the garage are made of wood, a fire passage must be constructed from a steel box, where the space around the pipe is filled with non-combustible material.
- Installation of the chimney pipe on the wall is carried out using special fasteners strictly vertically; a fungus is installed at the end of the pipe to protect it from moisture. The length of the chimney depends on specific conditions, the main condition being sufficiently good draft.
Chimney outlet through the roof
Diagram of the outlet of a stove chimney for a garage through the ceiling/roof:
As in the case of installing a chimney through a wall, when installing through a ceiling, preliminary assembly is first done in order to accurately mark the future passage through the roof. Once the installation hole is made, the steel penetration through the roof is installed.
Next, in the same sequence, the pipe is assembled and the passage through the roof is laid with non-combustible material. The passage of the chimney through the roof requires reliable waterproofing so as not to encounter leaks in the future. As in the first option, you should protect the pipe from moisture getting into it and insulate the outer part of the pipe to reduce the formation of condensation.
Conclusion
From all of the above, we can conclude that the installation of a stove in a garage must be done correctly, and all fire safety standards must be observed. Not only the long and normal operation of the heating device itself, but also safety depends on the correctness of the work on installing the stove.
You should strictly adhere to all rules and requirements to ensure normal, trouble-free operation of the furnace. It is important that before firing the stove for the first time, you must carefully ensure that there are no leaky joints and connections, and if the slightest defects are detected, they should be eliminated immediately. This will help protect against carbon monoxide poisoning and fire.
If everything is done correctly, the stove will delight and provide warmth for many years. You will be able to forget forever about working or relaxing in the garage, which previously looked more like an ice palace. In addition, the stove still remains a very efficient and economical heating device.
In addition to everything, a stove in the garage can be used for cooking. You can equip it to heat water and use it for your needs. Based on the stove, you can make full-fledged water heating for your garage; of course, this will only be appropriate in cases where the garage is visited every day. If the garage is not visited often, it is not worth using water heating as an addition to the stove.
Ready-made basement structures
All of the above work is complex and costs a lot of money. Today you can purchase a ready-made plastic cellar for your garage. It is made from low-density polyethylene or polypropylene. Production method: welding of individual elements or molding of finished cellars.
The advantages of plastic structures are obvious:
- complete tightness, which guarantees protection of the internal space from the penetration of moisture or groundwater;
- a wide range of models allows you to choose the size of your garage;
- ease of installation - it takes one day along with digging a pit;
- the lightness of the design does not require the presence of heavy equipment at the construction site;
- high strength of the structure;
- Fully equipped in terms of hatch and ventilation;
- reasonable price, for example, a plastic cellar made by welding, measuring 1.6x1.6x2.4 m costs 100,000 rubles.
Plastic cellar Source en.decorexpro.com
How to make a stove in the basement of a garage correctly
You are using an outdated browser. This and other sites may not display correctly. You need to update your browser or try using a different one.
Used for gluing decorative elements made of ceramics, stone or other mineral materials to heated surfaces. Recommended for masonry, cladding, putty, grouting and repairing stoves, boilers, fireplaces and sealing cracks in chimneys. The mastic is resistant to water and temperatures up to +1300°C. Excellent adhesion, high elasticity, ease of use, low consumption.
Project documents
Documentation is an integral part of design.
The set of documents should include:
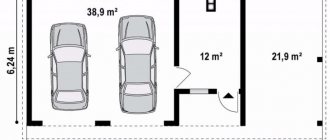
- schematic position of the building on the site and a sketch to scale;
- floor plans with all measurements and location of additional structures;
- drawing of the foundation and frame of the building;
- list of necessary materials and tools;
- cost of materials and labor;
- explanations for documents.
How to make a stove in the basement of a garage correctly
You are using an outdated browser. This and other sites may not display correctly. You need to update your browser or try using a different one.
Used for gluing decorative elements made of ceramics, stone or other mineral materials to heated surfaces. Recommended for masonry, cladding, putty, grouting and repairing stoves, boilers, fireplaces and sealing cracks in chimneys. The mastic is resistant to water and temperatures up to +1300°C. Excellent adhesion, high elasticity, ease of use, low consumption.
What kind of cellar to build?
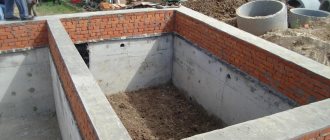
Proper arrangement of the basement during the construction of the garage will save the owner from the need for further redevelopment of the structure. Before you make a cellar in the garage with your own hands, you should decide what exactly it should be like. If it is assumed that the basement will be located directly under the building, then the type of storage is determined by its depth .
If the project for building a cellar in a garage involves the construction of a semi-buried storage facility , then it should be arranged according to the principles of arranging an inspection pit . The standard depth is 70–100 centimeters. If you want to decorate the walls of the cellar in the garage, then, as a rule, they are laid out from well-burnt bricks or poured from concrete . Modern coating materials are used for waterproofing.
Read more about what to do if you find water in the garage cellar here.
When it is planned to equip a completely buried basement , the calculation of metric characteristics is carried out taking into account the presence of groundwater on the site. 1.5–3 meters are the classic parameters for a recess.
Important! When starting the construction of a garage with a cellar with your own hands, it is imperative to carry out geological reconnaissance of the area , determine the type of soil, groundwater level, as well as the presence of economic and industrial communications under the site.
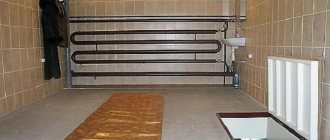
How to make a cellar in the garage with your own hands - photo:
Summary
- Before starting construction, you need to familiarize yourself with the requirements for basement premises and determine its dimensions.
- It is important to understand the procedure for selecting and calculating the amount of material.
- The pit must be located at a sufficient distance from the supporting structures of the building.
- The cellar must be equipped with high-quality hydro- and thermal insulation and ventilation.
- The optimal way to descend into the basement is a ladder made of wood or metal, which is lowered through a hatch.
- The choice of devices for electrical wiring must be made taking into account their protection from corrosion and moisture.