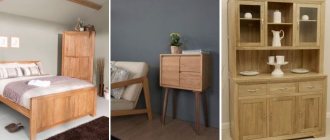
Painting a wooden blank with your own hands - be it a mirror frame, a children's high chair or an Easter egg - comes to the mind of many, especially when children appear in the family. Mothers want to add individuality to the interior, and little craftsmen want to leave their mark. However, having found a suitable unpainted product on sale, most novice artists immediately turn to paint, neglecting surface preparation. We'll tell you how to paint on wood according to all the rules.
Unpainted wooden blanks are called “linen”. They require special treatment. They must be carefully selected, paying attention to both the texture of the wood and the shape of the workpiece. After all, work on the product begins from this moment. Wood is a living material, and it would be good to know the properties and differences between its types.
Linden is traditionally considered the best material in Russia. It has clean, light, pliable, soft wood. Particularly valued are not sawn, but chopped blanks. Linden is now not as cheap as it used to be. And rightly so. And my conscience no longer allows me to waste this beauty. Linden easily accepts paint, so the tinting method may be the most suitable for it.
Birch is in second place in popularity after linden. Its wood is slightly grayish, denser, heavier. Sometimes with “moles”.
, aspen appears similar to linden. However, if linden is “warm”, then aspen is cold to the touch, and it is customary to disdain it. Its texture is uneven, as it dries out, it warps, and the egg blanks flatten. Aspen can be recognized by its marbled streaks and burrs.
Coniferous species. Spruce and pine are traditional northern woods. Conifers have yellowish wood, heterogeneous in texture, fibrous and with pronounced resinous areas. They preferred to make only large forms from them. The IKEA store offers a variety of pine blanks, and only the lazy haven’t yet painted a square “Ikea” mirror.
Beech comes to us mainly from Bukovina - Western Ukraine. The wood is dark in color with a pinkish-white tint. Very dense, heavy and, like oak, with a narrow notch. You can paint on well-sanded beech even without a primer. However, beech “leads”, it twists and therefore cannot be considered a very good material for painting.
Oak is a beautiful, noble wood of a grayish-yellowish color. Its texture is heterogeneous, like that of beech. He's good on his own. And it’s a shame to paint it over.
Veneer and papier-mâché blanks are offered to us by the hobby industry. These more environmentally friendly options have many advantages. The blanks are light, elegant and of any shape and configuration. Papier-mâché requires full surface painting, but veneer is better tinted.
Plywood is also a good material for painting. Toning, like veneer, reveals the beautiful natural grain of the wood. Very well painted and processed. Its impeccably smooth surface is easy to draw on.
How to process wood
The master class took place in the showroom of the home textile studio Helgi Home, which that evening looked more like a cozy living room than a workshop. The tables were covered with pink tablecloths and the instruments were laid out like utensils for a dinner party.
As promised, the participants mastered five techniques for decorating wood: etching, glazing, aging, imitation of metal and wooden surfaces. We tell you how it happened.
Features of working with floor coverings
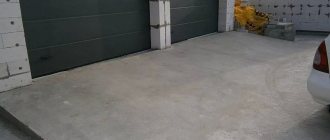
Not only furniture elements, platbands and all kinds of decor can be brushed. This processing technique is often used to imitate the aging of parquet and parquet boards.
The main difficulty in working with wooden floors is the large amount of work involved. The drill is of little use here: uniformity of processing and productivity suffer. At such volumes, it is reasonable to purchase or temporarily use a brush sander. This will allow you to maintain a uniform scratch depth with the brush and then quickly sand over a large area.
For the floor, it is not recommended to show deep wood relief, otherwise the coating will get very dirty and difficult to wash. The optimal depth is 0.5–0.8 mm, so the wood on the floor will become warm and pleasantly rough, and the unnatural gloss will disappear.
Etching
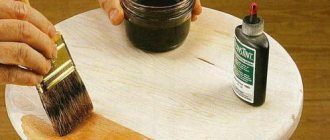
The first thing the master class participants tried to do was stain the wood. This is a simple but effective way to decorate wood: unlike paint, the pigment in stain is so fine that it penetrates into the thickness of the wood and creates the illusion of the natural color of the wood. In addition, soft and dense fibers absorb pigment differently, so staining emphasizes the texture of the wood.
Advice. You need to make sure that there is no excess pigment on the brush. It should be applied with gentle movements, “stretching” the color over the surface. Keep in mind that it will be almost impossible to wash the pigment off your brush.
As a bonus to etching, Mikhail told the audience about brushing. The essence of this technique is that the wood is “combed” with a wire brush to select soft fibers and emphasize the texture of the material. Depending on how aggressively this is done, the result is either a velvet surface effect or a textured pattern of aged, weathered wood. On lightly etched plywood boards, the master class participants also got a worn effect: the brush exposed fibers that were not touched by pigment.
Advice. To emphasize the texture of a brushed surface, put a little light or pearlescent paint on a wide brush, wipe off the excess on the paper and walk over the surface of the material with light, quick movements. Light paint will linger on the exposed grain, highlighting the grain of the wood.
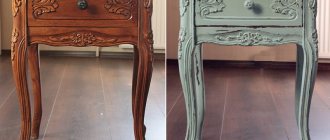
Wood tinting with shoe polish
Shoe polish is a cheap shoe cleaning product that can be found in almost every household. Due to its similar composition, it works no worse than wood waxes and can be used to impregnate wooden products and coatings. You just need to apply shoe polish to the surface and rub it in with a soft cloth, and then leave it until it dries completely.
Important! To decorate wood in a non-standard way, you will need shoe polish in three shades: black, red, brown.
Decorating wood with shoe polish.
It works like this:
- Take a cloth, pour brown shoe polish onto it, apply a thick layer to the workpiece, and rub in the composition.
- Allow the product to soak into the wood, after which the excess is wiped off with another rag.
- Separate areas of the product are treated with black shoe polish, other areas with red, partially mixing them and allowing crossover of shades.
- As it dries, polish the entire product again with a rag.
Glaze
The glazing technique came into decoration from painting, and consists of applying paint in translucent layers. I didn’t have to look far for an example - a beautiful chest of drawers, painted in this style, stood right in the studio. Those gathered repeated this technique on tablets. The sequence of actions turned out to be simple: apply a base coat of paint to the item, dry it, and then work on top of it with a wet brush with a small amount of paint. Each layer should be allowed to dry so that the paint is applied in gentle layers without mixing.
Advice. Instead of water, use a special thinner - it will allow the paint to maintain its thickness and color saturation, the drawing will be transparent, but more clear.
Dyes for wood species: choosing options
Dyes are sold in the form of water or powder, and any dye can be dissolved in one or more solvents: water, denatured alcohol or oil (toluene or turpentine). When starting to work with dyes for the first time, buy a water-soluble extract or powder, which is characterized by ease of implementation, good penetrating properties and good resistance to fading.
Regardless of the tinting method, end grain always presents a problem because it absorbs more dye or pigment, becoming darker than the surfaces formed by the longitudinal fibers. To get the most uniform color, try using one of the 2 methods outlined below. Before tinting, sand the end grains with a lighter abrasive than other areas, or prime them with a 50:50 consistency of shellac and denatured alcohol and, after drying, lightly sand them with 220-grit sandpaper.
Aging
Shabby chic
The shabby chic technique imitates layers of peeling paint, as if the item had many owners, each of whom repainted it according to their taste. To achieve this effect in 10 minutes, rather than decades, Michial said, you need to use paraffin. It is applied to the first layer of paint in those places where there should be abrasions. After this, the second layer of paint in these places can be easily removed with sandpaper. You can repeat the technique as many times as necessary.
Advice. When using paraffin, the final touch should be waxing the finished item. If soap is used instead of paraffin, you need to finish the work by coating the surface with matte acrylic varnish (glossy will be inappropriate on an aged item).
Scuffs
The protruding parts of things become lighter over time, and in the recesses, on the contrary, a dark coating appears. To imitate the first effect, you can take a simple sandpaper and sand tinted or stained wood; for the second, you can use a dark brown bitumen varnish. It is applied to the item for 3-4 hours, then the excess is wiped off with a rag soaked in water or white spirit. It is important to remember that bitumen varnish does not harden on its own, so such a thing must be coated with shellac in the end.
Advice. You can imitate a stained surface using oil paint, applying it to the item with blotting movements using a sponge. Just don’t use black pigment for this: it firmly eats into the material, and its excess is very difficult to remove.
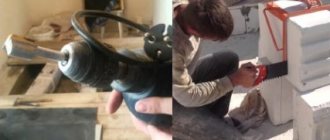
Brushing equipment
The procedure is considered the simplest and most accessible method of visual aging of wood at home.
It is enough to have a minimum of equipment. Even using only manual labor, you can achieve excellent results. To work you will need:
- Metal brushes of varying hardness. With their help, the primary (rough) removal of soft fibers from the treated wood is carried out.
- Sandpaper with different grain sizes. It is needed for rough cleaning after initial processing and final (final) polishing.
- To give the surface being treated maximum decorativeness, you need to prepare stain and other similar products.
- For final processing, you will need varnish, which is applied to the work surface after the brushing procedure is completed.
Power tools
All work on aging wood can be significantly simplified by mechanization. To do this, you can use either electric drills or angle grinders (grinders). To go with them, you will need to purchase wide or flat brushes of the following types - metal, polymer with an abrasive coating, sisal or hair.
Imitation of metal surface
Metallic paint and “contours” for applying a relief pattern are easy to find in art stores, but this is not enough to create the illusion of a metal surface. Mikhail shared a trick with the participants of the master class: the finishing touch should be the application of patina. To do this, acrylic paint of the required color (blue for gold, greenish for copper) is diluted in water, and the item is simply doused with this solution. The liquid lingers around the circuit and, when dried, leaves traces of “oxidation” on the “metallic” thing.
Tip: to make an imitation of blackened silver, paint the item black, then use a stencil and putty or thickened chalk paint to apply a pattern, paint it in a dark background color and, after everything has dried, go over the surface with a dry brush with silver or pearlescent paint. It will linger only on convex surfaces, creating the effect of old metal.
No. 2 Paint filling method
This method works best on unsanded wood with a slightly rough surface (such as a wooden fence). With its help, wood can be given a rustic look and an antique effect.
- Clean the wood with soapy water and a brush and leave to dry.
- If your paint is too rich, thin it with thinner.
- After this, pour some paint onto the wood surface, and then take a scraper and spread the paint over the wood.
On an unsanded, that is, not completely flat, wooden surface, the paint layer will not be the same everywhere. A little more paint will flow along the depressions and less on the bulges, that is, in some places the white color will be more saturated, and in others more transparent, which will create the effect of antiquity.
You can see the result of painting a wall using this method above.
Imitation of a fresh cut of wood
This is the only way to decorate wood for which the master class participants needed a special tool - a rubber spatula with veins. Thanks to its pattern, it can erase part of the thick layer of paint applied to the item so that the pattern imitates the structure of wood. The pattern will be unique depending on how the master tilts the spatula while working.
Advice. You need to move the spatula in one uniform, confident movement. The slightest jerk will be noticeable and ruin the drawing.
“I’m delighted, I really liked everything: interesting and informative. I wanted to decorate a house in the shabby chic style, and now I know how to do it!”, one of the participants in the master class, Gulshat, admitted to us. The others were not disappointed either: the meeting really turned out to be productive and very sincere.
The next event of the “Quartblog Live” project will be a lecture by designer Olga Rozet “The use of color in interior decoration.” We invite everyone who wants to learn how to create harmonious interior solutions using knowledge about the nature of color and professional tools for working with it. You can find out more about the event here.
I wish you a creative mood and see you again!
The best impregnations
The market offers a huge range of impregnations from different manufacturers. They all have their pros and cons. In order not to make a mistake with your choice, it is important to have an idea of the qualities of each option.
Pinotex Interior
Water-based impregnation, ideal for interior work. The composition is well applied to the surface and does not create smudges. The final coating is matte. Perfectly hides minor imperfections.
The impregnation does not have an unpleasant odor, it dries quickly and emphasizes the texture of the wood. The manufacturer's catalog presents a large assortment of solutions in different shades, which allows you to choose an option for any interior.
Ecohouse
Inexpensive domestic impregnation with a safe composition. After applying the solution, a “breathable” film is formed on the surface, which reliably protects against fungi, mold and insects.
The only drawback of Ecodom impregnation is the long drying period and an unpleasant odor, which subsequently disappears.
NEOMID 430 ECO
This is an aqueous solution with antiseptic properties. This impregnation is suitable for use in rooms with high humidity, for example, in a bathhouse or sauna, as well as high performance characteristics. The solution does not need regular updating, and the protection period can reach 35 years.
This impregnation has an unpleasant odor and can stain the wood greenish.
Tikkurila Supi Saunasuoja
Acrylic impregnation from a Finnish manufacturer. Has high protective properties. Prevents rotting, the development of fungus, mold, and also protects against moisture. Creates a thin film on the surface that repels dust and dirt.
Senezh Ecobio
Impregnation from a Russian manufacturer, designed to protect wood from:
- Rotting.
- Formation of fungus and mold.
- Impact of insects, etc.
The product has excellent antiseptic characteristics and does not have an unpleasant odor. It can be applied under any paint and varnish materials. The service life of the protective coating is 30-35 years.
Senezh Ultra
Impregnation with antiseptic properties. Protects the tree from pathogenic flora, insects and premature destruction for up to 35 years. Can be used for painting. The mixture can be applied with a roller, brush or spray.
This antiseptic is not applied to surfaces that have previously been treated with varnish, paint or other film-forming solutions.
Applying dyes to wood
We almost always prefer to work this way with water-soluble dyes. When the project or its parts are ready for finishing, we sand the wood as usual and wipe it with a damp cloth to raise the so-called pile. Let it dry for 24 hours and then lightly sand with 320 grit sandpaper. By removing the lint, we will prevent it from rising after applying the coloring solution. Then we dilute the dye, as shown in the photo.
Boil water, let it cool for a minute and add dye powder to obtain a concentration of 30 g/l. Let the solution cool to room temperature
Types of artistic processing
In total, there are 2 large groups of types of processing: artistic and decorative. Let's look at both and start with the first option.
Thread
Carving is a method in which designs are produced by cutting out elements. It can be performed using several techniques:
- The slotted method is the simplest and most ancient. It is performed using a jigsaw. This method is actively used to create objects imitating the Rococo and Baroque styles.
- The flat-grooved method involves outlining the contours of the pattern through the formation of recesses.
- Contour technique is characterized by straight lines.
Relief carving is used to create three-dimensional images and drawings.
Woodworking: carving tools
Turning
- Turning is currently carried out using modern lathes.
- Previously, more primitive models were used, which were created by the ancient Egyptians.
- This processing method is most relevant when creating parts of complex shapes, with roundness, cavities, ornateness, and so on.
- This is how they make: toys for children, well-known chess and many other popular items.
Mosaic
Mosaic belongs to the arts and crafts. Its essence is to assemble a three-dimensional image using a set of parts from various types of wood. The latter may have a different shade or texture from each other.
Most often, mosaics are used to decorate souvenirs, furniture, jewelry or paintings.
There are several types:
- Intarsia;
- Inlay;
- Block mosaic.
Inlay is a decoration that is made by decorating with elements cut into the surface.
The intarsia technique involves different inserts in texture or color.
Block mosaic is characterized by the presence of plates with identical patterns that are glued to the surface.
Burnout
- At first glance, such manual wood processing seems very primitive, but this is not entirely true. Ample opportunities open up for the master.
- Burning is carried out by applying ornaments, patterns and designs using a heated metal font.
- This way you can get the most extraordinary images.
Embossing
Artistic processing of wood can be done using embossing. This method involves creating a relief image.
- Embossing is performed using a press that contains a pre-prepared form.
- The wood is first steamed and treated with a solution containing hydrochloric acid.
- Pressing is done under high pressure.
- Subsequently, the finished product is processed.