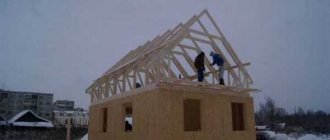
Rafters perform a number of significant roofing functions. They set the configuration of the future roof, absorb atmospheric loads, and hold the roofing material. Among the rafter's duties are the formation of smooth planes for laying the covering and providing space for the components of the roofing pie.
In order for such a valuable part of the roof to flawlessly cope with the listed tasks, you need information about the rules and principles of its design. The information is useful both for those who are constructing a gable roof truss system with their own hands, and for those who decide to resort to the services of a hired team of builders.
Types of gable roofs
Let's consider the main types of roofs with two slopes, the rafter system in which will differ slightly in design.
Symmetrical gable roof
This is the simplest gable roof, however, the most reliable and in demand. Symmetrical slopes allow you to distribute the load on the mauerlat and load-bearing walls evenly. In this case, the type and thickness of the insulating layer do not affect the choice of roofing material. Thick rafter beams have a sufficient margin of safety, so they will not bend. In addition, spacers can be installed at your discretion.
Among the disadvantages of this option, one can note only that the angle of the slopes is too sharp, which makes it difficult to use the attic floor and creates “dead” zones that have no use.
Roof with two asymmetric slopes
If the angle of inclination of the slopes is made more than 45º, you can use some unused areas of space. It will even be possible to arrange a living space in the attic. However, some additional calculations will be required, since the load on the walls will become uneven.
Broken roof with external or internal fracture
This configuration makes it possible to place a spacious attic or attic under the roof. However, in this case, more complex engineering calculations will be required.
Treatment with antiseptics and propylents
And at this stage it is already important to protect the future rafter system from biological destruction. You don’t want your roof to collapse after a couple of years of use, do you? Therefore, be sure to treat the wood for the rafters with fire and bioprotection.
The rafters are usually impregnated with an antiseptic and then treated with a fire retardant on top. You can also alternate this processing several times. If you use universal impregnation, be aware that it usually contains products with different service life. For example, fire protection will end before bio.
But the choice of means for processing today is huge. These include universal protective agents, a variety of fire retardants, and antiseptics. It’s easy to decide: if you are building in a fairly hot and dry area, first of all use fireproofing impregnations, which deprive the wood of its natural flammability. And if your house will be located where the air humidity is high almost all year round, protect it from rotting.
You can, of course, use both drugs - but just do not mix, otherwise the whole material will deteriorate. You just need to choose one product as an impregnation, and the second as a protective surface layer. Just try to dilute everything in the concentration indicated by the manufacturer. But do not treat frozen or damp wood with anything: its fibers simply will not absorb anything.
Video tip on the topic of processing rafters:
Note that a brush or spray when processing rafters gives little result - complete immersion and subsequent drying are much better. Just use a regular container, cover it with film from the inside and make a “bathtub” for future rafters. Moreover, it is advisable to do all this on the ground, as soon as you bring the material to the site, because in the finished rafter system it will be difficult to reach the internal elements of the connections. And they are the most defenseless in terms of moisture penetration. After processing, dry the parts so that all sides are ventilated for at least 24 hours.
Do not forget also that wood, like any natural material, is subject to biological destruction. Therefore, in addition to fire-bio-protection, it is important to consider waterproofing in all places where the rafter system adjoins the brick walls of the house, if any.
The design of rafters for arranging a roof with two slopes
The design of the gable roof truss system assumes the presence of the following components:
- Mauerlat . It is a durable beam made of oak, pine, larch or other strong wood, which is laid along the perimeter on the load-bearing walls of the building. The purpose of the Mauerlat is to evenly distribute the load. The cross-section of the bars is chosen based on their structure - solid or glued, as well as on the age of the building. The most commonly used beams are 100×100 or 150×150 mm.
- Rafters . The entire structure is created from such elements (pro
Formation of roofing layers
Further actions depend on what roofing material will be used for the coating. If it is rigid, such as slate, metal tiles, ceramic tiles or corrugated sheets, then sheathing is mounted on the upper planes of the rafter beams.
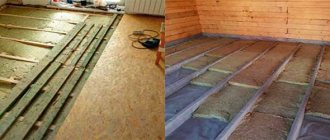
If the attic is not heated
But first, a hydro-windproof membrane. The roll is rolled out along the entire length of the roof, securing the canvas with antiseptic slats, as shown in the photo.
Installation of roof sheathing
The canvases are laid with an overlap of at least 10 cm, and first attached to the rafters with a stapler. Then the joints are taped with tape, after which the rail is used, due to the height of which a gap is provided for ventilation of the roof.
An edged board is placed across the counter-lattice, the size of which is selected depending on the pitch between the rafters. The larger it is, the thicker the sheathing board should be. The width is usually the same, 100 mm.
The distance between the boards is determined by calculation and depends on the parameters of the roofing material.
This is what the relationship between the rafter spacing and the thickness of the horizontal sheathing board looks like:
- 600 mm – 20 mm;
- 900 mm – 23 mm;
- 1200 mm – 30 mm;
- 1500 mm – 37 mm.
Structure of the sheathing of a cold roof with a hard covering
When using soft material (ondulin, flexible tiles) to cover the roof, the base under it must be solid, so the board is mounted not in increments, but end-to-end.
As an option, sheet material, mainly OSB boards, is used for flooring. They also hem the roof slopes from the inside.
Continuous gable decking for soft roofing material
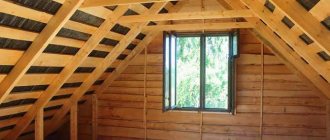
If there is an attic under the roof
The rafter system of the gable roof of the attic has no structural differences from the cold version, but the pie is composed somewhat differently.
In the attic floor, the roof is the same as the external walls for a frame house (attic roof projects are presented in our article). It should not only protect the under-roof spaces from blowing and leaking, but also ensure proper temperature conditions, and preferably, access to light, for which windows are made in the slopes or gables.
Diagram of the installation of a mansard gable roof of a house
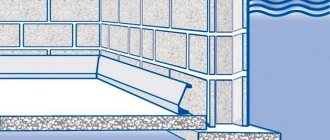
Mineral wool or foam plastic insulation (foam glass is not used here due to its high cost and greater weight) is laid not only in the attic floor, but also in the roof structure (the insulation of house floors is described in detail in the article). The thickness of the insulation is determined by calculation, but cannot be less than 200 mm.
At the same time, it is very important to ensure that steam penetrating into the structure through the wood and possible cracks, despite the presence of a vapor barrier membrane under the inner lining, does not settle on mineral wool or expanded polystyrene, but can freely exit through a small ventilation gap.
The principle of ventilating an attic roof
A free space of 3-4 cm is left between the insulation and the counter-lattice, which holds the rolled waterproofing without fail, otherwise the vapors will not have an outlet and will condense inside, reducing the thermal efficiency of the structure and leading to rotting of the wood.
How to add additional insulation
If additional insulation is necessary - in the case when the calculation determines the thickness of the insulation to be greater than 200 mm (this is the standard height of the rafter beam section), an additional layer is installed.
The choice of roofing material depending on the angle of inclination
This can be done both from the inside and outside, but the first option is easier to do, since insulation is usually installed during the interior finishing process.
And then, you need to cover the roof as quickly as possible with corrugated sheets or other roofing material, install gutters - so that until the installation is completed, rain cannot wet the insulation and rafters.
The roof needs to be covered as quickly as possible
When there is no dripping from the roof, everything can be done slowly from the inside and even several additional layers can be formed through spacer battens.
To prevent them from “eating” the under-roof space, it is very convenient to use rolled foil materials made of foamed polyethylene for this purpose.
Additional insulation with Penofol
In terms of heat retention, they are 4 times more effective than foam plastic or mineral wool, and to prevent the creation of cold bridges and steam from penetrating between the canvases, their joints are glued with metallized tape. Next, along the lathing, which is mounted on top of the canvases, cladding is made, the choice of which depends on the design of the premises.
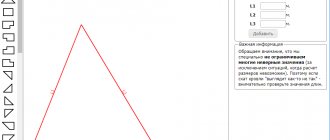
Calculation of frame elements for a gable roof
If you are going to build a gable roof with your own hands, you need to make careful calculations in advance. The rafter system of a simple gable roof consists of a set of triangular trusses - this shape gives the structure maximum rigidity. Such figures are the easiest to calculate. However, if the slopes have different shapes, the results are irregular rectangles. In this case, they are divided into simpler forms and calculations are carried out for each element separately. At the end, all data is summed up.
Please note that the more complex the roof shape, the greater the number of trusses and other parts required to ensure its strength. All of them increase the total mass of the roof, which, if calculated incorrectly, can damage the load-bearing walls.
How to draw up a project for a future roof?
The golden rule in roof construction is to measure seven times and cut only once. And first of all, it is important for you to understand that each rafter leg has its own individual location. Therefore, first, be sure to draw up a detailed project, and preferably in a special program. Only after this, using your 3D model of the future roof, mark exactly where and what kind of connections the rafters will have with the Mauerlat and with each other.
It is important to determine as accurately as possible the angle of inclination of the rafters and at what angle they need to be cut. And don’t worry about how to make all these rafters for a gable roof yourself: all you need is a regular machine.
Determining the angle of inclination of the roof: calculating the loads
The angle of inclination of a gable roof is made from 5° to 90°. But the most proven and standard option is 35°-40°, where loads are distributed most rationally and building materials are consumed.
Straight slopes are built when in the future there will be only a non-residential attic under the roof, the main function of which is ventilation and regulation of heat exchange. But when the under-roof space is planned to be residential, attic, they initially plan a so-called sloping gable roof. Its difference is that the slopes in the middle have a kind of kink, which changes their angle to a steeper one. This design is quite suitable both for arranging an attic and for protecting the entire house from bad weather.
Please note that most roofing materials are only suitable for pitches greater than 45°.
Constant and variable roof loads
It is important to calculate as accurately as possible the total load of the future roof, which will consist of permanent, which includes the weight of the rafter system and roofing, and temporary - wind and snow.
The same loads determine what rafter pitch you need for your gable roof. This table will help you choose the right section of rafter legs:
Indicators of rafters for deflection
Even strong-looking rafters may not be suitable for constructing the roof of a residential building due to the fact that they have insufficient deflection properties. There are separate paragraphs in the SNiP section called “Loads and Impacts”.
And the easiest way to increase the deflection strength of rafters is to make the cross-section larger. It’s a little more difficult to strengthen it with a special beam, bringing its edge to the strut.
Reinforcing elements for rafters
The more racks, struts and contractions, the more durability and stability the entire rafter system has.
If you have a suspicion or even an accurate estimate that a simple roof structure will not withstand future loads, make additional reinforcements for it. Such prevention will never hurt, but it will save you from many problems. Note that it is especially offensive when the garage roof falls in - right on top of the car. And such problems are not a joy for a residential building.
The rigidity of the rafter structure is enhanced by struts, additional purlins and support posts. The braces are designed to reduce the span of the rafter legs. Their angle of inclination to the horizontal is usually at least 45°.
A purlin is a horizontal beam that is parallel to the ridge and secured to vertical posts. More details in the video:
Determining the type of roof: cold or warm?
And now about the concept of the attic. If you are building a roof for a bathhouse or a small utility room, it can be done using the most simplified technology - install rafters, connect them at the ridge and cover them with sheets of roofing felt. But for the roof of a residential building, where ventilation is important, this principle cannot be used. There will already be at least three levels:
- The upper or first level of the rafters is about 200 mm.
- The average one is always equal in height to the auxiliary rafters.
- The third one is already on the edge of the wall.
This makes it convenient to install insulation, because the roof of a residential building is characterized by the fact that heat rises upward and, in the absence of thermal insulation, the roof covering is constantly heated.
The result: in winter, the snow melts and slides down, freezing and accumulating even more at the cold cornice. This causes a lot of problems: long dangerous icicles, a clogged drainage system, and the gradual destruction of the entire roof. Decide for yourself!
Determine the type of rafter system: layered or hanging?
So, now is the time to think about the support bases for future rafters, which also need to be prepared in advance and on which many parameters of the roof itself will depend. Thus, rafters are divided into layered, hanging and hybrid.
Hanging rafters are usually the lot of small and light roofs, the distance between the supports does not exceed 6 meters. But in buildings with a load-bearing middle wall or additional supports, layered rafters are installed to strengthen the roof. Or this combined option:
Another difference is that the hanging rafter system forces the Mauerlat to work in compression, while the layered rafter system works for shear. But the main task of both layered and hanging rafters is to transfer the loads of the entire roof to the walls and foundation as evenly as possible.
Load on the rafters according to the diagram
There are three types of load:
- Constant . This is a value that will not change throughout the entire life of the roof. This category includes a lot of roofing material, insulation, hydro- and vapor barrier, sheathing, additional roofing parts, as well as interior decoration of the attic. That is, the summed value of the mass of the elements will be the expected load. Its average value is 40-45 kg/m2, but not more than 50 kg/m2. It is advisable to provide a safety margin equal to 10% of the total mass.
- Variable . This refers to the intensity of precipitation, load from snow and wind, which can vary significantly depending on the time of year or weather conditions.
- Special . This group includes extreme natural phenomena - earthquakes, tornadoes, strong winds. In these cases, the safety margin is made significantly larger than usual.
The size of the ridge board and its installation height
The height of the ridge board is made equal to or greater than the vertical cut of the rafters adjacent to it. In both cases, the length of the vertical section of the rafter is first determined.
Hang the rafter triangle template onto the board from which the rafter will be made, draw a cutting line and measure it. On the board from which the ridge will be made, measure the size taken from the rafters, draw a line along the board. The rafters will be adjacent to this line with the lower edge of the vertical cut. Whether or not to cut the ridge board along the line depends on the interior decoration of the attic. If the protrusion gets in the way, cut it off; if not, leave it.
The installation height of the ridge board must correspond to the height calculated by the calculator. This is the height from the base of the rafter triangle to the lower edge of the rafter at the ridge, that is, to the line marked on the ridge board.
Starting from the end of the house, mark the ridge board for installing the rafters. The markings on the ridge and on the walls must match. To determine the starting marking point, place a long level against the wall and draw a cut line for the ridge board. Instead of a regular level, you can use a plumb line or laser level
Marking the ridge for the hip device is done in the same way.
Rafter pitch size and length
As a rule, the pitch of rafters for residential buildings ranges from 60-100 cm. The type of roofing material and the total mass of the roof are important here. The number of rafters per slope is calculated by dividing its length by the step size plus one. For the entire roof the value is doubled.
It is also necessary to calculate the length of the gable roof rafters. The length of the rafter leg is calculated using the Pythagorean theorem. If the maximum beam length of 6 meters is not enough, it can be increased with other sections.
Requirements for building materials
For the installation of a rafter system, the best option would be to use lumber from coniferous wood - pine, spruce or larch, grades I - III.
The material for the rafters is taken at least grade II, the mauerlat is made from boards or timber of grade II, material of grade II is taken for racks and purlins, the sheathing is made from lumber of grades II-III, it depends on the roof. Crossbars and tie-downs are made of Grade I material. Grade III material can be used on linings and linings.
Note! The lumber must be dry with a moisture content of no more than 20%. Before installation, it should be treated with fire retardants and antiseptics against fungal diseases.
Lumber should be stored under a canopy, providing protection from the sun and moisture. Level the storage area and cover the lumber with pads for ventilation.
For installation you will need fastening elements: ties, plates, studs, bolts with washers and nuts, self-tapping screws with EPDM gaskets, 2.8 mm thick, mounting tape, galvanized brackets.
Brackets are used when attaching the Mauerlat; they are secured with nails or self-tapping screws.
KR corners serve to attach the rafters to the mauerlat and prevent the rafters from moving.
All fastening material must be made of high quality material and be protected against corrosion.
Rafter section
The cross-section of the rafters can be determined based on the following data:
- step;
- type of wood;
- type of material - logs, beams, etc.;
- load;
- rafter length.
Here are the approximate dimensions of lumber for a rafter system for a gable roof:
- Mauerlat, section 10×10 or 15×15 cm;
- tie rods and rafter legs, 10×15 or 10×20 thick, in some cases timber with a cross-section of 5×15 or 5×20 cm is used;
- for struts and purlins - beams 5x15 or 5x20 cm, based on the width of the rafters;
- racks – section 10×10 or 15×15 cm;
- beds, section 5×10 or 5×15, based on the thickness of the racks;
- sheathing, section 2×10 or 2.5×15 cm - the value is determined by the type of roofing materials.
Installation of tile roofing
Before you make a roof at home, it is very important to understand the tile roof installation system, since this method is quite popular in modern times. As soon as work has been completed regarding the installation of rafters and all other parts, it is necessary to begin covering the tiles.
It is worth noting that some people use the simplest type of roofing “pie”, when a sheathing is stuffed on top of the rafters, after which a roofing mat is laid on it Real, however, this option must be insulated. It is necessary to pay maximum attention to this issue so as not to return to this process after the first winter.
Insulated roofing “pie”
An approximate creation scheme looks like this:
- Initially, it is necessary to cover the rafter structure with paraisol (vapor insulation film). The process is carried out by stretching the film and attaching it to the rafters using a construction stapler;
- On top of the vapor barrier film, it is absolutely necessary to cover the roof with sheets of plasterboard, which is fixed with self-tapping screws. This is done not only to give the attic more aesthetics, but also to create a basis for insulation;
- Now you need to lay the insulation boards between the rafters on top of the film. For these purposes, mineral wool is often used;
- It is necessary to lay plank flooring on top of the insulation. It is very important not to use excessively thick boards for these purposes, so as not to make the entire structure too heavy. For this you can use OSB or plywood 4-5 mm;
- Now it’s time for another layer, which should be made of waterproofing material. Ruberoid or polyethylene film is often used. The layers should overlap approximately 20 cm;
- Next, a counter-lattice is stuffed, for which slats 1-2 cm thick are used, which are fixed to the rafters;
- A roofing sheathing is fixed on top of the counter-lattice with a step from the adjacent guides less than the tiles by 5 mm;
- to install a drainage system, a front board is fixed along the cornice; Before you start laying the tiles on the rafters, you need to secure the hooks so that you can later install gutters to drain rainwater. Next, the cornice strip is mounted, which is also fixed on the front board;
- The last step after completing all the above steps is laying the tiles. You can start laying from any edge of the roof from the bottom row. The roofing material must be aligned along the edge of the eaves and installed overlapping using a locking system;
- The second row of material should be laid on the same edge as the previous one, and should cover it by about 5-7 cm. All subsequent rows are laid in this way up to the ridge;
- after all the slopes are covered with roofing material, you need to install a ridge at the junction of the tiles;
- an end beam 2.5 by 5 cm is fixed to the side rafter, a plug is mounted to the corner of the roof;
- a self-adhesive sealant is placed in the space between the roofing material and the beam;
- the side part of the roof is closed using an end strip, the main purpose of which is to protect the roof from strong winds, which can blow away the roof in strong winds x impulse.
The roof construction diagram presented above is an image that shows the main actions. In order to fully understand all the nuances of this process, at each stage it is necessary to go into more detail.
Types of rafter systems
There are two main types of rafter systems for roofs with two slopes - hanging and layered. Let's describe each of them separately.
Hanging rafters
The construction of a gable roof with hanging rafters is advisable only if the roof width is within 6 meters. Such rafters are attached to the ridge girder on one side, and to the load-bearing wall on the other. They experience bursting forces, which is the main feature of a gable roof with hanging rafters. The tightening for them can be made of both wood and metal. If you install the ties from below, they act as load-bearing beams. It is extremely important to securely fasten the tie, since it also experiences a bursting force. Tightening is necessary, first of all, to prevent damage to the load-bearing walls - otherwise they may fall under the pressure of heavy rafter legs.
Layered rafters
In this case, the size of the roof does not matter. The assembly of a rafter system of this type requires the presence of a beam and support posts. Part of the load is transferred to the bench, which is laid parallel to the Mauerlat. It turns out that the rafters are adjacent to each other at the top point and are additionally supported by a stand. In such a system, the rafter legs experience bending force only. They are much easier to install than hanging ones. True, support posts are required.
Combined type
Often the roof is given a rather complex shape, which requires the construction of mixed type rafter systems. Professionals recommend drawing up a detailed diagram with calculations for each element of the rafter system, so that during the work the data is always at hand.
Lumber sorting
Sort all the boards available on the construction site into three piles. Mark the hump of the board with arrows. Place relatively flat boards in the first stack. They will be used for constructing frames and frames. Place moderately humped boards in the second stack. Use these boards to construct beams and rafters that operate under a load directed perpendicular to their longitudinal axis. Direct the hump of these boards towards the load (towards the top), then over time these boards will straighten and receive less deflection than if they were initially flat. Place the crooked boards in the third stack. They can be used to make ties and spacers, and when cross-sawn they are suitable for making small building parts.
Installing rafters for a gable roof with your own hands
When all the preparatory work and calculations have been completed, and the necessary materials have been purchased, the installation of the gable roof rafter system begins. It consists of several stages.
Laying Mauerlat on walls
This element is mounted on the load-bearing wall along its entire length. If we are talking about a log house, then the upper crown can serve as a mauerlat. For buildings made of aerated concrete or brick, you will need a Mauerlat equal to the length of the wall. Sometimes this part can be laid between the rafters.
If there is insufficient length of material for the Mauerlat, several pieces can be spliced together. In this case, the edges are filed at 90º and joined using bolts - wire, dowels or nails are not suitable.
There are two ways to lay a mauerlat on top of a load-bearing wall:
- symmetrical in the center;
- with a shift in the desired direction.
The installation of the Mauerlat is carried out on a pre-laid waterproofing layer of roofing felt. This will protect the wood from rotting.
It is worth taking the process of attaching the Mauerlat responsibly, since in strong winds it must withstand a particularly large load.
The following consumables can be used as fastenings for the Mauerlat:
- Anchors that are indispensable for monolithic materials.
- Wooden dowels. These parts are used in houses made of timber and logs, although they require additional fastenings.
- Staples.
- Reinforcement or special studs. This option is preferable for buildings made of foam or aerated concrete.
- Knitting or steel wire is an auxiliary fastening element that is almost always used.
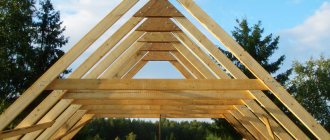
Assembling trusses or rafter pairs
Trusses can be assembled using one of the following methods:
- The beams for the rafters are assembled and attached directly to the roof of the building. This process is quite labor-intensive, since all measurements, trimming and coupling of beams will have to be done at height. However, you can do it on your own, without the involvement of technology.
- Trusses or rafter pairs can be fixed to the ground, and then the finished elements can be raised to the roof of the building. On the one hand, this simplifies the process of installing the rafters, and on the other, due to the large weight of the structure, lifting it to the top will require special equipment.
Please note that you should start assembling rafter pairs only after marking has been applied. And if you make a template in advance, for which you take two boards equal to the length of the rafters and connect them together, then all the pairs will turn out to be absolutely identical.
Installation of rafters
After assembly and lifting to a height, the rafters of the gable roof of a wooden house are installed. To fix them on the Mauerlat, cuts are made at the bottom of the rafters. The first to install are two trusses at opposite ends of the roof.
After this, a rope is pulled between the starting pairs, along which all other trusses will be aligned and the ridge will be installed.
Now you can mount the remaining pairs, observing the calculated step between them. In cases where the pairs are assembled directly on the roof, a ridge girder is attached between the two end trusses. The rafters are subsequently installed on it.
The procedure for installing rafter halves may differ according to the opinions of professionals. Some people prefer to lay the beams in a checkerboard pattern so as not to overload the foundation and walls during work. Others are inclined to install pairs of rafters in series. Be that as it may, rafter legs may need supports and posts - it all depends on the size of the roof and the shape of the trusses.
Skate attachment
A ridge is an element that is formed by attaching rafters at the highest point. As soon as all the parts of the rafter system for a gable roof have been installed, all structural elements should be thoroughly secured.
Installation of sheathing
The presence of sheathing is mandatory when constructing any roof. It not only supports the roofing material and allows it to be securely fastened, but also makes it possible to move along the roof while working.
The distance between individual boards is selected based on the type of roofing material:
- soft roofing is laid on a continuous sheathing without gaps;
- for metal tiles you need lathing in increments of 35 cm (between the two bottom rows - 30 cm);
- slate and corrugated sheeting can be laid on the sheathing in increments of 44 cm.
Results
Thus, in order to assemble a rafter system for a roof with two slopes, many nuances should be taken into account and any possible complications should be provided for. We hope that our tips will help you cope with this difficult task and create a high-quality and durable roof for your home.
Rafter structures of layered type
Layered rafter structures are much simpler to construct than their hanging counterparts. A reasonable advantage of the layered scheme is to ensure adequate ventilation, which is directly related to the long-term service life of the roof.
Distinctive design features:
- It is mandatory to have support under the ridge heel of the rafter leg. The role of support can be played by a purlin - a wooden beam resting on posts or on the internal wall of the building, or the upper end of an adjacent rafter.
- Using a Mauerlat to erect a truss structure on walls made of brick or artificial stone.
- The use of additional purlins and racks where the rafter legs, due to the large size of the roof, require additional support points.
The disadvantage of the scheme is the presence of structural elements that affect the layout of the internal space of the attic being used.
If the attic is cold and it is not intended to organize useful rooms, then the layered structure of the rafter system for installing a gable roof should be given preference.
Typical sequence of work for the construction of a layered truss structure:
- First of all, we measure the heights of the building, the diagonals and horizontality of the upper cut of the frame. If we identify vertical deviations in brick and concrete walls, we eliminate them with a cement-sand screed. Exceeding the heights of the log house is cut off. By placing wood chips under the mauerlat, vertical flaws can be combated if their size is insignificant.
- The floor surface for laying the bed must also be leveled. It, the Mauerlat and the girder must be clearly horizontal, but the location of the listed elements in the same plane is not necessary.
- We treat all wooden parts of the structure with fire retardants and antiseptics before installation.
- We lay waterproofing on concrete and brick walls for installation of the Mauerlat.
- We lay the mauerlat beam on the walls and measure its diagonals. If necessary, we slightly move the bars and turn the corners, trying to achieve the ideal geometry. Align the frame horizontally if necessary.
- We mount the Mauerlat frame. The beams are joined into a single frame using oblique notches; the joints are duplicated with bolts.
- We fix the position of the Mauerlat. Fastening is done either with staples to wooden plugs installed in advance in the wall, or with anchor bolts.
- Mark the position of the prone position. Its axis should recede from the mauerlat bars at equal distances on each side. If the run will rest only on posts without supports, we carry out the marking procedure only for these posts.
- We install the bed on a two-layer waterproofing. We attach it to the base with anchor bolts, and connect it to the inner wall with wire twists or staples.
- We mark the installation points of the rafter legs.
- We cut out the racks to uniform sizes, because... Our bed is exposed to the horizon. The height of the racks should take into account the cross-sectional dimensions of the purlin and beam.
- We install racks. If provided by the design, we secure them with spacers.
- We lay the purlin on the racks. We check the geometry again, then install brackets, metal plates, and wooden mounting plates.
- We install a test rafter board and mark the cutting areas on it. If the Mauerlat is set strictly to the horizon, there is no need to adjust the rafters on the roof after the fact. The first board can be used as a template for making the rest.
- We mark the installation points of the rafters. For marking, folk craftsmen usually prepare a pair of slats, the length of which is equal to the clearance between the rafters.
- According to the markings, we install the rafter legs and fasten them first at the bottom to the mauerlat, then at the top to the purlin to each other. Every second rafter is screwed to the Mauerlat with a wire bundle. In wooden houses, the rafters are screwed to the second crown from the top row.
If the rafter system is made flawlessly, the layer boards are installed in any order.
If there is no confidence in the ideal structure, then the outer pairs of rafters are installed first. A control string or fishing line is stretched between them, according to which the position of the newly installed rafters is adjusted.
The installation of the rafter structure is completed by installing fillets, if the length of the rafter legs does not allow forming an overhang of the required length. By the way, for wooden buildings the overhang should extend beyond the contour of the building by 50 cm. If you plan to organize a canopy, separate mini-rafters are installed under it.
Another useful video about building a gable rafter base with your own hands: