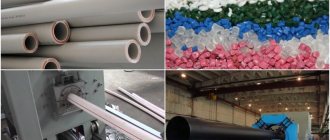
A successful alternative to traditional steel pipes is technological products made from metal-plastic. It gained particular popularity in the plumbing industry. Metal-plastic is used in the assembly and repair of pressure communications, non-pressure hot and cold water supply circuits, as well as heating systems.
A simple and accessible method is used to form connections - crimping metal-plastic pipes. We will tell you how this work is done, what tools an independent plumber will need to build or restore systems. Our recommendations will help you achieve the highest quality results.
Technology of using press fittings
Connecting copper or XLPE pipes requires the following tools:
- scissors for cutting plastic pipes (steel products are cut using a grinder);
- chamfer;
- calibrator;
- tape measure, marker;
- press jaws for the corresponding fitting profile.
It is rational to use press pliers for connecting small-diameter pipes (up to 26 mm); for crimping large-sized products, an electrically driven tool is required - a press gun, with the use of which crimping a fitting takes no more than 5 seconds. You also cannot do without a press gun if you are working on connecting steel pipelines, the crimping of which requires increased effort.
Installation of cross-linked polyethylene pipes is carried out according to the following algorithm:
- Using a pipe cutter, the pipe is cut at a right angle to its axis (the tightness of the connection directly depends on the accuracy of the cut - the end part of the pipe must fit tightly to the fitting body).
- An internal chamfer is cut on the pipe cut using a chamfer remover. The ovality of the end formed during cutting is removed with a calibrator.
- A fitting crimp sleeve is placed on the pipe, after which the pipe is pushed onto the fitting until it stops.
- Using pliers or a press gun, the sleeve is crimped.
Press fitting crimping
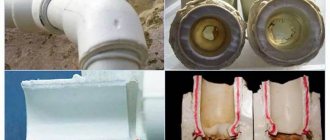
If the installation is performed correctly, after crimping, pronounced rings will form on the sleeve, which indicate the tightness of the connection. Please note that crimping a fitting can only be done once; if the connection is defective, you must cut off the part of the pipe on which the press fitting is attached and repeat the installation using a new product.
Features of selection and review of manufacturers
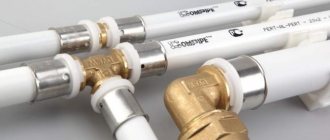
Press fittings are supplied to the market by a fairly large number of manufacturers; they are represented in the assortment of every company that sells cross-linked polyethylene pipes and metal-plastic products. Having studied consumer reviews and the opinions of specialized experts, we will highlight two companies - Henco and Tiemme.
Henco is a Belgian company, one of the market leaders. The company produces two types of press fittings - Henco PK and Henco PG. The PG series features standard brass products with a protective galvanized coating, while the PK press fittings have a PVDF (polyvinylidene fluoride) polymer body. Fittings from Henco are produced for pipelines made of cross-linked polyethylene with a diameter of 16, 20, 26, 32 and 40 mm.
Brass products can be used in hot water supply and heating systems (temperature maximum +115), while PVDF press fittings are intended for cold water supply pipelines.
Tiemme is an Italian manufacturer whose product range includes press fittings of the following series:
- Tiemme Cobra - a line of fittings for cross-linked polyethylene pipes;
- Tiemme 1650 - press fitting for reinforced metal-plastic pipes;
- Tiemme 2670 – press fittings for metal-plastic pipelines transporting gas.
The Tiemme fitting body is made of brass, the crimp nut is made of stainless steel. The maximum temperature of the products is +95 (short-term temperature +110), they can withstand pressure up to 16 Bar. Diameters – from 15 to 63 mm.
When choosing press fittings, beware of fakes, of which there are quite a lot on the market - pay attention to the weight (brass fittings are massive, low weight indicates that some cheap alloy is being passed off as brass), the thickness of the crimp sleeve and the markings (the letters must be engraved , and not applied with paint). Tools for installing fittings - press pliers - are also presented in the range of these companies
Henco pliers (the set includes attachments for press fittings with a diameter of 16 and 20 mm) will cost you 15 thousand, from Tiemme - 14 thousand rubles. However, the pliers from the Italian company are designed for use with pressing guns, while the tool from Henco is used for manual crimping
Tools for installing fittings - press pliers - are also presented in the range of these companies. Henco pliers (the set includes attachments for press fittings with a diameter of 16 and 20 mm) will cost you 15 thousand, from Tiemme - 14 thousand rubles. However, the pliers from the Italian company are designed for use with pressing guns, while the tool from Henco is used for manual crimping.
Mini pliers
A mini press designed for metal-plastic pipes is a small-sized device that provides manual crimping of the coupling. These mini pliers are used for highways with a volume of 16 to 20 mm. These mechanisms are complemented by sets of nozzles with a TN profile.
Mini pliers are not equipped with telescopic handles, so you will have to put in more effort when working. The compression force in such devices is 10.5 kN.
Without attachments, the mini device weighs no more than two and a half kilograms. The handles on these pliers are often covered with PVC material, and the axial eccentrics on mini pliers make it possible to make adjustments when excessive play occurs.
Professional craftsmen highlight the quality of small-sized devices from VALTEC. These manufacturers offer not only high-quality mini crimping pliers, but also threading tools, scissors, and other tools for installation work.
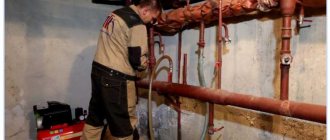
Installation of press connections: we take into account every detail
A press connection of metal-plastic pipes in a home pipeline can be created using press pliers. Before installation, a pipeline diagram should be created to determine the length of the individual components and the entire system.
- cut the pipe according to the plan;
- calibrate the end parts and remove the external and internal chamfer;
- put on the coupling;
- insert the fitting into the pipe,
- crimp the connection using press pliers.
When working, it is necessary to take into account that crimping is performed once. If it is not produced with sufficient quality, it will not be possible to disassemble it. Crimping of metal-plastic pipes creates a permanent connection. If an error occurs, all connection parts must be replaced and the process repeated.
If you purchase press pliers in a specialized store with a guarantee of originality, you can make repairs in an apartment, a country house, or with relatives and friends. High-quality pliers can be used for more than one year.
But if you don’t want to spend money on purchasing a tool that you will only have to use once, the situation can be alleviated by finding a retail outlet that provides a service such as renting a press for metal-plastic pipes, or that crimps connections on site.
Modern communication systems consist mainly of plastic and metal-plastic and can be located in any way. Heating pipes, for example, are placed behind walls, under the floor, making the system more efficient by reducing heat loss. In addition, metal-plastic is one of the most flexible materials, which makes it very convenient for turns and bends.
But in order to create truly strong connections, crimping of metal-plastic pipes is necessary. Before installing the pipeline into a wall or floor, it is necessary to check the strength of all connections. To do this, the system is filled with water and a pressure is created that is 30 percent higher than the working one.
The pipeline is monitored for half an hour to detect leaks. A special sensor that shows the pressure in the system can help with the check. If it drops, then we can conclude that some connection is leaking.
Even if the water supply or heating system was created independently, a specialist should be invited to check it, especially if the pipes are planned to be installed in a wall or floor.
Pressure testing of metal-plastic pipes of water supply systems
Do-it-yourself installation of metal-plastic pipes
Pipe cutting is carried out using metal scissors or a special hacksaw. The cutters are used for cutting small and medium diameter metal-plastic materials, and are widely used in professional installation. Scissors are a simpler household appliance; they can be bought in a budget price category, the main thing is that there is a comfortable and balanced handle, and the blades themselves are sharp and made of high-quality metal. The cutters are equipped with an internal calibrator, which allows not only cutting metal-plastic, but also restoring the deformed shape of the edges.
In addition to special tools, when installing a system of metal-plastic pipes, the use of more universal devices is required: a measuring tape, keys of the required size, a chamfer remover, a sanding emery, an expander, provided that press fitting connections are used.
A plumbing system made of plastic and metal is not only durable and practical, but also easy to install. The process can be performed even by a person who does not have the necessary knowledge. Having a set of the simplest tools, you can do basic installation work efficiently and with decent cost savings, if you follow simple installation rules.
Plastic in combination with metal is a good tandem, but it is also “afraid” of aggressive mechanical and ultraviolet influence, this must be taken into account when laying them open. If a closed type installation is intended, then it is necessary to provide hatches for access to compression fittings. The heating system can also consist of MP pipes, but in this case it is worth paying special attention to checking the integrity of all elements and observing the conditions for the most durable connection of all elements. Do not use sharp objects when unpacking new system elements; even a micro scratch can seriously damage the entire system. Metal supports and hangers used when installing pipes must be equipped with soft gaskets, this will help to avoid mechanical damage to the plastic surface.
Just as a wardrobe begins with a hanger, the installation of metal-plastic pipes begins with the selection and fastening of ball valves. This element is extremely important for the entire system; you should not skimp on it and buy Chinese budget analogues
A high-quality faucet must withstand up to 60 atmospheres and high temperatures
Just as a wardrobe begins with a hanger, the installation of metal-plastic pipes begins with the selection and fastening of ball valves. This element is extremely important for the entire system; you should not skimp on it and buy Chinese budget analogues. A high-quality faucet must withstand up to 60 atmospheres and high temperatures. In the event of a leak, it is the faucet that can stop the flow of water in the shortest possible time
If at the right time the tap does not cope with its direct task, the water supply system faces serious damage.
In the event of a leak, it is the faucet that can stop the flow of water in the shortest possible time. If at the right time the tap does not cope with its direct task, the water supply system faces serious damage.
Just as a wardrobe begins with a hanger, the installation of metal-plastic pipes begins with the selection and fastening of ball valves
This element is extremely important for the entire system; you should not skimp on it and buy Chinese budget analogues. A high-quality faucet must withstand up to 60 atmospheres and high temperatures. In the event of a leak, it is the faucet that can stop the flow of water in the shortest possible time
If at the right time the tap does not cope with its direct task, the water supply system faces serious damage.
In the event of a leak, it is the faucet that can stop the flow of water in the shortest possible time. If at the right time the tap does not cope with its direct task, the water supply system faces serious damage.
If the entire system is installed from scratch, then it will include the installation of cleaning filters, meters, a pressure reducer, and a manifold for distributing pipes over the entire area. It is recommended to install the pipes together with filters; this will prevent technical debris from entering the system.
How much heat should the pipeline supply?
Let's take a closer look at the example of how much heat is usually supplied through pipes, and select the optimal pipeline diameters.
There is a house with an area of 250 sq. m., which is well insulated (as required by the SNiP standard), so it loses heat in the winter by 1 kW per 10 sq. m. To heat the entire house, 25 kW of energy is required (maximum power). For the first floor - 15 kW. For the second floor - 10 kW.
Our heating scheme is two-pipe. One pipe supplies hot coolant, and the other pipe cools it to the boiler. Radiators are connected in parallel between the pipes.
On each floor, the pipes branch into two wings with the same thermal power, for the first floor - 7.5 kW, for the second floor - 5 kW.
So, 25 kW comes from the boiler to the interfloor branch. Therefore, we will need main pipes with an internal diameter of at least 26.6 mm so that the speed does not exceed 0.6 m/s. A 40mm polypropylene pipe is suitable.
From the interfloor branching - along the first floor to the branching on the wings - 15 kW is supplied. Here, according to the table, for a speed of less than 0.6 m/s, a diameter of 21.2 mm is suitable, therefore, we use a pipe with an outer diameter of 32 mm.
7.5 kW goes to the wing of the 1st floor - an internal diameter of 16.6 mm is suitable, - polypropylene with an outer diameter of 25 mm.
Accordingly, we use a 32mm pipe on the second floor before branching, a 25mm pipe on the wing, and we also connect the radiators on the second floor with a 20mm pipe.
As you can see, it all comes down to a simple choice among the standard diameters of commercially available pipes. In small home systems, up to a dozen radiators, in dead-end distribution circuits, 25 mm polypropylene pipes are mainly used - “per wing”, 20 mm - “per device”. and 32 mm “to the main line from the boiler”.
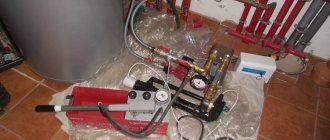
Instrumentation with electrohydraulics
Watch the video
The battery press, used for metal-plastic pipes, is one of the electro-hydraulic tools. This also includes networked and universal machines.
As a rule, a device with a battery is a small-sized mechanism that is light in weight. But, if you compare a battery-powered device and devices that do not run on electricity, the first one is distinguished by high performance and ease of use. A battery-powered device is used to process highways with a diameter of no more than 110 mm.
Any rechargeable model operates on a battery. These mechanisms use only universal pressing heads that are suitable for specific sizes of metal-plastic pipes.
IMPORTANT! The battery pack can perform approximately fifty to one hundred compressions per charge cycle.
Crimping process
Pressure testing of heating systems in a private home begins with disconnecting the heating boiler, automatic air vents and expansion tank from the system. If there are shut-off valves leading to this equipment, you can close them, but if the valves turn out to be faulty, the expansion tank will definitely fail, and the boiler will fail, depending on the pressure that you apply to it. Therefore, it is better to remove the expansion tank, especially since this is not difficult to do, but in the case of a boiler, you will have to rely on the serviceability of the taps. If there are thermostats on the radiators, it is also advisable to remove them - they are not designed for high pressure.
Sometimes not all heating is tested, but only some part. If possible, it is cut off using shut-off valves or temporary jumpers are installed - surges.
The following is the process:
- If the system has been in operation, the coolant is drained.
- A crimping machine is connected to the system. A hose extends from it, ending with a union nut. This hose is connected to the system in any suitable place, even in the place of the removed expansion tank or instead of the drain valve.
- Water is poured into the container of the pressure testing pump and pumped into the system using the pump.
- Before increasing the pressure, all air must be removed from the system. To do this, you can bleed the system a little with the drain valve open or drain it through air vents on the radiators (Mayevsky valves).
- The system is brought to operating pressure and held for at least 10 minutes. During this time, all remaining air is released.
- The pressure is raised to the test pressure and maintained for a certain period of time (regulated by the Ministry of Energy standards). During the test, all devices and connections are checked. They are inspected for leaks. Moreover, even a slightly damp connection is considered a leak (fogging also needs to be eliminated).
- During crimping, the pressure level is monitored. If during the test its fall does not exceed the norm (as specified in SNiP), the system is considered to be in good working order. If the pressure drops even slightly below normal, you need to look for a leak, fix it, then start pressure testing again.
As already mentioned, the testing pressure depends on the type of equipment and system being tested (heating or hot water supply). The recommendations of the Ministry of Energy set out in the “Rules for the technical operation of thermal power plants” (clause 9.2.13) are summarized in a table for ease of use.
| Type of equipment tested | Test pressure | Test duration | Allowed pressure drop |
| Elevator units, water heaters | 1 MPa(10 kgf/cm2) | 5 minutes | 0.02 MPa (0.2 kgf/cm2) |
| Systems with cast iron radiators | 0.6 MPa (6 kgf/cm2) | 5 minutes | 0.02 MPa (0.2 kgf/cm2) |
| Systems with panel and convector radiators | 1 MPa (10 kgf/cm2) | 15 minutes | 0.01 MPa (0.1 kgf/cm2) |
| Hot water supply systems made of metal pipes | operating pressure+ 0.5 MPa (5 kgf/cm2), but not more than 1 MPa (10 kgf/cm2) | 10 minutes | 0.05 MPa (0.5 kgf/cm2) |
| Hot water supply systems made of plastic pipes | operating pressure+ 0.5 MPa (5 kgf/cm2), but not more than 1 MPa (10 kgf/cm2) | 30 minutes | 0.06 MPa (0.6 kgf/cm2), with further testing for 2 hours and a maximum drop of 0.02 MPa (0.2 kgf/cm2) |
Please note that for testing heating and plumbing made of plastic pipes, the test pressure holding time is 30 minutes. If no deviations are detected during this time, the system is considered to have successfully passed the pressure test.
But the test continues for another 2 hours. And during this time, the pressure drop in the system should not exceed the norm - 0.02 MPa (0.2 kgf/cm2).
Correspondence table for different units of pressure measurement
On the other hand, SNIP 3.05.01-85 (clause 4.6) has other recommendations:
- Heating and water supply systems are tested at a pressure of 1.5 times the working pressure, but not lower than 0.2 MPa (2 kgf/cm2).
- The system is considered operational if after 5 minutes the pressure drop does not exceed 0.02 MPa (0.2 kgf/cm).
What standards to use is an interesting question. For now, both documents are valid and there is no certainty, so both are valid. It is necessary to approach each case individually, taking into account the maximum pressure for which its elements are designed. So the working pressure of cast iron radiators is no more than 6 Atm, respectively, the test pressure will be 9-10 Atm. It’s also worth deciding on all the other components in approximately the same way.
https://youtube.com/watch?v=ruN3puj3EyU
Instructions for use
Regardless of the type of installation and equipment you choose, there is a general procedure for preparatory work. These rules will facilitate the construction of the pipeline and are advisable to follow:
- you need to draw up a pipe routing plan, this will help calculate the amount of material and couplings;
- work areas must be thoroughly cleaned to prevent dust and dirt from entering the connection points in order to avoid leaks in the future;
- if you need to connect to an existing system, you need to check its integrity and prepare the insertion site;
- pipes should be cut so that the cut is exactly 90 degrees to the longitudinal axis of the pipe, this is necessary to ensure reliability and tightness;
- Guided by the diagram, lay out all the pipes and couplings to check the cutting and the quantity of all the necessary connection elements.
As mentioned above, there are three main options for joining cross-linked polyethylene. The selection of equipment and tools depends on the choice of method. For all methods you will need nozzles for the diameter of the pipes and pruning shears.
The first method is the easiest to implement. In addition to pipes and pruning shears, you only need compression couplings and a pair of wrenches. These tools are needed to tighten the nuts after fitting them to the joint.
It is important to remember: you need to control the process of tightening the nuts so as not to damage the threads. You need to tighten it tightly, but do not overtighten.
The second method is pressing. You will need a calibrator, scissors, an expander and a press.
There will be no difficulties with scissors; their purpose is simple - to cut the pipe into the sizes we need. We process its edges with a calibrator, chamfering it from the inside. This tool is necessary to give the pipe a rounded shape after cutting.
Then we take a manual expander, which is very easy to use. We deepen the working edges of the device inside the pipe and expand it to the desired size. This should not be done at once, as this can damage the material. We do this gradually, turning the expander in a circle. The advantages of this device are its price and ease of use. This is an amateur instrument.
The electrically powered expander is equipped with a battery and is designed to speed up the work of the installer. It significantly saves the worker’s effort and time for installing systems. Naturally, this device is many times more expensive, but if a lot of work is required, it is perfect and will justify the cost. There are hydraulic expanders. After we prepare the pipe, you need to install the fitting into it. For this we need a press vice. They are also hydraulic and mechanical. Before use, they must be removed from the storage case and assembled into working position.
After assembling the tool and installing the coupling into the pipe, the connection is installed using a press. That is, the fitting fits into place, and crimping occurs on top with a mounting sleeve. Manual presses are recommended for use with small pipe diameters and low demand.
Hydraulic presses require virtually no effort during crimping. Simply install the fittings and sleeve into the groove on the device, then they slide into place easily and smoothly. This tool can be used even in places that are inconvenient for installation; it has a rotating head. And the last option for connecting cross-linked polyethylene is welded. As mentioned earlier, it is the most expensive and rarely used, but the most reliable. In addition to the already familiar scissors and expanders, it will also require special couplings. Electric welding fittings have special conductors for heating.
After preparing the equipment and components, we begin welding. To do this, we install an electric welded coupling at the end of the pipe. It has special terminals to which we connect the welding machine. We turn it on, at this time all the elements warm up to the melting point of polyethylene, about 170 degrees Celsius. The coupling material fills all voids and welding occurs.
If the device is not equipped with a timer and a device that can read information from the fittings, you need to monitor the instrument readings in order to turn everything off in time. We turn off the equipment, or it turns off on its own, and wait until the unit cools down. Very often, pipes are supplied in reels and may lose their shape during storage. This is why you need a hair dryer. With its help, it is possible to eliminate this drawback by simply heating the deformed section with warm air.
In the next video you will find an overview of tools for installing heating and water supply systems made of cross-linked polyethylene.
Heating thermal test
Thermometer for thermal testing
Timely thermal testing of heating systems will determine the uniform heating of all radiators and radiators. Unlike the documents discussed above, this procedure is recommended to be performed without fail for stand-alone circuits.
For central heating, these actions are not performed every year. A thermal test report for the heating system is drawn up only in the following cases:
- Putting the system into operation;
- Replacing most of the components with new ones, changing the pipeline configuration.
Testing the heating system for warming up is often combined with a test run before the heating period. To do this, it is not enough to fill the pipelines with coolant and turn on the boiler. First, you should clean the system, ridding it of accumulated debris and limescale. If this is not done, thermal tests of the heating system will be incorrect. Foreign elements will affect the thermal conductivity of radiators and pipes, which will directly affect their energy output.
It is best to combine hydraulic and thermal testing. This way you can prevent the occurrence of air pockets.
Central heating
Thermal testing of central heating
For a centralized scheme, filling out a test report for the thermal effect of heating systems is carried out according to certain rules. The main one is the water temperature - it should be heated to +60°C.
The inspection time must be at least 7 hours. At the same time, individual components are adjusted to temperature balance the units. This is reflected in the thermal test report for the heating system. In apartment buildings, separate measurements are taken for each riser and the general indicators are compared with similar ones in the elevator unit.
Thermal test report
What benefits do heating system warm-up tests provide for home occupants?
- Verification of actual heat supply indicators with those declared by the management company;
- With an installed metering and regulation device for coolant flow (in the elevator unit), it is possible to determine the optimal operating mode of the system;
- Timely detection of air jams.
All this work must be performed by the management company. This is reflected in the heat supply contract. The result of the inspection will be a test report of the thermal effect of the central heating system.
The thermal test report for the heating system takes into account not only the degree of heating of radiators and pipes, but also the temperature in the room.
Heating system
Thermal imager as one of the thermal testing tools
Warm-up testing of the autonomous heating system is also necessary. During this procedure, points of sharp temperature changes can be determined in advance. Using control valves, the operating modes of radiators and batteries are adjusted.
In practice, for autonomous circuits it is not necessary to draw up a test report for the thermal effect of heating. But to determine the procedure, it is best to adopt the methodology for central heating. The difference may lie in the measurement methods:
- The degree of heating of the heating elements is checked using installed thermometers or according to the readings of a thermal imager;
- The room temperature is controlled using external sensors.
However, in summer the influence of low outside temperatures will not be taken into account.
Therefore, in addition to the above indicators, you need to take into account the degree of thermal insulation of the house - heat losses
Remember that each type of heating system test (hydraulic, thermal or pneumatic) must be performed according to a specific method. It also depends on the type of heating system and external factors.
The video describes the features of hydraulic testing of heating in an apartment:
Conclusions and useful video on the topic
From the video you can learn how to work with mechanical press pliers, namely, how to crimp metal-plastic pipe fittings.
It is recommended to install metal-plastic pipes using the crimping method in environmental conditions with a temperature not lower than +10ºС. It is advisable to keep the purchased material (pipes) in new conditions for at least 24 hours and only then begin installation.
The installed water supply system must be tested for tightness and strength through hydraulic and pneumatic tests.
Do you have experience working with metal-plastic pipes and making their connections? Do you know the technological subtleties of producing this work that are not covered in the article? Please write comments in the block form below, ask questions, post photos.
Method of hydrotesting for strength and tightness
Specific test conditions are established depending on the material of the system elements - cast iron, steel, polymers.
Strength testing activities include the following stages:
- A test pressure is created in the system and held for 10 minutes. If the set pressure decreases by more than 0.1 MPa, the test is stopped.
- The pressure is reduced to operating values and maintained by pumping water.
- The pipeline is inspected for defects.
- If defects are found, they are corrected and re-checked.
- If there is no damage, the tests are immediately repeated to confirm the results of the first test.
In accordance with the instructions set out in the standards, the value of the test pressure during hydrotesting of pipelines is 1.25 of the maximum established by the technical documentation for this communication system. The time for hydrotesting the pipeline for strength should not exceed 10 minutes.
Tightness control is carried out in several stages:
- the start time of the tests is recorded;
- the initial water level is noted in the measuring tank;
- determine the decrease in pressure in the system.
After leak testing, the additional volume of water in the tested section of the pipeline is calculated.
Methods for conducting hydrotests:
- Gauge: Using pressure gauges that indicate all pressure values during inspections.
- Hydrostatic. This is the most popular method, allowing you to immediately determine the behavior of the pipeline system under increased loads.
Preparing for work
All measuring equipment must undergo preliminary verification in a licensed testing laboratory.
The hydraulic power supply is connected to the pressure line via a test pressure manifold. The manifold has a drain valve and a pressure gauge. Pressure gauges are installed at the end and beginning of the pressure line. Before starting pipe pressure testing, all valves and valves must be closed.
Preparation for pressure testing of a pipeline includes the following steps:
- Filling the circuit with working fluid;
- Filling the line until a pressure equal to the test pressure is created there;
- Connecting test instruments and equipment to the desired section of the highway.
The essence of crimp tests
Pressure testing of a water pipeline (as well as any other systems for pumping liquid or gaseous media) is the most important in the pipeline construction process, especially in such industries as the chemical or oil and gas industry, hydraulic engineering, and housing and communal services. Along with checking the value of permissible compression in pipes, an analysis of the stress-strain state of pipes is also carried out, which makes it possible to assess their service life.
Some pipe manufacturers - for example, the Rehau brand - are developing their own original methods for crimping their products. For these purposes, Rehau sells a special electro-hydraulic tool, with which you can test the pipeline immediately after its installation. The verification method is local: a pressure testing pump is connected to the sealed area, creating the necessary internal air pressure. The stability of the indicators is established by a pressure gauge.
Classification of fittings
Types of compression fittings.
- corners and bends (used when connecting turns from 45 degrees);
- crosses (help to branch on two sides);
- tees (used for one-way branches);
- plugs (used for fastening at the end of a pipe);
- couplings (with the help of them pipes of the same diameter and direction are connected);
- fittings (if necessary, connection to a hose).
Fittings that are used to connect pipes of the same diameter are called straight, and those intended for fastening pipes of different diameters are called transitional.
There is a wide range of cast iron, steel, brass or copper connecting elements on the construction market.
As for cast iron, they are distinguished by such qualities as strength and durability. Cast iron fittings have a significant advantage over other connecting products, such as a steel coupling. Other positive qualities of cast iron elements include high resistance to negative environmental influences and versatility.
Modern industry today cannot do without steel fittings. More recently, it was possible to bypass obstacles in the pipeline path by bending the pipe. There's no need for that today
A pipeline using steel products is easy to assemble and disassemble, which is also important
More about manual models
Considering that electric-hydraulic press pliers are practically never used in households, below we will consider issues relating only to manual models.
Equipment
Additional tool kit
Press tongs are supplied complete with a set of replaceable inserts and a metal or plastic case (can be replaced with a special case or bag).
Diameter of connected pipes
Most manual models are designed for installation of pipes with a diameter of up to 26 mm. Some reinforced mechanical models and manual hydraulic pliers allow the installation of pipes with a diameter of up to 32 mm.
Availability of additional functions
Additional functionality is provided by several options:
- OPS system – ensures optimization of applied forces due to built-in step-type clamps.
- APS system – ensures uniform load on the fitting sleeve depending on its diameter.
- The APC system automatically controls the completeness of the liner crimping by blocking the opening of the press head until it is completely compressed.
Manufacturer
The most expensive models are produced by a number of European manufacturers (Belgium, Germany), and their cost largely depends not on the technical parameters of the equipment, but on the popularity of the brand. However, you can find quite decent functional Italian and Turkish models at fairly affordable prices.
Chinese press tongs are traditionally in the lower price category, but they do a good job with small volumes of work.
Technical characteristics of manual press jaws that can be bought in Russia
| Model | REMS Eco-Press | VALTEC VTm-293 | FORApress | STC 500 |
| A country | Germany | Italy | Türkiye | China |
| Max diameter | up to 26 mm | up to 32 mm | up to 32 mm | up to 26 mm |
| approximate cost | 19.800 rub. | 7,700 rub. | 9,500 rub. | 3,300 rub. |
Additional equipment
- REMS Eco-Press - steel case with a set of inserts 16, 20, 26.
- VALTEC VTm-293 - bag with a set of inserts 16, 20, 26, 32.
- FORApress - plastic case with a set of inserts 16, 20, 26, 32.
- STC 500 - plastic case with a set of inserts 16, 20, 26.
Buying Tips
Despite the large selection of crimping tools, purchasing them for personal use by a home craftsman in most cases does not seem optimal.
Even the cheapness of manual Chinese models does not save the situation, since after laying the pipeline the tool may not be useful at all. It turns out that purchasing it for a small one-time amount of installation or repair work is clearly impractical.
In this situation, the best option would be to rent for several days from a rental company, which in any case will cost less than purchasing the pliers itself. At the same time, you have the opportunity to select high-quality press pliers for metal-plastic pipes with suitable parameters for little money.
Another option would be to share the purchase of pliers with neighbors or friends who may also need the tool in the future. In this case, you can use it alternately as needed.
When selecting press tongs, it is necessary to take into account their main technical characteristics and the maximum dimensions used for the installation of MP pipes. To do this, you should carefully study the device passport and check for a quality certificate for the product.
It should be remembered that the use of unreliable tools can lead to poor quality connections and cause serious problems in the future during the operation of pipelines.
The main source of heating in heating systems of apartments and private houses are radiators, which radiate heat from their outer surface into the surrounding air space. How to connect a heating radiator to the system without the help of third-party specialists.
Mayevsky tap for cast iron radiators: review of a device for bleeding air pockets from heating systems.
How to use manual press jaws
By spreading the handles of the pliers, the halves of the press insert, the diameter of which corresponds to the diameter of the pipe, are inserted into the holder. The clip snaps into place and is considered ready for use. A metal-plastic pipe with a sleeve is inserted into it, which is already connected to the fitting.
The handles of the press pliers close on the sleeve, squeezing it with a certain force. Marks from the liner remain on the surface of the sleeve, indicating that the installation was carried out correctly. Re-compression of the connection is not allowed.
Overview of fittings for metal-plastic systems
To prepare for work, it is important to cut the pipes into sections of the required length, and all cuts must be made strictly at right angles. If the pipe is deformed during the cutting process, it must be leveled with a gauge (it will also help remove the internal chamfer)
To connect metal-plastic pipes of different categories into a single structure, connecting elements are used - fittings that differ in design, size and fastening methods
To install the structure, various types of fasteners are used - fittings; we will dwell on them separately.
Option #1: collet
Push-in fittings, consisting of a body, a ferrule, and a rubber gasket, have a detachable design, so they can be used several times. The thread of the parts allows them to be combined with household appliances.
To connect the connecting elements to the pipe, you need to put a nut and a ring in series. Insert the resulting structure into the fitting and tighten the nut. To make it easier for the pipe to pass into the connecting element, it is advisable to wet it.
Option #2: compression
Parts widely used for connecting pipes, which can be called conditionally detachable
Before installation, it is important to ensure the presence of o-rings and dielectric gaskets, which should be located on the shank of the part
Compression fittings are widely used in the construction of metal-plastic structures. They allow you to easily create connections without the use of special tools
To connect, a nut and a ferrule are put on the end of the pipe (if it has the shape of a cone, then the process is carried out on the narrower side of the part). After this, the shank is inserted into the pipe (this requires some effort), and in order to seal, the part is covered with tow, flax, and sealant.
The next step is to put the union nut on the fitting body and tighten it. It is convenient to do this with the help of two keys: one of them fixes the part, the other tightens the nut.
This method is quite easy and does not require the use of special equipment, however, it is not advisable to use it for hidden wiring, since it requires checking the connection.
Option #3: push fittings
Convenient connecting elements that do not require special tools for fastening. For installation, it is enough to insert the product into the connecting part, and the end of the pipe should be visible in the inspection window.
Immediately upon completion of installation, thanks to the included water jet, the fitting wedge is pushed forward, forming a clamp that prevents leakage.
This method allows you to quickly and easily create the required structure, ensuring high-quality, durable connections. Almost the only drawback of push fittings is their high cost.
Option #4: press fittings
These elements are used to create permanent connections using press jaws or similar devices.
Press fittings create tight, long-lasting connections, but can only be used once. In addition, to work with such elements you will need press pliers.
To connect using press fittings, you need to calibrate the part by removing the fez from it, after which the sleeve is put on it and the fitting is inserted. The sleeve is grabbed by press jaws, after which the part is firmly clamped by bringing the handle together.
This element can only be used once, but the fasteners mounted with it are quite tight and reliable, making them suitable for hidden wiring.
Installation of press fittings is carried out in the following order:
Installation of pipes from different types of materials
To connect elements, one of which is made of metal and the other of metal-plastic, special fittings are designed, one end of which is equipped with a thread, and the other with a socket.
For installation, a metal pipe needs to be threaded, wrapped in tow, lubricated with soap or silicone, and then the fitting is put on by hand. After its second end is connected to the plastic element, the thread is completely tightened using a wrench.
Assortment of fittings of different shapes
For ease of installation, the connecting elements can have different shapes. The most common are:
- adapters for connecting pipes with different diameters;
- tees providing branches from the central pipe;
- corners for changing the direction of flow;
- water sockets (installation elbows);
- crosspieces that allow you to organize different flow directions for 4 pipes.
Press fittings can have a special configuration (couplings, triangles, tees).
Installation of metal-plastic pipes
Installation of a metal-plastic pipeline includes several stages:
- Preparation of materials and tools.
- Installation of connections.
- Testing of the finished pipeline.
The preparation of the material for all types of joints is the same. Pipes must be cut according to the design. When measuring, take into account the length allowance for the fitting.
Since metal-plastic is sold in coils, the material must be straightened before installation by rolling out the pipe on a flat surface. First, the pipe should be wrapped in several layers of rags.
Tools
The set of tools for installing metal-plastic communications depends on what fittings are used to connect the parts of the pipeline.
To assemble a pipeline from metal-polymer pipes you must have:
- pipe cutter or hacksaw for cutting material;
- calibrator - to expand the pipe and give the circle ideal proportions;
- chamfer - for chamfering;
- sandpaper to remove burrs on the edges of the pipe;
- adjustable (or wrench) wrenches;
- press jaws for some types of connections;
- a heat gun or bending device such as sand.
It is preferable to do the cutting with scissors, but you can also use a hacksaw or a sharp knife.
When the edges are ready for connection, the pipe is inserted into the fitting. There are several types of connecting metal-plastic pipes to each other or with a transition to another material:
- compression fittings;
- press connection;
- push fit.
Compression connection
Connecting metal-plastic pipes using compression fittings is common and accessible for self-installation. Such units can be disassembled and reassembled. Installation requires 2 adjustable wrenches.
Installation algorithm:
- The fitting is unscrewed and disassembled. The union nut and ferrule are placed on the end of the pipe.
- The inside of the pipe and the end of the fitting with the rubber gasket are lubricated with thick soapy foam to facilitate the alignment process. For the same purpose, the internal diameter is pre-flared using a calibrator. Such measures will prevent the rubber gaskets from moving.
- The fitting is inserted into the joint, the ring is shifted and the nut is tightened. The tightening process is carried out using two keys.
The resulting connection requires periodic monitoring and tightening of the nut in case of leakage.
Press connection
The crimp connection is installed using press fittings and a pressing tool (manual or electric).
Installation diagram:
- Preparation: the cut is processed and cleaned. The press fitting is disassembled and the integrity and presence of gaskets are checked, then reassembled.
- The edge for the connection is put on the fitting up to the control window.
- The sleeve is compressed using press pliers, and the tool handles are pressed together until they stop.
- Repeat the operations on the opposite end of the connecting fitting.
The resulting connection can last up to 50 years, but is non-separable.
Push-fit connection
Push fittings are the most expensive elements for connecting metal-plastic pipes. However, their use does not require any tools or skills, and is reliable and durable.
The prepared pipe is inserted into the push-fit until the control hole. Next, the entire structure is assembled. A test flow is started, under the influence of which the connection is secured with an internal wedge.
Wall mounting
The weak point of metal-plastic products is their low resistance to mechanical damage due to the fact that the aluminum layer is thin.
With a large bending radius or constant pressure, the pipe is deformed. In this case, it is recommended to fix the pipeline on a solid base - a wall, ceiling or under the baseboard. To do this, a fixing element is mounted into the wall:
- clips;
- supports;
- pendants.
The process of fastening and fixing occurs using a simple method:
- the support is attached to the wall and fixed in a stationary position;
- The pipe is inserted into a clip with a release mechanism. If the clip is blind, then a pipe is initially inserted, and then the entire structure is attached to the wall.
Test pressure
According to SNIP 3-05-01-85, which was replaced in 2003, pressure testing must be carried out according to the rules. When carrying out work in apartment buildings, it is necessary to:
- The pressure was more than 1 mPa (that's 10 bar) - for hot water supply systems and heating circuits with heaters.
- At least 10 bar for panel and convector heating systems.
- At least 6 bar for circuits in which radiators made of stamped steel or cast iron are installed.
- The pressure for hot water supply must be greater than the working one and another 5 bar on top (but cannot exceed 10 bar).
If panel heating and heat exchangers are used, the pressure should not have a pressure greater than the maximum permissible for the devices. If you are testing air in a steam or panel heating system, you need to check the pipes that fit into the ventilation equipment. The air should have a pressure of 1 bar.
Types of equipment and principle of operation
There are hydraulic and mechanical manual press pliers for crimping. The former require less physical effort from the operator and allow for greater developed force, and therefore are ideal for frequent use in various production conditions. For rare use, it is more advisable to purchase mechanical press pliers - they are cheaper.
Hydraulic equipment is divided into several types. Non-autonomous models require connection to a pump; autonomous models are more convenient, as they can be used without additional equipment. Hand press pliers with a remote pump are great for working in hard-to-reach places.
There are special press pliers for fittings - equipment designed for crimping the connecting parts of various pipelines.
Rating of soldering irons for polypropylene pipes
| Photo | Name | Rating | Price |
| #1 | Rothenberger Roweld P63T | 99 / 100 3 - votes | |
| #2 | Rothenberger Roweld P40 T | 98 / 100 3 - votes | |
| #3 | Candan CM-01 | 97 / 100 3 - votes | |
| #4 | Dytron Polys P-4a 650W TraceWeld Solo | 96 / 100 7 — votes | |
| #5 | Wester DWM 1000A | 95 / 100 4 - votes | |
| #6 | ELITECH SPT 1500 | 94 / 100 2 - votes | |
| #7 | Wester DWM 1500 | 93 / 100 1 - voice | |
| #8 | Candan CM-03 | 92 / 100 4 - votes | |
| #9 | Resanta ASPT-2000 | 91 / 100 4 - votes | |
| #10 | Resanta ASPT-1000 | 90 / 100 1 - voice | |
| #11 | Elitech SPT 800 | 89 / 100 2 - votes | |
| #12 | Soyuz STS-7220 | 88 / 100 1 - voice | |
| #13 | Kolner KPWM 800MC | 87 / 100 1 - voice |
How it's done?
The general scheme of hydropneumatic tests is as follows:
- The part of the system being tested is isolated by shutting off the shut-off or control valves (the sewer pipes are closed with rubber plugs or wooden plugs wrapped in rags).
- Next, the system is completely filled with water. In the heating system, air is released through air vents installed at the very top.
- A pressure testing pump is connected to the pipeline, which pumps a certain amount of working fluid into the system, creating the pressure required by the test regulations.
- When the required pressure is reached, the pressure tester switches off. In this case, the observer records the readings on the pressure gauge.
- The system remains under pressure for a certain period of time. The exposure time can range from 0.5 hours (for heating systems) to 6 – 8 hours.
- After the appointed time has expired, the observer takes readings from the pressure gauge again. If the pressure differs from the original value, then there is a leak in the system that should be found and repaired. After this, crimping is performed again.
Pressure testing of heating system with air
The following connection points are usually used:
- For heating systems: a special valve on one of the radiators, or a drain valve on the elevator unit (in centralized systems).
- For water supply systems: one of the connections to a cold or hot water tap.
- For the sewerage system: any of the revisions, usually installed in increments of 40 - 50 m.
If the heating system has been tested, the Hydropneumatic Test Report is signed by representatives of the heating network and the organization providing heat supply. Next, the inspector checks the coolant for hardness.
What is flushing and pressure testing?
Flushing and pressure testing of heating systems is carried out in cases where the layer of deposits in the pipes becomes too large for them to continue to function. As a preventive measure, such events are rarely carried out, since this pleasure is quite labor-intensive and expensive. For hydropneumatic flushing, acid solutions are used that remove plaque from the walls of the pipeline to the outside. Metal particles cling to the inner walls of the pipes, thereby reducing their diameter. It leads to:
- increased pressure;
- increasing the coolant speed;
- decrease in efficiency;
- increased costs.
What is pressure testing of a heating system - this is an ordinary test, based on the results of which we can say whether it is safe to use such equipment or not, and whether it can withstand the required loads. After all, no one wants to become a victim of circuit depressurization and end up as a patient in the burn department. Pressure testing of the heating system is carried out in accordance with SNiPs. It is a mandatory procedure. After it, a document is issued confirming the technical serviceability of the circuit. Here are the main cases when pressure testing of a heating system is carried out:
- when assembling a new circuit and putting it into operation;
- after repair work has been carried out;
- preventative checks;
- after cleaning pipes with acid solutions.
Pressure testing of the heating system is carried out in accordance with SNiP No. 41–01-2003 and No. 3.05.01–85, as well as the rules for the technical operation of thermal power plants.
From these rules it is known that such an action as pressure testing of the heating system is carried out either with air or with liquid. The second method is called hydraulic, and the first is manometric, also known as pneumatic, or bubble. The rules for pressure testing a heating system state that water tests can only be carried out if the room temperature is above five degrees. Otherwise, there is a risk that the water in the pipes will freeze. Air pressure testing of the heating system eliminates this problem; it is carried out during the cold season. In practice, hydraulic pressure testing of the heating system is used more often, since everyone is trying to complete the necessary scheduled work before the onset of the heating season. In winter, only the elimination of accidents, if any, is carried out.
You can start pressure testing the heating system only when the boiler and expansion tank are cut off from the circuit, otherwise they will fail. How to pressurize a heating system:
- all liquid from the circuit is drained;
- then cold water is poured into it;
- as it fills, excess air is released from the circuit;
- after water has accumulated, a pressure blower is connected to the circuit;
- How pressure testing of a heating system occurs - the number of atmospheres gradually increases. In this case, the maximum test pressure should not be higher than the tensile strength of different circuit elements;
- High pressure is left for some time and all connections are inspected. You need to look not only at the threaded connections, but also at the places where parts of the circuit are soldered.
Pressure testing of a heating system with air is even easier. Just drain all the coolant, close all the outlets in the circuit and force air into it. But this way it is more difficult to determine the malfunction. For example, if there is liquid in the pipes, then at high pressure it will ooze through a possible gap. It is easy to determine visually. But if there is no liquid in the tubes, then there is nothing to come out except air. In this case, a whistle may be heard.
And if it is not audible, and the pressure gauge needle indicates a leak, then all connections are coated with a soap solution. To make it easier, you can check not the entire system, but by dividing it into segments. In this case, it is easier to carry out pressure testing of heating pipes and determine possible places of depressurization.