A low-speed drill belongs to the group of professional construction tools. This device received this name due to the high torque required when drilling large-diameter holes. In addition to high torque, the drill is equipped with a high-power electric motor, which makes the tool capable of withstanding significant loads. The tool in question is also called a drill-mixer, as it is often used for mixing solutions of different mixtures.
Types of drills
- Hand drill. It is a mechanical tool with the help of which a drill or other cutting tool is given a rotational movement while drilling holes. Hand drills are usually divided into single-speed and two-speed.
- Pneumatic drill. An industrial tool used in factory production conditions. Pneumatic drills are divided into independent types according to the presence of reverse, design, power and the maximum permissible drilling diameter. They can be straight (the motor axis in this case coincides with the axis of the cartridge), end-face (outwardly resembling a screwdriver) or angular (the axis of rotation of the cartridge is placed at an angle to the body).
- Electric drill. Immediately after electric motors were invented, electric drills began to appear, and already from the 1860s they began to be actively introduced into various industries.
Drills are also divided into:
- Regular drills. Such drills do not have a hammer function; therefore, they can only really drill into metal, drywall, wood and other not particularly hard surfaces. This tool is suitable for minor repairs.
- Impact drills. Excellent for drilling holes in stone, brick, concrete and other materials that are characterized by increased hardness. However, such drills are not suitable for constant work with materials that are too dense; in the latter case, it is better to give preference to a hammer drill.
- Drills and screwdrivers. In addition to drilling, they also successfully cope with the function of unscrewing or tightening screws, self-tapping screws and screws. However, for drilling brick or concrete this is far from the most suitable option.
- Drill mixers. Such drills are always equipped with special attachments that allow mixing semi-liquid or liquid compositions, and their design includes special handles that facilitate comfortable grip of the tool while mixing. Using these drills, it is not difficult to mix various mortars, paints, glue or putty - as a rule, it is not possible to achieve the same results by hand.
- Angle drills. Designed for drilling holes in the narrowest and most inaccessible places that cannot be reached with a conventional drill. The design of these devices implies the presence of an angular gearbox, and the rotating shaft is always located perpendicular to the housing. The power of such drills is usually low, and they have no impact function at all.
And according to the type of power supply, drills are divided into:
- Network. These models operate from the electrical network and boast fairly high power with relative ease of maintenance. However, at the same time, being tied to an outlet is also a disadvantage of such drills - if there are frequent power outages or when working outdoors, their use can be very difficult.
- Rechargeable. Suitable for use in absolutely any place, even in those where access to the power grid is significantly difficult or completely absent. The absence of wires guarantees complete freedom of action in this case.
Characteristics of the best models
When choosing low-speed drills, it is important to pay attention to the manufacturer. Let's look at several popular models of electric drills with their main characteristics and prices.
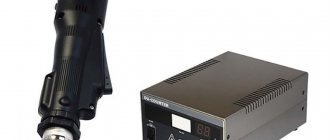
Makita
A Japanese company that is known throughout the world for the quality of its instruments. This company produces various types of power tools, including drill mixers. One of the most popular models of the devices in question from this brand is a product called Makita 6300-4. This model belongs to the category of professional devices. The cost of a low-speed drill is 14,500 rubles. For this price, the device will have the following parameters:
- Device power – 650 W
- Rotation speed is up to 1300 rpm
- Device weight – 3.2 kg
In addition, the device has 4 operating modes, and also allows you to drill holes in steel materials up to 13 mm, and in wood up to 30 mm.
Felisatti
An Italian company specializing in the production of professional power tools. A popular model of this brand is the Felisatti DMF23/1150VSE mixing drill. The main technical parameters of the device are:
- Power – 1150 W
- Shaft rotation speed – up to 970 rpm
- Weight – 4.4 kg
The tool has 2 operating modes, and allows you to drill holes in metal up to 23 mm, and in wood up to 32 mm. The cost of the Felisatti unit in the Russian Federation is 12,500 rubles.
Metabo
Metabo is a German manufacturer of power tools that are famous for their quality, reliability and durability. The disadvantages of devices of this brand include only the high cost, which is justified by the quality. The most popular model is the Metabo B32/3 drill. Its cost is 59,000 rubles, so not every master can afford to work with such a tool. The characteristics of this model are as follows:
- Power – 1.8 kW
- Shaft rotation speed is up to 470 rpm
- Product weight – 7.5 kg
The product allows you to drill holes in metal up to 32 mm, and in wood up to 70 mm.
There are many domestic manufacturers, for example, ZUBR, Interskol and others, which are in no way inferior in performance to foreign tools. In addition, domestic models are several times cheaper, so most craftsmen settle on such drills.
How to use a drill?
Before you start using the drill, you must:
- Make sure that there are no hidden fittings and wiring in the ceiling or wall, as well as that there are no foreign inclusions in the workpiece.
- Secure the workpiece as securely as possible - holding it in your hands while working is strictly not recommended.
- Make sure that the drill accessory is securely fastened in the chuck.
- Remove the drill clamp key from the chuck.
When using a drill you should:
- To avoid jamming, do not overload the tool with too much pressure.
- Be sure to use safety glasses when drilling in the ceiling.
- Be especially careful when using optional attachments.
- Never let go of the drill while the switch lock button is pressed and the engine is running.
- Do not use the reverse switch while the engine is running.
- When working with viscous materials or hard surfaces, hold the drill securely with both hands (especially when working with powerful models).
After finishing work:
- The drill is not released from your hands until the engine stops completely.
- To avoid burns, do not touch the equipment even after the final stop of the spindle.
Following these simple rules will help you avoid various troubles when working with a drill.
Drilling a hole for a dowel in the crowns of a log house
To drill a hole for the dowel in my bath, drills with a diameter of 30 mm are provided. But Nagel is square, made of oak. Drilling turned out to be much more difficult than I imagined. Therefore, I will share some experience of using a large-caliber drill. As always, I began my preparation by studying articles on the Internet and horror seized me when I read the following on a construction forum... I will give quotes without changes (do not consider them plagiarism). A few questions and answers:
Question: “How to prevent the tow from wrapping around the dowel drill?”
- Answer: “And I would lay tow, but when drilling, I would burn through the tow with a rod heated over a fire. In my opinion, it’s more technologically advanced.”
- Answer: I did it in the following sequence: I laid down the beam, drilled holes, put a mark on the side of the beam where the hole was, took it apart, put tow on, assembled it, found the holes with a crank, hammered in the dowel. At first glance, it is labor-intensive, but pulling out a drill with wound tow is more difficult;
- Answer: I put moss between the crowns. It doesn't wind up, but there is another problem. I drill with a 24mm twist drill
In practice, I drilled right through two logs at once. Half of the holes were made by an automated line. When drilling holes with modern large-diameter drills with a collar on the end, the most difficult task is to prevent the drill from going deep into the log. The collar pulls it down so that you don’t even need to press! The strength with which I held the drill in my hands was not enough to prevent the drill from pulling me into the hole. I'm not talking about the force of rotation, but the force with which the drill itself digs into the tree! I could barely pull the drill out with the shavings. The worst thing is that when the drill did jump out of the hole, I could topple over from a height. To prevent this from happening, I deliberately blunted the sharp edges on the drill gimlet so that it would not pull the drill with such force into the hole for the dowel. And it became easy to pull out the drill. An important feature of working with large-diameter drills is that you must constantly pull it out of the hole for the dowel and remove the chips. The drill may jam when cutting deep into the crown of the frame. This is time consuming, especially when working at height!
Construction (architectural) section of the wall with installation diagram for installing dowels, sequential numbering of log parts
What drills and drills should I use to drill a hole for the dowel?
Low-speed drills - old-style drills without a breakout mechanism - the torque is so high that it can turn the driller over. It is better to use a drill with two handles - it is easier to hold it in two hands and more convenient to pull it out of the timber.
Unfortunately, I drilled the holes with a regular drill with one side handle. It was difficult, but there was no other. Experience comes with time. and as it turned out. You can make drilling easier by changing the shape of the drill itself.
It is best to use drills with a centering gimlet (blunted as written in the first part of the article) if you do not want to spend all your strength tearing the drill out of the grip of the beam. Personally, this helped me a lot when drilling spruce beams (soft wood)
The holes for the dowel are drilled vertically so that the crowns can settle on them.
Bookmark Permanent link.
Purpose
A low-speed drill is designed to work in cases where high torque on the tool is strictly contraindicated. Such cases include:
- thread cutting;
- mixing mixtures;
- drilling large holes;
- pipe flaring.
Pipe flaring is the process of deforming a pipe, during which a tight connection is created between the pipe and the tube sheet.
When the volume of work is large enough, thanks to the low torque and high power, such a drill does not overheat. Performing such work with conventional tools can lead not only to overheating, but also to burnout of the engine. Since low-speed drills are quite heavy, they are usually equipped with two handles.
Types of cartridges
The chuck holds the drill bit or bit. Depending on its type, it is worth selecting the mate. They are classified as follows:
- The most common is the key chuck, which securely holds the drill. But using such a cartridge requires a special tool, and it is quite easy to lose it.
- Keyless chucks make it possible to install a drill without the use of additional equipment; you only need your own hands. It is convenient to use, but a drill with a keyless chuck is more expensive than one equipped with a key chuck. The design of the keyless chuck is ideal for solving everyday problems at the household level, but in the professional field it may not be enough - it is not always able to withstand rapid rotation and reduce the degree of drill fixation.
- A single-clutch quick-release chuck allows you to change a drill with a spindle lock of the installed type - depending on the model, you will have to press a special button or move the ring.
- The counter part of the tool with a Morse taper should be installed in a chuck of type MK2, MK3. It is this connection that ensures that the drill is securely fastened, and heavy bits can be centered with high precision.
- Diamond concrete core bits are installed in a special G 1/2” and 1 1/4” UNC chuck.
- Heavy bits and large diameter drills are fixed with a 19 mm Weldon chuck.
- Some manufacturers' models feature a six-flute shank chuck - 7/16 Hex.