Pressure testing of a pipeline is a technological operation performed on a relatively small isolated section of the pipeline. This section is specially tested by applying high pressure, close in value to the maximum permissible. Carrying out pressure testing of pipelines allows you to verify the integrity of the line, the quality of installation work and installation of fittings.
Pressure testing is a necessary and important operation that allows you to identify weak points in the assembled pipeline
The concept of pipe crimping
Pressure testing means checking the readiness of an object for operation by applying increased pressure. The object of such a check may be a pipeline system, a container, an assembly or machine, or a separate mechanism. When we talk about increased pressure, we mean a value that is 2-3 times higher than the working pressure and is close to the maximum permissible. An object that has successfully passed pressure testing is considered suitable for use. Leaks identified during the inspection are repaired.
Important! The amount of pressure during pressure testing is regulated by regulatory documents for certain groups of objects.
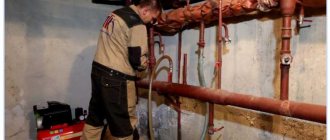
Pressure testing must be carried out by a trained specialist. Relevant employees of industrial and utility enterprises are required to undergo certification. Upon completion of the tests, a report is signed indicating the date, pressure value, holding time and other information.
The pressure in the system for testing is created either by a standard pump or a special pressure tester. They check, as usual, with water. When its use, for some reason, is unacceptable, air pressure testing of pipes is carried out, which makes it difficult to detect leaks.
Price
The cost of crimping depends on several factors:
- length (internal volume) of the system;
- the age of the system and the condition of its constituent elements (amount of rust and dirt and salt deposits);
- type of equipment used.
Prices from different performers, even within the same city, may differ by 2–3 times. Private teams and craftsmen charge the cheapest for their services.
On average, for flushing and pressure testing the heating system of a building with an area of 400 sq. m (two-story) performers charge from 7 to 15 thousand rubles. As practice has shown, if you know how to bargain, you can agree to complete this amount of work for 4–5 thousand rubles. The work will be completed in 1 – 2 days.
The same work in a building of 5 thousand square meters. m (5 floors) will cost from 30 to 80 thousand rubles.
Some performers indicate prices per unit of volume (150 - 250 rubles / cubic meter) or time (500 - 1000 rubles / hour).
If you want to install the washbasin yourself, be sure to take care of connecting the water seal. Water seal for sewerage: types, purpose and installation features.
You will learn about the types of antiseptics for cesspools in this review.
When is pressure testing of pipelines carried out?
All new pipeline systems, tanks, etc. are subject to pressure testing before putting into operation. All objects that have undergone repair or replacement of some element are also checked. Since the joints with installed fittings are considered to be the most unreliable sections of the pipeline, sections where coupling was used are subject to mandatory inspection.
All types of pipelines, domestic and industrial, newly built and already in operation are subject to pressure testing
Testing is also carried out in other cases:
- if the pipeline has been idle for a long time or operates in seasonal mode (like a heating system in the summer);
- if scheduled inspections are provided. In this way, the polymer sewer system is checked when the integrity of the outlet pipeline is monitored. Pressure testing of a plastic water supply is one of the most popular operations carried out after any pipe cleaning, since mechanical damage is very likely, especially at the joints;
- after flushing the pipeline, especially with the use of aggressive chemicals, which could cause damage to fittings or pipe walls;
- Wells are tested in a special way - to check whether perched water (water from the surface layers) gets into its shaft, because consumers are concerned about the quality of water, especially drinking water.
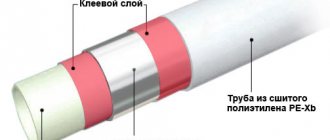
Why cross-linked polyethylene is not welded
Unlike polypropylene, which is easily welded with a soldering iron for welding polypropylene pipes at home, welding polyethylene of any kind is not used in everyday life due to the high cost of the equipment and impracticality.
Welding technology is used for joining large-diameter industrial and main pipes made of low-density polyethylene (HDPE), and two methods of welding polyethylene pipes are used: electrofusion welding using plastic electric welding couplings or butt welding, pressure welding after melting the pipe ends with a specialized butt welder apparatus.
Rice. 6 Features of connecting large diameter HDPE pipes by welding
Electric welding couplings for welding HDPE are expensive, and their use requires an expensive device that ensures the passage of electric current with the specified parameters. In the second, “cheaper” method, in addition to using a soldering disk with an electronic device that sets the temperature and time of its heating, the pipes are placed in a massive structure that allows their heated ends to be connected under pressure.
Preparation for work
Carrying out pressure testing is a responsible procedure that requires preparatory measures. Before starting pipeline testing, it is mandatory to:
- An inspection is carried out to identify visually detectable defects (corroded areas, missing parts, etc.). If violations are identified, they are eliminated. In cases where the system contains a working medium that is prohibited from being used for testing, it is customary to empty it (for example, the heating system is freed from coolant).
- The pipes are washed to remove rust, scale, and deposits of organic and inorganic origin. Some of the flushing methods require the use of a compressor. Upon completion of washing, the quality of its implementation is checked. The quality of flushing is checked by the condition of the inner surface of a half-meter section of the pipeline cut out at a randomly selected location.
To carry out work, a pressure gauge must be installed on the equipment to control the pressure.
If the injection device does not include a check valve that retains the working medium in the system, and a pressure gauge, then they are installed after completion of the tests.
It is important to know! Pressure testing of the heating system of an apartment building precedes an inspection of the work on preparing the associated heating unit. This is explained by the fact that the thermal unit is checked using high pressure values.
Do PEX products have any disadvantages?
Cross-linked plastic has disadvantages that the manufacturer eliminates at the production stage, the main ones being:
- High oxygen permeability. Technical operation rules regulate the oxygen content in water circulating in heating networks. Its presence in a liquid leads to the oxidation of metal products as a result of interaction, due to which metal oxides (rust) are formed, leading to accelerated destruction of metal parts. Therefore, during production, PEX is coated with a diffusion layer of synthetic components that prevent oxygen from entering the water.
- PEX is UV resistant. To protect it, it is painted at the manufacturing stage and used indoors.
- Installation of a pipeline requires the purchase of connecting fittings and specialized tools, which from an economic point of view is quite expensive, as is the cost of 1 linear meter of pipes, which is about 0.7 USD.
Mechanisms for carrying out
Crimping operators, i.e. Special pumps for carrying out relevant tests differ in design. Based on this feature, they are classified into three types:
- Porshnev.
- Vane-rotor.
- Membrane.
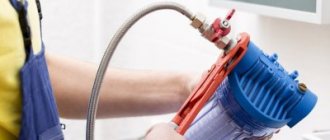
If testing of a pipeline (or other object) of a relatively small volume is required (for example, in private housing construction), then it can be performed using an inexpensive and easy-to-maintain manual pressure tester. This mechanism allows you to pump up to three liters of working fluid into the system in a minute.
To check the systems of a multi-story building, you will need a more powerful mechanism driven by an internal combustion engine or electric. The domestic UGO-30 is equipped with a 16-liter tank and allows you to develop a pressure of up to 30 atm. Manual two-stage pumps UGO-50 and UGO-450 are used when performing more complex tasks.
In domestic conditions, compact devices are used that can be manually controlled.
German-assembled electrically driven crimpers produced by Rothenberger (model ROTEST GW 150/4, for example, designed for testing drinking water and gas supply systems with air) and Ridgid (for example, model 1460-E 19021 are used in systems filled with as a working fluid water, oil or ethylene glycol).
Recommendations from experts
When filling heated floors with water at high pressure, there is a real danger of pipes jumping out of their seats. This usually happens in places where mounting tape was used. To avoid such situations, it is necessary to first install the beacons for the screed, securing them with small piles of mortar to be sure. This will allow you to acquire an additional holding frame after the mixture has hardened. If the contour was attached to the mesh, then there is no need for additional strengthening measures. Before laying the solution, it is recommended to rinse the pipes to remove possible contamination with clean running water. It is better to repeat the washing several times: the signal to stop the procedure is that the water coming out will be completely clean.
SNiP and safety measures during crimp testing
The procedure for testing pipelines, technological diagrams of the pressure testing process and safety standards are determined by the relevant sections of SNiP:
- for internal sanitary systems - SNiP 3.05.01-85;
- for external drainage systems - SNiP 3.05.04-85;
- for heating, ventilation and air conditioning systems - SNiP 41-01-2003.
Industry regulations define the procedure for performing pressure testing on industrial pipelines.
The specified documents establish the pressure values permissible during testing. This value is determined by the material of the pipes, the minimum thickness of their walls, the difference in height between the lower and upper elements of the system under test and other factors. When conducting hydraulic and pneumatic tests, the pressure value can be (in atm):
- for pressure pipelines of water supply systems – 10-15;
- for cast iron sewerage – 1.5;
- for non-pressure polymer pipelines – 1.5 – 2;
- for heating systems of apartment buildings where cast iron radiators are installed - 2-5 (but not less than the value exceeding the operating pressure by 1.5 times);
- for input nodes of centralized systems – 10;
- for private houses - 2 (since the emergency valve is usually set to this level).
Pressure testing must be carried out in accordance with SNiP, taking into account the type of main line and the material of the pipes installed in it
Important! When conducting tests, the main safety requirement is to adhere to the recommended pressure limit. To avoid unpleasant consequences, it is recommended to use a crimping machine equipped with a special limiter when conducting tests.
Which way is better
When deciding how to pressurize a heated floor, several considerations should be taken into account. When using metal-plastic pipes to organize the water circuit, it is recommended to use cold water injection as a test until the pressure gauge reaches 6 bar. The circuit is left in this position for a day. If the pressure has not dropped during this time, the pipeline can be covered with a screed. At the same time, the pressure gauge readings remain unchanged during the concrete work.
On pipes made of modern cross-linked polyethylene, the instructions require creating a double level of excess pressure (minimum 6 bar). It is worth noting that cross-linked polyethylene pipes cope with their task quite well. Half an hour after the pressure drops, it is restored to its previous levels. Usually this procedure is repeated twice. Next, the pressure is fixed at the original level, leaving the system for 24 hours. If the next day the pressure drop is recorded within 1.5 bar, the pressure testing of the heated cross-linked polyethylene floor is considered successful.
In some situations, it is recommended to complete test control with cold water by checking the system at the maximum coolant temperature. In this case, you need to carefully inspect all components and connections until the temperature reaches the desired value. The circuit should remain in this state for several days. If necessary, all joints are tightened. If there are no leaks, you need to wait for the circuit to cool completely, and only then start screeding.
When choosing between the air and water methods of crimping a water-heated floor, most experts choose the second method. There is an opinion that when testing in the summer, there is a real danger that the screed will not dry before the onset of cold weather. Since the circuit is filled with water, it can shrink, with all the ensuing consequences. An aerial inspection is much safer in this regard: it does not depend on the implementation time.
General procedure for conducting pneumatic and hydraulic tests
The testing scheme for air and water is general. The procedure is as follows:
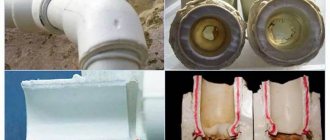
- Within the test object, a part of it is isolated and closed using shut-off (regulating) valves (the sewer pipes are plugged with rubber plugs or wooden plugs wrapped in rags).
- The test object is filled with water. When testing heating systems, when filled with water, air is discharged through special air vents in the upper part.
- A pressure tester is connected to the system, pumping a certain amount of working fluid to create the pressure required by regulatory standards.
- Having reached the required pressure value, recorded by the observer on the pressure gauge, the pressure tester turns off.
- The system is left under pressure for a certain time (for heating systems - at least half an hour; in some cases, the holding time can be 6-8 hours).
- At the end of the designated holding time, the observer again takes the pressure gauge readings. A difference in pressure gauge readings is evidence of a leak in the system that needs to be detected and eliminated.
You can connect the pressure tester to the heating system by removing one of the taps
Note! After the leak has been eliminated, the pressure test is carried out again.
Need for hydraulic tests
Pressure testing allows you to identify leaks in the system.
The operation is performed on a small section of the line, which is isolated from the main line and subjected to testing with increased pressure bordering on critical. A large volume of compressed air is pumped into the branch or a water flow is started under pressure. If the branch passes this test and maintains its integrity, it is considered suitable for further use. A breakthrough will be indicated by a drop in pressure on the pressure gauge.
The following must be subjected to hydraulic tests:
- newly created highways;
- repaired networks;
- plastic pipelines after cleaning;
- pipe sections after replacing a damaged section or installing a coupling or tee;
- water pipes in the apartment after connecting water meters;
- heating systems before the heating season.
Pressure tests of wells are carried out in order to check that there is no contact of the transported liquid with the upper layers of water in the mine. This is necessary to accurately determine the depth of water intake.
Pressure testing of pipelines with air and water
To test the performance of a heating, water supply or sewerage system, you will need a pump (special or one that circulates liquid in the system). It is connected to the heating system either:
- directly to the tap designed to drain the working fluid from the heating system;
- to any of the radiators. To do this, the Mayevsky tap is removed, and in its place an adapter is installed, to which the hose from the compressor is connected.
The water supply test is carried out through the connection pipe of the taps through which cold or hot water is supplied. To connect to the sewerage system, you will need to insert the sediment fitting into one of the revisions, special tees mounted in the outlet pipeline every 40-50 m.
Purchasing a crimping machine for personal use that will be used once a year is hardly advisable. Which pump to use to pump air or water into the system is determined based on the pressure that needs to be created for the test (and it should be 2-3 times higher than the working pressure). To pressurize the heating system of a private household, a car compressor or an electric pump should be sufficient.
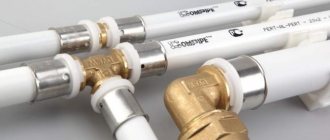
PEX connection using press fittings
Joining plastic pipes with press fittings is similar to these operations with plastic products and is performed in the following sequence:
- Cut the pipe ends with pruning shears and remove the internal chamfer using a reamer.
- A nozzle of the required size is inserted into standard press jaws; the most common outer diameters are 16, 20, 25 and 32 mm.
- Spread the handles of the tool 180 degrees and open its head, after which two halves of the press attachments are inserted into its grooves, they are secured with a push-button lock.
- Place the press fitting over the pipe until it stops (its location and accuracy of installation can be seen in the control window).
- They move the tool handles 180 degrees, open the lock, insert the press fitting and move the handles, for which they apply some effort.
- After aligning the handles of the device, crimping the press fitting in systems with crimping can be considered complete.
Rice. 7 Fragments of video of installation of press fittings
It should be noted that this technique is designed for rigid pipelines, since the press fitting is placed and crimped on the outside of the pipe surface, so its use for installing flexible PEX is practically not applicable.
About wiring diagrams
The simplest heating wiring diagram is considered to be a single-pipe one.
Its features:
- There is 1 circuit (closed in a ring);
- All radiators are connected in series;
- The coolant circulates in a closed circuit.
This is one of the simplest designs. But there are significant drawbacks here too. Thus, a single-pipe system is not suitable for large multi-story buildings. Since the further away the radiator is, the weaker it heats up. This means that the rooms will warm up unevenly.
And increasing the number of sections on a separate battery will not solve the problem. It’s just that the coolant tends to cool down along the way. And the last radiator in the line will be colder than the previous ones.
Therefore, it is worth installing a single-pipe system only in houses with a small area. You can compensate for this moment using a forced circulation pump. The changes are obvious:
- Pumping equipment is connected to the boiler;
- The coolant begins to circulate through the system with acceleration;
- The temperature will not change and all radiators will heat up correctly.
And at the same time, there are several disadvantages:
- Purchasing a pump is an expense;
- The equipment requires power supply;
- If there is a power outage, the heating will stop working.