Home/Interior/
March 22, 2020
Everyone knows that plastering and finishing walls is very expensive. Many simply do not have the means to tidy up the walls of their apartment. One designer stated that there is no need to hide the concrete under the final finish. You can completely do without it. There is absolutely no need to spend money on plaster and then on wallpaper or tiles. See what the walls look like without any decoration.
Aesthetics of brick and concrete
The walls can be freed from decorative coating and left in their original form. This applies to both apartments and private houses. Concrete or brick surfaces are decorative in themselves, which the loft style successfully proves.
A bare brick wall is a great interior accent
It is not necessary to transform an apartment into an industrial-looking room - an emphasis on one wall or part of it is enough.
Chips and potholes can be emphasized with contrasting paint: just apply it to the recesses, and remove the excess with sandpaper. To prevent the walls from dusting and crumbling, cover them with varnish. This technique is also suitable for ceilings. The step is, of course, bold, but with the right approach it gives an interesting effect. As a result, we get a fashionable interior and do not spend money on leveling the walls and wallpaper.
Concrete in the interior
Performing plastering
Preparation
Before plastering the adobe wall, it is necessary to prepare it:
Advice! If plastering adobe walls is done using this method, then the wooden slats must be treated with an antibacterial compound before installation.
Plastering an adobe house during construction
Plastering
Once the walls are prepared, you can begin applying the coating.
Instructions for performing this work are as follows:
Finished adobe house
Note! Lime plaster should dry slowly at a dry, above-zero temperature. Therefore, after applying it, the surface must be protected from direct sunlight and dry wind.
cheers for the dacha funny pictures
Putty and plaster
If a bare wall is too bold a decision for you, cover it with putty or plaster, but do not level it or make it glossy! This way you can get interesting decorative surfaces.
Mud effect
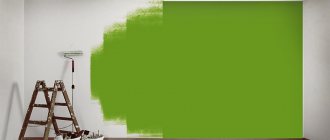
This is the simplest option. Apply gypsum plaster to the wall using wide, sweeping strokes of the trowel. Experiment by choosing a pleasant texture. When the plaster is dry, coat it with a primer and paint it with white interior paint.
Mud effect - a simple and cheap way to decorate walls
The walls look very interesting, where the lower part is decorated with wood or any other natural material, and the top is plastered with a daub effect.
Marble putty
We clean the wall to plaster and apply a thin layer of putty as a background. We are waiting for it to dry. Place a sheet of plywood or drywall next to it and place 3-4 splashes of putty on it. We take a trowel and press down the putty a little so that it imprints on the tool. And then we simply “smack” the wall with a trowel to create “bloopers”. Let them dry. When the putty no longer smears your finger, but is still soft, carefully smooth out the tops of the “blunders” with a spatula. You can wait until the surface is completely dry and sand it further with sandpaper. Just don’t get carried away, because texture is important. Now we vacuum the wall, and then take an opaque contrasting paint (you can even use alkyd enamel) and apply it with a brush over all the recesses. Don't be afraid to go overboard: we'll sand the surface later.
Is the paint dry? Using sandpaper again, we clean off the top layer of putty along with excess paint. The larger the layer removed, the lighter the wall becomes. We clean the surface from dust and treat it with several layers of colorless varnish. As a result, we get an original wall finish that is easy to care for. Costs are only for putty and one coat of paint.
Option for wall decor without prior leveling. Photo from the Country Life channel
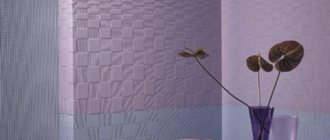
Tulle instead of stencil
You can decorate the walls using plaster and old tulle. First, the surface needs to be primed. Then apply the first thin layer of plaster, tinted in any, even very bright, color. We are waiting for it to dry. Next, we apply small pieces of tulle to the wall and coat them well with white gypsum plaster or putty. Without waiting for it to dry, remove the tulle. We smooth out the transitions between textured and smooth surfaces. To make the coating look stylish, you don’t need to print a design all over the wall—a few textured spots are enough. We fix the effect with varnish.
Wall decoration using plaster and tulle. Photo from Gennady PRODECOR channel - wall decoration
Facing
Some interior design styles involve covering the walls with ceramic tiles or mosaics not only in the kitchen and bathroom, but also in other rooms. Several materials are used for these purposes.
- Natural stone is rare, but quite popular for fragmentary finishing in the fireplace area, doorways or on an accent wall.
- Artificial stone is a ready-made gypsum imitation, stylized as stone of various types, used not only in accent areas, but also as the main finishing material for walls, if not in the whole house, then in some rooms.
- Homemade imitation is the simplest and cheapest, and therefore a popular finish among private owners, attractive due to its accessibility and relative ease of work. Brickwork on the wall is imitated using gypsum plaster applied to the surface either through a stencil or over “seams” of masking tape. The relief is created using various available means, it can be a spatula with fingers, or a dry brush. After removing the tape or stencil and drying the “brick”, the surface is painted in one or more tones. Some also seal the seams for greater authenticity, but this is not for everyone and makes sense when the tiles are thick. Imitation of masonry is done in corridors, halls, and living rooms, and some even decorate bedrooms this way.
You can also try making an imitation using polymer molds, but this is much more expensive, but the result is practically indistinguishable from expensive collections of famous brands.
Liquid wallpaper
Liquid wallpaper is another way to save on wall alignment. Yes, this material is not cheap, but the technology of its application allows you to avoid spending money on plaster and putty. Liquid wallpaper is applied in a layer of up to 3 mm to almost any surface and creates an even, silky coating. That is, they can mask small chips, and if the geometry of the room is broken, then visually smooth out this defect.
Liquid wallpaper is applied with a trowel
What types of liquid wallpaper are there and how to work with them, read on our website: Liquid wallpaper: what it is and how to apply it.
Useful tips
- buy the mixture with a margin of 5-10%;
- apply plaster to the wall surface from top to bottom and from left to right;
- plaster the ceiling from the opposite side to the windows;
- hold the gun perpendicular to the plane of the wall (when machine plastering);
- apply strips of mortar 70 cm long and overlap the previous application by 10 cm;
- make connections between sections using the h-rule;
- Perform surface glossing no earlier than 4 hours after plastering.
The video in this article will allow you to visually familiarize yourself with the technology of applying Volma plaster.
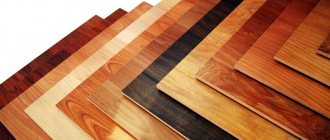
Laminate
Sheathing over a metal frame is another way to finish walls without leveling them. Of course, you can use traditional drywall and then paint or wallpaper it. But it’s faster and cheaper to immediately cover the guides with a finishing material, such as laminate. You don’t have to buy an expensive one - study the ads and pick up leftovers at a reduced price. Combine panels of different colors to get a more interesting effect.
Option to finish the wall with laminate. Photo from INTERIOR channel
Important! Consider the technical characteristics of the boards - size, type of locking connection and thickness. Otherwise, you will not be able to assemble a whole canvas.
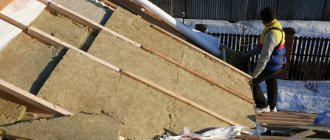
How to properly plaster adobe walls inside a house - stages of work
Adobe houses are a housing option made from natural and environmentally friendly materials: clay, sand, earth, straw and water are used for their construction. This method of construction was widespread in the last century, but even now there are many of its admirers. In the summer, such a house is always cool, and in winter it is quite warm. However, working with the material has certain specifics, so it is important to know how to properly plaster adobe walls inside a house.
Recycled wood or used boards
In addition to laminate, you can use old boards for the same purposes. Beaten by time, covered with several layers of paint, with traces of rusty nails - a material with history! But they need to be brought into appropriate form. To prevent porous wood from collecting dust, cover the boards with a matte varnish.
The board perfectly masks uneven walls and complements the interior with natural materials.
Both laminate and boards need to be used in very measured doses, not on all 4 walls. The interior looks most harmonious when only one or two sides are decorated in this way.
Old boards have an interesting decorative effect
Frame cladding allows you not only to hide uneven walls, but also to save on electrical wiring. To replace wires in apartments, you need to trench the walls. This work is dirty and expensive, and when covering the frame, you can run wires in the cable channel between the wall and the finishing coating.
What are the features of plastering?
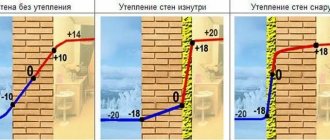
When plastering adobe walls, it should be remembered that the main feature of structures that contain natural materials is the need to protect them from the outside from frost, as well as take care to remove excess moisture from the wall itself.
When performing work on external walls, you should decide what thickness of the plaster layer will need to be applied. If it is thick, then it is better to use a reinforcing mesh in the process, otherwise in the future the plaster will begin to fall off in pieces.
Wooden paneling again
"I'm tired of it!" - you say. “You just haven’t revealed its potential,” the designers will object. Today, lining in the interior is not yellow varnished faceless walls. There are many colored compounds on the market that can be used to paint wood. Which color should I choose? Let's remember the trends.
- The pastel range remains relevant, especially shades from light sand to cream.
- Combinations of gray, graphite and white are in fashion. Against this background, splashes of bright colors look good.
- Deep shades of green, burgundy and blue are becoming more and more popular.
Depending on the purpose of the room, you can choose one color or a combination of several. This visually maintains a connection with natural materials and creates an atmosphere of country life.
Lining can look very interesting, harmonious and modern
Volma plaster: characteristics, dilution, application, photo, video, description
Independence.
This is the main installation for the Volgograd gypsum plant. He is 70 years old. The enterprise survived the restructuring only by increasing production volumes. The plant's management avoided dependence on Western companies by not taking their capital for development. Volma represents 100% Russian products. The best seller is plaster. Let's find out whether it evokes a feeling of pride for the country.
Applying panels
They allow you to transform the interior without much effort, especially since the panel is sometimes simply hung on the wall, like a large picture. You can make a large panel from boards, treat them with oil or stain, and fix them on the wall. It is advisable to choose wood for such an art object with obvious defects, ideally used boards. Similar panels can be made from plywood or cork and decorated, for example, with photographs. It is not forbidden to use panels upholstered with fabric, but dust must be removed from them frequently.
Panel covering part of the wall
Panels can fill part of the wall, zoning the space, or play the role of a headboard or an artistic accent.
It may seem to you that not all finishing materials proposed in the article belong to the budget category. But if you calculate how much time and money will be spent on high-quality leveling of the walls and their finishing, the benefits will become obvious. In addition, unusual finishing methods will help you create a modern, fashionable, individual interior.
Source
Types of wall materials according to method of application
Interior finishing is classified according to a large number of characteristics, ranging from the raw material base and method of application (cladding, laying, installation, etc.) to the specifics and mode of operation. Overall, all types of interior wall decoration can be divided into several categories according to application technology.
- The wet method is everything that involves wet processes, and this is not only painting and plastering, but also cladding using adhesives, and wallpaper, which, too, have not yet been learned to be fixed with the power of thought.
- Dry method - covering with various natural, polymer and composite panels and slabs.
- Combined interior - materials used in the wet method, wallpaper with paint, tiles with paint or decorative plaster are often combined.
The method of application must be taken into account when choosing one or another decorative wall decoration, since it directly affects both the speed of work and the result. It’s not the gods who fire the pots, but it’s better not to mess with some materials without at least minimal skills. It may turn out no worse than the pros, but it will take much more time, and when we are talking about expensive materials, even more money, taking into account the need for “training on cats.” If you plan to attract performers, the price of the issue is also important - the more expensive the finishing and the more complex the technology, the more the master will ask.
You can create the desired style using different materials and methods; today, several finishing options are most in demand.
Leveling with putty
The method is suitable if there are no height differences, potholes or other irregularities on the surface. The work will not take much time. Algorithm of actions:
- The surface is cleaned and treated with an antifungal compound, primed;
- Buy ready-made putty;
- Leveling is done using two spatulas. One narrow putty is placed on a wider one, the composition is applied to the walls and evenly distributed over the area. Leveling is done by construction rule;
- The finishing layer is washed away with a solution from the primer. The surface is sanded with sandpaper.
Mixture characteristics
Coating with a 10mm layer requires a dry mixture consumption of 9 kg per 1 square meter. After applying a centimeter layer of plaster, it takes 5 to 7 days until it dries completely. Active ventilation in the room will speed up the drying time. The solution begins to set after 45 minutes, after 3 hours it finally hardens, acquires a high density of up to 2 MPa and a smooth, glossy surface. No additional puttying is required. The base temperature during plastering is plus 5-30 degrees. The time for applying the solution to the wall after mixing is limited to a period of 20 minutes.
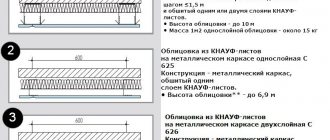
Leveling with plasterboard using the frame method
If the walls are uneven and there are large differences in height, this method is used. It is inexpensive and takes little time to work. First, markings are made on the surface. A frame is erected from timber or metal. Preference should be given to profiles; they will last longer, as they are resistant to moisture and mold. Communications are hidden behind the frame. The frame is covered with sheets of plasterboard. At the final stage, the walls are plastered using a gypsum mixture.
Preparation of the solution
To obtain a working consistency, take 0.55-0.65 liters of water at room temperature per 1 kg of dry matter. For 1 bag weighing 30 kg, from 18 to 21 liters of liquid are consumed. The solution is mixed in a clean plastic container. The walls of the container are pre-wetted. Intensive mixing is performed with a drill with an attachment or a special mixer until a homogeneous mass is obtained, after which the solution settles for 3 minutes. During the settling process, the components mature to working condition. After 3 minutes, the mass is mixed again until the clots and lumps completely disappear. The ready-to-use solution has the consistency of thick sour cream, does not drain from the working part of the instrument, and is plastic.
- environmental safety (due to the component composition from natural raw materials);
- vapor permeability (promotes a favorable atmosphere in the room);
- strength and durability (no shrinkage);
- active adhesion to the surface.
Volma is a practical, hygienic and economical material. The price of the mixture depends on the composition and packaging volume.
Alignment using the frameless method
It is used if the height differences are small. There is no need to make a frame; the sheets are attached directly to the wall. Algorithm of actions:
- The base is cleaned of dust and treated with a primer;
- Marking and cutting of the material is done. Immediately cut out holes for sockets and switches;
- The surface level is determined. Lines are drawn on the ceiling and floor to simplify the process of installing drywall;
- Glue or “liquid nails” is applied along the perimeter of the sheet. It is attached to the wall according to the markings. Leveling is done using a level and a mallet;
- Additionally, fastening is done with dowels;
- The joints are puttied with gypsum mixture.
The methods considered are an excellent alternative to plaster. This way you won’t have to set up beacons, apply the solution and carefully smooth it out using the rule.
Source
Decorating the wall surface
One of the tasks for which Volma plaster is used is decorating the wall surface in an original style. Using special rollers, a relief texture is created on wet plaster. The tool for applying a three-dimensional pattern can be a regular spatula, a hard brush, a sponge grater, a trowel, or a custom-made molding tool. The master applies orderly pressure with the blade onto the solution, which is in the process of setting. After hardening, the surface becomes patterned and embossed.
The properties of the material allow you to perform artistic decoration, create interesting drawings, use complex techniques for working with dry plaster, and paint walls. The photo shows options for decorating a wall in the interior.
When is the best time to use drywall?
Is it possible to cover the walls with plasterboard instead of plaster? Installation of gypsum boards is used in the following cases:
- the house has wooden walls;
- when it is necessary to hide communications, and building walls is time-consuming, dusty and expensive;
- it is necessary to carry out additional heat and sound insulation;
- there is a large curvature of the wall or the vertical is blocked;
- work must be completed as soon as possible - 2-3 days;
- there is no financial opportunity to attract specialists to carry out the work;
- when you need to hide the seams from the mortar in aerated concrete and gas silicate walls, as well as when using foam blocks;
- it is necessary to level the protrusion inside the room of the foundation blocks.
In all other cases, whether to replace plaster with drywall or not should be decided taking into account other factors.
What is better: laying tiles yourself or turning to specialists?
You can install tiles on a vertical surface with your own hands. But, as you understand, for high-quality installation of tiles on walls without plaster, certain skills are required. If you don’t have them, call a master and be his apprentice.
Of course, not every specialist will give his consent to this. After all, he himself is capable of completing this task efficiently and quickly. In another case, an inexperienced master, even with your help, will do this much longer, spending much more effort. And the result may not be at all pleasing.
But if you suddenly find a master who agrees to experiment with your participation, then in the process of work you will have the opportunity to learn secrets that will help you in the future independently install tiles on walls without plaster.
Where to start renovating an adobe house
Like any repair, it all begins with an inspection of the building, drawing up a work plan, estimates and purchasing the necessary materials. If you are not sure that you can carry out all the work yourself, then it is better, of course, to turn to qualified workers. The main elements of any residential building are the foundation, walls and roof, so we will consider everything in order.
Foundation
In adobe buildings, a classic foundation was rarely used, that is, the walls of the house were built on a compacted clay pad. Or, in the version of the adobe structure, wooden pillars were driven into the ground, which were subsequently coated with clay. When inspecting the building, if you see the presence of cracks on the walls, a difference at the level of window openings, then with a 100% guarantee we can say that the house has shrunk and the foundation under the walls needs to be repaired.
Option to strengthen the foundation of an adobe house
To do this, trenches are dug along the walls, but not in a continuous strip, but in increments of approximately one meter and a depth of about 0.6 m. Waterproofing is done along the lower edge of the adobe blocks. Foundation sections are laid in problem areas (the simplest option is reinforced concrete or sand-cement blocks). After this, waterproofing is done around the entire perimeter and a blind area is constructed.
Walls and ceilings
One of the main problems of adobe walls is that over a long period of time a “belly” appears: irregularities and bulges appear on their surface. If such irregularities are up to two centimeters in size, you can try to clean them up, and when they are larger, it is better not to take risks, but to think of a way to cover them (in the case of a facade, you can use siding, and plasterboard inside).
Plastering adobe walls inside the house
When building adobe houses, all floors were mainly made of wood. Therefore, it is necessary to assess the condition of the floor beams and if they are in poor condition, they need to be completely replaced. Of course, this is a large amount of work, since this will require dismantling the roof, replacing all the piping and making new wooden floors.
Roof
The roofs of such houses were previously covered with whatever was at hand: from reeds to ceramic tiles. When restoring an old roof, the first thing to start with is an inspection of the entire wooden structure. If necessary, replace worn-out elements and treat the entire sheathing, for example, with mastic.
Before starting roof repairs, it is necessary to carefully inspect all its elements.
If the old roof is covered with tiles, it is advisable to replace it with a lighter material, since, having a large weight, it creates an undesirably large load on the entire structure of the house.
When deciding to carry out a complete reconstruction of a building, first of all, never neglect the advice of specialists. Because, unknowingly, you can cause irreparable damage to the entire building, which will ultimately affect your budget.
Decorative coating with adobe effect
For interior use, wall preparation must be carried out in accordance with SNiP for preparing walls for painting. Minor defects and scratches are allowed. We draw your attention to the fact that the pronounced curvature of the walls and frequent deep defects will have a significant impact on the consumption of decorative material in a larger direction.
First, you need to saturate the walls with a special deep penetration impregnating primer PRIMER NORMAL. Before use, the impregnation should be diluted with plain water in a ratio of 1:8. Impregnation is applied using a regular paint roller. Drying time: 2-4 hours.
To create this effect, ROCCIA material should be applied in 2 layers: 1 layer (1 mm thick), covering evenly the entire surface and leaving obvious traces of the track from the working area of the Venetian trowel. 2nd layer with island broaches, creating obvious sagging in the form of unevenness and scratches. Drying time of the decorative coating: 6-8 hours, including between layers. ROCCIA decorative plaster has excellent thixotropy, so the material retains its paste-like state as long as you work with it. Therefore, if at any stage you are not satisfied with the result, you can repeat the procedure again.
To proceed to the next stage of decoration, the decorated walls must dry completely. Complete drying time: 24 hours.
24 hours after applying ROCCIA decorative plaster, remove obvious defects from the surface, if any, using K1500 sandpaper. After sanding, it is necessary to remove the resulting dust from the surface using a brush or a damp cloth.
The last stage of creating a decorative effect is the application of a special glaze decorative coating METALLINE. Before application, the material should be diluted with water by 20-30%. This will prevent rapid drying of the material during application and control the intensity of the pearl. METALLINE decorative paint should be applied with a sponge, lightly touching the tops of the texture. This way the paint will only be applied to the surface of the relief.
appraiser services for apartment flooding
Time for complete drying of the decorative coating: 24 hours.
For more detailed advice or an application master class, we recommend contacting our technical specialists or using the services of our salons.
Please note that painted walls must sit for at least 24 days before their initial cleaning.