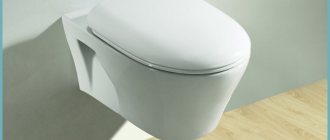
Installations - a modern method of installing toilets is increasingly used when renovating a bathroom. The installation system for wall-hung toilets consists of a metal frame from which the bowl is suspended, and all supply communications and systems that ensure the functionality of the device are hidden behind decorative cladding. Most often, the box for installing a toilet is lined with plasterboard and lined with ceramic tiles. Let's look at the general principle and step-by-step instructions on how to properly sheathe an installation.
What material to cover the toilet installation with?
To cover the toilet installation, you need a frame and sheet material.
The frame is assembled from a wooden block or galvanized profile for drywall.
The main disadvantage of wood is the change in geometry with fluctuations in humidity, which leads to the appearance of cracks in the finish at the corner joints of the frame. The disadvantages include the inaccuracy of the geometry and the difficulty of ensuring the required structural rigidity.
The steel profile does not respond to changes in humidity. And temperature fluctuations in the heated room are insignificant to affect the design of the box.
The profile has a standard geometry, clear parallels and right angles, which allow you to accurately maintain levels along all planes. The section in the form of a channel provides rigidity to each element and the structure as a whole.
For covering boxes, niches and walls, ceiling profiles are used - guides and racks:
- Knauf or domestic analogues marked UD and CD;
- Giprok with markings PPN and PP.
Note. Wall profiles UW/CW or PN/PS are intended for the construction of plasterboard interior walls and partitions indoors. They have a larger guide profile width. Even the narrowest UW has a “back” width of 50 mm (PN has a minimum size of 42 mm), and UD or PPN has a width of 28 mm. Therefore, the structure takes up more space, and this leads to a loss of useful volume of the room. And they cost more than ceiling profiles (with the same metal thickness).
GCR (plasterboard sheet) is used as a covering material.
How to make a collapsible box
If you need to provide access to communications, there is an interesting way to make a collapsible box from plasterboard and tiles. The general technology for constructing a collapsible structure is no different from cladding the installation:
- First, a profile frame is assembled around a metal frame.
- Then blanks from the plasterboard sheet are measured and cut out to cover the frame.
- Then the plasterboard sheathing is attached to the frame, which is performed at several points: usually two self-tapping screws are screwed in from each edge of the gypsum board, top and bottom. When the sheathing is “tacked”, ceramic tiles are glued onto it. At the same time, during tiling, the screws securing the plasterboard sheet are unscrewed. First, the tile is glued from below, the lower screws are first unscrewed, after the glue sets, the fixation is made through the tile: to do this, a hole is drilled in it, into which the self-tapping screw is then screwed, then the upper part of the tile is glued. The screw caps are then closed with plastic plugs that match the color of the tile.
This design of the “screen” allows, if necessary, to remove the decorative plugs, unscrew the hardware and carefully remove the front panel and thus provide free access to communications hidden behind the cladding.
Note! To prevent the tile from cracking when fastening through it, the screws are very carefully tightened by hand with a screwdriver.
Work order
Sheathing begins after all preparatory work has been completed:
- the surface of the walls and floor is cleaned of old finishing;
- water and sewer pipes are separated from risers;
- waterproofing work has been completed in full;
- rough (basic) floor finishing has been done;
- The toilet installation is installed and connected to the water supply and sewerage system.
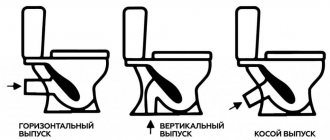
Choose a cladding method:
- on three sides and on top - the frame of the box follows the contour of the installation for the toilet;
- on both sides and on top - the box is adjacent to one of the side walls;
- from the front side and from above - the toilet sits in a niche;
- only from the front side - the installation is located in the cladding of a wall or partition;
- on three sides - the toilet installation is sewn into a box from floor to ceiling.
A drawing (sketch) of the box and frame is made, taking into account the required rigidity. Dimensions each element of the rack and guide profiles.
Separately, a drawing is made for the front blank, which is used to sew up the installation for the toilet. It marks the holes for the button for the tank drain mechanism, mounting pins and connecting the toilet bowl.
Performing markup
When all the preparatory work has been completed and the structure for concealed mounting of the toilet has been installed, markings are made for attaching the frame:
- In the example under consideration, the top sheathing is done to a minimum, so the mark is placed flush with the metal frame. If there is no laser level to align in one plane as indicated, the line is transferred using a square or a building level.
- Then the plane of the front frame post is transferred to the walls.
Tools and materials
List of tools required for working with profiles and drywall:
- hammer drill and drill (depending on the material of the walls and floor);
- hammer (for dowels or anchors);
- metal scissors;
- drywall knife;
- screwdriver;
- roughing plane;
- level, ruler, construction angle, tape measure, pencil;
- spatulas, trowel, sanding mesh (for putty);
- brush (for priming).
Construction Materials:
- drywall (moisture-resistant or regular);
- ceiling profiles (UD/CD or PPN/PS);
- fasteners for fixing the frame to the walls and floor;
- metal screws for assembling the frame and plasterboard sheathing;
- reinforcing elements - perforated PVC corner;
- in case of sewing the installation in a large box or in wall cladding, you need Knauf or serpyanka tape for seams;
- moisture-resistant primer and putty.
Installation nuances
Every business has its own secrets. There are also some nuances when installing the installation.
Block installation
With the advent of a block design with a wall-hung toilet, mounting it to the wall became a serious problem. At the same time, the method of installing pins on which the bowl is hung, proposed by plumbing manufacturers, is unlikely to be liked by the owners, since it steals some of the space and hardly fits into the design of the toilet.
Briefly about the method. The formwork is being assembled. Studs with a washer and a nut are installed on the back side. All this is poured with concrete, which is then tiled.
Plumbing experts have adopted other methods. More on the secrets below.
1. The solid wall is drilled through with a hammer drill with a long drill. Here's another little trick: the drill is cooled with oil very often, literally every 20-30 seconds. On the reverse side, a countersunk hole is drilled under the washer and nut (bolt head).
A long pin is installed if from inside the apartment or a bolt if from the outside of the wall. The potay is sealed with putty and lined. This method is ideal for private homes. In a high-rise building, it is unlikely that the neighbors will allow the decoration of their walls to be destroyed. Therefore, it is necessary to adopt the following method.
Scheme for attaching a tank with studs through the wall.
2. Anchors are driven into the concrete wall if it is monolithic, or special dowels are used if there are cavities. There is another secret here. Before installing the toilet with studs, you need to open the spacers. You can't just turn a hairpin - there's no head. For these purposes, plumbers use a mushroom nut, that is, not a through nut.
Dowel “petal” for concrete structures with cavities.
Tightened anchor pin.
Anchor pin.
They advise those who do the work themselves to do the same. It is impossible to find such a part for sale. Therefore, there is only one option left: look for a turner and order an unusual nut from him. However, being a professional in one business does not mean that a person is a pro in another.
Our grandfathers also knew how to screw in and unscrew studs using two nuts: you screw them onto the stud, and then use two keys to lock them tightly. The stud is screwed into the top nut, and unscrewed through the bottom nut.
Frame installation
When installing a frame installation, professionals advise:
- use a more modern panel with two buttons, which will save water;
- place the drain panel either between two tiles or in the center of one of them;
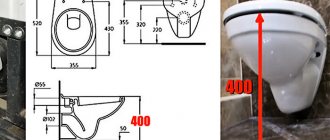
- set the upper edge of the toilet bowl to a height of 40-44 cm;
- the thickness of the protective screen or false wall should not be more than 7 cm;
- Carry out thorough quality control of work at each stage of installation.
Creating a frame for installation
Below are step-by-step instructions on how to make a frame for a three-sided box around the toilet installation:
- Using a construction angle and a level, transfer the outline of the installation frame to the wall.
- From the outline on the wall, two parallel lines are drawn on the floor to the installation racks
- Two pairs of side guide profiles are cut to the size of the contour and frame. The top pair of elements is made longer by two widths of the backrest (56 mm).
- Drill holes on the wall and floor for dowels (anchors).
- The guide profiles are attached along the “outer” boundary of the contour on the wall.
- The profiles are attached to the frame through the wall (shelf). Installation is carried out in such a way that the back of the profile is flush with the “front” plane of the installation.
- Starting profiles are cut to size for mounting on the floor. They are installed between the vertical guide profiles on the wall and the toilet installation.
- Jumpers are cut from the rack ceiling profiles, which serve as stiffening ribs for the resulting structure and for the plasterboard walls of the box. The length of the segments is made shorter than the depth of the box by 3-4 mm - two thicknesses of the profile back are taken into account (0.5-0.6 mm each) plus a small margin for marking and measurement errors. You need at least five jumpers - two at the corners of the frame, one in the middle on top and on each side wall of the box. If the installation height of the toilet is more than 80 cm, then two jumpers are needed on the sides.
- Mount the jumpers by inserting them between the guide profiles on the wall and on the frame of the toilet installation.
Connecting communications
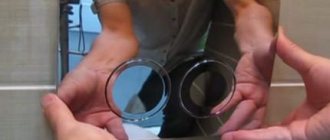
First of all, we supply water to the tank. Modern tanks have two types of connection to choose from: top or side. The pipe must be plastic, because... Flexible hoses have a limited service life. To replace such a hose in the future, you will have to dismantle the false panel with the lining. Agree, this is too expensive to replace one tube.
Tank installation
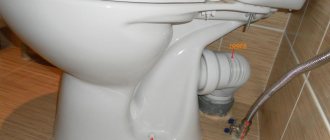
Having installed the tank, we begin to install the sewer pipes. The toilet outlet is connected to the sewer outlet through a corrugation. It is very rare when it is possible to make a connection directly. Install the tank button.
It is necessary to check the tightness of the system. The toilet bowl is hung on the frame and a test flush is performed. Then the toilet is dismantled and finally installed after finishing work is completed. The toilet is placed on the floor with the bowl down, fasteners are attached and fixed to the frame. It is worth placing a soft stand under the bowl for safety.
Connection to sewerage
Advice. The studs securing the toilet bowl must be screwed in before finishing work begins.
Installation of drywall on a toilet installation
The technology for assembling the box for installation looks like this:
- Blanks are cut out of plasterboard, taking into account the thickness of the sheet (12.5 mm). An adjustment is made for some element so that it “covers” the end of the adjacent part of the box lining in the corner.
- On the front sheet of the toilet installation system, markings are made for the holes. They are drilled for mounting studs, and cut out for the drain button and pipes.
- If a certain plane of the sheathing is made from two pieces of drywall, then edges are made along the joint border, which are necessary for puttying the seam.
- They sheathe the wall-hung toilet installation by screwing the blanks to the guides and lintels. The fastening pitch should not exceed 20 cm, and the distance from the edge to the fastener should be at least 10 mm. The attachment points of two adjacent elements are made with a shift of about 2 cm. The heads of the screws are “screwed” into the surface of the gypsum board so that they do not protrude.
At the final stage of assembling the box, the drywall is primed, PVC corners are installed in the corners and the entire surface is puttied.
If tiles or mosaic tiles are used to finish the box, then the putty is simply leveled with a trowel. Preparation for wallpapering and painting requires mandatory grinding of the surface.
Functionality check
Before sewing up the entire structure with a false panel, you need to make sure that there are no leaks and that the system as a whole is working. To check, open the water supply tap. After the tank is full, the water is drained. You need to do this several times.
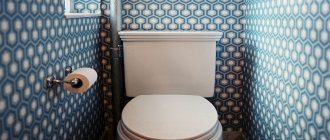
A toilet with installation looks neat and is suitable for most interior styles
If problems occur, possible causes may be:
- If water leaks from the tank, the sealing gaskets are most likely installed incorrectly or have moved during installation. Turn off the water, unscrew the connecting bolts, inspect and correct the gasket;
- If the toilet is wobbly, it means that somewhere it is necessary to tighten the bolts in the installation or the fasteners of the toilet itself. Tighten the bolts carefully so as not to split the ceramics or strip the threads of the fastening fittings;
- Stagnation of water in the toilet indicates that the drain pipe is installed at the wrong angle. Dismantle the device and install the drain strictly at 45 degrees;
- A leak near the floor may be caused by insufficient sealing of the corrugation.
The installation of a wall-hung toilet is technologically more complex than the installation of its classic counterpart. However, if you own construction tools, then installing the installation yourself will not cause any difficulties if you have the desire.
Finish options
There are several options for covering a toilet with plasterboard sheets:
- creating only a box to hide unwanted elements in it (sewer and water pipes with meters);
- wall decoration. This allows you to perfectly level the surface of the walls and significantly simplify the final finishing of the room. This also creates a partition between the bathroom and the toilet;
- construction of a plasterboard ceiling. It will allow you to build in additional lighting and make it possible to hide defects in the concrete coating;
- complete toilet lining with plasterboard, including walls, ceiling and creation of a box for pipes.
Finishing options The choice of finishing option depends entirely on your desires and capabilities.
Finishing the toilet with plastic panels
When choosing plastic panels, first of all pay attention to the strength of the material. For the ceiling, this parameter is not the main one, but there is more load on the walls (presence of shelves, hangers, etc.), so you should choose a more rigid panel that will not vibrate when touched
It is also worth paying attention to the size, because the wider the panel, the smoother and more precise the frame base is required. And, of course, it is necessary to choose a color shade that best suits the overall design of the room.
The most important step in finishing a toilet with your own hands is installing a frame on which the plastic panels will be mounted. As a basis, you can use special slats measuring 30x30 mm. When purchasing this material, you need to choose optimally smooth slats, without all sorts of flaws. Also, you should not skimp on fittings, because the strength and aesthetic beauty of the entire structure depend on it. Choose with reserve, as errors may occur during the first fitting.
Finish options
There are several options for covering a toilet with plasterboard sheets:
- creating only a box to hide unwanted elements in it (sewer and water pipes with meters);
- wall decoration. This allows you to perfectly level the surface of the walls and significantly simplify the final finishing of the room. This also creates a partition between the bathroom and the toilet;
- construction of a plasterboard ceiling. It will allow you to build in additional lighting and make it possible to hide defects in the concrete coating;
- complete toilet lining with plasterboard, including walls, ceiling and creation of a box for pipes.
Finishing options The choice of finishing option depends entirely on your desires and capabilities.
Designing a drawing
In order to carry out all installation work correctly, you should draw a preliminary drawing of the plasterboard structure, separately for the box, ceiling and walls. It is also needed if a partition is installed between the toilet and the bathroom. In any situation, to create a drawing you must:
- draw the perimeter of the wall/ceiling;
- Apply the dimensions of the structure, be it a partition, box or sheathing of walls and ceilings.
Device diagram
If there is additional lighting in the ceiling, we also indicate the placement of the lamps on the diagram. Do not forget that when installing the box, you should think in advance about quick access to the pipes. To do this, you can make part of the structure removable or construct a door.
Direct cladding: recommendations
Before you start covering, you need to cut out blanks and templates from the material; they must match the dimensions of the frame. From a sheet of material you need to form three strips with the parameters for the frame.
The first stripe is marked on the sheet. On the front side, a groove is cut along the markings using a wallpaper cutting knife. The sheet is placed vertically and broken along the cut part. The cut piece is held suspended and the layer of material is cut from below, so the first piece is separated. The second and third are done in the same way, after which these parts are applied to the frame and fixed.
Scheme of covering pipes with plasterboard.
The most reliable fastening is ordinary metal screws.
After work on fixing the frame and covering it with material, finishing work follows. It is necessary to take into account that the pipe must be accessible at any time for repairs or checking its serviceability, therefore, opposite the removable fitting part, you need to make a window through which you can get to this area if something happens.
As you can see, the work is not at all difficult. The main steps are:
- preparation of the surface of pipes and materials;
- frame work; where the profile connects to the working surface, it must be glued with shock-absorbing tape;
- covering it with plasterboard, the sheets are easy to cut, their edges must be processed and cleaned;
- if batteries and similar structures are lined, make several holes for heat exchange;
- box processing.
The corners are reinforced with metal corners, the joints are sealed with putty. Next, the structure is sanded and primed. Good luck!
«>