New engineering systems are increasingly being created using pipe products made from polypropylene and low-density polyethylene. Often pipelines made of PP and HDPE have to be connected to each other. This makes it possible not to dismantle already laid communications made of low-density polyethylene.
Therefore, it will be useful to learn how to connect a HDPE pipe with a polypropylene pipe when upgrading and repairing an existing network. The information will be especially useful for beginning craftsmen.
Types of PPR pipes
Polypropylene belongs to the group of thermoplastics. When heated to temperatures below the yield point, the polymer becomes viscoelastic. It is reversible, so the material becomes solid again when cooled. This property is used in PPR welding.
The industry produces pipes with a diameter of 10 to 1600 mm with a wall thickness of 2-61 mm. For domestic needs, sections from 16 to 110 mm are mainly used.
The pipe range is made from varieties of polypropylene:
- PP monopolymer;
- block copolymers PP-N, PP-B;
- random copolymer PP-R.
The differences between them lie in the structure of the polymer chains and the structure of intermolecular bonds.
Products made from PPR have the necessary strength and chemical resistance, but rather high thermal expansion. When heated to 50 °C, a 10 m long pipe lengthens by 60 mm.
To reduce deformation, polypropylene is reinforced with fiberglass or aluminum foil. Such materials are most widespread in low- or high-temperature heating systems, where the environment experiences significant temperature fluctuations.
Product labeling contains information about the manufacturer, pipe type and diameter, wall thickness, service class, and nominal operating pressure. Additionally, the number of the Russian or international standard may be indicated.
The scope of application of pipes is determined by the operating pressure:
- PN10, PN16 - for cold water supply;
- PN20 - for cold and hot water supply;
- PN25 - for heating.
The color of the plastic can indicate the purpose:
- white and gray - for internal cold or hot water supply, heating;
- black - for external systems;
- green - for irrigation, cold pipelines of short length.
Installation features
Soldering of polypropylene pipes is carried out using thermal contact or electric pulse welding. The thermoplastic polymer in the joined areas softens when heated, and when hardened, forms a monolithic joint. The nodes are non-separable.
For heat welding, a special soldering iron with heating tips of various diameters is used. The optimal soldering temperature for polypropylene pipes is 260-300°C. When assembling the system, it is recommended to use products from the same manufacturer, which guarantees compatibility of pipes and fittings in diameter and chemical composition.
During installation the following are used:
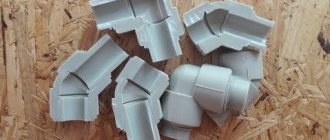
- couplings, tees, angles, adapters, bends, contours from PPR;
- combined products for connecting to metal;
- Ball Valves;
- check valves;
- filters;
- water sockets.
The pipeline is attached to the wall using brackets, clamps, and supports.
Connecting elements
The connection of structures made of metal-plastic or polypropylene is made using special fittings. These are connecting elements that allow you to install a water supply network of any design. There are different types of fittings. Among them there are dismountable threaded, press fittings and compression connectors. These two types of fittings are dismountable, so if a leak occurs at the connection point, you can replace the faulty element without any problems.
Press fittings are considered the most durable. However, if a leak occurs, replacing such a unit will cause some inconvenience. Installation of such parts is carried out using a special crimping coupling or press pliers.
Threaded fittings are mainly used for attaching a metal pipe to a metal-plastic one.
Design and principle of operation of a hand-held soldering iron for PPR
A welding machine for soldering polypropylene pipes helps to quickly and efficiently install a water supply, heating, drainage or irrigation system. The tool consists of a body with a handle, a metal platform (“iron”, cylinder) for attaching attachments and a stand.
The device operates from a 220 V network, power consumption is 600-2000 W. The heating temperature is set by a thermostat within the range of 50-300°C. Readiness for work can be determined by the glowing indicators. The platform has holes for nozzles for pipelines of the most common diameters: 20, 25, 32 mm. In some models, the equipment is expanded to 40, 50 or 63 mm.
The nozzles are installed in pairs - the sleeve is designed to heat up a section of the pipe, the mandrel is for the socket of the coupling or the valve body. The coating can be steel or Teflon. Unlike metal, polymer material has low adhesion and is much better cleaned from plastic solder.
Pin soldering irons use pad attachments. They consist of two parts and are bolted to the heater. Such welding machines are used for soldering in hard-to-reach places.
How to properly solder polypropylene pipes according to the instructions:
- Install the required attachments.
- Plug in the device.
- Set the required temperature using the thermostat.
- Wait for the indicator signal.
- Place the pipe on one nozzle and the fitting on the other.
- Wait for the time indicated in the instruction table.
- Remove the heated elements, connect, press without force.
- Let cool for a few minutes.
Some manufacturers equip the device with a metal case for storage and carrying, scissors for cutting polypropylene pipes, and protective gloves. The power tool is affordable and easy to use, which has made it popular among both professionals and home craftsmen.
Film gluing method 2
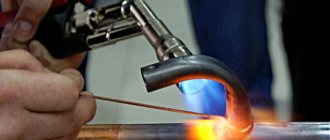
You can connect the edges of the panels as follows: clamp them between 2 smooth strips of metal so that the edges of the film protrude about 1 cm from under them, and melt them with the flame of an alcohol lamp or blowtorch.
To glue the film, you can also use xylene and trichlorethylene, heated to 70 - 75 ° C. At a temperature of 30 °C, film panels can be glued with 80% acetic acid
If you choose one of the above substances to connect the film parts, use extreme caution when working with them
The film can be glued using BF-2 or BF-4 adhesives, having previously treated the surfaces to be joined with a 25% solution of chromic anhydride. PK-5 glue is best suited for joining panels of polyamide film. Be sure to iron the seam obtained after gluing with a warm iron heated to a temperature of 50 - 60 °C.
More recently, superglue has appeared on sale, which is designed specifically for plastic film. It gives a very strong, water-resistant and elastic connection. In addition, it is absolutely odorless, and the connections are transparent and practically invisible. With one bottle of glue with a capacity of 50 ml, you can glue a seam 15 - 20 m long.
Since superglue contains solvents used in everyday life, it is recommended to follow the same precautions when working with it as when using household chemicals. If stored in sealed packaging, the shelf life of the glue is unlimited. If it dries out, it is enough to dilute it with acetone to restore its original properties
If it dries out, it is enough to dilute it with acetone to restore its original properties.
Superglue is also useful for repairing finished film coatings. The method of its application in this case is as follows. Using a brush or stick, apply a thin layer of glue around the damaged area from the outside of the film covering. Let it dry for 2 hours. Then cut out a patch of the required size from the film, apply it to the damaged area and smooth it well. You can even glue old film with superglue. However, you should know that it is best to repair film coatings in sunny weather.
If you want to sew film panels with threads, overlap them on top of each other. Place stitches infrequently. To increase the strength of the seam, use a paper gasket. This method of joining film sheets is most often used when it is necessary to apply a patch to the film covering before it is stretched onto the frame or when an already stretched film breaks. Minor damage to the film can be sealed with adhesive tape.
This problem is often faced by owners of summer cottages, greenhouses, home craftsmen, and even car owners. After failures, people start looking for information on the topic. Is it even possible to glue polyethylene? In the article you will find the answer to this question.
Soldering of unreinforced pipes
It is recommended to weld PPR pipes at an air temperature of at least +5°C, since the plastic becomes brittle in the cold. For installation you will need fittings, a soldering iron, a hexagon for tightening attachments, scissors, a tape measure, a pencil, and gloves. Nozzles of large diameters are installed closer to the base, smaller ones - to the edge of the heating platform.
The temperature on the thermostat is set in the range of 240-280°C. After turning off the control indicator, you can start soldering.
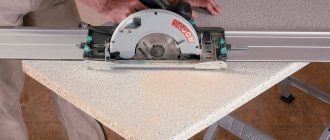
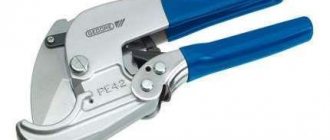
cutting
The pipe must be prepared before welding. It is cut into sections according to the pipeline diagram in advance or directly during installation. For cutting, use special polypropylene scissors, which give an even cut.
Scissors can be of various designs - with a return spring, a ratchet or roller mechanism, or an electric drive. The wide base allows you to install the pipe correctly in relation to the cutting part.
The use of hacksaws for metal is allowed. To obtain a high-quality cut, the tool must be held strictly perpendicular to the axis of the pipe.
Chamfering
According to the technology for installing polypropylene pipelines, it is necessary to remove a chamfer with a depth of 1 mm from the ends at an angle of 30°. This operation is often neglected, believing that it is not necessary. However, by cutting off excess volume and forming a thinner end of the pipe, the heated connection is much easier to assemble and less deformed. The molten material is not forced into the lumen and does not reduce its area.
The chamfer can be removed with a construction knife, a special sharpening machine, or a homemade device with a cutting blade.
Video on how to chamfer aluminum and non-aluminum pipes
Cleaning and degreasing
Remove dust, dirt and grease with a rag moistened with acetone. This measure promotes more uniform diffusion between the heated boundaries of the pipe and fitting and increases the service life of the unit.
Marking
If you do not have sufficient welding experience, it is recommended to make preliminary markings. To do this, measure a distance at the end of the pipe equal to the depth of the fitting socket plus 2 mm, and make a mark with a pencil. You can install a limit clamp.
Recommended distances to marks depending on pipe diameter:
If the work front is large, it is convenient to use a homemade template.
Warm-up and connection
The heating time of the nozzles depends on the thickness of the pipe wall. The larger it is, the longer the temperature effect should be. The values recommended by manufacturers are indicated in the instructions for the welding machine.
The pipe is placed on the heated sleeve up to the limit mark, and the fitting is placed on the mandrel. After a few seconds, the parts are carefully removed, connected with little force, a technological pause is maintained and cooled naturally without mechanical influence. After each use, the nozzles are cleaned of any remaining adhering material.
It is not recommended to exceed the heating time. As a result, polypropylene becomes too viscous and forms sagging, which can narrow the lumen and impair the patency of the joint.
Misalignment of the apparatus and parts during welding must not be allowed. In areas longer than 2 m it is necessary to place supports. It is better to solder complex links in advance on a horizontal platform - a floor or table, and then weld the finished unit into the pipeline.
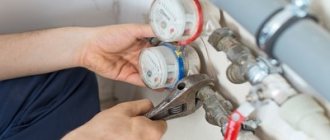
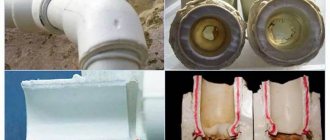
Coupling connection
The design of a conventional coupling consists of a cast iron body, a pair of nuts, rubber gaskets, and four washers. When purchasing, you need to pay attention to its compliance with the diameters of the plastic pipes being connected. To join, the pipes are inserted inward until the ends touch in the middle of the coupling, passing through washers and gaskets. The nuts are tightened with sufficient force to compress the gaskets.
The tightness of connecting pipes with a coupling is 100%, however, when laying them close to a wall or floor, this method is unacceptable. Then clamping couplings come to the rescue. Before joining, the end of the plastic pipe is cleaned and the coupling is unscrewed. Fasteners are put on the prepared area in the correct order. The sealing ring is placed at a distance of at least 10 mm from the end.
The clamping coupling is inserted inside the plastic pipe and the previously put on parts are pushed towards it, and the bolt is tightened. The degree of clamping is checked by lightly twitching the body; if it moves, continue tightening. A fitting with a union nut is screwed onto the thread on the opposite side, installed in the next section.
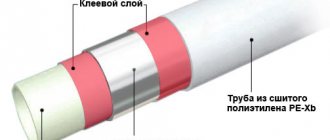
How to solder polypropylene pipes with reinforcement
The reinforcing layer, which reduces thermal deformation, is made of aluminum foil or fiberglass. It can be located on the outer surface or in the thickness of the wall. Fiberglass reinforced pipes are welded similarly to conventional polypropylene pipes. Glass threads do not interfere with the diffusion of materials; the structure does not change during hardening.
During welding, foil creates an impenetrable barrier for mixing polymer molecules, so the metal is first removed to the depth of the joint. To do this, use special manual strippers or attachments on a hammer drill.
The sharpeners work like a pencil sharpener. They cut off the top layer of polypropylene and metal. There should be no foil particles left on the surface after treatment. Then soldering is carried out in the usual way with the selection of appropriate fittings.
Tools
Ease of installation is a key advantage of polypropylene. You will need certain materials and special tools:
- polypropylene pipes;
- pencil;
- clips to fix the line;
- roulette;
- couplings for connection;
- corners;
- Ushastik-MRV. It is used to secure the mixer;
- MVR outlets with metal threads;
- soldering device;
- scissors for plastic items.
How to solder polypropylene pipes in hard-to-reach places
It often happens that the connection is difficult to reach even with a compact hand soldering iron. These are areas under the ceiling, in corners, niches or places with closely located plumbing equipment. In this case, the following welding methods are used:
- The complex assembly is first assembled separately, then welded to the pipe in a convenient place.
- The direct and mating parts are heated sequentially with a minimum period of time and quickly connected so that the parts do not have time to cool down.
- Use 2 sets of nozzles at the same time, installing them mirror-like in the heater. In this case, one of the branches should not be rigidly fixed.
- The nozzles, preheated on a pin soldering iron, are slightly unscrewed, removed and the areas being connected are melted.
Since welding must be carried out quickly, it is necessary to have an assistant to work in hard-to-reach places.
Advantages
- low cost;
- chemical inertness - does not react with alkalis or acids; the water does not acquire any foreign taste or smell;
- corrosion resistance; resistance to aggressive environments;
- durability - the first pipes have been in service for more than fifty years;
- smooth inner surface - such pipes do not “overgrow” with calcium salts, like metal ones;
- tolerate freezing with water inside and do not burst like metal ones;
- are not afraid of temperature changes (ranging from - 20 ° C to 40 ° C):
- plastic polyethylene easily tolerates soil movements;
- Manufacturability – easy and quick installation;
- polyethylene is environmentally friendly - its production and disposal do not lead to environmental pollution;
- their low weight facilitates their installation, storage, and transportation.
Hydraulic tests
When examined externally, high-quality connections do not have misalignment of more than 5°, folds, cracks or other defects. A roller should form along the edge of the socket, protruding beyond the end of the pipe. If it is heterogeneous or layered, the temperature conditions were disturbed during welding or dirt got into the joint.
Hydraulic tests are carried out at a pressure exceeding the maximum permissible by 1.5 times. So for a pipeline with a PM of 25 atm. this is 40 atm. Pumping time 30 min.
After 10 and 20 minutes, the pressure is reduced and the connections are checked for leaks. The pressure is then increased again. If leaks are detected and a loss on the pressure gauge of more than 0.2 bar, the section of the pipeline with defects needs to be replaced. If you hire a specialist, the cost of soldering polypropylene pipes will be higher than if you install it yourself. But you will be 100% able to avoid leaks due to poor-quality joints and, therefore, save on rework.
Types of fittings
It is possible to connect 2 pieces of different materials using special fittings. They are also used when you need to connect plumbing fixtures to steel fittings. Inserts on fittings are necessary for a strong connection. They can be made of brass or chrome. Today the most common options are:
- crosses;
- combined tees;
- coupling;
- Ball Valves;
- adapters (have an external plastic thread).
How to avoid mistakes
The quality of welding can be harmed by non-compliance with technology. To avoid having to replace individual sections or the entire pipeline, it is recommended:
- do not work at low air temperatures;
- do not exceed heating time;
- do not twist the connection parts when removing them from the nozzles;
- do not use excessive force when joining;
- Do not use attachments with damaged coating;
- clean and degrease surfaces;
- Do not weld a metal pipeline next to a PPR fitting, which may melt when heated.