Author: Yuriy Fedorovich Kolesnikov, thermal power engineer
How to build an outdoor stove with your own hands is a relevant question both for residents of non-gasified regions and for inhabitants of completely civilized places. The first are interested in the opportunity to cook food in the warm season using waste fuel (dead wood, dead wood, construction chips) - a home heating and cooking stove in the summer is not very economical, and it makes the house very hot while cooking dinner. Secondly, the opportunity to sit by the fire in the gazebo or on the lawn in a relaxation corner at the dacha or on your own property, while at the same time preparing shish kebab or barbecue ribs, without shelling out a mind-boggling amount for a turnkey branded garden stove. Both are also attracted by the opportunity to receive home-smoked products that are obviously not adulterated and are much cheaper than store-bought ones.
Design features
This design can have either one or two hearths. It consists of:
- internal combustion chamber for loading fuel;
- countertops for preparing dishes (optional);
- external hob;
- woodshed - a special compartment in which fuel is stored for drying (optional);
- space for a grate – can be combined with the internal combustion chamber.
Note! The larger the combustion chamber, the larger the dimensions of the structure itself and, accordingly, the greater the functionality. But remember that a stove that is too large will take a long time to heat up, as will it to cool down.
Handy tools
A set of necessary tools is also collected in advance. It should consist of:
- Angle grinders 230;
- Angle grinders 125 (not necessary, but preferable so as not to rearrange the wheel and cup);
- extension cord with a tee (so as not to switch sockets);
- level 80 cm;
- level 30 cm;
- metal ruler 1 m;
- tape measures 3m;
- masonry trowel;
- regular and rubber hammer;
- a mixer with a nozzle for preparing a solution or a drill with adjustable speed;
- buckets for mixing the solution;
- containers for soaking bricks;
- hand and brick rags;
- concrete mixers (although you can mix by hand);
- shovels.
Stage 1. Selecting material for manufacturing
Despite the huge selection of building materials, there are actually not many of them that can be used in our case.
- fireclay brick or aerated concrete - both materials are very resistant to high temperatures;
- finished metal or cast iron products are an expensive option, but installation time will be significantly reduced.
Let's look at the problem from a practical point of view. Aerated concrete blocks will cost less than brick, but in terms of aesthetics they are definitely inferior. In addition, these blocks require additional cladding.
Note! Many people resort to buying ready-made stoves, and the reason for this is their undeniable advantages: easy installation (using glue) from a kit of parts according to the included instructions.
If we talk about the combustion chamber, then everything is more complicated here, because it is extremely difficult to purchase a suitable option. Therefore, you need to do it yourself. And the design itself, in theory, should be the way you want it to be - from the preferred design to the cladding method.
Chimney installation
The operation of the entire garden stove depends on a correctly installed chimney. The easiest way to make a chimney without errors is to use a modular system. Having collected a sufficient number of modules, you only need to assemble them like a construction set and cover the outside with bricks. It is important that the modules fit tightly together and are firmly connected with clamps or heat-resistant sealant.
There are several rules for installing a chimney:
- Installation must begin from the stove;
- The parts must fit tightly together without forming gaps or cracks;
- Good access must be provided to all parts of the chimney so that in case of blockage, the chimney can be cleaned;
- The joints of the modules should not be in the ceiling.
Stage 2. Selecting a suitable location
Let’s immediately make a reservation that the outdoor stove should be located in the most convenient place. Ideally, its location should be determined at the initial stage of building a house. But if the house has already been built, then the choice of location will depend on specific conditions.
In this case, you must adhere to a number of mandatory requirements:
- the structure should be placed near the recreation area, terrace or veranda (otherwise you will have to build a canopy and install several benches);
- there must be lighting;
- Regarding the dimensions, we cannot give any specific advice, since they depend only on your personal preferences and needs;
- between the gazebo and the stove (if the distance is large enough) you need to lay a path;
- the structure should be located on the leeward side so that smoke does not enter the house;
- It is better not to build it next to plants and bushes, because they may suffer from high temperatures;
- the space around the stove must be laid with stone or tiles;
- and most importantly, there should be no flammable materials nearby!
Advantages of stove heating
In the fall, there is still a lot of work in the garden and vegetable garden, but the daylight hours are short, and you want to do more, to get everything done. By evening, fatigue accumulates. And therefore it is very pleasant to wash in the bathhouse and spend the evening and night in the warmth.
With the onset of cold weather, the craving for the evening warmth of the home increases. But what to do if the heating has not yet been turned on in a city apartment, and spending the night in a country house requires the operation of an electric heater and high energy consumption. In addition, the widespread use of this heating method distances people from communication with nature - living fire.
My wife and I once returned to the dacha after a 4-day absence. The house greeted us with cold and dampness. We lit the mini-fireplace, then the stove. After 4 hours the house was filled with warmth.
The summer of 2021 also turned out to be cold, so they burned the entire carry-over supply of dry firewood, but nothing, they found a simple means of kindling with new firewood. Moreover, heating with wood is also useful for obtaining mineral fertilizer - wood ash.
| Mineral content in wood ash, % | ||||
| Type of firewood | Р2О5 | K2O | Sao | Source |
| birch | 7,1 | 13,8 | 36,3 | Development of a summer cottage / Yu.M. Andreev, Moscow: EKSMO-Press: Lik press, 2001, – p.114 |
| pine | 2,0 | 6,9 | 31,8 | |
Two years ago, wood ash appeared in stores in 1 liter packaging at a price of 65 rubles. However, the name of the wood from which it was obtained was not indicated on the pack. But the composition of ash is important for plants.
Stage 3. Let's get started
First, work out an action plan and draw up a diagram, preferably in great detail. Think about where the stove should be located, what it will look like, etc. This way, the time spent on work will be significantly reduced, and the amount of materials needed will be determined as accurately as possible.
Note! It is advisable to use only high-quality building materials - this will help avoid problems in the future. If, for example, the brick is of good quality, then when laying it you use a minimum of mortar (at least that’s what experienced stove makers say). You can, of course, use used bricks, but before using them for internal elements, thorough cleaning of the surfaces is required.
- The prepared solution should be plastic, but in no case liquid! This way the seams will be completely filled and drips will be eliminated.
- It is recommended to sift the mixture through a fine-mesh sieve (cell diameter is maximum 1.5 millimeters).
- If oily clay is used, it must be mixed with sand.
- The solution is mixed with utmost care. Recheck the entire mixture with your hands at the end of kneading, knead the lumps and eliminate unnecessary impurities. Remember - the solution must only be homogeneous!
- Before working, the clay should be checked for fat content. Do it as follows: take 1 liter of each clay and sand solution, then roll into balls with a diameter of 0.5 centimeters. When the balls are dry, drop each one onto a hard surface from a height of one meter. A ball that will not break and will be the ideal ratio of components.
- The clay should be soaked at least two days before starting work. During this period of time it will “sour” enough and acquire the required plasticity.
An outdoor oven also involves the use of tools and materials such as:
- brick (preferably fireclay), the quantity of which is determined by a previously drawn up project;
- nylon rope;
- clay;
- shovel;
- cement;
- trowel;
- sand;
- mounting level;
- ash door;
- door for the combustion chamber.
Which one to build?
First, let's see what kind of stove it is possible to build outdoors, taking into account the fact that it will not be heated intensively and irregularly, but will be exposed to climatic influences, freeze in winter, and it will be difficult to provide it with a high chimney. But the danger from the spread of carbon monoxide from an outdoor stove is reduced to the minimum possible, although it is not completely eliminated, especially in a gazebo, under a canopy and in calm weather. Don't forget about this: there is no stove that can be heated at random without fear of fumes. You can get burned just sitting by the fire.
Keeping these circumstances in mind, the choice of outdoor stove design is not so wide. The simplest garden stove is the well-known rough or rough stove. She can look terrifying, pos. 1 in Fig., but it can be heated with any fuel and it works properly, almost regardless of the quality of the materials used and the work: when building a rough structure, you can use broken simple red working bricks or stones from the surrounding area using ordinary cement-sand masonry mortar, i.e. .To. microcracks in the masonry have almost no effect on the technical performance of this stove. See, for example, the video below of how a 5-year-old child built a rough stove, which his family successfully uses and which can also be used for smoking. Which, by the way, not every oven allows, see below.
Video: a simple stove, a rough one, a design accessible to a child
An outdoor oven at a weekend cottage is often a barbecue roaster, pos. 2. Although, as we will see later, in fact this is not a barbecue at all. Such a stove takes about the same amount or less bricks as a rough one (about 200 pcs.), and you can use red working brick in the same way, but masonry mortar, due to the, so to speak, subtlety of the structure, is already needed for the stove for the street (see .further, about technology and materials).
Based on the brazier, the so-called. Finnish outdoor brick oven, which is a hearth, brazier or barbecue attached to a rough stove, pos. 3. In fact, the only Finnish thing about such a stove is that the Finns were the first to think of producing them in the form of a set - construction instructions with detailed instructions and procedures, dry mixture for preparing masonry mortar, embedded parts, fittings. Now domestic kits for building an outdoor brick oven are sold in the Russian Federation. Sometimes the set also includes bricks; if necessary, hemmed/trimmed and numbered. A kit for an outdoor Finnish stove is inexpensive, and even a completely inexperienced person can build a stove from it, which is why the Finnish outdoor stoves from the kit are very popular, see for example. track. video clip.
Video: Finnish outdoor stove
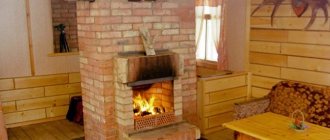
Note: a stationary smokehouse is also often attached to a wood-burning stove, pos. 4. But during use, it turns out that in the cooking mode the stove is quite gluttonous, and the quality of smoked meats is slightly above average. Why this is so and how to still combine an outdoor oven with a smokehouse, we’ll talk further.
Even less common in areas is an outdoor fireplace, pos. 5. The reason is limited functionality: you can admire the flames and cook something as if on a simple fireplace, although the material and labor intensity of an outdoor fireplace is quite high. A Russian stove is built on the street (item 6) even less often. The culinary qualities of products and dishes from a Russian oven are well known, but a small Russian oven requires 2500 bricks, a large one - 3500, the design is very complex and it is not easy to protect it from bad weather. For the same reasons, Neapolitan (item 7) and Sicilian ovens for pizza and pastries are not very common in private households; In addition, these are quite highly specialized devices.
Note: much more attention for the garden and picnics deserves the so-called. mobile rocket oven, pos. 8. Rocket stoves are a special article. Here we only recall that rocket stoves exist in 2 forms - a luxury item that allows you to get a warm bed at home without building a Russian stove, and a light, compact device on which you can quickly cook dinner using a minimum amount of waste fuel. In the latter case, the degree of heating of the cooking utensil is regulated as precisely as in a gas stove.
Stage 4. Laying an outdoor stove
So, you have in your hands a detailed design diagram, as well as all the necessary equipment and building materials. Therefore, you can prepare for the main work - remove all debris and completely level the site of future installation.
Construction of the foundation
Traditionally, the foundation for the future structure should first be prepared. It certainly needs to be strong enough to support the weight of the entire oven. The sequence of actions is as follows.
Step 1. First, using a nylon rope, mark the location for the future foundation. Typically, the base should be wider than the main masonry by about 10 centimeters.
Step 2. Dig a small pit 0.5 meters deep.
Step 3. Prepare the solution. To do this, mix “three hundredth” cement with sand in a ratio of 1 to 3, mix and fill with the required amount of water. Bring the resulting mixture to a liquid state.
Step 4. Cover the bottom of the pit with a “cushion” of crushed stone, compact it, and then pour the liquid solution.
Masonry procedure
After the solution has dried, cover the base with roofing felt - it will serve as a waterproofing layer. Next you can lay the brick.
Step 1. First use only a whole brick, then 3/4 and 1/2 of the product. Thanks to this, the order will be securely connected. After the first row is completed, begin laying the second. Upon completion of each row, check the structure using a mounting level to ensure that it is parallel to the ground surface.
Step 2. Having completed the first row, install the blower door, having previously wrapped it along the contour with an asbestos cord for additional sealing.
Step 3. To secure the door, lay ?3 millimeter steel wire in order - it will help secure the door.
Note! Some recommend installing steel plates and then attaching the doors to them - in fact, this is completely wrong! To fix such plates, you will need special welding, which only an experienced specialist can work with (after all, cast iron is quite difficult to weld to metal). And the quality of the seam in this case is not guaranteed in any way.
For this reason, we recommend using only wire.
Step 4. Using a grinder, make a small groove in the brick for the wire.
Step 5. The gap that should form between the brick and the door should be approximately 1 centimeter.
Step 6. Having closed the ash pit, install the grates. For this purpose, make cuts in the brick so that the grating is located no higher than the brick row strictly along the gap. When exposed to high temperatures, the metal heats up, but under no circumstances should it touch the masonry.
Step 7. Continue laying until the installation of the second door is required. If the brick does not fit, then carefully cut it with the same “grinder”. Also remember about the centimeter gap between the masonry and metal elements!
Step 8. Cover the top part with a stone slab (although you can also use metal) so that you can heat food on the stove.
Chimney for outdoor stove
When the outdoor stove is installed with your own hands, start working with the chimney pipe. The best option (especially in our design) may be to use only a modular chimney - it is durable enough to serve you for a long time. Moreover, it is very easy to install, and you can use heat-resistant sealant or clamps to insulate the joints.
We also note that there are a number of rules that must be followed during installation.
- The installation procedure should begin from the stove.
- If you are interested in the possibility of observing the fire, then you can purchase a door made of heat-resistant glass and install it. But remember that the connections in this case should also be sealed using an asbestos cord.
- The joints between modules should be as tight as possible. When connecting, components of a smaller diameter must be inserted into adjacent ones by at least 50 centimeters.
- To make the joints as airtight as possible, it is advisable to seal them with heat-resistant sealant.
- All connections must be sufficiently accessible (this is necessary for cleaning).
- Brackets should be installed at least every two meters.
- There should be no gaps left in the ceilings or walls.
After all this, all that remains is to install the gazebo, as well as arrange the surrounding area. You can decorate an outdoor stove with your own hands using both tiles and decorative plaster. For a more detailed introduction to the construction procedure, we recommend watching a thematic video.
Foundation
Under a large complex, you will have to make a reliable foundation , with a depth below the freezing point of the soil (it is different for each region, you can check it with familiar builders). The foundation must be reinforced. On soils with heaving soils, it should have a trapezoidal shape.
If the garden stove is small, then an ordinary slab 10-15 cm thick is sufficient. To construct it, the fertile layer is removed, a hole 40-60 cm deep is dug, 10-15 cm of sand is filled in, compacted, after 30-40 cm of gravel. The formwork is being exposed. Reinforcing mesh is placed in it and everything is filled with concrete. It is better if the foundation is 50-100 mm above ground level.
Brick barbecue projects: drawings, photos
Features: the length of the firebox should not exceed 1 m - this is enough for 8-10 skewers at a time. The width should be consistent with the length of a standard skewer - 47-62 cm. The height of the frying area is ideally just above the waist of the person who will cook.
Since a stationary barbecue often becomes the central decorative element of a site, this should be taken into account when designing and choosing a location. Its reverse side looks like a solid brick wall, so it is advisable to position the structure so that it is not visible from the reverse side. Or provide for its decoration taking into account fire safety.
Russian stove with smoke circulation
Unlike traditional ovens, units with an improved design heat up throughout the entire volume right up to the floor. However, laying them out with your own hands is quite difficult, because it requires certain skills.
For stoves, united under the name “Teplushka”, the entire space from the floor to the roof is divided into two parts by the bottom:
- upper cooking compartment
- lower heating compartment
The cooking compartment is the same as in a traditional Russian stove; it is also covered with a damper, but much more tightly. In the heating space there are brick columns to support the hearth, as well as smoke circulation channels that have access to the chimney.
The heating and cooking compartments are connected by four holes along the edges of the hearth. There is also a fuel compartment with a grate that covers the ash pan, in which hot gases first enter the cooking compartment, separated from the overtube by a tightly closed damper, where they heat the food, and then through the above-mentioned holes they are lowered into the heating compartment, heating the lower half of the stove, and only after this is sent into the chimney.
In such a stove, only a small volume of hot gases is released from the cooking compartment into the chimney, and the main volume passes first through the smoke circulation.
You may be interested in the article “Chimneys for summer cottages: features and advantages.”
Recommendations from experts
The following tips will help improve the quality of the design and the aesthetics of its appearance:
- round the sides of the stove - this will make it look more attractive;
- lay the ash pit made of bricks, with the edges cut at an angle (45°) - the ash will crumble freely during operation;
- to shrink the bricks, use a rubber hammer - this is effective and does not damage the material;
- install doors so that you can open them with your left hand (for left-handed people with your right hand);
- When installing stove fittings, use a level;
- For a firebox made of fireclay bricks, lay them on edge - the space will be used efficiently and food will cook faster;
- Fireclay bricks and ceramics should not come into contact - be sure to lay basalt cardboard between them.
To set up a barbecue with a brick stove, you will have to spend a lot of time and effort, but the result will pay for it all many times over. A well-organized design will last a long time, and it can be used to prepare a variety of dishes.
Accommodation
If you decide to install a barbecue stove on your property, then regardless of the type of stove you choose, you first need to think about fire safety - the place where it will be installed. It should be understood that any device with an open flame, if neglected in its placement and rules of use, threatens serious burns, large fires, which result in harm to human health (often fatal), surrounding buildings and nature.
It is safest to place a resting place with a barbecue on an area that is located at a considerable distance from the main buildings (country house, outbuildings, premises with animals and birds). But this is not always convenient, especially for an open outdoor brazier and those models that are under a roof, but do not have electricity, running water and other amenities of civilization.
Gazebos with barbecues can be placed on the same foundation as the house and under the same roof. But in this case, you must adhere to all fire safety requirements for buildings and residential premises.
It is not recommended to place such devices in the following places:
- near the storage area for firewood, hay, lumber and their waste;
- near dry grass, fire hazardous debris;
- close to fences and walls;
- directly under trees and overhanging branches.
When installing a collapsible barbecue in the garden or on the street, you need to take into account the speed and direction of the wind. Smoke should not go towards neighboring buildings and houses, and in cases of installing a stationary outdoor barbecue (including in a gazebo), you should take an interest in the local “wind rose” and build a protective screen on the side of the most possible “wind blower”. Special portable protective screens are available for sale, which is the best option for solving the problem of wind direction.
You also need to take care of the convenience of using the stove in the selected location of the site.
The following questions must be addressed here:
- a free approach to the device from at least two sides, because it is always more convenient and fun to cook with an assistant;
- there should be space for a table and seats nearby;
- the ability to provide a recreation area with clean water and lighting;
- Convenient access to the place from the house.
The following points should also be considered:
- how much time is expected to be spent at the dacha (this means constantly or only in the summer) - the installation of the stove indoors or in an open gazebo depends on this;
- how many people the recreation area is designed for;
- what design to choose for the barbecue area and gazebo.
Each owner will probably have a lot of questions about the design and selection of stoves, but they can already be solved in the process of creating the interior.