The thermostat (TR), or thermostat, plays an important role in heating equipment. This is a universal device that controls heating systems. Its design can be different, but the function is the same: TR stabilizes the temperature of a given environment for a certain period of time. You need to know how to connect the thermostat so that it correctly fulfills its purpose.
Mechanical thermostat
Types of thermostats
DIY thermostat
There are mainly 3 types of thermostats:
- Bimetallic plate;
- Thermocouple;
- Infrared sensor.
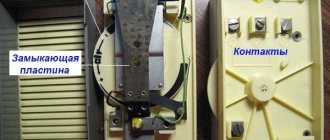
Bimetallic plate
Under the influence of heating or cooling, the plate bends in one direction or another. Thereby closing or opening the contacts that supply electricity to the heating elements. The plate is a two-layer strip welded from two metals with different coefficients of thermal expansion. Because of this, when heated, expansion forces “force” the plate to bend.
Thermocouple
The element is a V-shaped bracket made of a heat-sensitive metal alloy. A weak current passes through the wire. As the temperature changes, the resistance of the conductor changes, which affects the current characteristics. This factor acts through the control circuit on the heater power relay.
Infrared sensor
The photosensitive film of the sensor perceives the degree of heating of the surrounding space in the infrared range. Passing currents in the device change their characteristics, which affects the operation of the relay system for powering the heating elements.
Pumping and mixing unit
The pump drives the coolant at high speed along the contour of the heated floor. This results in three benefits:
- Minimum difference between supply and return temperatures.
- Uniform heating of the floor.
- Independence of ETP parameters from the temperature in the boiler or radiators.
The thermostatic valve mixes in hot coolant from the boiler. And the cooled water returns back to the heating source.
Areas of application of thermostats
In everyday life, an example of using a thermostat would be a washing machine. A temperature sensor connected to a heating element in the tank “monitors” the level of water heating. In a car, the thermocouple of the cooling system “controls” the mode of turning on the radiator fan.
Car thermostat
Various room heating devices of a sufficient level of complexity must have a built-in temperature regulator. Not a single underfloor heating system can do without solid-state thermostats. In a refrigerator, the thermostat is an integral part. In all PCs and laptops, temperature sensors turn on fans, keeping the equipment from overheating. Air conditioners, microwave ovens, electric ovens - they all have thermostats. Various water heaters, electric boilers, gas boilers included in the heating system of buildings and structures operate only together with thermoregulatory control units.
Electronic thermostat
Safety precautions
Any work on the installation of electrical equipment must be carried out in compliance with basic safety regulations. Failure to comply with these can lead to disastrous consequences.
The basic rules include the following:
- Before carrying out work, make sure that the entire room, or a separate room in which the sensor is installed, is de-energized;
- Do not start a device that is in a disassembled state;
- operation of the regulator implies a temperature range from -5 to 40 °C;
- carry out timely cleaning of the thermostat from dust;
- The device must be cleaned with products that do not contain solvent or benzene;
- carry out repairs only if you are 100% confident in your abilities, and you will need to figure out how to remove the heated floor thermostat;
- Make sure that the system power does not exceed the permissible limits provided by the thermostat manufacturer.
Sources
- https://kaminguru.com/obogrevatel/podkljuchenie-jelektricheskogo-tjoplogo-pola.html
- https://stroy-podskazka.ru/pol/teplyj/podklyuchenie-k-termoregulyatoru/
- https://otivent.com/termoregulyator-dlya-teplogo-pola
- https://sovet-ingenera.com/otoplenie/teply-pol/termoregulyator-dlya-teplogo-pola.html
- https://teplospec.com/teplyy-pol/kak-sdelat-podklyuchenie-teplogo-pola-k-termoregulyatoru-regulirovka-elektricheskogo-podogreva-pola.html
- https://polspec.com/teplyy-pol/pravilnaya-ustanovka-termoregulyatora-teplogo-pola-i-usloviya-ekspluatatsii.html
[collapse]
Connecting and installing the thermostat
There are two known options for connecting a thermostat. These are methods for connecting two-core and single-core wires.
Connecting a two-core cable to the thermostat
A two-core wire is used in the case when the TR requires full power from the electrical network for the functioning of a closed system for controlling the heating mode of a certain volume. These are integrated circuits built on microprocessors.
The data received from the sensor in the form of changes in current strength and resistance values are analyzed by the device. As a result, commands are sent to the starter of the heating elements with a given period of time and a boundary threshold for heating a specific space.
Note! An example of connecting a two-core wire is a diagram showing how to connect a thermostat to the circulation pump of a water heating boiler.
Connection diagram to the circulation pump
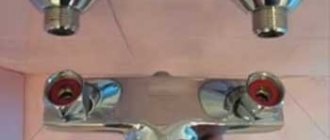
Connecting a single-core cable to the thermostat
A single-core cable is used in the connection circuit of thermostats in the case when the device itself is installed in the break of the phase wire leading to the positive terminal of the heating element. That is, the cable serves as a phase break in the mains current supplying the heating elements.
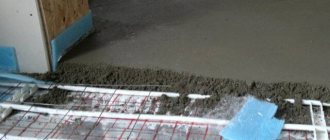
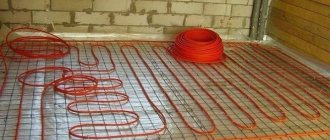
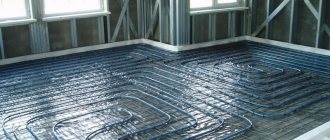
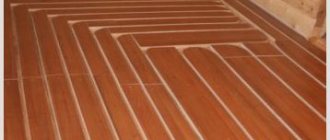
Warm floor
The main function of such underfloor heating is to heat the floor and/or room itself.
There are two types of such heaters: water and electric. The first involves laying pipes into the base of the floor, through which warm water is released. This is a cheaper and not entirely safe option, since if the pipes are damaged, not only will you have to remove the entire coating in order to repair the leak, but there is also a very real risk of ruining the repair completely. As for the electric variation, everything is much more favorable here, although the cost of such a heating project will be more expensive. However, the costs will quickly pay off, because such a system:
- safe;
- very convenient;
- economical;
- In the event of a breakdown, repairs are much easier.
Some people fear that electric heating options use a lot of electricity, but this is not the case. After all, it is worth considering that the main expense is only for warming up. Further, electricity is required only to maintain the set temperature. And a high-quality and competently installed and configured heater will not be a very greedy consumer.
A mixed type of heating will allow you to further reduce electricity consumption, that is, when there is both a heated floor and main heating in the room. Although without the latter, energy consumption will not become a big problem.
In this video you will learn how to connect a cable heated floor to a thermostat:
Connection options
- To the heated floor system;
- To the heating element;
- To the heater.
Connecting a thermostat to a heated floor system
A standard underfloor heating thermostat is supplied with detailed instructions for connecting the device to the underfloor heating system. You can connect the TP yourself using the markings under the terminal blocks.
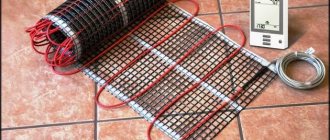
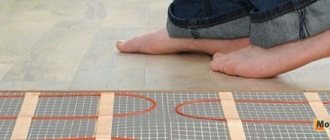
Underfloor heating mat
On the back of the regulator there are three pairs of terminal sockets for wires. The first pair is intended for connecting a two-core network cable. Socket “L” – phase, “N” – zero.
The second pair of sockets is intended for connection to the underfloor heating terminals – L1 and N1. The fifth and sixth terminals are used to connect to the temperature sensor.
Connecting the thermostat
Floor temperature regulators can be inserted into a socket box or mounted on the wall. The temperature sensor can be either built into the body of the device or installed at the end of an external cable.
In the first case, the air temperature inside the room is measured. In the second option, the sensor measures the degree of heating of the final floor covering.
Connecting the thermostat to the heating element
The thermostat must be connected to the electric heater through a magnetic starter. This is due to the fact that the power of the regulator is far from comparable to the power of heating elements.
A magnetic starter (MP) is needed when the thermostat controls several heating devices at once. The MP is cut into the phase wire in parallel with the thermostat. Adjustment of the operating modes of the heaters is carried out by a thermostat, the supply current passes through the MP. This makes it possible to use a three-phase power supply, which allows the operation of high-power heating elements.
Many TRs are equipped with electronic microprocessors, which additionally provide indicators of the level of humidity, pressure and time required to achieve the values of the specified parameters.
Connecting the thermostat to the heater
Thermostats can be mechanical or electronic. Recently, the second models have been actively displacing their mechanical counterparts. The use of modern electronics makes it possible to more effectively control the temperature in a given environment.
TRs for room heaters are built into heater housings or placed away from heating devices. The regulator, first of all, is connected to the electrical network, then through the control circuit it is connected directly to the temperature sensor.
Additional Information. In most cases, infrared heaters are connected to a thermostat via a magnetic starter. To connect the device correctly, you must strictly follow the instructions provided.
Features of how temperature control devices are connected depend on the type of heating devices. This can be a single-core or two-core connection of TP underfloor heating. The connection of a two-phase thermostat to three-phase current heating elements is carried out only through a magnetic starter. For water heating, the thermostat is embedded directly into the radiator. Each specific case has its own thermostat connection diagram.
Some useful information about electrical wires
Inside the box you need to insert several wires with different insulation colors. According to the standards, zero is blue, and phase is black. The ground wire is painted in two colors - yellow and green.
To determine the phase, you should use an indicator screwdriver. In addition, at the time of preparation, before installing the floor heating regulator, you should check the voltage in the network. Ideally, it is as close to 220 volts as possible.
Next you will need to cut the main heating cable and the power cable. To do this, it is best to use a sharp knife or special nippers. You need to cut it so that the cables protrude from the mounting box by about 50 mm. Next, the wires are stripped.
If the model provides screwless cable fastening, then the stripping length is determined based on the recommendations indicated on the device body. Be careful not to let the stripped cables touch each other. It is best to connect the ground wire to the heating cable braid by soldering or a terminal.
After this, the power cable is connected to the mounted thermostat. Instructions on how to install a thermostat for a heated floor are indicated by the manufacturer either on the body or in the manual. The instructions may vary slightly between similar models, so the diagram must be studied in each individual case individually.
Connect the wire with the phase and secure it to the desired contact in the device; it is usually marked with the letter L. The terminal for the neutral wire is marked N. However, you should be careful, as there are types of systems in which the N terminal is intended for connecting the main heating cable. This nuance needs to be studied separately with special care.
Next, you need to connect the temperature sensor to the terminals marked sensor. As mentioned earlier, it is located inside a corrugated tube. If the sensor is not initially located in the tube, then you will need to place it there yourself.
Types of heating cables:
- A two-core heating cable hides two current-carrying conductors under its protective insulation. This type of cable is considered more convenient than its single-core version, because it is connected to the thermostat only at one end. In such a cable there are 3 wires nearby, two of which are conductive and one is grounding.
- A single-core cable has only one conductive wire, usually white.
Installation Tips
Some tips:
- Before purchasing a TR, you need to make sure that the characteristics of the regulator and heating elements are compatible.
- You need to choose to install the device in the most accessible location.
- When deciding whether to purchase a device, you should evaluate the economic feasibility of using a specific thermostat model.
- If you do not have enough experience in installing such devices, then it is better to seek help from specialists.
A person sometimes has no idea about the number of thermoregulatory devices around him. They became a part of everyday life. Their work brings significant savings in energy costs.
Varieties
Temperature regulators are divided into:
- purpose:
- Indoor;
- Weather.
- mounting method:
- Wall-mounted;
- Mounted on DIN rail.
- functioning:
- Central regulation (allows you to control the temperature of the entire facility from one place);
- Wireless control (used when there is no possibility of laying a cable).
- type of government:
- Mechanical (resistant to voltage surges and not affected by electronic failures);
- Electromechanical (equipped with automatic heating);
- Digital (wide range of settings and modes).
- number of channels:
- Single-channel (used to automatically adjust and maintain temperature values at a certain level, they have smaller dimensions and weight);
- Multichannel (focused on controlling the temperature of a group of temperature sensors).
Noirot Royat 2 1200
The infrared quartz heater Noirot Royat 2 1200 is a universal wall-mounted option. Programmed with three operating modes, it is ideal for installation in any room.
Cable VVG-Png(A)-LSLTx- In what cases is a diesel generator needed: tips for choosing
- Automation shields: use
The possibility of greater coverage of the heating area is achieved by rotating the surface of the heating device at an angle of up to 30 degrees. The control panel, for ease of use, can be mounted on both the left and right sides of the heater.
Specifications:
- the heating element is made of quartz;
- the device operates at different powers of 0.3,0.6,1.2 kW;
- device dimensions 0.45x0.12x0.11 m;
- presence of a safety device and thermostat;
- low noise when the heater is operating.
Unlike the previous two models, this heater has a higher cost, around 9,700 rubles.
The question of how to choose a thermostat for an infrared heater can turn into a difficult task. In addition to its main function - heating the room, the potential buyer is interested in the cost-effectiveness and safety of the device.
Heating element device
A tubular electric heater (TEH) is an electrical device in the form of a multilayer metal tube that allows you to convert electrical energy into heat. Typically, heating element devices are installed in water heating systems (for example, in boilers or boilers), which makes it possible to obtain hot water for domestic needs or room heating. Depending on the design, there are several types of heating elements, but most devices have a three-layer tubular design:
- The outer shell of the heating element is a thin-walled metal tube, which is usually made of copper, brass or carbon steel. The metal tube receives heat from the heating rod through a layer of insulator (they are located inside the tube). From the outside, the metal comes into contact with air or water, which causes it to heat up.
- Inside a thin-walled metal tube there is a dry filler, which is quartz sand, corundum or magnesium oxide. The filler has electrical insulating properties, so it does not allow the electrical current generated by the inner rod to pass through. The filler also allows heat to pass through well, which heats the outer tube of the heating element.
- Inside the filler there is a thin metal spiral, which is usually made on the basis of nichrome. The spiral has high electrical resistance, so when an electric current passes it becomes very hot. From the outside, the spiral is connected through wires to a source of electric current, and at the ends of the spiral there are silicon insulating flaps.
The operating principle of a tubular electric heater is simple. When connected to a current source, electricity passes through the coil, causing it to heat up. Heat is transferred to the dry filler, which, due to its insulating properties, does not allow electrical current to pass into the surrounding space. The heat heats the outer metal tube, which warms the external environment (water or air).
Note! To heat the air, heating elements with a ribbed corrugated tube are often used, which increases the heat transfer and efficiency of the device.
Schemes for connecting heating elements to a single-phase network
Many homes use a single-phase electrical network. Heating elements can have different levels of operating voltage, but for home use it is recommended to buy devices with a voltage of 220 volts. There are the following options for connecting the heating element to a single-phase network:
- Direct plug-in. If you bought a low-power heating element with a power level of up to 1 kilowatt, then you can safely connect it to a working outlet directly. You can also connect several heaters (series or parallel), but their total power should not exceed 1 kilowatt, and it is recommended to use a more reliable plug for connection. Such heating elements are not suitable for heating systems, since they generate little heat, but boilers and electric kettles are often made on their basis.
- Connection via auto switch . If you want to install a more powerful heating element at home, it is recommended to connect it directly to the electrical panel using a switch. The simplest option would be to use a single-way switch that is connected to the phase. To improve the operation of the heater, you can use a two-way device, which is connected to phase and zero on the panel. There are also three-circuit systems with grounding that automatically drain current and de-energize the machine in the event of a short circuit or overload. This allows you to avoid electric shock and also protects equipment during an emergency.
- Connection via temperature controlled circuit . In this case, the installation of the heating element is carried out through various thermostatic devices that allow you to keep the heating temperature within certain limits. The main devices in this category are relays, starters, contactors and others. Most of these devices work on a similar principle - they are built into a circuit and monitor the temperature level, and if there is excessive heat, they open the circuit. They can also perform auxiliary functions - they multiply contacts, redistribute the load level, act as a fuse when closed, and so on.
Device and connection diagrams for heating elements video
Nikaten 200
Nikaten 200 is considered one of the new infrared heating devices. Air temperature is controlled using a built-in thermostat. The device is equipped with a safety system that allows you to turn off the device in the event of an emergency.
The advantages of the device are as follows:
Drying wood in drying chambers: features of the process- Plastic electrical panels
More about diesel generators
- panel made of ceramic material;
- dimensions 0.3 m by 0.6 m;
- The heater cools down period is 90 minutes while maintaining heat generation;
- low noise level;
- Quite simple installation of the device.
Heating devices of this brand are presented on the market in a wide selection at a low cost of about 3,500 rubles.