There are many ways to lay out ceramic tiles. Some of them involve additional processing of the tiles. For example, in order to assemble a “herringbone” on the floor or to make a right angle when lining niches, ventilation or utility ducts, you will definitely need to cut the tiles at an angle of 45 degrees. It allows you to form a fairly neat right angle from two separate modules. A story about how to do this, what tools may be needed to perform such work is the subject of this article.
Advantages of tile end sharpening technology
The technology of sharpening the ends at 45 degrees eliminates the need to use decorative corners when finishing external corners. Thanks to this, it will be possible to create an aesthetic appearance of the wall. Such corners have a neater and more stylish appearance than those with corners. Agree, this is much more interesting than tiles laid on tiles or inserted plastic.
Washed down the mosaics
Mosaic is the same ceramic tile, it is also actively used today in the design of modern interiors, so sometimes it becomes necessary to cut at an angle of 45 degrees on small-sized modules. How to do it?
For work, it is better to use an electric tile cutter; if you have experience working with an angle grinder, it can also come in handy. If you use a tile cutter, as practice shows, cutting mosaics with the glaze facing up is not very convenient. And all because the structure of the formed models is very mobile, it constantly moves, so it is better to turn the tile inside out, fix it on the back of the cutting disc and, supporting it with your hand, make the cut. You will have to suffer a little, but you will still be able to complete the operation.
And here an important condition remains - when processing the edge, you do not need to reach the glaze layer. Mosaics processed in this way are most often used to decorate niches and boxes under which utility lines are hidden in the bathroom and toilet.
It will also be quite difficult to cut down with a grinder. This process is quite dusty, and you need to be prepared for it. The mosaic in this case is also laid face down. During operation, the tile must be pressed against the surface of the base with something. You can use plywood of a suitable size for these purposes.
The sawing is done slowly, the clay is removed layer by layer. The diamond blade should operate at the lowest speed all the time. It will not be possible to cut down carefully with a grinder. Therefore, the cut will need to be modified with a file or sandpaper.
Disadvantages of trimming tiles to form outside corners
When using the technology of sharpening the edge of tiles or porcelain stoneware at an angle of 45 degrees, the edge of the finishing material becomes thinner . As a result, its edge becomes very fragile and susceptible to destruction under external physical influences. Therefore, the use of this technology is not allowed when finishing steps and external walls in areas with high traffic. In such cases, it is recommended to use special decorative plastic or metal corners.
Using Sandpaper
This material is most often used to hide inaccuracies in preliminary work when the glaze is damaged or chipped. In addition, there is another option for using sandpaper.
Instead of using a professional tool and the need to preserve a layer of glaze, an incision is made on the front part using a glass cutter. After this, on the reverse side, a grinder is used to make a notch in the form of the letter “V”, which should be made across the entire width of the tile. All that remains is to break the element, and the remaining work is completed with sandpaper.
Some craftsmen try to reduce work costs by using only regular sandpaper. In this case, cutting down the corners of the tiles at 45 degrees is done independently, monitoring the condition of the clay and the glaze itself. If you overdo it, the damage will affect the tiles, therefore, you will have to spend money on purchasing a similar material. The roughness of the sandpaper itself, which should vary, will also play a significant role.
For precise alignment, two material options are suitable for creating a 45-degree bevel:
- No. 40 and No. 60.
- No. 40 and No. 80.
The first numbers will be used as a rough fit for the tiles, and the second numbers will be used to create a truly smooth and high-quality surface as best as possible. Only after this can you put the tile on the corner without fear of criticism from the outside. If you follow the requirements and recommendations from specialists when making cuts at 45 degrees, there will be no questions about how to design the corners of the tiles. As a result, you can even say that the result is a tile without corners.
What tools are used to sharpen the ends of tiles at 45 degrees?
Cutting porcelain stoneware at 45 degrees can often be called sawing, sharpening, trimming, or bevelling. In this case, the meaning is the same in each case. The end of the tile is ground so that it changes its right angle to an angle of 45 degrees.
Such an operation can be carried out using various instruments. But the best result and the highest quality of sharpening the ends is achieved using an electric tile cutter , which is a special device for cutting and sharpening the ends of tiles. As a last resort, it is allowed to use a grinder with a special circle for cutting tiles. True, in this case the master must have sufficient experience and skills in order to do the job efficiently.
In any case, it’s worth taking a closer look at each of the methods for cutting porcelain stoneware and tiles at 45 degrees.
Cutting tiles with a grinder
Cutting tiles at 45 mm using a grinder is a rather labor-intensive and technically complex process. Not every experienced craftsman will be able to carefully trim the end of the finishing material. True, with the proper skill and experience, you can still cope with this. In fact, using a grinder is the most affordable way to trim tiles at home, as many people have a similar tool at home, which cannot be said about electric devices for sharpening or cutting ceramic finishing materials.
Also on the topic: Cutting tiles with a grinder: how to make a cut without chipping?
Before you start using the grinder, you should make sure that you have a good diamond blade suitable for cutting ceramic tiles and porcelain tiles.
The presence of diamond coating on the edge is required
The ceramic tile is placed on an edge, after which the other edge, which is in a perpendicular position, is carefully sharpened with a diamond disc to an angle of 45 degrees. At the same time, it is worth remembering that the reverse, non-glossy side of the tile should be undermined.
If the surface is not perfectly smooth the first time, you can trim it by again with a diamond wheel. belt sander may also be suitable for these purposes . True, not everyone has such a tool in their home. Therefore, as an alternative, we can suggest using a wooden block wrapped in sandpaper.
You can also use Velcro sanding pads. Such attachments are simply screwed onto an angle grinder, after which sandpaper is glued to them. You can use diamond bits, which have a longer service life and higher performance. True, they cost significantly more than regular sandpaper with Velcro.
When finishing large areas, it makes sense to spend money on buying diamond nozzles. If we are talking about finishing a small section of the wall, for example, an apron in the kitchen, then you can limit yourself to using sanding wheels.
Important: when using diamond bits to cut porcelain stoneware at 45 degrees, you will need to use a grinder with a speed control function, and the speed should be set to a minimum.
Electric tile cutter
Can be installed without legs
The tile cutter is a machine for cutting tiles at 45 degrees, as well as for cutting them longitudinally and transversely. This device has a water cooling system. In addition, water helps to remove almost all dust that occurs during the cutting of porcelain stoneware or ceramic tiles. The main advantage of a tile cutter is its accuracy. It cuts along one predetermined trajectory. This eliminates the influence of factors such as trembling of the master’s hands. As a result, the cut is as smooth and neat as possible.
Tile cutters can cut at virtually any angle. True, craftsmen often cut tiles at an angle of 90 degrees or 45 degrees.
How can you make a bevel without a tile cutter and grinder?
Sometimes it is difficult to find professional construction tools at home. But in this case, you can also do the tile fixing manually. In this case, you must act as follows:
- A line is drawn from the front side of the tile directly across the glaze using a glass cutter.
- Then the tile is turned over and a groove is made with a grinder at the site of the future cut, similar to the English letter “V”. The groove is cut across the entire width of the tile.
- After this, all that remains is to carefully break the cut and finish it with sandpaper.
Recommendations for correct cutting of tiles at an angle of 45 degrees
Cutting tiles at an angle of 45 degrees should be carried out in such a way that the disc of the grinder or tile cutter does not reach the glossy coating of the tile by about one millimeter. This means that only itself . That is, only the clay, which acts as the basis of this finishing material, is cut off. This is due to the fact that this technology helps make the cut more accurate. When cutting tiles to the full depth at once, the likelihood of damage to the glossy coating and the appearance of chips on it increases. Such a defect will no longer be correctable, so you will have to throw the tile away or put up with its less than aesthetic appearance.
In some cases, cutting tiles at 45 degrees forces the craftsman to cut directly along the glaze. At the same time, experienced craftsmen know several ways to eliminate the possibility of damage to the glossy tile coating.
First of all, it is recommended to simply cut the tiles exactly to the specified dimensions. After this, you can begin sharpening the resulting edge to the desired angle. As a result, the resulting cut will be smooth, neat and beautiful. True, to do everything right you will need to get better at it. Therefore, it is recommended to practice a little on broken or damaged tiles so as not to subsequently spoil a lot of finishing material.
Additionally, the edges of the tiles can be processed using sandpaper to give them maximum smoothness and evenness.
Craftsmen also use the method of cutting corners from the factory edge. At the same time, they hide all the cuts made with a grinder or tile cutter under another tile.
Also on topic: Hole in tile for socket: how to cut correctly?
In any case, taking into account the latest trends in bathroom design and kitchen decoration, craftsmen and designers prefer the technology of cutting tiles at 45 degrees rather than corners. Therefore, if you want to create a truly cozy and modern interior, then you will have to work a little to master the technology of cutting tiles at a certain angle.
Waterjet cutting of tiles
Taking advantage of the variety of colors and textures, craftsmen use the most advantageous combinations that make the interior unique and truly exclusive. But sometimes choosing just a combination is not enough
When the need arises to emphasize the importance of a place or the status of its owner, the conversation turns to various panels, zones, borders, and decoration of facades
Waterjet cutting of ceramic tiles is a reliable assistant for the modern designer, allowing him to implement the most ambitious, exclusive design projects. Hydrocutting of tiles allows you to process materials of various thicknesses and dimensions, and to combine seemingly incompatible materials (inserts made of metal, stone, glass) into a single product.
Porcelain tiles are highly durable, and special technologies have been developed for cutting them. The most advanced of them was waterjet cutting of porcelain stoneware, being universal (curvilinear cutting, straight cutting while maintaining high precision), it has firmly established itself in the Russian market and is successfully used in various industries. Hydrocutting of porcelain stoneware and ceramic tiles allows you to cut materials of various thicknesses and densities, and produce parts of various shapes with any radius of curvature. Thanks to the minimum cutting width (about 1 mm) and the minimum load on the material, the most rational use of the amount of material is achieved (no breakages, chips, or overheating). In addition, cutting porcelain tiles with waterjet has a high accuracy of 0.1 millimeters, and products made using this method do not require additional processing - the edges of porcelain tiles are polished with abrasive particles, the cut is smooth and even, allowing to significantly reduce production time and optimize the cost of the finished product.
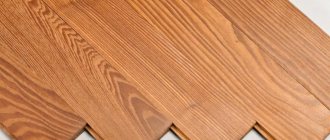
Facing and forming right angles with ceramic tiles and porcelain stoneware
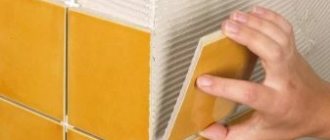
It is important to understand that the installation of porcelain tiles at 45 degrees, as well as ceramic tiles, is carried out when there is a need for facing external right angles.
First, the first tile with the previously cut end is glued and leveled. In this case, the pre-cut end will protrude beyond the edge of the wall.
After this, on the other hand, a second tile is glued, acting as a counter part of the formed corner made of porcelain stoneware or ceramic tiles. Until the glue has completely dried, the tiles need to be leveled and compared with each other so as to create a perfectly even and aesthetically pleasing corner.
So, the tiles are laid gradually row by row in an upward direction.
Important: before you start tiling the wall, you need to make sure that vertical . This is due to the fact that with an uneven wall it will be extremely difficult to ensure the possibility of matching the sharpened ends of the tiles. At the same time, it will be extremely difficult to correct the resulting defects and only with the use of overhead plastic corners attached to the sealant.
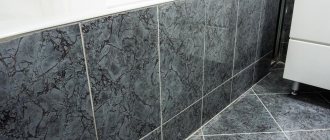
How to tile a corner with embedded tiles?
We level the first tile.
Then immediately set the second half of the corner. While the glue under the first tile is still fresh, you can move it a little and form a nice angle.
We move up, in each row we immediately form the entire corner (we place two tiles at once). There is no need to lay out all the tiles on one side of the corner to the ceiling, and then start the second - this is not correct.
It is important that the plane of the corner that will be lined has a clear vertical level, otherwise the corner will begin to converge or, conversely, diverge. In general, it will turn out ugly
You can find out how to cut mosaics at 45° using a tile cutter here.
How to cut a mosaic at 45° with a grinder (video) - here.
In what cases should you not use tiles with ends sharpened at 45 degrees?
When cutting tiles at 45 degrees, it is important to remember that the sharpened ends, due to their thinning, become quite fragile. For this reason, this technology should not be used when finishing steps. In places with high traffic, the treated ends will certainly begin to collapse.
Steps should be finished by laying the ends of the tiles on top of each other or using metal corners.
In any case, before finishing the outer corners of the walls using this technology, you should think carefully about everything. If the outer corner of the wall is often touched, then the use of this technology is not allowed, as the corner may collapse due to constant external physical impact. In this case, it is recommended to give preference to the use of metal or plastic decorative corners.
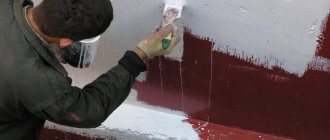
Silicone seam
Making this connection is the most technically correct, and many grout manufacturers recommend making the connection this way.
Many customers like it because regular cement grout has a matte effect, while silicone grout has a glossy effect. This corner formation is carried out after all the grouting has been completed.
Using the basic grout mixture
The simplest, but no less labor-intensive way to form an internal junction is to use the main grout mixture.
Let’s say from experience: if you do not have permanent walls, but, say, made of APA plasterboard panels, then this method of formation will not suit you, since you may subsequently get a crack in this seam. In this case, the previous method is better for you. Let's also add that we prefer the rounded shape of the junction. To do this, we perform this grouting in several stages. First, we fill the space between the tiles, and only then we directly form a rounded shape. And, unlike the two previous methods, here we first grout the corners, and only then do the rest of the grouting on the walls.
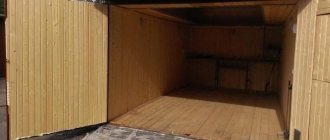
Frame for partitions and plasterboard ceilings
If you purchased an apartment in a new building, before moving you will undoubtedly want to make quality repairs.
This usually involves leveling the walls, installing a suspended ceiling for sound insulation and leveling, creating partitions, niches, as well as implementing design ideas and original lighting solutions. As a rule, work begins with the manufacture of the frame. But if in the recent past almost all frames in the interior were built from wooden blocks, today preference is given to metal profiles .
Need to plaster a wall? We choose a beacon profile, or in common parlance, plaster beacons. They will help to form smooth surfaces and level the plaster, generally in one plane, to a given level.
The beacon profile usually has a wall height of 6-10 mm. The beacon profile requires elasticity and strength so that it does not sag during plastering. It is recommended to take a 22 mm wide profile with stiffeners. You can check the profile for bending right in the store: bending a high-quality profile is not so easy.
Among ordinary consumers and even builders, all components for frame systems are usually called in one word “guides”. You can often hear the phrase: “Now let’s fasten the guides, and you can install the drywall.” But the profiles have different types and sizes. Let's look at the four main, most popular types using KNAUF profiles as an example: Guide profile (PN 50x40) Rack profile (PS 50x50) Guide (or ceiling) profile (PN 28x27) Ceiling profile (PP 60x27).
These profiles are made of 0.6 mm thick galvanized steel, with grooves and stiffeners, as well as second-by-second markings on the side wall.
Partitions The guide profile, or in the slang of professionals “PN-ka”, has a size of 50x40 mm. This profile is installed in conjunction with the PS 50 x 50 rack profile, and the guide is usually screwed horizontally. The lateral width of its wall is 40 mm, on the back there are two grooves - stiffening ribs. For ease of fastening, factory holes with a diameter of 8 mm are punched in the back of the profile for the screw head.
Another type of profile is rack-mount 50x50 mm. It is installed vertically, and this is clear from the name itself. It’s easy to remember: the rack profile stands vertically, the guide profile lies or is installed horizontally, showing the direction of installation of the racks.
The rack profile has bends at the edges for greater strength, and the stiffening ribs are 3 longitudinal grooves, grooves or “corrugations” located on the shelf (side). The function of the grooves is not only to strengthen the profile, but also to precisely guide the tip of the screw so that it does not jump off or slide along the smooth surface of the profile. This is especially important when constructing multi-layer cladding. If the screw is of poor quality or has a dull point, it will be difficult for them to penetrate the metal and press down the drywall.
The central groove helps to install KNAUF sheets exactly in the center. in the back of the rack profile for the passage of electrical wiring or other small communications.
Typically, rack profiles are installed in increments of 600 mm. A gap of 1 cm is left in the height under the ceiling of the PS so that the profile fits easily into the guide. The gap is also important in the event of shrinkage of the building, which, by the way, is a problem with new buildings. The gap prevents frame deformation.
Structures made of plasterboard or gypsum fiber are not load-bearing, so you should not design loads or use profiles as racks. Two additional profiles are installed above the doorway so that the joints of the drywall sheets do not intersect on two different sides of the partition.
From below, the profiles are fastened together with a cutter or screws with a flat head. It is not recommended to rigidly connect the profiles to each other at the top, otherwise even in the case of slight shrinkage of a fraction of a millimeter, cracks may appear in the final finish. Actually, a standard 12.5mm thick plasterboard sheet securely fastens the profiles and provides the necessary structural rigidity.
The sheets are screwed to the rack profiles with a screw pitch of 250 mm. Drywall is not screwed to the upper horizontal (guide) profile in order to leave free movement of the concrete floor slabs. The pitch of the profiles and, accordingly, the screws every 600 mm in the rack profiles is quite sufficient to ensure that the partition is strong.
It is impossible to screw drywall close to the floor; the sheet must be lifted, leaving a gap of 1 cm. Any moisture, even when the floors are washed, can accidentally seep in, rise up the plaster, and the finish will be compromised. The gap between the sheet and the ceiling should be left at 5mm.
Ceilings For suspended ceilings, as well as thin, economical wall cladding, there is a set of ceiling profiles 28x27 mm and 60x27 mm.
The narrow profile 28x27 is popular among builders, which is often used for all occasions, since it is the simplest and cheapest. Armed with metal scissors, they cut out any combinations and connections, but this is wrong. The main purpose of the ceiling guide profile is to fix a wide ceiling profile 60x27.
You can see how the suspended ceiling frame is assembled here .
Cladding If you need to level and at the same time insulate or soundproof a wall, as well as hide communications - pipes or wires, we choose a certain type of cladding on a metal frame.
There are two main types: from the 50th profile (Covering C-625) and the ceiling 28th profile (C-623). Thin cladding saves space and is attached to the wall using direct hangers. The cladding on the rack profiles is not fixed to the wall. The rules for installing cladding are approximately the same as when constructing partitions, only the frame is sheathed on one side.
Corner profile Corner profile 31x31 mm is designed to protect the outer corners of plasterboard or gypsum fiber sheathing from mechanical damage.
The cross-section of the PU profile is made in the form of an acute angle (85°), due to which the profile fits tightly to the surface of the corner of the partition or cladding. “The top of the corner profile also acts as a beacon for puttying surfaces.
So, we looked at the main types of metal profiles. I would like to emphasize that when choosing profiles, you should pay attention to the thickness of the metal, rigidity, and quality of the galvanized coating. Properly assemble your construction site and accurately combine the types of profiles with each other.
Advice from experts
To work with porcelain stoneware, it is preferable to use a professional electric tile cutter, as it is adapted to work with harder material. And this material itself is more expensive, so I want to minimize its losses during processing.
When cutting, the angle can be made not 45 degrees, but sharper. This will make gluing the tiles at right angles somewhat easier.
When working with bevels at corners, high-quality grout is very important, since you can even catch a tile with a gash with a clothing belt. This may lead to a fragment breaking off. If a chip does occur, but at the moment you do not intend to replace this tile, grout will help hide the defect. They are available in different colors, so choosing the right option to match the color of the ceramic is not difficult. There is also another option: use any existing grout and tint it on top with paint of the desired shade.
When, after laying tiles, small flaws are visible on the seams, for example, from unsuccessful sanding of the glaze, you can use masking compounds that will hide imperfections. Such corrective products are easy to use - the cap usually contains a small brush. The main thing is to carefully study the instructions. Note that we are talking about very minor flaws, and not about broken pieces of ceramics. The corrective agent will become an indispensable assistant if you need to “discolor” a small crack on a tile, or indeed on any ceramic product.
If you have enough experience working with finishing materials, you can do everything yourself. If you don’t have the necessary qualifications, but your finances allow you to hire experienced workers, then it’s better to trust the professionals - then you can be sure of the quality of the work.