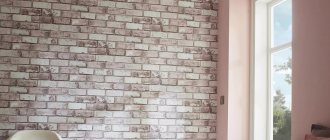
Antique brick is increasingly being used in modern interiors. This type of masonry looks stylish and gives the room a special warmth and coziness. If earlier they tried to hide brick under layers of decorative plaster, today it is an independent finishing material with many advantages. Most often, this design option is used in the loft style. You can either purchase ready-made aged bricks, or age a brick wall on your own using simple manipulations and tools. This is exactly what this article will discuss.
Various methods of aging brick
There are several ways to achieve an effect in which aged brick looks natural. All of them pursue one goal - to obtain an uneven, chaotically processed surface of the brickwork.
Mechanical aging.
An old wall inevitably acquires various defects: chips, cracks, abrasions, and the color becomes uneven. Therefore, to obtain this option for interior design made of brick, the masonry will have to be properly damaged. You need to prepare: a hammer and chisel, a hammer drill, a grinder with an abrasive disc or a grinder, a blowtorch.
Aging of color.
For this method of aging the surface, it is better to use gray or white acrylic paint, as well as a foam sponge or roller. A sponge is better because it allows you to apply the paint more randomly. Avoid drips and ensure that enough of the compound gets onto the seams. If you paint with a roller, do not saturate it completely, let it always remain semi-dry. Before the paint dries completely, its excess is removed from the masonry with a damp sponge. To imitate a surface covered with old moss, you can use dark green or gray-green paint. The mark must be made barely visible, so the dye is applied using the same sponge.
Imitation of old plaster.
You will need a spatula and light-colored plaster (white, beige or gray). The solution is applied in spots, the resulting layer should be uneven. In places where it thickens, after drying, you will need to go through it with a grinder, hammer or chisel, and the thin layer must be lightly rubbed until it becomes translucent. This method of aging brick will produce a rough, heterogeneous texture.
Joining materials
Technological joining of laminate and ceramics can be done using the following products:
- the use of a flexible PVC profile allows you to connect curved bends;
- a flexible metal profile is used to connect curved zones and straight seams;
- an aluminum threshold is used to process the joining surfaces under the door leaf;
- the use of a box threshold increases sound insulation and seals joints;
- using a transitional PVC profile, coatings with a large difference in height are finished;
- when using a cork expansion joint, a smooth joining surface is obtained between the laminate and the tile;
- Using a T-shaped profile from solid wood, straight seams are made.
Choosing paint for brick
Paint and varnish products will be able to fulfill their functions and preserve the protective and decorative properties of brickwork for a long time only if a number of requirements are met:
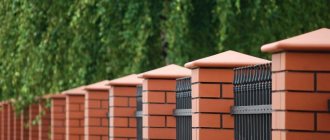
- The paint must be highly adhesive. This will allow it to penetrate deeply and reliably linger on the surface of the material, preventing the destruction of the brick due to sudden changes in humidity and temperature. When decorating building facades or fences, pay special attention to the adhesion of the composition.
- The paint should not become a barrier to the penetration of steam and moisture, which will allow the walls to “breathe” and help get rid of excess moisture, preventing the surface from completely drying out. This quality will allow you to achieve a comfortable microclimate.
- The dye must resist the effects of UV rays and not fade in the sun, retaining the initial shade for a long time. The optimal interval between updating the surface of a fence, facade or interior is 5 years or more.
Variety of coatings
Repair and restoration work on bricks on your own is possible if you use organic paint or a water-based composition. Each type of dye has its own advantages and disadvantages, let’s look at them.
Oil-based and solvent-soluble nitro enamels
They have the ability to penetrate well into the structure of the stone, protect it from exposure to ultraviolet radiation, but prevent “breathing” due to the durable waterproof film that forms after drying. This leads to the formation of condensation under the surface of the paint and has a detrimental effect on the microclimate of the rooms in which they were used. But they will be indispensable for decorating facades, the outside of balconies or fences. They are quite toxic, but they will reliably protect the bricks from water and will not fade or crack in the sun.
Water soluble
They have increased strength, which is why they are often used for painting exterior walls. Water-soluble paints can be used to paint even a brick fireplace (heating) pipe or draft from a gas boiler. They are also suitable for interior work when decorating simple or sand-lime bricks, as well as gypsum surfaces (brick or tiles imitating full-fledged brickwork). They remove steam and moisture well, ensuring a sufficient level of gas and water exchange between the surface and the air. Fireproof, do not have toxic components, such dyes can be used indoors. There are also heat-resistant compounds. Ceramic tile material must be coated with special compounds intended for tiles.
Epoxy
They contain resins, depending on which they may or may not acquire toxic properties and have different properties. They have increased adhesion and strength, but do not tolerate atmospheric conditions well. They can be used to treat the balcony from the inside, as well as decorate gypsum tiles or bricks to ensure long-term preservation of the coating. To increase the weather-resistant qualities of such dyes, they are usually coated with a layer of varnish. The choice of interior paint for residential premises is made taking into account its non-toxicity (you can verify this by carefully reading the composition).
Mineral
They are based on cement and are an ideal composition for treating external walls, balconies or brick fences. They are resistant to moisture and temperature fluctuations, withstand the onslaught of precipitation, reliably preventing the facade of a building or fence from destruction. They are extremely rarely used in interior work.
Silicone
The composition for painting surfaces made of silicate composition must cope with its low adhesive properties. Therefore, it is customary to coat smooth bricks with silicone mixtures. They are heat-resistant (for finishing fireplaces or stoves) and do not fade for a long time.
Marking
The next stage is choosing a scheme. A wide variety of options are used for walls:
The last two methods are difficult. If you are new to this business, it is better to glue the tiles according to the usual patterns.
Once you decide, you need to mark the wall. Ideally, use a laser level, but you can get by with a regular tape measure. First, mark the boundaries around the perimeter, since the sizes of the sides of each rectangular area are likely to differ.
For convenience, plumb lines are used. Next, determine how to correctly lay the tiles according to the chosen pattern on the wall: draw the contours of the rows vertically and horizontally. Do not forget that here you need to take into account the distance intended for the seams.
Types of decorative bricks
You can make aged decorative brick yourself, or you can purchase ready-made antique finishing material. It comes in several types: flexible, gypsum and clinker.
Clinker brick
Most closely resembles natural brick, it is a heat-resistant finishing material (made from clay at a temperature of 1200 degrees). Clinker brick imitates antiquity well, but is not cheap. Mainly used for lining existing stoves or fireplaces.
Gypsum brick
It has high moisture absorption, and therefore is suitable only for interior decoration. To reduce the level of moisture absorption, it is coated with varnish or waterproof paint. A very light, easy-to-work material that is not afraid of fire. Gypsum brick can be made even at home.
Flexible brick
Special decorative tiles used for cladding facades and decorating interior walls. Allows you to achieve the effect of neat brickwork. It is used not only on flat surfaces, but also on corner elements and rounded structures with non-standard design solutions. It has a pronounced texture, is stylized to resemble real brick and comes in all sorts of shades. The basis of raw materials is mineral-polymer components.
How to tile a backsplash in the kitchen
When finishing a kitchen apron with ceramic tiles, the technology is practically no different from that described above. There is simply no need to calculate the number of vertical rows. The “start” location is determined by the height of the tabletop: it should start 5-10 cm above the edge of the tile. Attach the bar at the required level, align it exactly with the horizon, and you are ready to begin.
An example of a tiled apron on a working wall in the kitchen
An apron in the kitchen is usually made on the work wall. If it is not one wall, but two or three, you can start from one of the corners.
How to tile a backsplash in the kitchen
If it is laid out from small-sized tiles, the undercuts may not be very noticeable. If you want to do everything symmetrically, repeat the layout and start from the center, as described above.
Aging brick with plaster
You can achieve an original and impressive look for brickwork by applying a layer of wall plaster to it. You can use either a special (decorative) or the simplest one. It is necessary to choose colors that contrast with the main shade of the brick (light gray, beige, white), which will allow you to achieve the desired effect.
First, a plaster solution is prepared and then applied to the wall so that it appears as if a layer of plaster has peeled off due to time. The remaining bricks are aged with a blowtorch or sandpaper. The resulting texture of aged brick looks very impressive. During chaotic collapse of the plaster, this should be done carefully so that the entire coating does not collapse.
Preparing the wall
Before any wall finishing, it is necessary to prepare the surface for finishing. The training requirements are standard. The surface must be cleaned of old coating, if any. The presence of old mortar or plaster will reduce service life and complicate tile laying. It is important to prime with a deep penetration mixture and plaster the wall, leveling and smoothing out all defects. Significant differences are best hidden with drywall, since the consumption of plaster for leveling will be too large.
DIY antiquity
Set of tools
Even a beginner can give a brick wall an aged look. The technology for aging brick involves the use of construction tools:
- hammer with chisel;
- coarse sandpaper;
- hammer drill and grinder;
- blowtorch.
The process of aging bricks in stages
Work to achieve the effect of old material is carried out as follows:
- The outer layer of the masonry is destroyed using sandpaper or a grinder.
- The mortar is tapped randomly, and the edges and surface of individual bricks are knocked together to produce uneven edges and give texture.
- Using a hammer drill, arbitrary recesses are made between the rows of masonry; some of the seams are grooved more strongly, while others remain untouched.
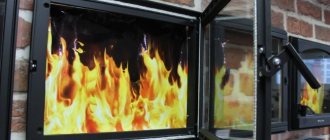
- Using a blowtorch, the desired uneven color is given to the wall, which is then rubbed down with sandpaper.
Using a foam sponge, to enhance the effect of antiquity, paint of a darker color is applied to the wall. In bright rooms, a layer of unevenly applied plaster is used for this, simulating collapsed fragments of material. You can darken the surface of aged brick using various special acids (in this case, a blowtorch will not be needed).
If desired, you can pull out several individual bricks from the top of the masonry, thereby achieving the effect of ruins or a partially collapsed wall. The main thing is, in order not to cause real destruction of the masonry, do not pull the lower bricks and do not overdo it with their number. In order not to weaken the wall, you can not remove the bricks from the masonry, but simply chip off a few of them up to a third of the volume. A decorative patina can be obtained by vigorously firing the stone. Working with sandblasting equipment will greatly facilitate and speed up the work, but will make repairs more expensive.
After all manipulations are completed, the aged wall is covered with a mixture of turpentine, wax and paraffin, mixed warm. A thin layer is applied over the bricks; when it hardens, it will give the masonry a noble matte finish, protect it from moisture and prevent further destruction of the surface.
Laying stages
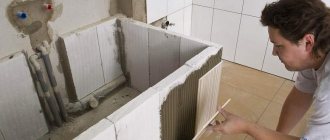
Laying tiles on an unplastered brick wall is quite a difficult job. You should first prepare a primer mixture, a brush, tile material, glue, and a building level.
The technology involves performing the following steps in turn:
- The wall surface is thoroughly cleaned from dirt and dust. Grease stains and foreign particles are removed;
- a primer is applied and time is allowed to dry;
- the level will check the evenness of the wall surface;
- an adhesive solution is applied to the back side of the tile, the thickness of which is determined taking into account the existing irregularities;
- The ceramic product is pressed tightly against the wall and checked for correct placement with a level.