Despite the diversity of cookers, the introduction of various new functions and materials, their main task is cooking. Moreover, the operation of such equipment is carried out either by gas or electricity. In this article we will talk about gas units and jets for a gas stove, as well as situations when they may need to be replaced.
Purpose and types of jets
The purpose of a gas stove nozzle is to ensure gas flow to the burner. At the same time, it also evens out the flame on the burner due to the dosed supply of combustible substances. You can connect the kitchen stove to gas coming from a gas pipeline or liquefied gas in cylinders. Since such substances have different pressures and compositions, different jets will be required. Their main difference is the different hole diameter. LPG requires a narrower diameter. Also, the greater the power of the burner, the larger the hole size will be.
It happens that, after serving for some time in the kitchen in an apartment, an outdated stove is transported to a dacha or to a country house where there is no main gas pipeline or connection to it. And gas in cylinders will be used as a flammable substance. In such a situation, you not only need to connect the cylinder correctly, but also replace all the nozzles.
Safety precautions when using a stove with bottled gas
Gas equipment is always a source of potential danger. In this regard, a number of simple but important rules should be followed:
the gas stove must be installed in a well-ventilated area;
a liquefied gas cylinder is installed outdoors, in a special metal box;
If you smell a smell in the room, you should immediately ventilate it and turn off all electrical appliances;
All connections, hose and gearbox must be accessible for inspection.
Good afternoon, dear readers. I think some of you are faced with the problem of replacing jets in a gas stove
. Well, since you are reading this article, it means you are interested in this topic. Let's first figure out in what cases it is necessary to replace the nozzles (jets) in the stove. The most important reason for this procedure is when you need to change the type of gas that is supplied to the stove (well, there are only two options: methane (CH4, main) or butane-propane (liquefied, bottled gas).
We'll talk about this today...
Most often, we are faced with a situation where a stove that has worked honestly for several years, after being replaced with a new one, is taken either to the dacha or to grandma’s in the village. Moreover, if nozzles for natural gas are installed on the stove, and at the dacha you have liquefied
, or, to put it simply, “balloon gas” (in the article I already described the connection in detail),
then without replacing the nozzles you will be faced with the fact that your stove will mercilessly smoke
.
And the gas will leave faster. This is due to the fact that nozzles (nozzles) for liquefied gas have a much smaller opening cross-section than for natural gas
.
So, if you connect a stove with installed liquefied gas jets in an apartment (where there is methane in the pipes), then when you try to light the burners, the gas will burn very weakly
. (Sometimes “gas workers” connect the stove, try to light it, but the gas hardly burns. And they start... the pressure is weak, they measure, etc., but these are just jets installed for LPG). In general, if you connect the stove to a new place, and the gas burns weakly or, on the contrary, smokes, you most likely need to change the jets.
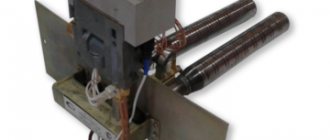
Jets or nozzles
for a gas stove
(shown in the picture on the left) are bolts with drilled holes in the center with different diameters. For propane (liquefied gas) the holes are smaller, for natural gas they are larger, as mentioned above.
How to replace jets yourself
As a rule, injectors rarely fail, and many people do not even suspect that they can be replaced at home. One of the cases where it is necessary to change injectors is when changing the type of fuel, as mentioned above. But the need to replace jets on a gas stove also appears in the following cases:
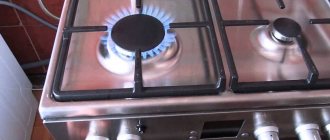
- the color of the flame has changed: yellow and red inclusions appear instead of the usual blue color;
- there is soot or uneven combustion;
- there is a hissing sound, and at the same time the flame separates from the burner or goes out;
- When the burner is ignited, a popping sound is heard.
If you are going to fix the problem yourself, then we will consider the whole process step by step.
Disassembling the burner
First, of course, you need to shut off the gas supply. In general, working with gas equipment requires special care and compliance with safety precautions. After this, remove the grate from the cooking surface. The burners themselves can be removed without effort. To replace the jets, in some models of gas units you will need to unscrew the top panel of the hob. But more often the nozzle is visible right under the burner.
If you have an older model of equipment, and the jet is located in the housing, you will have to disassemble it. In this case, you need to unscrew the bolts at the corners of the hob. There may be other assembly options where the panel will have to be pryed off to separate it from the main body. In this case, of course, it is better to look in the documentation where exactly the required elements are located and how to get to them.
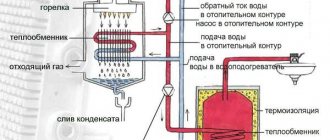
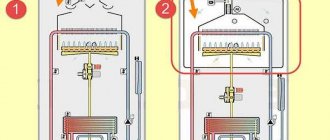
The internal structure may look like this. A pair of parallel metal strips is a traverse, onto which the burner bodies are attached. The gas supply to the burner is similar for all units. The burner body contains the nozzle itself, to which the gas pipeline is connected. Through the tip, the fuel is supplied to the nozzle, from where the gas flows to the burner.
Unscrew the jet
To unscrew the jets in a gas stove, you will need an open-end wrench or a tubular wrench, depending on the model. It should be said that in older models of such equipment, getting to the nozzle can be extremely difficult, since it is located in the burner body and it will not be easy to unscrew it with a key. It may be necessary to disassemble almost the entire unit. In this case, it is better to remember the sequence of actions and prepare different small containers for the parts that you will remove.
For more modern models, the process should not cause difficulties. When replacing, you need to take into account the size and thread of the nozzle. Some kitchen appliances are equipped with nozzles for converting to liquefied gas, and all replacement steps are clearly stated in the instructions, for example, in the Darin 1A GM 441 002W model. If the kit does not include such parts, it is better to seek advice from the seller of a specialized store. In this case, it is advisable to have with you old nozzles or at least measurements of the diameter and thread pitch.
Checking the channel
If your goal was not to change the nozzles to use a different fuel, but only to eliminate the combustion problem, then it is quite possible that the hole was simply clogged. And cleaning it will save you from replacing it. You can do this with any thin sharp object, such as an awl or a knitting needle. It is important that the diameter of the object is not wider than the diameter of the hole. Otherwise, you can deform it, which is unacceptable. For the same reason, cleaning must be done with caution.
Replacing the jet
As already noted, in modern models it is not difficult to get to the injector and replace it. In a more complex situation, it is located in the burner body. And to change it, you will have to remove the tip with the nozzle from the burner body. To do this, you will need to remove the latch, which is located directly under the body and looks like a clothespin. It is worth remembering that when performing such actions you should not make too much effort so as not to break individual parts.
It is not recommended to unscrew the nozzle directly from the body, as this may deform it or damage other parts.
Assembling the burner
After replacing all the nozzles, you will need to reassemble the burner in the reverse order. After this, you can switch from natural gas to bottled gas. But before that, you need to remember to change the nozzle in the oven.
Burner is ready
After the burner is assembled, it is too early to start checking the flame of the fire. Below we will look at replacing oven jets in a gas stove with our own hands.
Electric ignition does not ignite gas
Before disassembling the gas stove, you should turn off the power supply (voltage for the candle - 220V), which is required for electric ignition. This malfunction of a device with electric ignition can affect either one burner or all of them at once. If a spark does not occur on one burner, this means that the ignition plug (electrode) has failed. A crack may form on it, in the ceramic insulator, as a result of which the electrode stops working correctly.
To repair a gas stove with your own hands to replace the spark plug, just remove the burners, open the stove lid (unscrewing several bolts), and replace the electrode with a new one.
Also, a common malfunction of electric ignition on one burner can be damage to the wire going to the spark plug. To check this, you need to press the ignition button with the unit lid open. If the wire is “broken” in any place, then you will see a spark jumping in this place either onto the body of the device or onto the foil that covers the oven. Repairing the electric ignition of a gas stove with a damaged wire consists of replacing it with a new one, or it needs to be moved to another place so that there is no breakdown to ground.
The process of repairing Darin's electric ignition gas stove is shown in detail in this video:
Replacing nozzles in a gas stove
Before replacing the nozzle, be sure to study the technical data sheet of your kitchen unit. The parameters for liquefied gas and the main gas pipeline are indicated there. Even for one stove, different jets may be needed, since the power of the burners may be different. All injectors must be marked. You can purchase them in markets, gas equipment stores or online resources.
Stove burners
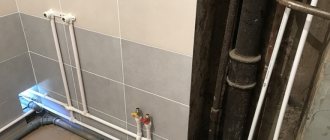
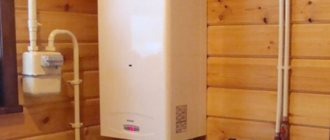
When you plan to convert the stove to bottled propane, you will need to replace not only the burner nozzles, but also install a reducer. This is a special adapter that will regulate the gas supply from the cylinder and stabilize the pressure in the system. It is placed directly on the cylinder itself.
Oven nozzle
Replacing the nozzle for liquefied gas in an oven will be similar to replacing those in the burners of a gas stove. It is important to find the location of the nozzle itself. Depending on the model, you need to remove either the front bottom panel, which is located below the oven, or unscrew the panel inside the oven. Then you will have to remove the burner. And the component we need will be located on the inner wall of the oven. Again, the jet is located in the housing and can become stuck to it over time. Therefore, to remove it, you may need to unscrew the body itself, and then treat the threads with kerosene or other means that will help remove the nozzle.
Choosing household chemicals
No matter how trivial it may sound, a good assistant in the fight for the cleanliness of a gas stove is a gel-like dishwashing detergent. It washes off well, does not scratch glass ceramics, enamel, steel, and breaks down fats excellently.
However, dish gel only helps with simple stains. If the situation is severe, take a walk through the household chemicals department. Manufacturers offer a number of special compositions for cleaning gas stoves. These are thermonuclear chemicals, which are presented in several forms: pastes, sprays, aerosols. After applying them, the decomposition of proteins and fatty deposits begins, and the surface remains to be wiped with a clean napkin.
The standard restriction applies to steel wool, brushes, and abrasive powders. All these improvised means lead to the formation of scratches and chips, which aggravates the accumulation of dirt and subsequently causes corrosion.
I note that among all household chemicals there are those that contain silicone. This is a very useful supplement. It forms a thin layer on the surface that protects it from contamination.
Connection and setup
After installing nozzles for liquefied gas, which differ from those for natural gas, you can begin connecting the cylinder itself.
Before opening the valve on the cylinder, you must install a reducer on it.
You can install the cylinder indoors with a stove, but it is recommended to take it out to a shady place outside, in a metal box adapted for this purpose. In this case, the distance from the window should be at least 0.5 meters. It is always better to turn off the tap after cooking.
Connection to the cylinder
The connection to bottled gas is similar for all similar equipment, for example, the Hephaestus stove. The reducer is screwed onto the cylinder. A gasket must be installed. A fitting is screwed onto the inlet pipe of the plate. It can be included with the unit. A gasket is also needed here. Now a gas hose is connected to the outlet of the reducer and connected to the fitting on the stove. The hose is secured with clamps. If the hose is inserted from the street through a hole in the wall, be sure to place a piece of metal pipe in the hole to avoid chafing of the hose.
The following requirements apply to the hose:
- should be no longer than one and a half meters;
- it is advisable to carefully secure it to ensure its immobility as much as possible;
- it should not break or bend;
- it must be a special hose designed for such gas;
- do not use beyond the prescribed service life;
- Be sure to check it over time for damage.
After connection, it is necessary to check all elements for leaks. To do this, the gas supply is opened, and all joints are coated with soap foam. The presence of leaks is eliminated by tightening the nuts, harnesses, and replacing gaskets. After replacing the cylinder, this check must also be performed.
Let's sum it up
To switch to using bottled gas, you will need to replace the nozzles for gas stoves in all burners and in the oven. This may also be required if there are any problems with the operation of the burners. Before replacing, be sure to pay attention to the diameters of the nozzles for gas stoves, as well as their thread pitch. All of them are marked, therefore, knowing the characteristics specified in the technical data sheet of your kitchen assistant, it is easy to carry out the necessary replacement. In more modern stoves, unscrewing the nozzles does not cause difficulties. In older models, it may be better to contact a service center, since some designs are quite difficult to repair yourself.
Recommendations for cleaning the jet
Most often, the injectors do not need to be removed for cleaning. It is enough to remove the burners. In some models, you will also have to remove the hob cover and other parts.
First, try cleaning the nozzle hole without dismantling it.
The nozzle hole is narrow, use fishing line, copper wire or needle to clean it. You just need to twist the needle around its axis with your fingers. After the needle has deepened, before removing it, turn on the gas supply and remove the needle. A jet of gas blows dust out of the hole. A few seconds will be enough for purging.
If cleaning is not possible on site, the nozzle should be removed, cleaned and rinsed. Reinstall after drying.