Repairing a brick stove in a country house with your own hands is quite possible. Is it possible to give a second chance to a heating stove that stood at the dacha for ten years without major repairs and was the only source of heat for the dacha house. In principle it is possible. Here we will introduce you to how you can repair a brick oven without the expense of calling specialists. We repair the stove ourselves!
To do this you need:
1) conduct a visual inspection of the furnace.
2) Decide what needs to be changed.
3) Determine what else may well serve.
Today we will repair a brick oven. In this case, a stove complex, which is located on two floors of a dacha.
Stove base and fireplace masonry
The necessary material that will be needed in order to build a fireplace is a ready-made mixture of stove mortar. If you prefer to make it yourself rather than buy it, then you will need:
- clay, as the main binding material when laying a fireplace;
- sand is a substance that is a filler; it should not contain foreign impurities;
- cement is added to the clay-sand mortar; it is especially necessary when working on an external chimney located above the roof. It is recommended to use high quality 400 grade cement;
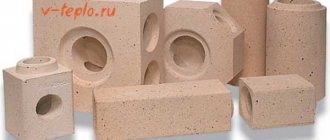
- heat-resistant adhesive used when laying fireclay bricks.
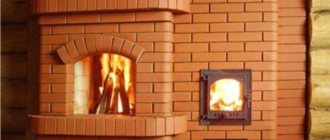
Each folded row is carefully measured with a level. The firebox is made of refractory brick. The walls of the fireplace are not tied to the firebox, since fireclay and red bricks react differently to increased heat. They have different coefficients of expansion when exposed to high temperatures, so if you tie the firebox to the walls of the fireplace, the stove may simply fall apart. Therefore, there must be an air pocket between the outer walls of the fireplace and the firebox. A fireplace with a wood burning chamber in the form of / is the most efficient. Before making a fireplace from a stove, you need to select a sample portal and form the portal when laying the firebox.
Of course, the ideal, or rather, real fireplace is a stove with an open portal, however, some owners prefer to install a glass door on the fireplace, space for it is left on the second row, and joints in the masonry are made in the middle of the brick row, but in no case with edge.
Air pockets can be filled with broken bricks; they, like stones in a heater, will retain heat for a long time. A magnesium glass sheet is installed on top, which can withstand temperatures of thousands of degrees.
On the back of the firebox, on top of the glass-magnesium sheet, three bricks are laid in such a way that there is space on the front side for smoke removal. Immediately behind the front part, on the front side, a metal corner is laid along which the row is tied, into which the upper stove strips coming from the door are hidden.
The depth of the firebox is related to the height of the portal in a ratio of one to two or two to three. A shallower depth will cause smoke, a larger depth will reduce heat transfer. And the fireplace itself should not exceed 1/50 of the volume of the room.
Arranging a brick oven for a garage
Brick stoves provide gentler heat, but until they heat up themselves, they will not heat the garage. If you plan to heat every day, this option is good. If the garage will be heated periodically, it is better to make a metal stove - heating up a frozen brick stove is long and tedious, and it will start heating in about two hours.
For those who decide to install a brick stove in the garage, we will lay out the order of a small (relatively) stove with a heating shield and a hob (just in case).
Image of the furnace and necessary materials
The stove is made of solid ceramic bricks (not burnt). Excluding combat, 290 pieces are required. The masonry should be laid using clay mortar, the thickness of the seams is about 0.5-1.8 cm.
This furnace requires a separate foundation - the weight will be about 500 kg. Its dimensions are 15-20 cm larger than the dimensions of the oven.
Arranging a brick oven for a garage
It is desirable to lining the firebox (laying fireclay bricks on fireclay mortar). Bricks are ground down for furnace casting. The dimensions of the bed for the grate, stove and doors must be larger than the dimensions of the casting. The gap is necessary to compensate for thermal expansion and also for laying a thermal insulation layer around the doors. This will reduce the formation of cracks near them (due to different thermal expansion).
Asbestos cord was traditionally used as a thermal insulation material. If you don't want to deal with asbestos, you can cut mineral wool cardboard into strips. Only it must withstand very high temperatures - up to 1200°C (minimum 850°C).
Installed in the 6th row, the valve allows you to switch the stove into winter and summer modes. This is convenient in the off-season, when full power is not required, but it is already damp.
Continuation of masonry
The height of the oven can be increased by repeating rows 14 and 15.
Continuing the formation of the heating shield
Watch the video for the process of pre-laying a stove without mortar (recommended in order to select bricks and understand what’s what).
How to convert a stove into a fireplace
You'll need
: plain brick, fire brick, sand, cement, shelf boards, facing material.
Instructions:
- The easiest way to convert a stove into a fireplace is to install a Finnish glass door instead of a cast iron one. In this case, the heating properties of the stove will remain at the same level, plus the functions of a fireplace will appear. This option can be called the most economical, both financially and in terms of labor intensity. After reinstalling the door, you can also decorate the stove beautifully in folklore style.
- If you plan to radically disassemble the stove and only then make a fireplace in this place, then you will have to do more labor-intensive work.
- First, we disassemble the old stove to the ground. At the same time, you can build a fireplace podium from old bricks on which fuel will be burned. During construction, only cement-sand mortar should be used. We create a niche for firewood in the body of the podium. First, we cover them with three rows of ordinary bricks, then with fireproof bricks placed on edge.
- We set up a portal on the podium where the combustion process will take place. We determine the portal based on the overall dimensions of the room itself. For example, in cases with a small room, it should not take up too much space. We also calculate the dimensions of the combustion window. At the same time, it should also be remembered that if its size turns out to be significantly larger than provided, then you can get constant drafts, and therefore hypothermia of the room itself. There will be such a fireplace and a lot of smoke.
- We calculate the smoke opening of the fireplace. Compared to the area of the combustion chamber opening, it should be 10–15 times smaller. It is possible that you will even have to narrow the chimney a little.
- The depth of the firebox of the fireplace is carried out in relation to the height of the portal, as 1 to 2 - 2 to 3. The consequence of a smaller depth can be smoke, and a larger depth can result in a decrease in heat transfer.
- We cover the portal opening of the fireplace with brick lintels, which we arrange using a special formwork (circle). We start work by laying the heels. We support the circle with temporary supports. After the support heels, we install the central brick on the circle and continue the laying on both sides simultaneously. The overlap at curved vaults and the smoke collector should be no more than 6 cm.
- The cladding can be done in the style and materials that will be included in the overall design of the room. But for the mantelpiece, it is best to use treated oak boards.
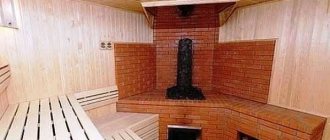
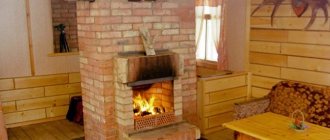
Today, in country houses, you can no longer find conventional stoves as often as before, since there are more modern heating and cooking systems. First place comes to fireplaces, which can perform almost the same functions, but their appearance is more decorative. The fireplace can be placed in any room: bedrooms, living rooms, halls. Such a hearth gives more coziness, provides soft warmth, which quickly warms up a small house.
How to make a fireplace durable and comfortable? It is worth immediately noting that the work is not only complex, but also significant financial costs. It is required to invite a professional master. You can save a lot if you buy a ready-made metal fireplace that requires only external decorative finishing, but this option cannot be called the best.
Sometimes, when buying a country house, it happens that it already has an ordinary Russian stove, which is not used for its intended purpose. In this case, based on this stove, you can make a fireplace with your own hands. Such an alteration consists of assessing the condition of the furnace and determining a plan of work that may be needed. As a rule, most often it is necessary to expand the firebox, install a door and a new chimney pipe.
What you will need for work
This is what you will need to spend money on and prepare for the work to begin. It is best to find/order/buy pipes; they may not be new, but it is better if they are made of galvanized metal. We need batteries - they also may not be new, for example, the author got them after a major overhaul from mechanics who assembled them and did pressure testing. You need a suitable boiler, an electrical connection (carrying out wires), a thread cutting machine, a 100 die and a pipe holder, couplings and angles in large quantities, the most expensive thing was a pump, you need a programmable relay, a 1.5 W heater and another ring for ten, that is, it is an adapter for welding a nut. It’s worth buying an expansion tank right away, 3 pieces of Mayevsky valve to remove air from the system, a pressure relief valve with a pressure gauge. From the tools you will need to prepare two gas wrenches, a drill, feathers instead of a drill for an inch pipe.
The entire assembly took two weeks, but after that the author realized that he had made some mistakes, he had to re-arrange the pipes, twist the threads, and trim. The system operates using a battery-charged timer. And for heating there is a separate socket and RCD. External house wiring with 2.5 wire. This is enough for safety. There are no mice in the house, but just in case, the wiring between the walls is equipped with tubes.
Options for converting a stove into a fireplace
How is a fireplace made from a stove? There are several options here, much depends on the initial state of the structure. The simplest option for making a fireplace from an old stove is to simply update the firebox, expand it slightly to an acceptable size, and then install a special glass door, also called Finnish.
This option is the simplest, there is no need to make changes to the design, it remains the same, but the oven itself must be cleaned. The new door will make the structure as similar as possible to a fireplace, and if you also perform decorative cladding, for example, using tiles or marble tiles, then the resemblance to the fireplace will be maximum.
There are still options on how to make a fireplace from a regular stove. The most expensive and difficult is dismantling the old structure and assembling a new one. First, the stove is dismantled, after which it is necessary to inspect the base; it may be necessary to add new sand. After this, a layer of roofing felt waterproofing is laid on the surface, and new masonry is made according to the chosen scheme.
The work process in this case looks like this:
- The old stove is dismantled and the base is inspected for damage.
- The brickwork of the podium is being carried out, which is necessary to protect the base from high temperatures when burning wood.
- According to the prepared diagram, the fireplace is laid, which is no different from the usual one. For this, special oven and refractory bricks are used. The firebox itself can have different sizes; it is recommended to install a glass door, which will not only increase heat transfer, but also make using the fireplace safer. The floor around such a structure must be laid out using a fire-resistant material, such as ceramic or stone tiles. The surface of the fireplace is decorated with different finishing materials; the most stylish are tiles, which are ideal for any interior.
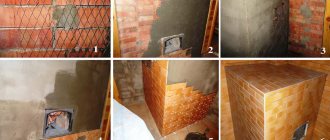
Stove decor
The Russian mini-stove can easily fit into a wide variety of home decor. It can be painted and painted without much effort, giving it uniqueness and special charm. When the stove has already been built, in any case it makes sense to finish it, because the surface of the brick is rough and will accumulate dust and dirt.
Finishing work can be carried out in different ways: whitewash, paint, apply plaster, veneer with ceramic tiles or make a beautiful painting. It all depends on your imagination.
To paint, the surface of the stove must be rubbed down. After this, it is treated with a primer. Paint is applied over the dried primer. It should be chosen special - heat-resistant. All materials can be freely purchased in stores and markets.
Clay-based plaster can be applied to the surface of the stove. This method has been used since ancient times. Repair of such coating must be done every year.
Before tiling the stove, you need to remove dust from the surface and clean the seams.
Then the mesh is attached and the solution is applied to it. Then the tile itself is laid.
To paint the stove you need sandpaper, chalk, brushes and your imagination. Original patterns can now be easily found in various sources.
You can do this work yourself or hire a specialist.
Having made a high-quality stove, you will receive a magnificent heater for your home, which will create unique coziness and comfort.
Facing
When the structure is completely dry, you can move on to decoration. There are different methods for cladding a fireplace; the material must be resistant to high heat.
Brick finish
Old brick can be given a more fresh, decorative look if treated correctly.
First, excess cement-clay mixture is removed from the seams and bricks with abrasive paper. It is necessary to treat the seams, for example, with a colored mixture, to give them a convex shape.
The bricks must be coated with heat-resistant paint. The final coating is a varnish that can withstand high heat.
Plaster coating
A simple finishing option is plaster. To perform the cladding, complex installation work is not required, as, for example, with tiles.
It is necessary to make the solution more durable; you can use salt or crushed fiberglass. To give the coating a tint, add lime paint.
Before you start plastering, the fireplace is heated until the outer surface becomes warm. The plaster is applied in layers, the first layer eliminates minor irregularities, the second is decorative.
Stone covering
An impressive finish can be made with artificial or natural stone. In both cases, environmentally friendly material will be used, the difference is in weight and density of raw materials.
Artificial material is much cheaper, you can make it yourself. The natural analogue is better due to its natural properties.
Natural raw materials are characterized by increased resistance to any changes in temperature, humidity, and mechanical damage, in contrast to artificially created materials.
The cladding is complex, and it is difficult to attach natural raw materials to ordinary mortar. It is recommended to consult a mason.
Tile surface
Not all tile models are suitable for decorating the outside of stoves and fireplace devices: clinker, porcelain stoneware, terracotta, majolica.
Clinker tiles have become widespread due to their stability. There are many colors, imitation of natural stone. Models are produced with the addition of stone chips, which enhances performance characteristics.
The tiles will require adhesive that will not dry out when exposed to high temperatures.
Making a fireplace from scratch, or remaking an old stove is not very difficult, the main thing is to work out the diagram and prepare the materials. You cannot replace the material with a similar one; the structure will become very hot.
Step-by-step algorithm for remodeling the furnace:
Finishing a built fireplace
Particular attention should be paid to the appearance of the former stove. If you have saved the old case, it may not look aesthetically pleasing enough in the interior of the room
This can be corrected with the help of competent finishing.
Finishing work on fireplaces is carried out using several types of materials:
- bricks,
- plasters,
- stone,
- tiles
The time spent on finishing the fireplace depends on the complexity of the decor.
Finishing work using bricks
Old brickwork can be given a beautiful look if it is treated well. Using an abrasive material, you need to remove excess mortar from the seams. You can also update the seams by making them convex. Another interesting decor option is updating the seams using a solution with colored pigment.
Brick trim can be painted with heat-resistant paintThe brick itself can be painted with heat-resistant paint. If it is preserved in excellent condition, it will be enough to coat the brickwork with a paint and varnish composition that is resistant to high temperatures.
Finishing the fireplace with plaster
This method of finishing work can be considered one of the simplest and most affordable. Plaster does not require installation, like stone or tile.
The plaster mixture for the fireplace must be strong enough. To do this, add salt and finely chopped fiberglass to the plaster. To add color, you can add lime-based paint.
Before starting work, it is advisable to heat the fireplace, as the surface should be slightly warm. You also need to moisten the surface. The plaster is applied in several layers. The first layer must be applied with a spatula, the walls of the fireplace must be leveled. When it dries, you can begin applying the second layer. Its thickness should not exceed half a centimeter.
The layer is applied using a trowel or brush and leveled in a circular motion. To apply the plaster with a wave effect, use a sponge or rubber spatula to apply the second layer.
Artificial and natural stone for finishing the fireplace
Various types of natural stone are used to decorate fireplaces. The most difficult thing to work with is granite or marble, as this is a fairly durable material that cannot be processed without special tools. You can also decorate the fireplace with stones such as limestone, shell rock, and rubble stone.
A cheaper finishing option is to use artificial stone. You can purchase it or make it yourself. To do this, you should prepare in advance silicone molds that imitate real stone blocks. The mixture for artificial stone consists of cement, sand and paint of the desired shade.
A fireplace portal can become a real work of art if you use figured stone carving
Particular attention should be paid to the fireplace portal. Uneven stones can be placed together to make an imitation of a stove from the times of knightly battles
A fireplace made of marble blocks will add luxury to the atmosphere. You can build stone columns or use natural stone in several colors.
Finishing work using tiles
Another common finishing material for stoves and fireplaces is tile.
Several types of material are used:
- clinker tiles,
- porcelain stoneware,
- majolica,
- terracotta.
The most common option for finishing fireplaces is the use of clinker tiles. This is an environmentally friendly and fairly strong material that is made from clay. Porcelain tiles are made artificially and are also not inferior in strength to clinker tiles. Majolica is a patterned material made from pressed glazed parts. Terracotta is a porous tile made from colored clay.
Before tiling the fireplace, remove the coating remaining from the stove from its surface. You can leave it only if you first stretch a metal mesh over the fireplace and secure it with self-tapping screws. The base of the fireplace is leveled with glue. When the mixture has dried, you can attach the tiles. To do this, glue is applied to the part with a spatula and the tile is applied to the fireplace. To make the glue stick better, tap the tile with a rubber mallet. You need to start laying the tiles from the base of the structure.
You can use a fireplace converted from a stove two weeks after finishing. Heat the fireplace using only dry logs. During the first kindling, you need to check the operation of the chimney, assessing whether there is an unpleasant odor in the room. Smoke can enter the room due to too strong or weak draft in the chimney, as well as errors in calculations.
The procedure for arranging a fireplace stove with your own hands
The following materials will be required for fireplaces and stoves of this design solution:
- solid and fire-resistant bricks;
- steel strips;
- clay mortar;
- oven;
- hob;
- steel doors.
Next, installing a fireplace stove with your own hands is done in the following sequence:
- The 1st and 2nd rows of bricks serve to level the structure being constructed, since as a result of pouring the foundation, unevenness will still form on its surface. After completing the second row, the building level must show an absolutely flat surface, otherwise the life of the structure will be short.
- On different sides of the fireplace stove there is one ash pan and two cleaning windows.
- A steel door is installed on each window. An additional steel strip is placed above the blower door. A fireplace compartment is installed on the front side of the structure, preferably with a side so that combustion products do not fall out of it.
- The doors are covered with brick, and a portal is opened on the side of the fireplace.
- A grate is placed above the ash pit. The long narrow compartment is covered with a steel strip.
- The side channels are divided in half by bricks. Open the combustion window.
- Install the combustion door.
- The firebox door is covered with a steel strip and covered with brick.
- Also, a strip of steel covers the fireplace.
- The channel above the firebox is connected to the nearest well. The front side of the fireplace is covered with brick and a smoke intake is formed.
- The hob is located above the firebox. The remaining space above the passage and well is covered with steel strips.
- The channel above the fireplace is narrowed and a cooking compartment is formed.
- The 14th and 15th rows are performed similarly to the 13th.
- An exhaust hood is installed between the nearest well and the cooking chamber.
- A metal cleaning door is installed in the hood.
- The rear well, located above the hood, is divided in half. The one that will go outside is covered with a summer curtain. The well above the hearth takes on the size of 1 brick. Steel strips cover the cooking chamber over the entire area.
- The cooking chamber is closed.
- The 20th row is similar to the previous one.
- The 2nd rear channel is expanded to its maximum size and a cleaning window is removed from it. A damper is installed above the well with the fireplace.
- Install the cleaning door.
- A metal oven is placed in the cavity. On the far side there remains a vertical smoke well.
- On one side of the oven, smoke flows into the central pipe.
- The actions are repeated.
- They make a transition from the cavity to the pipe because the oven has run out.
- The cavity and well are covered with steel strips.
- On top of the strips, the area is covered with bricks. A winter valve is installed in the last unused well.
- All wells are connected to the fireplace using horizontal passages. Install the cleaning door.
- The 30th and 31st rows are similar.
- The area is covered. Install a common damper.
- The 33rd row and further - the structure is narrowed - it goes into a pipe.
Today, in country houses, you can no longer find conventional stoves as often as before, since there are more modern heating and cooking systems. First place comes to fireplaces, which can perform almost the same functions, but their appearance is more decorative. The fireplace can be placed in any room: bedrooms, living rooms, halls. Such a hearth gives more coziness, provides soft warmth, which quickly warms up a small house.
How to make a fireplace durable and comfortable? It is worth immediately noting that the work is not only complex, but also significant financial costs. It is required to invite a professional master. You can save a lot if you buy a ready-made metal fireplace that requires only external decorative finishing, but this option cannot be called the best.
Sometimes, when buying a country house, it happens that it already has an ordinary Russian stove, which is not used for its intended purpose. In this case, based on this stove, you can make a fireplace with your own hands. Such an alteration consists of assessing the condition of the furnace and determining a plan of work that may be needed. As a rule, most often it is necessary to expand the firebox, install a door and a new chimney pipe.
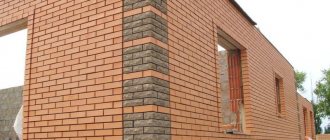
Arrangement of a traditional fireplace
The classic design of a fireplace with a direct chimney that is not built into the wall to which the fireplace is adjacent is the simplest. However, such a structure is outwardly unsightly. You can achieve it to look, albeit not luxuriously, neatly through smooth masonry and subsequent finishing. For laying the body of the fireplace, it is better to use a type of solid ceramic brick, such as facing brick. It has a geometry close to ideal and allows you to make the rows of masonry as even as possible.
The ordering diagrams do not take into account the foundation, so we will not talk about it. But it is worth noting that its presence is mandatory for heavy brick structures. So, the 1st row of the classic fireplace masonry is made continuous. It plays the role of thermal insulation to protect the foundation from high temperatures. Its necessity is justified by the low heat resistance of cement mortar, the use of which predominates in the construction of foundations.
Starting from the 2nd row, an ash pan and a ash pit are laid, which are necessary to collect solid combustion products and unburned fuel residues, as well as to create draft that stimulates the combustion process. When laying the 3rd row, an ash pit cover is constructed. This row is made almost continuous, with the exception of the channel through which the ash will fall off and air will flow into the firebox.
The 4th row is similar in shape to the 3rd, but will have a different orientation of the bricks. This technique should be used throughout the entire masonry to increase the strength of the structure. Also, at the stage of laying the 4th row, a grate is installed.
Rows 5 through 7 will be identical except for the orientation of the bricks. They form the firebox of the fireplace. From the 8th to the 13th row, the formation of a fireplace tooth occurs, narrowing the space of the firebox upward.
On the 12th – 13th rows, an overlap of the firebox opening is formed. Cast iron corners can be used as supports; this material is less susceptible to thermal expansion than steel.
When laying the 14th - 15th rows, an opening is created on the back wall of the fireplace for installing the door. It serves to clean the internal walls of the fireplace from settling ash. In this regard, the required distance of the fireplace from the wall of the room should be taken into account.
From the 15th to the 16th row, the internal opening is narrowed on the inside of the front wall of the fireplace. Thus, a smoke collector is formed, which passes into the chimney.
From the 17th to the 20th row, a chimney is formed, the cross-sectional area of which is equal to the area of one brick.
A smoke damper is installed between the 20th and 21st rows to regulate the draft in the fireplace.
For laying the body of the fireplace, it is better to use solid-faced ceramic bricks
Digital symbols for figure “b”:
- Chimney damper
- Grate
- Ash pan
- Cast iron corners
- Chimney cleaning hole
Installing a foundation for a fireplace stove
To make a foundation for a stove, you need to prepare the following tools and building materials:
- roulette;
- shovel and crowbar;
- burner;
- Bulgarian;
- welding machine;
- roofing felt;
- sand;
- 10 mm reinforcing rod;
- concrete solution grade M300.
The dimensions of the future foundation are marked on the floor with chalk - 110x100 centimeters. These parameters are greater than a standard oven, which is explained by the presence of an observation window (portal). The depth of the hole to be dug should be 35 centimeters. Its bottom is leveled with a sand cushion 5 centimeters thick. The walls are also made as smooth as possible using a shovel.
You need to know this
Before you start sealing the seams, you need to prepare them: remove residual clay, rinse thoroughly with water using a brush, then prime with heat-resistant glue (50% solution is suitable). When grouting joints, you need to ensure that the repair mixture fills the joints completely, leaving no voids. If a gap is too large in the masonry, in addition to the mixture, you also need to place a ceramic cord into it. Due to its physical properties, it not only withstands open fire, but also very high temperatures - over 1000 degrees.
Ceramic cord is often counterfeited, so before purchasing it, you need to hold a lit match or lighter to it to evaluate the heat resistance of the product. The cord is placed in the masonry seams around the perimeter of the cast iron slab, using heat-resistant glue for fixation.
Where can you see a Russian stove?
We will answer all your questions step by step. In our country, a huge part of the population lives far from civilization. In the 90s, there was a tendency for villages to die out. Young people left their parents' homes and went to the city in search of a better life. Many buildings remained simply abandoned.
Most village houses were equipped with stove heating. In order to dismantle the stove, it is necessary to re-lay the floor covering and seal the hole in the roof under the chimney. Not everyone had the desire and opportunity for this, so the symbols of warmth and comfort in the home, sung in Russian fairy tales, still stand to this day.
Massive brick building
Gasification made it possible to install a burner in the stove and give the structure a second life. But the modern approach to reconstruction implies that it will be converted into a functional, stylish fireplace.
Common mistakes
There are many nuances and difficulties in installing a stove.
This process is not as simple as it might seem at first glance. Everything must be done correctly so that there are no accidents during operation. In the bathhouse, the stove is heated very hot, and there are wooden elements and a high temperature, so for safety you need to observe the insulation as correctly as possible. All connections and installation must be done correctly and efficiently. This work is difficult, responsible and dangerous. Therefore, it is not easy to cope with such a matter alone.
When purchasing a stove in a store, they always offer installation, but some people want to do everything themselves, so they make many mistakes.
With a small area, some build baths close to other buildings, which makes a big mistake. To protect against accidents, the pipe at the bathhouse should be higher than all other buildings, and a grate should be installed on top to extinguish sparks.
Remember, repairs must be carried out in accordance with all safety regulations.
Remodeling options
The simplest method of remodeling is considered to be the method of expanding the structure. Its peculiarity is that the old stove will have to be thoroughly cleaned, and the equipment itself will have to be made more modern - the outdated finishing material will have to be replaced with a new one.
The biggest difficulties arise with the redevelopment of the firebox of the previous furnace. Experts advise using cast iron plates or fire-resistant bricks to cover the firebox.
Remodeling the oven completely is the most difficult task. Work begins with the complete dismantling of the entire structure. After which the foundation is considered. If its quality meets modern requirements, then it does not need to be dismantled. The old and cracked foundation will have to be redone.
It is worth noting that complete dismantling of the building must also be carried out correctly:
- The superstructure is completely dismantled from ceiling to floor;
- Whole and good bricks are set aside (they can be used during the construction of a new structure);
- Dismantling the old stove should not be accompanied by severe destruction of nearby walls and interior items;
- Keep a close eye on the old firebox. During the dismantling process, try not to damage its doors or chambers. Damaged equipment will have to be thrown away and new equipment made.
Beautiful examples in the interior
The Russian stove does not look organically in all interiors. Often such a structure requires serious changes. Remaking it is not so difficult if you follow our recommendations. A converted fireplace stove will suit any room.
It is worth highlighting the following interior styles:
In such ensembles, fireplace stoves look especially harmonious and attractive. They can have not only smooth and neat surfaces, but also artificially aged surfaces with scuffs.
For more modern interiors, fireplace stoves with shiny or plain dark surfaces that have the most laconic or angular appearance are suitable.
To learn how to make a fireplace stove, see the following video.
All rights reserved, 14+
The use of any materials without our prior written consent is prohibited.
How does a stove differ from a fireplace?
Now let’s dive into the realities of the upcoming work and note their labor intensity and complexity of implementation in technical and theoretical terms. To understand how to make a fireplace from a stove, you need to determine all the types of work required. Only a real professional can do this, so hiring a professional will most likely become a prerequisite. But for the sake of information, we will explain how to analyze the reconstruction.
A stove is fundamentally no different from a fireplace. Both devices operate by burning fuel and both participate in heating the room. But still, one of them is called a stove, and the other is a fireplace.
- The functions of the stove are not designed to provide the opportunity to observe the flame, so all technological nuances are aimed at high-quality and efficient use of heat. The firebox door is made of metal and hides the combustion process from the observer's eyes.
- The gases formed after combustion have a high temperature. I don’t really want to give such energy to nature, so the chimney in the stove body is made in the form of a labyrinth. When moving, heated gases give off their heat to the bricks of the stove.
- The firebox of a Russian stove is somewhat smaller than, according to calculations, a fireplace for such a room should have.
Ready-to-use brick building
Otherwise, the differences concern only the external elements, which can also be used in the converted structure.
Conversion of the stove for heating: photo gallery and explanation of the work
Table of contents
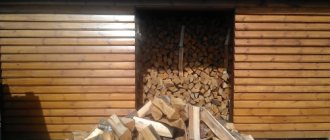
There was a stove at the dacha, and everything seemed to be fine, but I had an obsession: to make the heating better, since the heat from the stove spread unevenly throughout the house, that is, it was cold in the corners, and I wanted to come to a warm house in winter. It was decided to slightly alter the functional significance of the stove. It's time to get to work, all that remains is to stock up on the necessary tools for cutting and carving, and pipes. The author of the project has no experience with such work; everything was done for the first time.
The area of the house is small, there are only two rooms: this is a small children's room of 2x2 square meters, only pipes were installed there, and a large room (relatively) - 18 meters, there is another battery, the last one in the corridor space, and the walls there are not insulated. The house is a warm beam with insulation. Regarding heating: if you heat it with electricity, the liquid will reach 50 degrees in 3 hours, and then the situation will depend on the frost outside. This winter will be the first, but the goal was not to heat the house, but to warm it up before arrival in order to enter an already warm house. For example, if you program for Thursday, then by Friday evening the rooms will have to warm up to above-zero air temperature. Even a small plus will be better than a minus. Then bring a bundle of firewood, continue heating - and the house will be completely warm in a short period of time.
Step-by-step instructions for remodeling
You need to draw up a diagram, which is better to order from a specialist. The specialist will carry out calculations to avoid errors and rework. It will be immediately established what materials and tools are needed for the work.
You will need fire-resistant bricks for the firebox and heat-resistant blocks. The material can be found in a hardware store, on the market, or ordered delivery through a reliable company.
For masonry you will need dry cement mortar, clay, a construction mixer, and a drill attachment.
The solution requires a large container and clean water. The mixture is applied with a trowel.
Rework
In order for the fireplace to be level, it is necessary to constantly monitor the installation using a building level, usually a plumb line.
The first fireplace row is placed on waterproofing with markings applied, applying the mortar downwards. After laying out, according to the rules of order, you need to lay the second tier with a shift of half, a third, a quarter of the brick. To make the rows even, the blocks must be cut evenly with a grinder.
The order of brickwork involves placing the bricks of each next row above the joint of the blocks of the previous tier.
Clay in the solution prevents the destruction of the structure; a mixture of sand and cement does not tolerate such loads. In combination with clay, a heat-resistant effect can be achieved.
To form a combustion chamber, you will need a dense sheet of refractory metal on which subsequent rows will be laid.
A frame is immediately installed under the future door, which is fixed with fire-resistant wire.
Repair of medium complexity
If you need to replace the grates in the oven, you need to make an expansion joint 5 mm thick between them and the brickwork.
If the firebox door falls out, it can be secured using steel wire. However, first you need to dismantle the brickwork around the sash.
Pre-furnace sheets, as a rule, cannot be repaired: holes and rusty elements are simply replaced with new ones. In this case, the previous product is removed, the nails are removed, then felt soaked in liquid clay is placed on the bottom, and a new sheet is placed on top and nailed.
Experts advise whitening the stove with lime from time to time. Among its beneficial properties is the fight against bacteria.
If there is a need to replace the lining, the same brick that was used for the old one is used for the new masonry. The coefficient of thermal expansion must remain the same.
If the firebox or hearth lining is damaged, more serious work will be required. As noted earlier, it is necessary to maintain the same coefficient of thermal expansion, therefore the uniformity of the selected material, namely brick, is extremely important.
Separately, it is worth mentioning the repair of a tiled stove. The damaged element must be carefully removed, clean the place where it was located, place the product on a pre-prepared clay mixture with the addition of crushed brick, then lay a new tile, previously adjusted to the size of the place. Any irregularities that arise should be immediately rubbed down by hand.
What to look for when remodeling a stove
When remodeling the furnace, it is necessary to perform the following preparatory steps:
- Checking and assessing the condition of the stove and chimney structure. This is done necessarily, since further safety of use depends on the quality. The chimney must have good permeability, since the fireplace simply will not work without draft. The cross-section must be no less than the size of one brick. Otherwise, the thrust will be very small, completely insufficient. Usually the chimney is immediately dismantled, after which a new one is installed in its place.
- The stove has a small firebox, which is not enough for a fireplace. This means that when carrying out reconstruction, the size of the firebox must be increased to the required size. You can install a glass door that will cover the firebox, ensuring the safety of using the structure. But this door is not mandatory; it does not need to be specially mounted.
- It is necessary to carefully inspect the body of the structure. If it is intact, there are no cracks, signs of deformation, or numerous falling bricks, then there is no need to disassemble it. It is better to decorate the surface of the case after all the work, making it more attractive.
Materials for creating a foundation
The average fireplace stove together with the chimney weighs up to three to four tons; it will require a foundation, which must be independent. As a rule, this is a monolithic structure made of durable concrete, where the ratio of cement to sand is 1:3. 3-5 parts of crushed stone are added as filler. You can reduce costs and labor by backfilling the foundation, but here you need to use only durable natural stone (construction debris or, for example, broken bricks will only weaken the concrete).
As you can see, the foundation for the fireplace stove has its own formwork; its reinforcement frame is not connected to the foundation of the house
When pouring a furnace foundation, all general construction requirements must be observed, this applies to:
- earthworks,
- choosing the depth level,
- rules for reinforcement and formwork assembly
- preparing concrete and laying it,
- compliance with the aging periods before stripping and before the start of masonry,
- carrying out the necessary actions to care for the monolith.
Rework
Before drawing up a project for a future fireplace, check the condition of the chimney. The smoke exhaust system bears most of the responsibility for safety.
Check the condition of the stove and foundation. If violations are detected, it will be necessary to redo it from scratch, especially if the foundation was damaged.
It is easier to convert the structure into a decorative device.
The chimney pipe must meet basic requirements. For example, the height of the pipe used can be at least 7 m. The cross-section of the material is 13 - 25 cm, the depth of the firebox is from 0.5 m.
The combustion chamber is lined with fireproof, fireclay bricks, which will not deteriorate from direct contact with fire.
During laying, channels are created that allow air to pass along the door, which will prevent the accumulation of soot.
After all the rough work has been completed, you can begin finishing.
An example of converting a stove into a fireplace design with a heat shield:
Conclusions during operation
Several conclusions can be drawn after the first operation and the onset of cold weather. At first, the first disappointments regarding the work carried out began to surface. There is a big disadvantage of placing the boiler on the stove, and the batteries begin to heat up when the combustion occurs. The boiler should be installed in the stove. It turns out that the oven is hot, but the boiler has already cooled down. There are no problems with electricity - everything works quite well. 1.5 W heating element will be enough for heating. The transfer of the boiler to the furnace will need to be dealt with when the spring season approaches.
If the boiler is heated in a stove without liquid, it can quickly burn out, it’s like putting an empty pan on the fire and forgetting - everyone knows what will happen to it. There are two ways out of the situation. If you remodel the stove, you can install a damper, or fill in the liquid and not drain it. The author does the last option - he will leave the liquid and does not see the need to drain it. There is no cooking on the stove; it serves only for heating. The system that is made works well, but the boiler needs to be put into the stove, otherwise it will cool down very quickly. Electrically, on the contrary, everything is fine. The meter was changed to day/night, and the cost of electricity became almost twice as cheap. In the morning you can heat it with wood, and it will last until the evening, then you need to heat it a little more, and before going to bed, turn on the electricity and set the regulator to 40 degrees. You can sleep warm until the morning.
If you install a heat exchanger inside the stove, then only a gravity system will be suitable for heating, there will be constant problems where the pipes pass through the walls of the stove, and the expansion of brick and metal is very different from each other. As a result, it was concluded that it is best to have a full-fledged stove and use propane for heating. But in order to have proper heating, it is worth having not one, but at least two stoves. One is simple, and the second is necessary for heating. Or make a stove and boiler separately. This is one of the possible options for heating from a stove.
The author twisted the pipe several times and added batteries to the structural system in order to achieve a greater effect, but this did not lead to anything. We could try to build the tank into the stove instead of the oven, but we had to redo everything again. And at the moment the tank has been reduced and placed above the level of the stove, the batteries have also been replaced with seven 7-section ones, and a heating element has been installed instead of 1.5 kW 2.0 kW. The launch is planned immediately after installation. Upon arrival, the stove is heated for the night, and you need to leave the system on. We also switched to a two-tariff meter at night for 1 kW the amount became less. We can conclude that everything works very well, there are some drawbacks - I would like to get away from the electric pump, since in the absence of electricity the tank will begin to heat up, and there will be no circulation. Too much again needs to be redone, although there is a pressure relief valve, and you can be calm about the system. Everything works well, it just feels unfinished.
It is best to install the boiler where there is a large heat output, that is, above the stove. If there is a pump in the system, you don’t have to worry about poor circulation, since it will still happen. The author tried to put the boiler in the oven, but it was not as warm as it seemed.
Initially, the stove is designed for a specific combustion mode. If you insert a boiler into a normal heating stove, it will quickly become overgrown with soot and flooded with condensate. If you remove the register from the stove boiler, the stove will only heat the street, since its efficiency will drop to the level of a fire that is lined with bricks. If there is an old stove, then you can hang up the pipe and repurpose it for other needs, using any brick - either old or new.
vote
Article rating
Converting a stove into a fireplace
The very first thing you need to do before installing a new fireplace is to prepare a future drawing. All sizes must fit the old foundation.
Converting a stove into a fireplace takes place in several stages:
- The foundation of the furnace is strengthened with waterproofing. Roofing felt is used as a waterproofing material. Several layers of material are laid on a clay-cement mortar.
- The next step is to install the base under the fireplace. You can build a new foundation or install a stove if it is in excellent condition.
- The firebox is made according to new drawings, since the stove combustion hole is not suitable for the fireplace. To create a base for the firebox, the structure is lined with brickwork around the circumference.
- The firebox itself is being built. The walls must be made vertical. It is advisable to check the clarity of the lines of the future side walls of the firebox using a building level.
- Correct calculations are also important at the chimney construction stage. It is laid out using brickwork. Every few rows you need to remove excess solution from the inside of the chimney, as soot may subsequently remain on them. Because of this, the chimney will have to be cleaned frequently.
The air duct can be made not only from brick. You can consider the option of a sandwich pipe, the streamlined shape and smooth walls of which do not prevent smoke from escaping from the fireplace.
Installation of a finished (factory) stove
Position the base plate so that it is at least 40 cm from the doorway. The stove weighs 20 kg. An assistant will be required for installation.
After installing the stove, you should temporarily install the chimney pipes for testing in order to be able to change the position of the stove.
It is enough to leave a distance of 20 cm between the back of the stove and the wall.
Install the side parts made of artificial stone on the base plate and secure them at the back with a metal clamp.
Use the four adjustable feet to level the oven.
The parts should first be installed without cement mortar to also determine the desired position of the plinth.
Stage 2 – GLUING
1. Apply adhesive solution to the joints of the side parts with the base plate. After installing the side parts, you can install the steel plate and chimneys. Also glue the plinth to the base plate and to the wall.
2. We placed a small bench on the side between the stove and the door frame. This will allow access to the back and bottom of the stove. The front panel should fit under the front of the stove. First install dry, then glue.
3. The side parts should be securely fixed with tape during gluing.
4. At the very end, install the grate and fireclay bricks. Now the combustion chamber is ready for the first kindling.
Link by topic: How to make a fireplace stove from a fireplace with your own hands
Conversion instructions
Converting a stove into a fireplace is not required so often; usually such work is planned when there is already a stove in the house, but it is used extremely rarely. Without spending a lot of time and money, you can use such a stove to make a beautiful and stylish fireplace that will not only warm the house, but will also become a real decoration for any interior. Stoves are not that difficult to convert into a decorative structure.
Often such stoves are located in kitchens, in central rooms; they do not take up much space, but their appearance is not always aesthetically pleasing. Therefore, you can safely take on the renovation and use the fireplace as an additional source for heating the room.
To convert the stove into a comfortable and beautiful fireplace, you need to prepare the following tools and materials:
- kiln and fire-resistant brick, its volume depends on how much the furnace will have to be rebuilt;
- building level;
- Bulgarian;
- cement;
- clay masonry mortar;
- finished chimney pipe (if the old one has to be completely removed);
- Master OK;
- putty knife;
- tiles for facing;
- glass door for fireplace.
Before you start converting the stove into a fireplace, you need to take into account that the fireplace is heated differently. Only special wood briquettes or dry firewood are suitable. Therefore, it is recommended to immediately ensure that there is always a certain supply of fuel.
You should prepare all the specified materials and tools, and draw up an individual drawing of the future fireplace. Its appearance depends on the original stove. You should definitely inspect the stove, find out how well the body is made, and what condition the foundation is in. If everything is in perfect order, then there is no need to disassemble an already standing structure; the work is carried out on the material that is available. There should be a gap of 25 cm between the general foundation of the floor of the house and the base for the stove; it is completely covered with sand.
The depth of the firebox must be 50 cm, and the body inside the stove must be lined with refractory bricks.
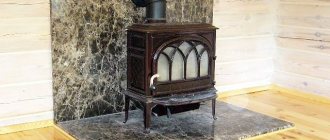
If all the conditions meet the required ones, then you need to move on to inspecting the chimney pipe, since it may have to be rebuilt. For fireplaces, the requirements for chimneys differ from those for stoves; the height should be from 7 m, the cross-section should be at least 13 * 25 cm. It is necessary to have special channels that inside the structure will control the air flow along the doors. This will prevent soot from constantly settling on the door glass. A version of the converted stove design can be seen in the figure. IMAGE 1.
No matter how strange it may sound, quite often the question arises of how to convert a stove into a fireplace. There are several alarming facts that require additional clarification. Where did the stove come from in the 21st century? Why does it need to be remade? Is this possible, since the stove and fireplace are different devices?
Home
How to build
Converting a stove into a decorative fireplace is not very difficult. This is required mainly in cases where a conventional stove is already installed in the house, which is no longer used. You won’t need to invest a lot of effort and money to create a modern, stylish fireplace out of an ordinary stove that can heat your home and, in addition, bring comfort to it.
Often old stoves are located in houses in the kitchen or in the central room. The stove takes up little space, but the appearance leaves much to be desired.
To convert the stove into a modern and stylish fireplace, you will need the following materials: bricks, cement, mortar for masonry, a chimney pipe (to replace the old one), facing tiles, a glass door, as well as tools for minor repairs, which every owner will certainly have . Next, you will need to draw up a personal drawing of the fireplace you are creating. You should also definitely inspect the stove, determine the quality of the body and the condition of the foundation. If all this is in excellent condition, you can continue working.
Another important requirement is that there must be a small gap between the base for the stove and the foundation of the house - about twenty-five centimeters; it must be completely covered with sand
After these conditions are met, you can proceed to checking the chimney pipe. The requirements for its height are more than seven meters, and its cross-section is more than 13 by 25 centimeters. And the last step is to provide channels that can direct air flows along the doors, which will not allow soot to constantly settle on the glass door.
Preparation of building material
Of course, it is possible to convert the stove into a fireplace, leaving the old bricks behind. To do this, it is enough to replace the fireplace door, but this will not be a fireplace that will bring into the house the comfort and warmth that is expected to be received from it and, therefore, we will consider the option when the old stove will have to be completely dismantled. The fireplace will have to be stacked on the foundation of the stove. You need to purchase all the material at once, exactly how much is needed to build a fireplace, and since the stove is being built by a non-professional, even with a small order.
In order to install a fireplace, you will have to buy
- a little more than 500 bricks, grade M-150;
- for laying a fireplace insert you need 55 pieces of fireclay, fire-resistant bricks;
- You can buy 6 bags of a special mixture of stove solution.
There is an opportunity to save money by preparing a clay solution, but the preparation process will take a lot of time and require a lot of labor.
- you also need to buy a fireplace door;
- chimney sandwich panels;
- eight 50 mm metal corners;
- chimney view.
- In order to secure the stove fittings you will need construction stove tape.
All the material will cost about 10,000 rubles.
Features and Benefits
By itself, a fireplace is of little use; it is impossible to heat all rooms with it, so owners often opt for a heating structure. It heats all rooms efficiently, so it is universal for the home and serves as an additional mechanism for heating water. There are mechanisms that allow you to connect the heating part of the stove with the aesthetics of the fireplace. This mechanism is called a fireplace-stove.
There are many multifunctional models, but not all of them are suitable for private homes - you should take into account the heating area and the location of the house itself. There are also unusual designs: miniature fireplace stoves for small spaces, and even a built-in bed.
Features of the rework procedure
This process will require much less financial investment compared to completely removing the stove and installing a new expensive fireplace. As a result of this work, you can significantly improve the appearance of any room, as well as choose a design that will fit perfectly into the existing interior.
The very first steps that can be implemented with your own hands are those that involve the preparation of building materials and tools. You can use old stove bricks while working, and here they are usually replaced with a standard fireplace stove. This solution is not considered optimal, since the stove still does not look like a fireplace. Therefore, it is best to almost completely dismantle the stove structure, in the place of which a full-fledged fireplace is erected. It is quite difficult to do such work with your own hands, but it is possible if you follow the instructions exactly.
To remodel the structures, you need to purchase bricks and masonry mixture, as well as a special door for the fireplace and some other special elements that will be used in the process. These include:
- sandwich panels designed to decorate the chimney;
- metal corners;
- chimney view;
- oven tape.
Advantages
Fireplaces of this type are an alternative source of heating, which has led to their enormous popularity. It should be noted that they can be used both for a country house and for an ordinary apartment. Some models are installed outdoors - in the garden, combining them with landscape design.
Among the advantages of fireplace stoves, several main parameters can be identified:
- Relatively small in size and easy to install. They can be mounted in almost any corner of the room by preparing a hole for the chimney.
- Variety of designs. These stoves will suit almost any interior, and the possibility of external finishing provides even more possibilities for decoration.
- Low fuel consumption and the ability to use several types of fuel (coal, wood, etc.).
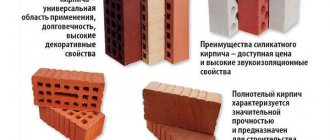
What types of brick ovens are there?
Building a brick stove is not the easiest thing. To begin with, careful preparation of materials, tools, and plans is necessary. But first of all, you need to decide which of the many types of stoves you want to make.
- Heating stoves. As the name implies, their main task is to heat the room. Furnaces of this type are extremely simple, have a simple design and do not take long to construct.
- Combined ovens. A more universal type of stove than the first. They are somewhat more difficult to construct, but have not only the function of heating the room. You can cook food on such stoves. In some versions, even ovens are built into them.
- Stoves and fireplaces. The ideal type of stove for a private home or cottage. With their unrivaled appearance, they do a great job of heating your building. A well-built and well-finished fireplace will become the interior highlight of your home.
Some masters rank stoves not by their main function, but by the shape of the unit: square, rectangular, round, etc.
Of course, almost any homeowner can make a stove with their own hands. Numerous diagrams and guides will help you do this efficiently and with minimal time. The oven can be of any size, shape and purpose. However, it should be remembered that the main condition for its successful construction will be fire safety.
Main problems and how to fix them
Minor problems
- Abrasions that appeared on the firebox sheet. They can cause serious problems and even fire. To solve the problem, the worn sheet is replaced with a new one. To do this, we dismantle the deteriorated metal, protect the floor covering with an asbestos sheet and attach a new sheet of metal of the required size on top.
- Replacing the grate from the grate.
- Lack of traction. If the draft is lost, most likely you are faced with a clogged chimney or lack of air flow. Once a year, inspect your chimney for dirt, debris, and foreign objects. Chemicals are used to clean the canals.
Cleaning the chimney with chemicals
To clean the chimney from soot, you will need to prepare:
- Firewood
- Trowel with sharp edges
- Soot scraper
- Clay mortar for masonry
- Lime and plaster for whitewashing
The entire work process comes down to heating the stove with wood. It is better to use alder or aspen firewood, as they burn out quickly, produce good draft, and burn out soot. Sprinkling salt on your firewood can help clear soot from your chimney and chimney. This procedure is recommended to be carried out every three months.
Replacing the grate comes down to:
- Removing old grates
- Carrying out repair work on masonry and ashlars if necessary
- Laying a new grate, remembering to leave 5 mm gaps
- Filling gaps with sand or ash
Attention: the new grate from the grate must strictly match the old one in size. It must be placed in its original place without using a solution.
Medium difficulty problems
- Loose fire door
- Damaged chimney pipe
- Repair and refurbishment of the firebox
Medium repair work also includes updating masonry joints. They not only spoil the appearance of the structure, but also allow harmful gases into the room. To identify problem areas, it is recommended to heat it. To solve the problem you need:
- Clean out the seams.
- Wash the walls with water using a brush.
- Fill noticeable cracks and defects in the brickwork with a new clay solution.
To prevent the clay from cracking after drying, add a little table salt to it. For one bucket of clay, it will be enough to add 300 grams of salt. If the cracks in the masonry are large and deep, they should be sealed using a fire-resistant cord.
A loose fire door can be strengthened. If you notice that cracks have formed around the doors, and it is very wobbly, it’s time to repair it:
- We clean the repair area down to the brick and rinse it with water
- Prime the surface
- We put sealant in all cracks
- Seal it with mortar
To prepare the solution we will need to take:
- Fireclay clay
- Heat resistant glue
- Portland cement
- Sand
The prepared composition should be similar in consistency to sour cream.
After strengthening the fire door, after 24 hours, you should heat the structure with a small amount of firewood.
Capital works
- Complete replacement of the lining
- Converting a stove from one type of fuel to another
- Repair and re-laying of brickwork
Repair without disassembling the stove
If you need to replace burnt bricks without disassembling the stove, prepare the following materials and tools:
- Brick
- Hammer
- Masonry mortar
- Water
- Scraper and trowel
Instead of old burnt bricks, it is necessary to lay new material, having previously moistened them with water. Next, apply the solution to the masonry.
Attention: with the prepared solution you must thoroughly lubricate the area of the fallen brick. The new material is placed in its original place, pressed and sealed.
How to move the firebox
It also happens that the refractory brick from which the masonry is laid collapses and becomes unusable. In this case, it is necessary to repair it through the combustion door. If the damage is small, clay mortar will help to cope with it. If only a few bricks are destroyed, it is recommended to replace them by removing the old mortar.
To complete the work you will need to prepare:
- Spatula, hammer and chisel
- Solution
- Water
- Fire brick
The old mortar is removed with a construction tool, the area is moistened with water, and new bricks are laid on top.
When repairing the firebox, it is advisable to use the same solution that was used during construction. After repairing the firebox, you will be able to use the stove only after a week.
How to restore a stove
If you want to restore an old brick stove and restore its aesthetic appearance, you should stock up on the following materials:
- Heat resistant tiles
- paint
- Whitewash or lime
When decorating a stove with tiles, it must be laid on a prepared and flat surface. Be sure to use bas-relief edgings and frescoes. The advantages of this material include:
- Ease of care
- Presentable appearance
- Durability
If you want to paint the stove, pay attention to the material that can withstand temperature changes. To give the product originality, use a stencil to paint designs and ornaments.
Whitewashing the stove is the most common option. To give a snow-white shine to the lime, add salt.
Safety precautions when repairing furnaces
Before you start repairing a brick kiln, be sure to take care of safety precautions:
- To prevent wooden surfaces from heating up and catching fire, use insulating materials adjacent to the heated part.
- Choose your supplies carefully. They must be of high quality and without visible defects.
- To prepare the solution, it is recommended to use fatty clay and heat-resistant glue.
- Before starting work, place a steel sheet in front of the vent.
To summarize, it is worth noting that timely preventive maintenance and repair of minor problems will significantly extend the life of a brick kiln. Keep in mind that repair work must be carried out with full responsibility, since not only the performance of the structure and its appearance, but also the safety of your home depends on it.
When inspecting the furnace, the following facts may be revealed:
- The device does not have an additional blower, the so-called letnik, which enhances the stove draft when it is lit.
- Changing the location of the blower: instead of the lower part of the firebox (under the door), it is located at the end of the stove.
In addition, there may be no additional hood above the hob, and the heating of the room is less on the side where another wall is located. These errors also need to be corrected.
The second disadvantage is the location of the view relative to the smoke channel going up. From an ergonomic point of view, this valve cannot be positioned horizontally all the time. This leads to disruption of its operation or, as stove makers aptly put it, to “tears of the stove.” The fact is that in winter, especially during frosts, a lot of condensate accumulates in the equipment, which, mixing with soot, turns into a solution of high concentration carbonic acid, which leads to the gradual destruction of the masonry.
So, thanks to an external inspection, it was possible to identify problem areas that need to be worked on. After this, you can begin repairing the brick oven with your own hands.
The main advantages of a brick oven
With the widespread development of private households, conventional brick kilns are increasingly being used. They are often preferred to modern heating devices: gas and other boilers. Not to mention metal stoves. Among the main positive features of brick kilns are:
- Long-term heat conservation. A brick oven is a real heat accumulator. Thanks to the material it is made of, it maintains its temperature almost throughout the day. Accordingly, it needs to be heated much less often, and firewood needs to be added no more often than once every
- Economical. As mentioned earlier, the stove stays warm longer, which means you heat it less often and waste less fuel.
- Environmental friendliness. The stove consists of natural materials and is heated primarily with wood.
- Safety. The outer surfaces of the furnace are not subjected to strong heating. The brickwork gradually takes excess heat from the firebox and transfers it to the surrounding space. This means that the thermal radiation will be softer than from an iron “potbelly stove”.
- Breath. During combustion, the stove releases moisture from the brick, which softens the air. When cooling, the masonry is moistened again. Air humidity is always at a level that is beneficial for the human respiratory system.
Making the solution
Most often, when lining a furnace, a solution of clay and sand is used in a ratio of 1:2. Many home craftsmen recommend the following proportions for mixing: 4 parts clay, 8 parts sifted sand and 1 part water. It is advisable to take clay from a depth of 1.5-2 m, clean, without various impurities. In order for the clay to acquire the desired viscosity, it must be soaked in water for 2-3 days and then rubbed through a sieve. If this is not done, small pebbles or plant debris may end up in the solution, which will not only complicate the laying process, but will also negatively affect the strength of the structure.
The following solution is also used for masonry: 1 part clay, 1 part sand and 100 g of table salt per bucket of solution. The clay must be pre-soaked in water and the sand must be sifted. When kneading, water is added in small portions so that the mixture does not become too liquid. The finished solution holds its shape well, does not stick to the trowel, and easily slides off the walls of the container.
Clay mortar mixed with fireclay powder and cement has excellent qualities. To prepare it, take 60% of the total mass of clay, 35% fireclay powder and at least 10% cement. If you do not want to select the proportions for the mortar, use a ready-made masonry mixture, which only needs to be diluted with water to the desired consistency. The solution should be mixed in small portions so that it does not have time to dry out before application.