You can have a garage without being a car enthusiast. Often, a garage is a place to communicate with friends, a workshop, even a production workshop that requires heating in the cold season. Garages are not equipped with central heating. Therefore, heating a garage space is important both for the person working in it and for the room itself. Maintaining temperature conditions in the warm range and maintaining room humidity at the proper level have a positive effect on the durability of the garage. Buying a boiler and installing a heating system in a garage is quite an expensive proposition. It is much more economical and practical to equip it with a stove - a potbelly stove, made by yourself. Moreover, in the friendly garage team you can always find the necessary materials, tools and equipment.
- 2 Design and principle of operation
- 3 Drawing and diagram: calculation of basic parameters
- 4 Required materials and tools
- 5 Preparatory work
5.1 Photo gallery: where is the best place to put a potbelly stove in the garage
- 6.1 Video: how to make a garage stove yourself
What is it used for?
It should be noted that installing a potbelly stove in a garage does not require any special engineering research. But making it yourself will require skills in using power tools and metal welding.
The clear advantages of such a stove are that it has a compact size, can be made for solid and liquid fuel, quickly heats the room and maintains heat well in it. The additional functions of a potbelly stove include the following: using it for cooking, using it as a dryer for clothes and shoes.
If basic fire safety standards are observed, such a stove has virtually no drawbacks.
The third type of stove-stove
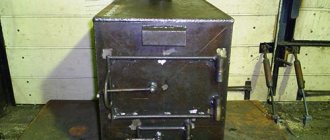
Now let’s figure out how to construct a homemade potbelly stove with a square body with thin walls and an adjustable draft. The main advantage of a square-shaped potbelly stove is its larger surface area of interaction with air, that is, greater efficiency compared to a stove based on a pipe.
The most optimal dimensions for a homemade stove will be a structure height of 800 mm and a base of 450 × 450 mm. A potbelly stove of this size will not take up much space and can easily accept almost any piece of wood.
Chimney installation diagram.
You should also determine what thickness of metal will serve as the material for the stove. Here, as in everything, a golden mean should be observed: very thick walls (about 1 cm) take too long to warm up, thin-walled metal sheets swell after heating, and the stove will become shapeless.
For these purposes, choose an average wall thickness - approximately 0.3-0.5 cm. Then the potbelly stove will retain its original appearance and will perfectly warm the room.
Design and principle of operation
A solid fuel stove of the simplest design does not have any intricate elements. Essentially, it is a metal container with two main compartments.
The main material used for its manufacture is metal. Since it must provide resistance to high temperatures, the metal should be selected with a thick wall. Be it a barrel, an old gas cylinder, a piece of pipe or individual pieces of sheet metal.
Use only steel elements to make a potbelly stove. Aluminum, brass, cast iron (except for the grate) materials are not suitable. There will be a problem with their installation due to the peculiarities of welding various metals. Also, the melting point of these metals may not be suitable.
The main compartment (firebox) is the container in which the combustion process takes place, which means it must be large enough, with access to air, outflow of smoke and other volatile combustion products, but at the same time structurally suitable for the installation site.
The second main compartment is the ash pit (ash pan). The ash pan is located under the combustion compartment, connected to it by mesh-type holes or a grate made of thick metal (rod, fittings). The ash pan serves to remove ash from the combustion compartment in a natural way. The ash, under its own weight, pours into the ash pan compartment through the holes. Ashes are removed directly from the ash pan by hand.
It is advisable to install a door on the ash pan; by adjusting the gap, you can control the intensity of the air flow entering the firebox. The door in the firebox should be closed after loading and igniting firewood.
Main compartments: firebox and ash pan
A pipe is welded into the top sheet, through which the smoke flows out. A metal pipe is welded to this pipe, leading the smoke to the street.
Alternative to pipe
There are many products that can be used instead of a barrel or pipe. For example, you can make a potbelly stove from wheel rims.
Furnace made from wheel rims
Which requires four disks. They are installed on top of each other, electrically welded together. But before this it is necessary to carry out a number of preparatory measures.
- All holes in the upper disk must be welded tightly, leaving a hole for the chimney. If it has a small diameter, then it will need to be expanded.
- In all other disks, the central partitions are cut off to create a hollow space inside the assembled structure during assembly.
- The second disk from the bottom will need to be cut so that an opening is formed under the firebox door. You can make a door from the cut-off part by welding the corners around the perimeter so that it fits tightly to the body of the unit. By the way, this design does not provide for a vent, so the air supply will have to be carried out through the firebox door by opening it.
- You will need to immediately install a grate between the lower and second disk.
- After which you can assemble a homemade potbelly stove. That is, first a grate is installed between the two lower disks, then they are welded together. A third element is installed and welded to the second. Next, the last disk is installed and welded. Either a chimney or a pipe is welded to it on top, on which a chimney pipe can then be installed.
- The door is hung.
Combined version of discs and metal casing
That's it, the potbelly stove made from wheel rims is ready, you can use it. By the way, the ash will fall down and collect in the volume of the lower disk. It can only be removed by lifting the grate.
Drawing and diagram: calculation of basic parameters
The main parameter that ensures the correct transfer of heat from combustible products in the firebox - not into the chimney, but into the room - is the correctly selected chimney diameter.
The cross-section of the chimney pipe can be calculated based on the volume of the firebox. The optimal ratio in numerical terms should be 1 to 2.7. This indicator is taken from the calculated parameters of metal and brick furnaces. It is nominal and generally accepted.
This ratio is very easy to calculate. We calculate the volume of the firebox. For example, 70 liters. Then the cross-section of the required pipe will be 182 mm. (70 * 2.7 = 189 mm, the closest according to GOST is 182 mm). This calculation means that such a cross-section of the pipe will optimally ensure the outflow of smoke in the chimney and sufficient resistance to retain heat in the potbelly stove.
Efficient heat transfer is the main parameter of a potbelly stove. The rest is design features. Which depend on the installation location and the imagination of the designer. This refers to the volume of the stove, its dimensions, the presence of legs or a stand, vertical or horizontal position.
The most efficient design, designed taking into account thermal technological features, is presented in the following diagram:
One of the most effective models. "Engineer Loginov" stove
The diagram clearly shows structural elements made of sheet metal with dimensions, the process of movement of hot air and combustion products in the section of the furnace. The names of the main elements are also shown on the diagram.
How to increase efficiency?
Let us highlight the main problems that need to be solved to change the potbelly stove:
- Increase combustion duration in optimal thermal conditions.
- Maximize the heat output of the furnace.
- Create such a high temperature in the combustion zone to ensure complete combustion.
- Provide convenience for loading firewood.
- Prevent the release of harmful combustion products.
To solve these problems, both good engineering solutions and “folk” methods were invented.
Required materials and tools
Assembling the potbelly stove structure involves working with metal. To prepare structural elements, the following tools are required:
- grinder with a set of cutting and grinding wheels for cutting and processing metal workpieces of various thicknesses.
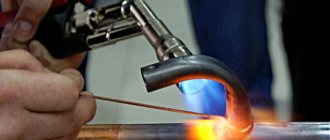
- welding machine for welding structural elements.
- plumbing tools: hammer, clamps, pliers, etc.
- electric drill with a set of metal drills. For making technological and installation holes.
You will also need a measuring tool: ruler, scriber, square, level. To ensure that your product comes out smooth and has an aesthetic appearance.
It is better to use metal rulers, squares and levels. During the processing and welding process, the metal heats up and can damage measuring instruments made from non-metallic materials.
If you decide to build a potbelly stove from sheet metal, then its thickness should be at least 4 mm. The grate should be made of reinforcement or rod with a cross-section of at least 12 mm. This ensures the durability and safety of the product.
Monitor the quality of welding of the grate structure. Scald the rod on both sides. A weak weld can burn out in a short time.
It is not always possible to buy rolled metal for a new product. But, for sure, in a garage cooperative you can find an old propane tank, a piece of pipe, a metal barrel, and the like for cheap. The main thing is to choose a container for the firebox with a sufficiently thick wall. Next, if the dimensions of the firebox are satisfactory, we turn on our imagination, or adhere to the above scheme as much as possible.
When preparing structural elements, cutting metal, and welding work, it is necessary to follow safety rules. The work should be carried out in special clothing, and always with safety glasses. Welding work should be carried out in the fresh air or in a well-ventilated area.
Question of price
As always, consumers are interested in the question of the price of the product and its manufacture with their own hands. That is, will it be cheaper to make a potbelly stove with your own hands or purchase a ready-made sample? For obvious reasons, not all models can be made by hand. For example, the one shown in the photo above. This is a cast iron stove, cast with high artistic performance.
It will be easier to build a small stove like the “Gnome” brand with a round or rectangular cross-section. And if you have the skills to work with a welding inverter, then there will be no problems with the manufacture of the unit. Plus, the ability to use some structural elements from used metal.
Preparatory work
Before assembling the stove, you need to decide on its size and installation location in the garage. There are no standard recommendations on this matter. It is necessary to take into account such factors as the convenience of the design, understand the physical processes of heating the room and heat transfer, the flow of air into the room and its ventilation. The larger the heated surface area of the potbelly stove, the faster the garage room warms up. But the dimensions of the potbelly stove should not be a detriment to the garage area. This is also important for fire safety reasons, because the entire structure of the furnace is heated to fire-hazardous temperatures.
It is often recommended to install potbelly stoves in the far corner of the garage, and make the chimney in the opposite direction. Thus, the fastest heating of the room is achieved; due to the long structure of the chimney pipe, greater heat transfer is produced. The disadvantage of this design is the slope of the chimney pipe. The angle of inclination should not be less than 30 degrees. The ideal position is vertically up. Providing better heat transfer, you have to sacrifice the efficiency of the chimney. This increases the risk of smoke leaking into the garage. The seams of such a pipe should be checked for leaks before installation.
This principle of placing a potbelly stove would be more suitable for a basement than for a garage.
It is optimal to place the potbelly stove in a convenient place. The place itself needs to be prepared. It is necessary to lay a metal sheet or a small concrete slab on the floor, the edges of which should extend beyond the dimensions of the potbelly stove by at least 200 mm. This is due to fire safety. It is also necessary to remove flammable materials as far as possible from the stove.
Photo gallery: where is the best place to put a potbelly stove in the garage?
Location at the gate
Location in the far corner
Location at the gate
Why is there bad draft in the furnace?
Poor or weak traction most often causes reverse traction as a consequence. The reasons may be completely different from each other. As for the main one, these are the mistakes that people made when designing the heating system. In this case, there is a possibility of improper use of building materials. Let us also consider in more detail the possible sources of the problem and what to do in such cases:
The defect may be hidden in the chimney design. The proportions between height and firebox are sometimes calculated incorrectly. And because of a low pipe, for example, the pulling often happens worse. However, if the parameter for this component was greater, then reverse thrust would not have formed.
REFERENCE
That’s why it’s so important to consider the universal size – about five meters
- Don't forget about the diameter ratio. A narrow value makes it difficult to remove combustion products.
- In addition, if the product is square in shape, then most likely the movement of smoke will not be as free as it would be with rounded corners.
- Natural conditions also significantly influence the presence of weak traction. In rainy climates, high humidity or strong winds, the level tends to decrease.
- If there are various damages or scratches or irregularities on the pipe, then there is a high probability of obstacles to attraction with a good coefficient.
- Stove care. There are often cases when the user forgets about cleaning, thereby accumulating dirt - collapsed building materials.
- The reason is very similar to the previous one. Only this time the clog is soot.
- The ventilation process has been disrupted. Because of this, there is a shortage or no supply of air mass at all.
How to make a potbelly stove in the garage with your own hands: step-by-step steps
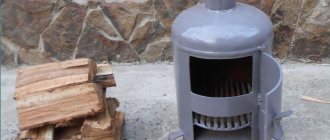
The manufacture of a simple but effective potbelly stove is presented using the example of a potbelly stove made from a pipe.
Pipe based design
- On the prepared container for the firebox, you need to mark and cut two rectangular holes. The cut out segments should not be thrown away - these will be the doors for the firebox and ash pan compartments. To attach them you will need loops. The seals are made with a metal strip around the perimeter of the doors.
- in the firebox container, at a height of 100 mm from the lower edge of the door, stops for the grate are placed. It is convenient to make such stops from a corner with a shelf of 40 - 50 mm, on which the grate structure rests. A grate made of ordinary metal mesh will not work; it will quickly burn out. Therefore, rods with a diameter of at least 12 mm are used.
- The grate is welded from reinforcement rods according to a grid pattern.
- After doing the welding work inside the pipe, you can weld its ends - the bottom and ceiling of the potbelly stove.
- To stabilize the stove, legs are welded to the bottom.
- a chimney hole is made in the ceiling of the potbelly stove with a diameter corresponding to the cross-section of the chimney pipe. Weld the pipe.
- weld the hinges and hang the doors. Equipped with locks or hooks to lock doors.
- welding seams should be processed with a grinder with a grinding wheel to give the product an aesthetic appearance.
- The product can also be painted with heat-resistant paint.
Such a potbelly stove is often made from a gas cylinder:
The video was taken from the Internet resource Youtube, is used as educational material and is not an advertisement.
Making a potbelly stove from a gas cylinder yourself.
Video: how to make a garage stove yourself
A rectangular potbelly stove is made primarily from sheet metal. It has the same main compartments as a potbelly stove made from a pipe or barrel. The process of making a rectangular potbelly stove is no more labor-intensive than the example discussed above. In some ways, the rectangular design is more practical. You can heat food on this stove. This stove is more stable.
Rectangular potbelly stove
A drawing diagram indicating the dimensions of such a stove is given below.
Sheet metal model
The so-called “Pipe in Pipe” model combines a firebox and an additional shell around the firebox. This design increases the area of the heated metal, due to which the air space around the stove heats up faster. Heat transfer is more efficient.
A diagram of such a potbelly stove is shown below.
Assembly diagram “Pipe in pipe”
This diagram shows how a suitable air flow receives heat from the burning material and exits through the technological holes at the top of the stove. This design is called a heat gun. Some garage engineers install a fan under the potbelly stove, thereby ensuring a forced outflow of hot air. Due to this addition, heating efficiency increases, but the need for fuel also increases, since the firebox is cooled by air.
When making welding seams, you need to ensure their tightness. This is important for safety.
Metal cutting should be done using protective equipment. Follow safety rules when working with power tools.
The design of potbelly stoves largely depends on the imagination of the engineer and on his practical skills in working with metal. Some “Kulibins” bring the art of installing potbelly stoves to perfection:
Potbelly stove from George Lucas's garage
Chimney for potbelly stove
Material for making a chimney
Before you start making a chimney pipe that will be installed on a potbelly stove, you need to decide on the material that will be used.
Taking into account the fact that a potbelly stove is a portable stove, we immediately refuse brick chimneys. In this case, we have few options: either asbestos-cement or metal pipes. Most heating experts still recommend using metal chimneys: they are lighter and easier to manufacture
We'll talk about them in more detail.
Most heating experts still recommend using metal chimneys: they are both lighter and easier to manufacture. We will talk about them in more detail.
Cast iron stove with steel chimney
Making a metal chimney for a potbelly stove
So, we have decided on the material - we will make a chimney from a metal (stainless steel) pipe. However, it is not enough to simply insert the chimney pipe into the corresponding hole in the potbelly stove - the chimney must be correctly mounted and optimally located.
Potbelly stove on the street
As a rule, a simple chimney for a potbelly stove installed indoors consists of two parts - internal and external. These parts are connected in the attic or at the level of the under-roof space.
This “double-knee” design makes it relatively easy to replace the lower burnt-out segment of the chimney without dismantling the entire system.
By the way, you can not buy steel pipes, but bend them from a steel sheet, but this will require certain skills from you. On the other hand, then you can make a pipe for a stove-stove of exactly the diameter that you need.
Pipe installation
To install a chimney of standard dimensions, we will need the following materials:
- Elbow 100x1200mm (1 pc.)
- Elbow 160x1200 mm (2 pcs.)
- Butt elbow 160x100 mm (3 pcs.)
- Tee 160 mm with plug
- Mushroom 200 mm
Also, depending on the characteristics of the room in which the potbelly stove with our chimney will be installed, you may need a passage glass, a rain canopy, thermal insulation, etc.
Also, to seal the joints between pipes, we may need an asbestos cord or a special sealant.
After all the materials are ready, we begin assembling the pipe for the potbelly stove:
- We fix the first section of the pipe on the chimney opening or the furnace pipe.
- We extend the pipe bends until they overlap.
Chimney hole
- We make a hole in the floor slab with a diameter of at least 160 mm for the chimney outlet. We remove the thermal insulation along the edges of the hole to prevent it from igniting.
- We insert a passage glass into the hole, and then pass the potbelly stove pipe through it.
- We connect the pipe to the external chimney.
- To ensure optimal operation of the chimney, we provide thermal insulation to the outer part of the chimney by wrapping it with thermal insulation and coating it with bitumen.
Chimney outlet through a window
We strengthen the fungus on top of the chimney, which protects the pipe from precipitation and small debris getting inside.
Pipe care
In order for the chimney (and with it the potbelly stove itself) to work properly, it must be looked after:
- At least once a year we check the outer surface of the pipe for defects - burnouts, rust, cracks.
- Likewise, the pipe needs to be cleaned annually. To do this, you can either use special chemical compounds that are burned in the firebox along with firewood, or simply burn several aspen logs in a potbelly stove. Aspen gives a very high temperature, which perfectly burns soot.
- It is unlikely that it will be possible to use mechanical cleaning means (brush, weight, etc.), because the chimney of a potbelly stove is not very durable.
Manufacturing and arranging both the stove itself and the pipe for the potbelly stove is a difficult task only at first glance. Of course, you will have to work hard and carefully study the proposed instructions - but it is still quite possible to do this without resorting to the help of specialists. So go for it!
Features of operation
To operate a potbelly stove efficiently and safely, you need to know and follow a few simple rules.
- It is necessary to maintain the distance from the potbelly stove to the nearest walls of the room. The minimum allowable distance is 300 mm, but it would be optimal to install the stove at a distance of 500 mm from the walls of the garage. You need to navigate based on local conditions.
- The chimney must be installed outdoors. The chimney cannot be installed in a general ventilation system. Where the chimney pipe passes through a wall or ceiling, it is necessary to insulate building structures with non-combustible material, for example, asbestos.
- The heated room should also be insulated. The heating efficiency of such a stove depends on the level of thermal insulation of the building. It is recommended to insulate a chimney vented outside to reduce heat loss.
Insulation of the chimney pipe - It is not recommended to install the potbelly stove on the floor. You need to place a sheet of metal under it to prevent fire from spilled coals.
- To eliminate the risk of fire in a timely manner, place a box of sand or a fire extinguisher, or better yet, in close proximity to the potbelly stove.
- Place logs of firewood and chopped finished firewood in a place separate from the potbelly stove.
- Drying clothes and shoes directly on the stove structure is prohibited. It heats up to fire hazardous temperatures. For these purposes, it is better to string a rope next to the potbelly stove at a height of at least 1.5 m from the stove.
If you follow these recommendations, you can be confident in the safe operation of the potbelly stove.
Safe installation of the heating device
For safety, the stove is installed on a foundation or metal sheets.
When installing and operating the stove, the following safety precautions must be observed:
- install protective screens made of sheet iron under the fireplace and on nearby objects;
- insulate the passage through the wall with non-flammable compounds - clay, brick, asbestos;
- do not make right angles on the chimney, avoid horizontal sections of more than 200 cm;
- It is prohibited to melt fuel with explosive substances - alcohol, acetone, gasoline;
- keep fuel no closer than 100 cm from the operating firebox.
If possible, do not leave the potbelly stove unattended.
Increased utility
Potbelly stoves can come in a variety of sizes and shapes. They are invariably connected by one fact - low efficiency. Thermal energy does not enter the desired room, but flies away into the chimney. Therefore, the owners of such stoves decided to experiment with the design to increase utility.
In this case, they often resort to partial modernization of the furnace. There was no single solution for everyone in this matter, so each owner, using his own trial and error, looked for a solution to the problem.
To increase the amount of heat released without increasing the volume of fuel required, you can do the following:
- Improve heat transfer surface
- Increase heat removal
- Change the type of fuel to a higher calorie one
- Increase the heat capacity of a potbelly stove
Option 1
The heat in a house or garage from a potbelly stove comes not only from the outgoing heat of the structure, but also from the metal chimney. Therefore, the heat transfer surface can be increased. This is quite possible when making a stove with your own hands.
We recommend: How to make a grill-smokehouse?
If you already have a ready-made device, then here’s how to implement the idea. Weld a corner to a metal chimney pipe. You need to position it with its apex facing the entire length of the element, and set the angle along the circumference of the pipe. Using this method, it is possible to increase the heat transfer surface by about 4 times (depending on the size of the selected corner).
You can also resort to the option of making a metal pipe that will pass over a larger area. It is necessary to make a chimney with turns. Turns should be smooth, without right angles, so that the device does not start smoking. The final section of the chimney is made vertical; a compartment is located in the last section to subsequently clean out soot.
When it is impossible to lengthen the pipe, then change its composition. To do this, cylinders with a circumference of about 40 cm are welded onto the pipe, which protrudes from the body of the structure. They are connected to each other by pieces of pipe, the diameter of which is no less than the diameter of the pipe.
Option 2
To modify the stove, you can install side screens. Everything is quite simple, but effective in the end.
Sheets of metal are attached to the side parts of the potbelly stove using self-tapping screws. The metal must be unpainted and of any thickness. The screens are mounted at a distance of 6 cm from the body.
In this simple way, the principle of heat transfer changes. That is, thermal energy enters the room through convection, and not through radiation. The air begins to circulate in the prepared space, which will save on fuel purchases and increase the rate of heating of the garage or house.
Folk way
A curious way to ensure that the heat continues to spread even after the stove is no longer working.
After all the fuel in the stove has already burned out, an iron box is placed on it and two buckets filled with sand are placed on top of it.
This design will allow heat to accumulate, and the garage will heat up for some time without additional fuel.
Making an ash pit
An ash pan is a grate near a potbelly stove, on which fuel will subsequently be placed to heat the room.
A good ash pan provides the combustion chamber with a sufficient amount of air (that is, oxygen), and also provides good draft, thereby ensuring better combustion. In most cases, ash pans in potbelly stoves leave “much to be desired,” so upgrading the ash pan will help improve the performance of the potbelly stove.
An effective ash pit should be made of heat-resistant material and have a door, thanks to which you can avoid smoke in the room. Improving the ash pan will help turn an ordinary potbelly stove into something like a fireplace.
Instructions
Making an ash pan yourself will require certain skills from you, and the production must be in accordance with the instructions:
- First you need to weld the box to the size of the potbelly stove, without the top wall and leave a rectangular cutout in the end wall. Steel is most often used in production. The dimensions must correspond to the width and length of the potbelly stove itself.
- Make holes in the bottom of the stove. The diameter of the holes should be about 20 mm.
Drilling holes for the ash pan
- Weld the box to the stove.
- Install the door into the ash pan.
This design will give better and more uniform operation of the potbelly stove.
Making an ash pit
An ash pan is a grate near a potbelly stove, on which fuel will subsequently be placed to heat the room.
A good ash pan provides the combustion chamber with a sufficient amount of air (that is, oxygen), and also provides good draft, thereby ensuring better combustion. In most cases, ash pans in potbelly stoves leave “much to be desired,” so upgrading the ash pan will help improve the performance of the potbelly stove.
An effective ash pit should be made of heat-resistant material and have a door, thanks to which you can avoid smoke in the room. Improving the ash pan will help turn an ordinary potbelly stove into something like a fireplace.
Instructions
Making an ash pan yourself will require certain skills from you, and the production must be in accordance with the instructions:
- First you need to weld the box to the size of the potbelly stove, without the top wall and leave a rectangular cutout in the end wall. Steel is most often used in production. The dimensions must correspond to the width and length of the potbelly stove itself.
- Make holes in the bottom of the stove.
The diameter of the holes should be about 20 mm. Drilling holes for the ash pan - Weld the box to the stove.
- Install the door into the ash pan.
This design will give better and more uniform operation of the potbelly stove.