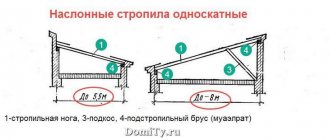
Often during the construction of roof frames with complex configurations, the need arises to use elements of non-standard sizes. Typical examples include hip and half-hip structures, the diagonal ribs of which are significantly longer than ordinary rafter legs.
Similar situations arise when constructing systems with valleys. To ensure that the created connections do not cause weakening of structures, you need to know how rafters are spliced along the length and how their strength is ensured.
Types of wood for roofing
For rafter installation, depending on the purpose of the object, the following types of lumber are used:
- Clean-edged timber, two-edged and four-edged.
- Edged board.
Coniferous wood, for example, larch and pine, is most often used in the construction of rafter systems. It has sufficient strength, is easy to process and resists rotting. Before laying on the roof, the material is treated with a special impregnation.
A standard board is 6 meters long, a beam is 3 meters long.
Defects affecting the quality of lumber:
- Knots – technical conditions regulate the number of knots in the board, which does not affect the strength of the structure.
- Wane - for rafter structures it is completely cut off.
- Cracks - occur from improper drying or cracking in the cold. This material is not suitable for roof installation.
- Rot and fungus - from improper storage in damp conditions - are rejected.
The edged board must be free of defects Source yandex.net
Having chosen the right lumber, we begin measuring and splicing the rafters.
Complex roofs
Multi-gable, hip, half-hip or dome roofs are more difficult to calculate and build. The frame is a complex system consisting of parts:
- Mauerlat;
- main, slanted (diagonal), shortened rafters;
- racks;
- struts;
- runs;
- trusses.
In half-hip roofs, the gable section rests on a horizontal reinforced board. If the slopes are connected at an internal angle, there are grooves or valleys. The structural elements are fastened together with a notch and additionally with hardware. If you don’t have enough experience, you shouldn’t take on the installation of such roofs, even if you have a detailed project on hand.
Calculation of rafter sizes by length and cross-section for the correct selection of lumber
At the design stage, the rafter system considers the options for lumber and the layout of their arrangement in the rafter structure. Further work on laying insulation, insulation and roofing depends on correct calculations. Resistance to loads during operation of the facility, resistance to atmospheric changes and tectonic influence also play a significant role. Therefore, the calculations and selection of high-quality lumber are approached very responsibly.
To calculate the required length of the rafters, determine the angle of inclination of the roof slope and calculate the height of the roof. The small size of the house will allow the use of solid boards and timber to create a rafter structure. With a wider bevel in a large structure, the length of the lumber may not be enough. Then they use splicing of two pieces of wood to make a rafter leg of the appropriate size with a small margin.
Calculation formula for calculating the length of rafters Source orchardo.ru
The size of the span between the ridge of the house and the top of the wall corresponds to the length of the rafter. The cross-section of the beam is determined based on the size of the loads and the distance between two adjacent rafter legs.
The load on the elements is created by the weight of the roof, for example, made of ceramic tiles or asbestos-cement slate. Such materials require an increased cross-section of the timber.
Example:
- The length of the beam is 6 meters.
- The end section is 10X20 cm.
- The distance between adjacent bars is 140 centimeters.
Why is it better to make rafters yourself?
After all, the easiest way is to purchase ready-made rafters, thereby receiving many bonuses:
- Short production times.
- Technological precision of all details.
- Identical, already adjusted dimensions of all structural elements.
But then be prepared for the following disadvantages:
- High cost (at least twice as much as if you planed the rafters yourself).
- Delay in delivery (especially during the season).
- Using low-quality or under-dried wood (and then the roof will “sink”).
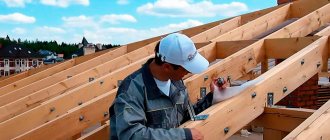
So convenience or quality? If this is not your first time carving or planing something out of wood, feel free to take on making rafters! Here's what it all looks like in real life:
In the construction world, in simple language, rafters are usually divided into the main ones, i.e. load-bearing ones, on which the roof is supported, and auxiliary ones, which are located inside the roof and serve as support for hemming the ceiling and walls of the attic (if one is planned). The strength and reliability of the future roof depends on how accurately and correctly you calculate the rafter system in advance.
The rafter system of any gable roof itself consists of the following basic elements that you need to make:
- Mauerlat.
- Vertical racks.
- Crossbars.
- Rafter legs.
- Spacers.
- Ridge run.
It is better to entrust complex roofing structures with multiple elements to a professional, but you can handle a small roof of a private house. To do this, you will need these simple formulas that will help you find out how thick the rafters should be, with what slope and what span:
We also invite you to use our free calculator.
Scheme of the truss structure
Along the perimeter of the wall, a mauerlat is laid - a beam, which takes on part of the load-bearing function, evenly distributing it onto the load-bearing walls. The bases of all structural elements will be placed on it.
Purlins are laid across the building; the same purlins will serve as support for the rafter legs in the middle of the structure.
They raise trusses, pre-installed on the ground, that will hold the ridge and attach them to the mauerlat.
They install supports for the ridge, lay the ridge and attach diagonal, intermediate rafters to it.
Strengthen the structure with the help of struts, supports and crossbars.
Racks for rafters Source domdkm.ru
Rafters are laid on the structure, taking into account the design distance between the individual beams. The ends of the legs rest against the mauerlat, and the top is sawed off and connected with metal fasteners at the beveled corners. Waterproofing, insulation and roofing are laid on the finished base.
The correct location and methods of connecting the beams guarantee stability when laying insulation and roofing. Further operation of the facility largely depends on accurate design and correctly selected lumber.
It is preferable to lay spliced rafters when installing steep roof slopes, where atmospheric loads are several times lower than on flat slopes. Flat slopes in winter are loaded under the influence of snow, which puts pressure on the lumber under the roof.
Fasteners
Metal products are used to attach the rafters to the Mauerlat:
- nails 150 mm long;
- self-tapping screws;
- rafter corners;
- beam holders;
- sliding supports;
- serrated plates;
- perforated pads;
- staples;
- bolts, studs with nuts.
It is desirable that the fasteners be galvanized or stainless. Regular one quickly corrodes and breaks down, causing loose connections.
For nails up to 6 mm in diameter, pre-drilling of holes is not required. With a larger cross-section, to prevent the formation of cracks, you need to drill a socket with a size equal to 0.9 of the diameter of the nail. In wooden buildings, as well as in small brick buildings, brackets are used to secure the mauerlat and rafters. Wood is prone to splitting, so it is recommended to pre-drill the holes.
Design features of splicing rafter legs
The rafter leg is the distance from the top level of the wall of the building to the ridge of the roof. If overhanging rafters are provided, the length of the board or beam should be increased to the specified length.
Table of length and thickness of rafter legs Source postroyka-dom.com
By connecting pieces of plank, the required size of rafter legs is achieved. It is taken into account that the connection node behaves like a bending hinge, so the joint should be located in an area where there will be no bending stress. The calculated location of the joint near a support, crossbar or other element that relieves the load. The beam must have a sufficient margin of rigidity along its entire length.
Additional support is provided between the Mauerlat and the ridge. The connection distance from the support is 1/6 of the length of the entire board. Adhering to the specified parameters, they ensure uniform rigidity on the supports.
Hip and half-hip roofs with diagonal rafters are mounted from longer and stronger timber, which serves as a support for short roofs. You cannot splice splices, only solid timber.
Rafters are increased in length in several ways, which are used taking into account the construction features and the need for load resistance.
Splicing methods:
- Direct docking - on short slopes;
- Oblique cut - for timber;
- Overlapping - suitable for boards;
- Double splice - board only.
Joining with an oblique cut Source build-experts.ru
See also: Popular designs of houses with a gable roof and an attic.
For work, a miter box is used that ensures precise cutting at a given angle.
Direct docking
The method allows you to build up an element of any length using different overlays. Parts of the overlays can be removed from disassembled formwork, trimming lumber or remnants of laid rafters. It is allowed to choose a board or three-layer plywood as an overlay.
Direct docking Source blog-potolok.ru
Sequence of work:
- The joint is cut strictly at a right angle to ensure the most even joining and to prevent deflection under full load on the connecting unit;
- The cuttings of the board serve as overlays, which are secured to the timber with pins.
- Prepare a level area of sufficient length in advance. The beam or board is placed on a flat surface, placing bars under it, 30 centimeters high, so that when cutting with a circular saw it does not touch the ground;
- Select overlays. For overlays, cut boards or three-layer plywood are used after removing the formwork. The length of the overlay is calculated as four times the width of the board. And if the roof is planned to be insulated with mineral wool or it will have a slight slope, then the loads on the structure will increase, and the length of the linings should also be made longer;
- The cut part is joined to the second half, pressed tightly and covered with connecting pads. The boards usually vary slightly in thickness, so during the preparation process, the edges are lightly filed or sanded.
Joining and connecting boards with overlays Source obustroeno.com
Important ! When cutting, the board should not delaminate or break; the cut should be smooth, without nicks or burrs.
- The entire structure is clamped with clamps and the studs are driven in, tightening the nuts until they cut into the wood. The use of nails is not recommended due to cracking of the wood and weakening of the tensile properties of the finished element. The studs take at least 8 mm; a smaller size will not sufficiently strengthen the joints, and a larger size will push the layers apart;
- It is recommended to take wide washers and recess them into the wood;
- The amount of fasteners should not weigh down the element too much, otherwise you will have to order a recalculation of the project;
- It is permissible to additionally glue the plywood onto the board and compress it with clamps until the glue dries completely.
See also: Companies specializing in attic reconstruction and roofing materials.
Oblique cut
A beam with a large cross-section does not lend itself well to direct joining, so the beams are joined together along the length using the oblique cutting method. The name of the technology comes from the type of trimming of the ends of the timber.
Rules for splicing with an oblique cut Source krovgid.com
Stages of oblique cutting:
- Measure the distance at which the cut will be made. This is necessary so that the finished elements match as much as possible without the slightest gap. Mark the cut location on both ends of the beams with a pencil;
- The ends are cut at a certain angle, using a miter box, so that the angles coincide as much as possible along the cut, usually this is an angle of 45°;
- The beveled ends are joined, achieving maximum coincidence of the planes. Secure with a clamp;
- Drill a through hole, one millimeter smaller than a pin or self-tapping screw, so that it enters with difficulty, without moving the wood fibers apart. This condition will allow you to avoid play during installation and subsequent operational loads;
- The cut is tightened with self-tapping screws or pins and washers of sufficient width so that they do not subsequently become buried in the wood and lead to weakening of the structure. It is recommended to place a ring under them.
Overlapping
The method is suitable if the question arises: how to join two boards. The rigid connection of the structure makes it popular in many construction operations. The method is quite simple - two boards are laid overlapping one on top of the other.
Overlapping splicing Source obustroeno.com
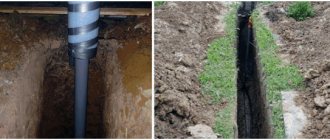
The need to use sliding supports
Rigid fastening of rafter legs to the mauerlat or floor beams using nails, staples and other fasteners is not always justified. If the building frame is prone to shrinkage, it is recommended to allow the rafter legs to move relative to the support. Traditionally, twisted forged wire, which is tensile strength, was used for this. With its help, a reliable connection of the rafters with the upper crown of the log house was ensured, while a certain degree of freedom of the structural elements was provided. Today, for this purpose, a specially designed fastening element is used - a sliding support; this type of fastener is easy to install, reliable and durable.
Free movement of the rafter beam at the point of attachment to the support (floor beams or mauerlat, the function of which is performed by the upper crown of the frame) is necessary, first of all, when building wooden houses. The degree of shrinkage of building structures depends on the material from which they are made and the moisture content of the wood. It could be
:
- chopped log;
- rounded log;
- solid timber;
- glued timber.
Glued laminated timber is the least susceptible to shrinkage; walls made of solid wood with natural humidity are much more deformed. A log house placed under a roof can become 15% lower over the course of a year.
. It should be taken into account that shrinkage usually occurs unevenly, as a result of which the rafter system, rigidly fixed to the mauerlat or floor beams, can be seriously deformed.
Roof skew can also occur during the operation of the structure. High humidity during the rainy season causes the wood to swell, and in winter the wooden material naturally loses moisture and dries out noticeably: the geometric dimensions of the log house are constantly changing. At the same time, the walls of the house differ in the rate of moisture gain or loss depending on the degree of sun illumination and the wind rose. If the log house of the house has a central wall on which floor beams or ridge girder supports rest, it should be taken into account that this wall is also subject to temperature and humidity deformations, and the amplitude of its changes is very different from the indicators of the external walls - when the house begins to be heated, the central wall dries out greatly .
If you rigidly fasten the rafters to the mauerlat (upper crown) of a four-wall wooden frame, then the load (including snow) can cause the upper logs of the walls to bend outward due to horizontal pressure
Another problem should be taken into account: if the material for the rafters has not been subjected to mechanical drying, the length of the timber (boards) will decrease when drying. In this case, when the rafter legs are rigidly attached to the frame, the roof will noticeably deform over time, which will affect its performance characteristics
Such difficulties can be avoided by the special design of the fastening points at the junction of the rafter legs with the walls. Special fasteners allow the roof to move without changing its geometric parameters.
Video description
This video will tell you how to join rafters and make calculations:
The advantages of such joining are the simplicity of the operations; it can be done even by a non-professional at a home construction site.
Double splice
There is also a rather interesting method of lengthening - composite rafters. It is performed using boards and short pieces of boards. The advantage of this method is virtually waste-free construction when the shortest elements are used.
Double splicing method Source yandex.net
Materials
The rafter legs, which distribute the weight of the waterproofing coating and thermal insulation of the roof between the load-bearing walls on which the slopes rest, must have high load-bearing capacity and excellent strength properties. In addition, they must be light so that, despite their considerable length, they do not bend under their own weight. The optimal materials for making rafters are:
- Tree. Wood is a lightweight, durable building material that can be easily processed by hand with the most primitive tools. Rafter legs made from this timber with a cross-section of 100x100 mm or 150x150 mm can withstand up to 500 kg/m2. Due to the fact that the standard size of lumber does not exceed 6 m, the tree is used for the manufacture of private rafters, because when the length of the slope exceeds 6 meters, it is necessary to build up the boards. The disadvantage of wooden rafters is considered to be poor resistance to rotting, so they are treated with antiseptic compounds.
- Metal. Metal rafters are used mainly in industrial construction, since household, commercial and industrial buildings, as a rule, are large in size. The high load-bearing capacity of the metal profile allows the use of elements of a smaller cross-section. In addition, the metal is highly resistant to corrosion.
Video description
In this video you will see what methods of connecting rafters can be used:
Connection of logs and beams in length
Splicing timber and logs along the length has deep roots in ancient methods, when only log cabins were built. Our ancestors knew how to extend the rafters correctly. This is evidenced by ancient wooden buildings that have survived to this day.
Stages of connecting logs:
- Trim the edges of the logs so that they fit snugly together;
- Drill a hole for the pin at the ends;
- The size of the hole should be 1-2 mm smaller than the insert so that the pin fits tightly into place without splitting the edge;
- Insert the pin and connect the logs tightly.
Connecting logs and beams with a direct lock:
- Cut out grooves at the end of the timber being joined;
- Carve out the corresponding size in another;
- Connect the grooves and secure them with studs or clamps.
Connecting beams to each other Source masterbrusa.ru
They also join together with an oblique lock and a wedge.
Each connection is very strong and can be used in rafter legs. The fit must be precise. Filling cracks and chips with wood chips or other material will reduce the durability of the timber. It will become unsuitable for laying rafters. For a clear result, the cutting locations are measured and marked in advance.
Fastening the rafters in the ridge
Enclosing structures experience large fluctuations in temperature and humidity, so the rafter system must be able to compensate for deformations. If all the parts are rigidly connected to each other, changes in their dimensions can lead to geometry violations and negative impacts on other parts of the building.
To correctly connect the rafters and the Mauerlat, you need to take into account all the factors and select the optimal design of the ridge assembly:
- If the rafters are rigidly fixed in the lower part, then a certain degree of freedom should remain in the ridge. To do this, the beams are not fixed to the ridge girder, but are, as it were, layered. They can be attached to each other in various ways - by cutting, nails, overlays.
- When the lower connection is movable, the ridge should firmly hold all the parts together. In this case, a rigid pinching is created at the top point, eliminating displacement in the node.
In hanging systems there is no ridge support girder. All components of the trusses are connected as rigidly as possible.
Briefly about the main thing
Splicing rafters provides significant savings in construction wood. There will be a minimum of wood waste left on the construction site.
There are several practical options for splicing rafter legs, each of which can be used during the construction of a house:
- For boards: overlap or double splice method;
- For a log house: direct joint or oblique joint.
When installing a rafter system, it is important to remember that the connection with fasteners should not weigh down the elements so much as to become problematic for the overall weight of the structure under the roof.
Proper rafting provides the same load resistance as solid timber.
Ratings 0
System requirements
To properly install a rafter system with your own hands, you must take into account a certain set of rules. Without taking them into account, the structure will not be able to effectively resist negative influences from the outside.
First of all, it is worth considering strength. All elements must withstand the load without destruction. The design of the roof truss system involves a preliminary calculation of the load-bearing structures according to the first limit state. It is he who checks the elements of the rafter system for strength.
The rafter system must be strong and rigid
The second requirement is rigidity. The maximum deflection is taken into account here. The roof structure of a wooden house or any other should not sag too much. The permissible deformations in the middle of the span are equal to the length of this span divided by 200. Before construction begins, the structure of the rafter system must be calculated according to the second group of limit states - for rigidity.
Do-it-yourself roof raftering is done taking into account that the structure is light in weight. Otherwise, the load on the walls and foundations increases greatly. It is for this reason that wood has become widespread as a base material. The wooden rafter system has sufficient strength, but weighs relatively little
Attention should be paid not only to the roof structure, but also to choosing the right roofing material. It shouldn't be too heavy
Ceramic tiles have lost their popularity not only because of the cost, but also because the roof of the house, its walls and foundations must be reinforced to accommodate it.
The weight of the roofing material for a wooden rafter structure should not be too large
Special requirements are placed on the quality of the material. The production of wooden elements should be made only from good raw materials. It is worth considering the following recommendations:
- For the main elements, grade 1 or 2 wood is used. Grade 3 can only be used for sheathing and other small parts.
- It is recommended to make rafter structures for pitched roofs from coniferous trees. They are more resistant to rot and other problems because they contain resin. With the same cross-section, the permissible span for hardwood will be less.
- Before starting work, all elements must be treated with an antiseptic. This stage of preparation allows you to prevent many troubles in the future. You can also treat the wood with fire retardants if desired. This will increase fire resistance.
- It is better to purchase wood from the northern regions, which is harvested in winter. This material is of the highest quality.