When operating an electric “warm floor,” it is important to reduce heat loss into the space under the heated room. Depending on the purpose, there are 5 types of premises:
A
— Living space, with a ceiling separating it from the heated room
IN
— Living space, with a ceiling separating it from unheated or periodically heated rooms
WITH
— Bathroom, living space with a ceiling separating it from unheated or periodically heated rooms
D
— Office (bureau), residential premises with a ceiling separating them from unheated or periodically heated premises, or located directly on the ground zone
E
— Living space with a ceiling bordering the outside air
* - when laying the floor for separation from parts in contact with the ground zone, it is important to ensure waterproofing of the structure.
A
- ceiling separating from the heated room
B, C, D
- ceiling separating from unheated or periodically heated rooms, or located directly on the ground zone
E
- ceiling bordering the outside air
Thickness of the electric heated floor screed
The thickness of the screed above the heating cable depends on the purpose of the room:
Table 1
| Room type | Moving load in vertical direction, (DIN 1055) | Thickness of the concrete floor above the heating cable (min), concrete grade | Minimum period of screed hardening before the first heating*, days | |
| Living spaces | 1.5 kN/m2 | 30 mm, m350 | 45 mm, m250 | 28 |
| Administrative and management premises | 2.0 kN/m2 | — | 45 mm, m250 | 28 |
| Classrooms, doctors' offices | 3.5 kN/m2 | — | 45 mm, m350 | 28 |
| Exhibition halls, department stores, workshops | 5.0 kN/m2 | — | 55 mm, m350 | 28 |
| Industrial workshops, garages, service stations | 10.0 kN/m2 | — | 60 mm, m450 | 28 |
* - it is necessary to check with the manufacturer the thickness of the floors, hardening and heating times
Features of heating cable
Available in sections of a certain length. It is laid in a screed from 3 to 7 cm thick. It can be used both for main heating and as additional heating.
Advantages
- It is placed in a screed, which is a kind of heat accumulator. Since the screed cools slowly, the cable is turned on less frequently and energy consumption for heating will be less.
- By laying the required amount of cable per unit area, you can obtain the required heating power. To do this, you just need to select the appropriate cable laying step on the mounting tape.
- The cost of a heating cable is lower than that of a heating mat.
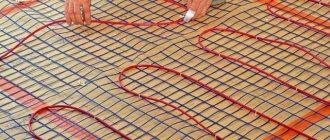
Warm floor with heating cable
Warm floor with heating cable
Selection of optimal values
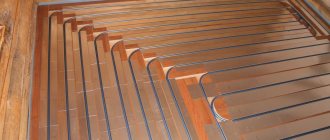
If the screed designed to strengthen the warm water floor is designed correctly, then practically no problems will arise during operation. The main criterion when selecting its thickness is the cross-section of the pipes of the heating circuit being laid. For example, for a pipe of grade MB12, a screed of 60 mm thickness is selected, for MB17 the recommended value is 65 mm.
MULTIBETON pipe for water heated floors
The optimal thickness depends on the method of laying the screed oriented above the water-heated floor.
- If you need to fill a sufficiently large area, then to improve the quality of the solution, fiber fiber is introduced into it - polypropylene, basalt. With this additive, the coating layer becomes more even, gaining wear resistance and good strength. Such a base, subject to the standard thickness of 40 mm, does not crack or delaminate.
- The main disadvantage is the long installation period, since the screed takes almost a month and a half to dry. The generally accepted thickness with this method should not be less than 40 mm. If the diameter of the pipes allows this size to be slightly reduced, then measures should be taken to increase the plasticity of the cement-sand mortar. Plasticizers help avoid deformations and cracks when the slab dries.
- The most traditional is the wet variety. Among the advantages is the high strength achieved after the slab dries and reaches operational condition. The advantage of this method is also the availability and low cost of starting materials. Typically, plasticizers are added to the cement solution to increase strength, as well as additives to improve thermal conductivity.
- The semi-dry variety dries faster because less water is added to the mixture than with traditional work. This screed turns out to be lightweight and is more suitable if a warm water floor is installed in the apartment. It is stronger than a conventional cement slab and does not crumble from heat. The base must be prepared and a vapor barrier must be laid. The material for the screed is prepared in accordance with the instructions. The layer thickness varies from 40 to 200 mm. The need to increase it is mainly influenced by an uneven base.
- The dry mixture does not add excessive loads, being the most gentle for floors. Since no drying time is required, this installation is the fastest. After leveling, plywood sheets are laid on the dry screed and only then the finishing coating.
When pouring, it is advisable to purchase ready-made leveling compositions, in which the proportions of the incoming components are strictly adjusted, and the necessary additives are added to the mixture - plasticizers, additives. The technology is traditional, when the screed is aligned along the beacons. After the time required for complete drying specified by the manufacturer, the slab becomes durable, resistant to loads and temperature fluctuations.
Screed thickness for heated floors
When installing a screed, it is considered optimal to have a layer above the pipeline of at least 20 mm. This will avoid damage to the slab. If necessary, you can increase this size by another 20 mm and achieve a total thickness of 60 mm (with a pipeline diameter of 20 mm). A larger increase should not be carried out so as not to lose the economic advantages of a water-heated floor, since a thick layer of concrete will be more difficult to warm up.
Flaws
- The heating cable requires quite a lot of time to reach the desired degree of heating of the floor covering and the entire room.
- When laying the cable, the floor height will rise by at least 3 cm without taking into account the thickness of the tiles and tile adhesive.
- You can turn on a heated floor based on a heating cable no earlier than 21 days after installation (based on a heating mat - after 10-12 days).
Warm floors based on heating cables can be used in rooms with significant heat losses, for example, in a loggia or on the first floor with a cold basement. In this case, you should remember about thermal insulation.
Thermal insulation
To prevent heat loss through the ceilings, thermal insulation is used. When choosing it, take into account the heat-shielding properties, on which the overall thickness of the screed depends. On the ground floor, slabs 5 cm thick are used as thermal insulation; if there is an apartment below with heating, insulating layers no more than 2-3 cm can be used.
The heat insulator is taken with a metallized coating. Aluminum foil does not withstand prolonged contact with the screed and is destroyed. It is necessary to use metallized coatings in the form of spraying with lavsan, etc.
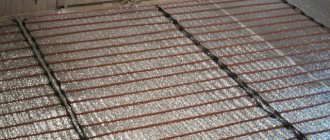
Laying thermal insulation for heated floors
Laying the slabs is done without gaps. The resulting cracks are filled with polyurethane foam, all joints are sealed with adhesive tape.
Heating mats
This is a cable heating system, which was created to simplify the process of installing a heated floor. This mat is a resistive heating cable laid out at a certain pitch on a plastic heat-resistant mesh and attached to it with a fixing tape. The average mesh width is 50 cm.
This type of heated floor is suitable when the screed is already ready and all that remains is to lay the floor covering. The mat can be installed using tile adhesive with a layer of 3 to 5 mm.
Heating mats laid in this way reduce the height of the room only by the thickness of the adhesive layer and tiles.
Advantages
- It is sold as a finished product with a certain calculated step, that is, there is no need to calculate the power per 1 m2 of area, laying step, etc.
- Since the mat is located directly under the tile, the coating heats up quite quickly.
- Changes the floor level little.
Warm floor with heating mat
Warm floor with heating mat
Cable heating systems
A characteristic feature of such heating systems are heaters made in the form of cables, which are responsible for converting electricity into heat.
Cable heaters have found wide application in all sectors of industry and the national economy. In everyday life, they are used not only to organize heated floors, but also to protect pipelines from freezing, to create anti-icing systems on roofs, stairs, ramps, and for subsurface heating of greenhouses and greenhouses.
The main strength of cable systems is the small cross-section of the heater. Due to its minimal dimensions, the heating wire does not significantly increase the size of the structure that it has to heat. To supply electricity, small cross-section wires are also used, which are much easier to “hide” in the interior than pipes for supplying hot water. Consequently, cable systems are a serious alternative to hot water-based heating systems in terms of installation and operation.
The heating cable also has weaknesses. When installing it, you should especially carefully observe safety precautions, fire and electrical safety, and ensure the correct connection diagram, installation and protection from external influences.
Flaws
- Available for a specific heating area: 0.5 m2, 1.0 m2, etc.;
- The area is limited by the width of the mat; when laying on an area of complex shape, a certain level of skill is required.
- Do not lay it on insulation, as this may lead to overheating of the cable.
- The mat is easier to damage than the cable, which should be taken into account during installation, including when laying tiles.
- The shallow installation depth can also be considered a disadvantage, since the floor cools down quickly after turning off the power.
Both systems are reliable and their service life is approximately the same, from 15 to 20 years. Electricity consumption for small heating areas is also approximately the same. That is, the main selection criterion is the installation conditions.
Filling, materials for screed
Each owner decides independently what to use and how to make screeds for water heated floors. This is done taking into account the location and characteristics of the premises where the coating will be made. The following compositions can be used for filling:
Self-leveling mixtures
Dry mixes. The preparation method (how much water is needed) is indicated in the instructions. The readiness of the solution is determined by compression (should not release moisture). Strength and elasticity are imparted by the plasticizers present in such solutions. To achieve a perfectly flat surface of the heated floor screed, the heated floor screed is laid along the beacons. Reinforcement will protect the top layer from cracks and peeling. The surface is sanded with a special machine, approximately 1 hour after pouring. This process simultaneously compacts and levels the mixture. Drying takes 12 hours. After 5 days you can begin the finishing coat.
Dry mixes
The most common surface is concrete. The solution is made from cement grade no lower than M-300, sifted sand, and water. To make concrete elastic, a plasticizer and fiber are added. Next, the reinforcement frame is laid and the screed is poured. Floor finishing is possible in 1 -1.5 months. Until this moment, the concrete pad under the heated floor is dried, and a plastic film is laid over the heated floor. It promotes complete drying without rapid loss of water.
Screed made of concrete and reinforced mesh
The screed lies flat, according to pre-installed beacons. Aligned using a special rule. It is necessary to ensure that there are no voids in the thickness of the solution. When drying, do not connect heated floor elements. It is not recommended to use heat guns or hair dryers for top drying. You need to let the composition dry on its own. Otherwise, the appearance of cracks and damage to the structure of the structure cannot be ruled out.
It is not recommended to use crushed stone for preparing concrete screeds. Preparatory stage for pouring:
- Removing debris from the base.
- Waterproofing. It is carried out by treating the base of the floor with deep penetration mastics.
- Thermal insulation. The surface is covered with heat-insulating materials.
The design of the floor resembles the structure of a “layer cake”. Here, too, one preparatory layer is superimposed on another.
Design of heated floors for different coatings (click to enlarge)
Sections or cable mats? Educational program on heated floors.
Warm floors, as usual, come in several types, depending on the availability of coolant and the design of the heating system.
Electric heated floors are the most popular devices, suitable for installation under any type of coating. They, in turn, are divided into cable and rod. Rod heated floors are an interesting concept consisting of solid semiconductors connected in parallel to two power cores. Unfortunately, this technology does not provide significant advantages, but it complicates installation and requires large resources in production. These floors can expect a new round of popularity if there are any breakthroughs in their production or sale, but now it is more relevant to talk about classic electric heated floors, which are based on a resistive heating cable.
This is what a core floor looks like
This is what a core floor looks like
Cable heated floors are divided into sections and cable mats. The section is a resistive cable equipped with a coupling and a power cable for connecting to the network. The mat is the same heating resistive cable, but already laid in a snake on a certain base: on a plastic mesh or a layer of foil.
This is what the mat and section look like
This is what the mat and section look like
The mat and cable are laid either in a layer of screed or in a layer of tile adhesive. “Warm screed” is a convenient solution, since any floor covering can be laid on top. A warm floor in tile adhesive will be much more economical due to its shallower depth, but here the coverage is limited to ceramic tiles or porcelain stoneware.
Selecting by type of flooring
The choice is also influenced by the type of flooring
First you need to decide whether the screed will be poured or not. If it is not provided, you should take a closer look at electric mats or IR film. Almost any floor covering can be laid on the film.
If the house has a tiled floor, you should give preference to heating mats. They are very thin and efficient, their power is up to 150-160 W per 1 sq. m. Mats can be laid under any floor covering. For example, if porcelain stoneware is chosen as the covering, it is enough to lay out the mats and start laying the tiles using regular mortar. In the case of laminate, engineered boards and parquet boards, it is necessary to make a thin screed 20-30 mm thick.
It is recommended to use an electric cable for subfloors made of wood. It fits into slots in wooden joists, and thermal insulation is laid underneath.
There is nothing stopping us from using IR film. It can be laid on the floor and even behind the ceiling, which will increase heating efficiency.
If you plan to lay laminate flooring, you need to pay attention to the class of the material. It is not recommended to install heated floors under laminate flooring below class 32. If the class is higher, you can choose one of 3 options:
- cable heated floor of sufficient power in the screed;
- heating mats in self-leveling floor;
- film heated floor directly under the laminate.
If the room has different floor coverings
What to choose for mixed flooring?
In modern and even classic interiors you can find different types of flooring within the same room. Most often they combine tiles or porcelain stoneware with laminate (when combining a living room with a kitchen). When installing heated floors in such rooms, you need to keep in mind that laminate and tiles have different thermal conductivities. Ideally, an independent heating system should be installed under each covering. The general heating element will fail faster when operating under such conditions.
The following comparison table will help you navigate your choice:
| Criteria | Cables | IR film |
| Screed | Need | Not required |
| Floor compatibility | Tile, natural stone, porcelain stoneware - the best choice | Laminate, linoleum, PVC tiles, parquet - the best choice |
| Reliability | 40% | 80% |
| Maintainability | No | Yes |
| Service life(average) | 10 -25 years | 10 -50 years |
| Energy efficiency | Average | High |
| Use under furniture | Allowed | Not recommended |
| Reuse | No | Yes |
When choosing underfloor heating for a home, heating systems are often combined with each other. For example, cables are used for bathrooms, toilets and hallways, and IR films are used for living rooms, bedrooms and children's rooms. On balconies or loggias you can use both heating systems; here the final choice depends on the type of flooring.
The most important
A fixed laying step is the key difference between a mat and a section. The cable turns are fixed to the mat at certain intervals, while the section must be laid out around the room independently.
Thanks to a calculated and consistent laying step, warm mats provide a stable specific power per square meter. As a rule, the cable is secured to the mesh with tape: this leaves some freedom of placement, but the laying step can be considered constant.
Some sellers claim that adhesive tape is also needed to secure the mat to the floor surface - this is a marketing ploy, since ordinary adhesive tape does not stick very readily to technical surfaces on top of which the screed will be poured.
Further development of cable mats
The next step in the development of mats can be considered sewn technology: here the cable is sewn to the mesh, and not just glued. The Profimat line from Teplolux is an excellent example of the implementation of sewing technology.
Electrolux has a mat with a floating laying step: instead of adhesive tape, rubberized strips are used. In this case, there is a considerable chance of getting a “thermal zebra” on the floor, saving floor footage. A “zebra” is obtained when the space between the turns remains cold, while the floor above the cable itself is heated. Warm stripes alternate with cold ones - this will not please the owners of this floor.
Original design solutions
Original design solutions
To more flexibly regulate the specific power and position the heating surface in a room with complex geometry, sections are used. Previously, when heating cables were single-core, it was necessary to connect the heated floor on both sides, as if shorting the cable through a thermostat. Now that two-core cables have long been entrenched in the market, a section can be laid in any kind of snakes and turns, achieving heating of the floor covering in any corners and nooks.
How to maintain the laying step using a section?
The sections can completely functionally replace the mat if you purchase additional mounting tapes for them - these are metal strips with clamps at regular intervals. The cable is laid on such tapes and fastened at a given frequency. This way you can repeatedly increase or decrease the power consumption of a heated floor, but this will affect the quality and speed of heating.
In conclusion - about money
Sections, as a rule, are somewhat cheaper: you should not expect significant savings, but a penny will save the ruble. If a Warmstad mat for 6 square meters costs 6,300 rubles, then a section with the same power from the same manufacturer will cost less than 5,500 rubles. Let's add mounting tapes for a hundred or two and there is still a noticeable benefit!
Heated floors in sections are a more advanced system that provides more installation options. In return, this floor requires careful calculation and cable layout. If you are not sure that you can do the whole complex of work yourself, or if installers are new to such tasks, it is better to spend a little more and purchase a mat that is guaranteed to heat evenly.
Read other articles from our magazine:
Recommendations for screeding
All activities related to ensuring the flatness of the floor using cement-sand compositions must be carried out in accordance with the requirements regulated by building codes and regulations.
SNIP specifies the main parameters that cement screeds must have:
- minimum permissible thickness;
- strength characteristics;
- the need for waterproofing;
- size of the layer covering communications;
- the need for reinforcement with reinforcement;
- requirements for the location of expansion joints.
Depending on the composition used for its implementation, the thickness varies. The minimum thickness of the composition based on sand and cement, according to the requirements of SNIP, for residential premises is at least 20 mm. For cement mixtures with the addition of polymer fibers, the tolerance is reduced to 15 mm. The rules stipulate that when ensuring a slope of the surface, the minimum thickness of the screed in areas located next to trays and ladders must be at least 20 millimeters. Deviation from flatness should not exceed 4 mm.
When pouring a cement screed with their own hands, home craftsmen rarely pay attention to the requirements set out in SNiP
A barrier for waterproofing is necessary in situations specified by SNIP, when there is a possibility of waterlogging of the layer.
If the thickness of the screed is more than 5 centimeters, it is subject to reinforcement. This requirement is prescribed by building codes and regulations for residential premises in which small and medium forces are applied to the floor surface. Thanks to the reinforcement, the base of the floor acquires additional strength and does not crack. With a smaller thickness, mandatory reinforcement is not required. If necessary, steel rods are installed, for example, if the floors are operated under conditions of temperature changes. Rough cement coatings are not reinforced with reinforcement, since the main forces are absorbed by the layer on top.
Expansion joints are indicated on the coating technological map, which takes into account all parameters. The document is necessary when arranging large areas. It is a project containing information about the order of operations, the properties of the materials used, the location of the seams and the distance between them, which should not exceed 6 meters.
The standards provide for screeding if required:
- Plan the base surface.
- Cement the lines.
- Distribute efforts evenly across layers.
- Place the floor on a slope.
- Ensure thermal insulation of the floor in accordance with regulations.
The surface created by builders must necessarily comply with the requirements of SNIP both in terms of design features and operational characteristics and perceived effort. Technical requirements for underlying layers and load-bearing soils are regulated by sections of construction regulations.
The tables attached to building codes provide data for selecting the coating required for a particular room and ensuring its strength.
Electric underfloor heating cable or mat
- Registration: 04/27/09 Messages: 144 Thanks: 12
LucyM
Live here
Registration: 04/27/09 Messages: 144 Thanks: 12 Address: Voronezh
Electric underfloor heating cable or mat
I didn’t find a more suitable section for the topic, moderators, please move it to the right place, if possible.
There is a new apartment in a high-rise building. We are planning to have heated electric floors in the bathroom and toilet. I read that the cable is more economical to use than the mat, and also cheaper to purchase. The builders poured the preparatory screed higher than necessary, 1.5-2 cm remained to the level of the finished floor, of which 1-1.5 cm will go to the tiles with glue. It is clear that a mat with glue installation suggests itself, but still the question is - what will be bad if I put NOT a mat, but a CABLE (recommended screed height is 3-5 cm)? Are there really no options?
- Registration: 05/07/15 Messages: 85 Thanks: 33
subnus
Live here
Registration: 05/07/15 Messages: 85 Thanks: 33
Place the cable in glue, since there is a decent choice on the market.
- Registration: 08/16/15 Messages: 7 Thanks: 1
obogrev61
Participant
Registration: 08/16/15 Messages: 7 Thanks: 1 Address: Taganrog, 1st Kotelnaya Street, 67
@LucyM, in this situation you only need to use a minimat, because if you lay the cable you will get a zebra effect so the distance between the wires is around 10 cm and the heat will not have time to cross. And under no circumstances should you lay thermal insulation, otherwise your tiles will swell. If you don’t have a first floor, then put a mat down and don’t be afraid of anything, because there will be a warm room under your apartment, and according to physics, heat tends upward, so your thermal insulation is your neighbors below)
- Registration: 08/16/15 Messages: 7 Thanks: 1
obogrev61
Participant
Registration: 08/16/15 Messages: 7 Thanks: 1 Address: Taganrog, 1st Kotelnaya Street, 67
By the way, if you want, I can calculate it with a very interesting discount
- Registration: 04/14/16 Messages: 14 Thanks: 3
orbit7
Participant
Registration: 04/14/16 Messages: 14 Thanks: 3
You will hardly notice any difference in your electricity bills. depending on how you use it, of course. If your floor is always on and controlled by a mechanical regulator, then the electricity consumption of the screed floor will be slightly less than that of the mat. if you install a programmable thermostat and turn it on at a time, for example in the morning and evening, then in this case the screed floor will consume a little more than the mats.
- Registration: 04/14/16 Messages: 14 Thanks: 3
orbit7
Participant
Registration: 04/14/16 Messages: 14 Thanks: 3
Suxarrr, yes I wrote something in the wrong place, I meant that using a programmable thermostat will provide significant energy savings
- Registration: 10/12/15 Messages: 2,665 Thanks: 1,241
Suxarrr
Compositions and types of screed
A concrete screed for an electric heated floor will turn out to be of high quality if you select the correct proportions of materials and mix them thoroughly.
Cement and sand alone are not enough to prepare a screed. It requires plasticizers and additives that increase the plasticity and uniformity of the mass.
Might be interesting
Thermal insulation
Tables of comparative characteristics of thermal insulation…
Thermal insulation
Why polyurethane foam insulation is the best...
Thermal insulation
Self-adhesive thermal insulation: how to choose and apply?
Thermal insulation
What are thermal insulation materials: comparative…
Dry screed
Advantages of dry screed over wet screed:
- no special equipment is required: mixers, containers for solution, etc.;
- less effort is spent on delivering the material;
- speed of work completion (in 1-2 days);
- there is no need to wait for the screed to mature;
- the possibility of stage-by-stage installation of heated floors divided into zones;
- absence of dirt and excess moisture;
- low specific gravity of the screed;
- the floor acquires sound absorption and thermal insulation properties without the use of special materials, the price of which is sometimes high;
- the possibility of laying communications in the thickness of the material;
- the surface is smooth and ready for finishing floor coverings.
With all the advantages, the coating is quite light and durable. It will not withstand the load from an interior partition made of gypsum boards or bricks, but frame structures made of plasterboard can be installed on it.
Dry screed is not used in the following cases:
- if there is a slope in the room;
- in the presence of large dynamic loads (vibration effects or high intensity of human flow);
- in rooms with high humidity or the possibility of water spills on the floor;
- in cramped spaces where it is not possible to compact and level the composition efficiently.
When preparing dry screed, the following materials are used:
- Waterproofing film.
- Damper tape around the perimeter to compensate for temperature deformation.
- Dry backfill made of fine gravel, expanded clay, slag pumice, perlite. Instead, high-density insulation boards can be used, for example, extruded polystyrene foam, etc.
- The top layer is sheets of moisture-resistant plywood, asbestos cement, chipboard, OSB. They are also used for large thicknesses. The best option is to use waterproof gypsum fiber sheets that are suitable for any floor finish.
Manufacturers of building materials produce special complete and balanced dry floor systems. A whole line of Knayf dry screeds is produced for different types of premises. Among them, two-layer gypsum fiber boards with the possibility of assembly with locks are popular. For housing, “Vega” compositions are produced based on small expanded clay screenings in bags and other components.
When using industrial waste, for example, solid expanded clay or slag, for dry screed, the fraction size should not exceed 5 mm. Otherwise, the floor will begin to sag and creak.
The thickness of the backfill must be more than 30 mm, otherwise the required quality cannot be achieved. If the upper limit is higher than 60 mm, intermediate spacer sheets will be required. The top of the screed is additionally covered with a sheet covering, the thickness of which is about 20 mm.
The base for backfilling must be level.
Semi-dry screed
The screed is a cement-sand mixture with the addition of fiber fiber and plasticizers, but with a low water content. A distinctive feature is the large layer thickness of 70-100 mm. If the thickness is less, the layer may crack.
The advantages of semi-dry screed are its heat and sound insulation properties due to its porous structure.
The disadvantage is the need to use construction equipment, but in small rooms the screed can be laid manually.
The ratio of components, which include cement, sand and water, is 1:3:0.4, respectively. Fiber fiber is added to them in an amount of 600-800 g/m3.
The screed is laid using beacons, similar to the wet method. A special machine is used for grouting, which can be rented. It is difficult to compact the screed manually.
Seal semi-dry screed
Wet screed
A screed is a layer of mortar or concrete applied to the surface of the base.
It is laid in several layers, the functions of which differ:
- Leveling the base. The first layer is always used for uneven surfaces. It is necessary even when a dry screed is placed on top.
- A layer on top of thermal insulation for laying heating elements. If the cable touches the insulation, it may overheat at this point.
- The third layer covers the heated floor, evens out the temperature field and holds the floor covering in place. It is often combined with a second layer, if the thermal insulation is covered with a waterproofing film on top.
In all cases, it is advisable to reinforce the layers to prevent them from cracking and maintain the integrity of the heated floor. At the same time, the thickness of the floor increases significantly, which leads to a decrease in the height of the premises. It can be reduced through the use of leveling compounds.
The classic screed is cement-sand. But the composition is not limited to just two components. Plasticizers are added to it, as well as crushed stone or expanded clay. A mixture of 3 parts sand, 1 part cement and PVA glue, added in an amount of 1 kg per bag of cement, works well.
Cement-sand screed for heated floors
When using ready-made mixtures, high quality screed is achieved. Each composition has its own preparation instructions.
Any heated floor must be installed on a flat surface. To obtain a level base, a regular cement-sand mortar is used, and leveling compounds are most often placed under the finishing coating. Their cost is high, but the filling is perfect.
The thickness of the tie depends on the diameter of the cable and is 3-5 cm. If it is made smaller, the required strength of the slab and uniform heating will not be ensured.
When cracks appear in the screed, the reliability of the heated floor decreases sharply. Due to the violation of the integrity of the layer, the heating of the floor becomes uneven. Areas with high temperatures appear, as a result of which the cable overheats and its service life is reduced.
The technology for laying the screed must be performed correctly. The strength of the cement takes 4 weeks; no work can be carried out during this period. It is important to ensure uniform fixation of the layer. To do this, cover it with film and keep the surface damp.
The main screed is installed after leveling the base and laying the cable. First, a damper tape 10 cm wide is rolled out along the perimeter of the walls from below and secured with tape in places adjacent to the subfloor. It is also placed in places of transition to other rooms.
Cracks will not form in rooms larger than 40 m2 if they are divided into rectangular zones and T-shaped strips of porous material are laid between them. Damper tape is not suitable here because it is flexible. Thin foam sheets are usually used. Where the cable passes through expansion joints, a short corrugated hose is put on the cable so that it does not break due to temperature deformations.
A reinforcing polymer mesh is placed under the cable. It should be rigid and located at a distance from the insulation.
The laid heated floor must be tested - apply voltage and check the uniformity of heating.
In order for the screed to be exactly horizontal, beacons should be installed at a given height. A laser level is used for this. If it is not there, the usual one is used, but then the upper boundary of the fill should be drawn on the walls.
The first beacons are installed at a distance from the wall, and the next rows are made at a distance slightly shorter than the rule. Beacons are made using a solution, after which you need to wait for it to set.
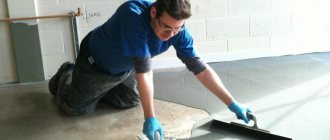
Laying screeds along beacons
The heated floor is poured with careful leveling and filling of all voids manually. The solution is poured 1 cm above the level of the beacons and compacted with a hand tamper. Then another layer of screed is applied on top and pulled out using the rule. After this, you should immediately rub the surface with a trowel, making circular movements. At the same time, the horizontal level is regularly checked by adding solution to the holes and removing excess.
The work of pouring the screed is done within one day with minimal interruptions during manual mixing.
The drying surface is covered with a film and moistened for a month until the concrete matures. If you rush and turn on the heated floor earlier, it will crack and all previous work will be done in vain. In addition, removing a frozen screed will not be easy.
The nuances of choosing high-quality sand concrete and cement in bags and the features of pouring screed
To the stage of pouring the screed so-called. Some developers do not treat the “wet type” responsibly enough, making mistakes when choosing a ready-made sand concrete mixture M300 or violating the proportions when preparing the solution themselves. For example, they use a lot of water to give the mixture greater mobility and increase its life time during the laying process, which leads to a decrease in the strength of the screed and an increase in the likelihood of cracks.
Maria A
I want to make my own mixture for pouring sand concrete screed. Questions: how to choose the components of the mixture and what additives are best to use?
Another common question from portal users is: what is better - using ready-made sand concrete or preparing your own mixture from high-quality cement in bags.
Anna Ruzhitskaya
In terms of convenience, reliability and stability of the result, it is better to use ready-made dry mixtures (sand concrete). For these mixtures, the maximum sand grain size is regulated, i.e. In production, seeded sand is used, the cement-sand proportions are strictly maintained, and the crack resistance parameters of the hardened mortar are checked.
Please note that mixtures from trusted manufacturers undergo thorough quality control at all stages of production and meet all GOST requirements. The mixture, precisely measured by weight, is delivered to the site in reliable packaging - 40 kg bags.
To install a screed on a warm floor, it is better to use a “wet” screed.
A semi-dry screed differs from a wet screed in that it uses a small amount of water necessary to mix the cement-sand mixture.
Therefore, it is difficult to distribute and compact the semi-dry screed efficiently, taking into account the installed underfloor heating system - mounting tape and thermal cable. When the density of the cement stone decreases, due to the formation of air cavities, the heating efficiency decreases, because The thermal conductivity of the screed decreases.
When preparing sand concrete for screed yourself, special attention should be paid to the quality of the ingredients. The sand should be coarse, sifted, without clay and other harmful impurities (shells, plant remains, contamination with petroleum products, etc.). When choosing the proportions of the mixture, you should remember that sand can have different humidity levels, which affects the required amount of mixing water.
When working with ready-made dry mixtures, pay attention to the availability of information with recommendations on basic recipes and exact proportions for preparing the main types of solutions. This simplifies the work of builders.
The quality characteristics of sand concrete and screed can be improved by using plasticizers and fiberglass.
Semi-dry coating
Today, many people prefer dry mixture for laying screed. It is less problematic to pour than a cement-sand mixture. This installation method has its own characteristics. The semi-dry mixture is considered stronger than ordinary cement. After pouring, the drying period is much shorter, which makes it possible to finish laying heated floors faster.
Experts say that the material does not crumble or collapse under the influence of heat emanating from the pipes. It is easier and more convenient to work with this type of mixture.
Before laying the semi-dry mixture, you should carefully prepare the base. All debris is removed, the base is laid with a vapor barrier material. If there are deep cracks or depressions, it is recommended to fill them with a viscous cement solution. Rolled materials are laid with an overlap, and it must also overlap the walls. The seams are treated with special tape. The semi-dry mixture is poured onto the finished base.
The mixing proportions that should be used are indicated on the packages of the semi-dry mixture. The consistency of the material should not contain a lot of water. If you squeeze it in your hand, you get a dense lump. Moisture should not flow down your hand. In this way, they check that the ingredients of the mixture are mixed correctly. Very often, fiber fiber is added to the dry mixture to make the coating even more stable. The fiber is well distributed throughout the structure in all directions.
The minimum thickness of the screed will be 4 cm. Its height also depends on the method of laying the pipes themselves and what material they are laid on. The floor and its maximum height can reach 20 cm. If the base for pouring has significant unevenness, the height must be raised significantly. In general, the thickness will be at least 4 cm and no more than 20 cm.
The coating may be destroyed by improper drying methods. Just because you can walk on the floor does not mean the grout is truly dry. A liquid cement-sand mixture 4 cm high takes at least a month to dry. The mixture prepared from dry materials dries within several days, depending on the height of the coating. In order for the material to harden correctly and without cracking, the surface should be moistened with water and covered with film. As a result, the base will not sag, will dry well and will not crack.
The size of the water coating depends on the type of fill and the characteristics of the base. The more significant irregularities on the surface, the higher the structure will be. This happens due to the application of several layers - this is a necessity to achieve the zero level.
Based on experience, experts say that the relative total height of the warm water coating is 10-15 cm, taking into account absolutely all materials used, including the floor covering.
Water cover height
When planning heating with a warm water floor, you should take into account the rise of the surface by several centimeters. If the coating is laid in an apartment, its thickness is of particular importance, as pressure may arise on the slabs. It is advisable to avoid this. In this regard, in multi-storey buildings they prefer to do without concrete screeds; special metal structures are used for heated floors.
However, this does not mean that the screed will become lower. The base will rise in any case to a height of at least 10 cm in general. In order to correctly determine how much the coating will rise, you should decide on the type of rough screed. That is, how it will be made and from what material. These factors greatly influence the thickness of the warm coating and its quality.