Do you want to seriously renovate and update your apartment? Then it will not hurt to know that one of the most basic stages of major home renovation is replacing old plumbing and pipes with new ones. In addition, this is the most impressive item of expenditure in the budget allocated for this work.
Reducing already impressive costs is a normal desire of every prudent owner. Do you agree? It’s quite possible to reduce them: installing plumbing fixtures yourself will help. We will tell you how to do the wiring, how to move and connect plumbing equipment, and what tools and materials are needed.
You will learn how to change the pipes in the bathroom and connect plumbing fixtures yourself. And in order to make it easier to understand the repair issue, the article provides thematic photo guides and video instructions.
Which is better: series or collector circuit?
Today, two generally accepted wiring schemes are used - serial and collector.
The sequential (or as plumbers also call it, tee) system is considered classic. It is used in all standard apartment and private buildings with small bathrooms.
The system is very simple - from the central risers, through which hot and cold water is supplied to the apartment, it is laid under one main pipe, from which every plumbing fixture in the apartment is powered.
For each device, a tee is cut into the pipe. Thus, the entire length of pipes in a house or apartment is relatively short, so this wiring option is considered the most inexpensive
The amount of work involved in installing bathroom fixtures with your own hands is also not very large. However, this is where the advantages of the sequential circuit end. The main disadvantage of this type of connection is that all devices are powered from one pipe, and when one device is working, the pressure in all the others drops.
That is, when the washing machine pumps water, the pressure in the kitchen tap will be very weak, and vice versa.
Another drawback lies in the shutdown method. If one plumbing fixture breaks, then in order to repair it, you will have to completely shut off the water in the apartment. The collector system is used in those houses where there is a large load on the water supply system. In this case, all plumbing points are connected to the collector.
The manifold is a large-diameter distributor with a certain number of outlets. A separate tap is installed for each outlet
Most often, the collector is hidden in a special cabinet or closed niche for aesthetic reasons. Each plumbing fixture is connected to the collector separately, through a personal outlet. This connection method will require a large number of pipes, and installation work will take a lot of time.
Although you will have to tinker with connecting such a system, the advantage is obvious: the pressure in all plumbing fixtures will be stable under any mode of operation of the water supply system.
In addition, each device can be turned off or dismantled if necessary. In this case, there is no need to turn off the water completely - just turn off the tap at the desired outlet.
Modern piping systems
Polymer and metal-polymer pipes have practically replaced traditional steel and copper products from this area due to a number of advantages. Such pipelines are not subject to corrosion, their inner layer is resistant to abrasion and does not contribute to the accumulation of deposits. Thanks to this, the diameter of the pipe bore remains constant throughout its entire service life (at least 50 years). An important property is the high degree of hygiene of the pipes. Moreover, the installation of such pipes is simple and does not require much time.
Metal-polymer pipes
The most common type of pipes used in water supply systems is metal-polymer. They consist of an inner layer, usually made of cross-linked (PEX) or heat-resistant (PE-RT) polyethylene, an aluminum shell, an outer protective layer and bonding layers based on adhesives.
The advantages of the pipes, in addition to excellent operational properties (working pressure 10 atm at a maximum temperature of 95 degrees), include a low coefficient of thermal expansion, as well as high stability of the shape specified during installation (the pipe does not unbend spontaneously). A wide range of fittings are available for metal-polymer pipes. There are crimp, or compression, fittings and press fittings (mounted using press pliers).
Metal-polymer pipes are produced by many companies, for example OVENTROP (Germany) under the Copipe brand, VALSIR (Italy; Pexal pipeline complex), PRANDELLI (Italy; Multirama products), GEBERIT (Switzerland), ALTAIS, METALLOPOLYMER (Russia).
How to properly connect a regular sink?
First you need to calculate the installation height of the sink. In most cases, it is no more than 80 cm. However, if there are small children in the house, the washbasin can be lowered a little. Once the height is determined, we place a mark on the wall.
Focusing on it, we mark a horizontal line on the surface of the wall. After this, you need to measure the width of the back wall of the washbasin and set this distance down from the mark.
Detailed diagram of the installation of a washbasin in the bathroom, indicating all dimensions. Usually instructions and drawings are included with new plumbing fixtures
Before attaching brackets to the wall, you need to accurately calculate the distance between them. This is not difficult to do: turn the washbasin over and place the brackets on top so that they fit into the special grooves. Next, measure the distance between the brackets and transfer it to the wall.
Now you can make holes, beat dowels, tighten bolts. Next, you need to install the faucet on the sink, then secure it with bolts and washers, check the level of the sink and secure it with nuts.
We install a rubber gasket on the drain hole and mount the drain, connecting it to the siphon. Using an adapter, we connect the siphon outlet pipe to the sewer. Using flexible hoses, we connect hot and cold water to the mixer.
Cost of services for designing water supply and sanitation systems in an apartment
| Name and composition of the design documentation section | Cost, rub/m2 |
| 1.Water supply. | |
| — Explanatory note; | 23 |
| — Balance of water consumption; | 23 |
| — Floor plans with routing of drinking water, fire and process water supply lines; | 23 |
| — Schematic diagram of the drinking water, fire-fighting and process water supply system; | 23 |
| -Hardware Specification; | 23 |
| 2. Sewerage. | |
| — Explanatory note; | 23 |
| — Balance of water consumption; | 23 |
| — Floor plans with tracing of domestic, process sewerage and internal drainage; | 23 |
| — Schematic diagrams of domestic, process sewerage and internal drainage; | 23 |
| -Hardware Specification; | 23 |
| The cost of a comprehensive project for all sections will be 110 rubles/m2 | |
| The minimum cost of the project is 15,000.00 rubles |
Reviews about the company
Recommendations for installing a toilet
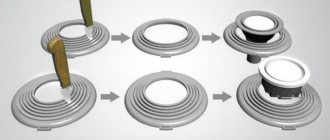
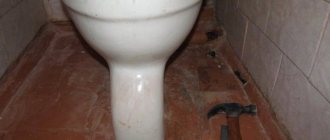
The most popular toilet model is floor-standing. If the bathroom floor is tiled with ceramic tiles, you need to place something soft under the toilet - for example, a piece of linoleum or rubber. To connect the toilet to the sewer, you need to use a special cuff. One end of it is connected to the toilet outlet, and the other to the sewer pipe.
The toilet is attached to the floor with special pins, which are inserted into dowels fixed in pre-made holes.
The toilet is usually sold already assembled. All you have to do is attach it to the floor and connect it to the water supply and sewerage system.
In some cases, the toilet is glued to the floor using epoxy glue. In this case, the toilet cannot be used for approximately 12 hours until the glue has completely hardened.
Basic methods of pipe laying
During a major overhaul, the piping circuit in the bathroom can be made in an open or closed form.
Open installation
Open laying of wiring
With open installation, all lines are laid in such a way that at any time you can get free access to almost all of its areas for maintenance or repair of leaks. In the open version, steel or copper piping in the bathroom is usually used, since these materials cannot guarantee a reliable connection and are used mainly to create complex circuits. Recently, the installation of metal-plastic pipes in the bathroom has been actively used, since these products are connected by cold pressing or crimp nuts, which also do not guarantee reliability and require regular technical inspection.
However, the installation of plastic or metal pipes in the bathroom does not always suit the owners, since open installation takes up significant space, and these products cost much more than propylene ones.
Closed styling
An example of closed wiring in a bathroom
Hidden piping in the bathroom is the most popular today, since it allows you to significantly save room space by laying pipes in the walls, however, the procedure requires additional time spent on planning and hollowing out grooves in the walls. In the hidden version, polypropylene wiring is used in the bathroom, since the connection of these products is made by hot pressing and is reliable, has a long service life and does not require regular maintenance.
Before laying plumbing in the bathroom under the cladding, it is necessary to additionally put a corrugated sleeve on the hot main, since polypropylene tends to expand when heated, and the sleeve will provide the necessary free space.
Connecting the drain system
Laying polymer drain pipes has recently gained wide popularity. This system consists of straight sections and connecting elements with special rubber sealing rings. Its installation is not particularly difficult.
From the point of connection to the riser, at a slight angle of inclination, a sunbed is laid to the most distant point to ensure unimpeded flow of water and avoid the occurrence of traffic jams inside the main line. A slope of up to four degrees is considered optimal. You can check the angle using a level or simply calculate it. Usually it will be enough to raise the pipe by a centimeter when removing it from the riser by one meter. The vertical and horizontal lines should be fixed to the wall using clamps.
The sun lounger is laid to the most remote access point at a slight slope
Along the path of the sun lounger, at all connection points, direct connections to the device are made using tee connections
In this case, it is important to ensure that the gasket-seal is in the correct position. To make it easier to pull it onto the connecting elbow, experts recommend lubricating the ring with vegetable oil or rubbing it with soap
When purchasing connecting fittings, pay attention to the angle of articulation. The best choice would be elements with bends of at least 45 degrees.
A smaller slope will promote the formation of blockages. It is desirable that the tees have inspection holes with special plugs. This design will greatly simplify further maintenance of the drain system and will help to easily clear blockages in the pipes.