A variety of materials are used to build a wooden house.
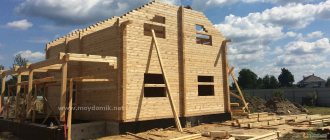
Recently, timber has been considered a popular material for the construction of cottages. It is lightweight, durable, warm, and easy to install.
A house made of timber can be built with your own hands quickly, in a short time, even without construction experience. The main thing is to know the technology and nuances of its construction. Today we will tell you how to build a house from timber.
Selection of timber
Timber is a material of square or rectangular cross-section, hewn on all sides. The correct choice of material requires deciding on its size, paying attention to the time of its preparation, and appearance.
It is best to purchase timber from wood harvested in winter. It contains a lot of resin, which will increase the service life of the material.
When purchasing, its dimensions should be checked with a tape measure so that they correspond to the sizes stated by the seller. The material must be inspected to see if there are any fallen knots, damage to the wood by bark beetles or other pests, and whether the surface of the timber is even. It is not easy to build a house from 150x150 timber with your own hands due to its heaviness. It is easier to take a beam measuring 150x100.
The timber can be regular, glued or profiled. To determine which one you need, consider the features of each of them.
Errors in the process
When constructing a wooden house yourself, you can make a number of mistakes that can lead to a reduction in the life of your home.
Possible errors are :
- Poorly thought out layout .
You cannot take the design of a brick or block building as a basis. Different buildings have their own design solutions. The project must be developed specifically for a timber structure. When drawing up a project, it is recommended to consult with a specialist. - Wrong choice of material . It is necessary to choose timber of the optimal cross-section, based on weather conditions and time of residence in the house (for year-round living it is better to choose lumber with a larger cross-section).
- Incorrect connection of beams . If there are no dowels between the crowns, they will sag over time and cracks will appear in the structure.
- Incorrectly arranged harness . If the first crowns are laid unevenly, the structure will quickly deform and cracks will appear, which will lead to a decrease in the service life of the structure.
- Refusal to treat with antiseptics . Without special impregnations, timber will rot faster. Solutions protect wood from rodents, mold and rot. There are impregnations that change the color of wood; they can be used for finishing the exterior of a building.
In order for the house to last as long as possible, construction technology must be strictly followed.
Ordinary construction
It is a blank of square or rectangular cross-section with planed edges. Its side can be 10-25 cm.
It is used for simple wooden buildings.
Due to the fact that it dries naturally, it shrinks to a significant extent during use. After a few years, cracks appear on it. Due to deformation and loose fit of the bars to each other, the cracks and gaps between them increase and require compaction and insulation.
Wall made of ordinary timber
A house built from ordinary timber requires reinforcement of corners and load-bearing walls. Before use, the material must be treated with antiseptic agents. Its cost is low. Subsequently, most likely, such a house will need to be insulated if you live in the middle zone and to the north.
Hand-hewn log houses
Logs of this type are processed manually, i.e. the bark is removed from them with an ax and a hand scraper. This is a wall material of natural moisture from pine, larch or cedar.
Pros:
- manual processing allows you to leave an outer, resinous layer on the surface of the logs, protecting the structure from atmospheric influences - environmental friendliness - houses are not inferior in appearance to structures assembled from rounded logs - looks beautiful and exclusive for specific buildings
Minuses:
- relatively high cost of construction - takes a very long time to dry (a pine log with a diameter of 32 cm dries in 1.5-2 years, and from larch - 5-7 years) - the need for many years of shrinkage of the log house seriously increases the construction time - the log house can only be built by specialists, such as very little - complexity of finishing
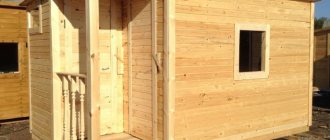
Profiled
Profiled timber is made from logs that are thoroughly dried before processing. The residual moisture content of the wood should not exceed 22%.
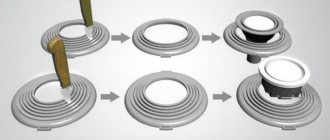
Profiled timber. Various profiles.
Profiled timber has a flat surface and ideal dimensions because it is made on a precision woodworking machine. It has a tongue-and-groove connection, which makes the house assembly process easier. The crowns are tightly adjacent to each other, eliminating the passage of air and moisture into the joints between them.
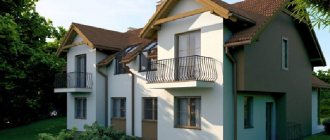
Structure made of profiled laminated timber
This type of timber also has its disadvantages:
Advantages and disadvantages
Before you decide whether to start building a wooden house yourself or hire professionals, you need to weigh all the advantages and disadvantages.
The advantages of self-construction are :
- the opportunity to build a house according to your own design;
- personal participation at all stages of construction;
- gaining experience in construction work;
- budget savings (no need to pay a team of workers);
- the ability to build a house in stages;
- confidence in the quality of construction.
There are also disadvantages to such construction.:
- waste of time and effort;
- you need to find an assistant, since it is impossible to build a house without outside help;
- the need to independently select and order material;
- low construction speed. The process may take years;
- Lack of experience can lead to mistakes in construction, which will lead to problems in the future.
If possible difficulties do not frighten you, you have the time, opportunity and desire to learn, then you can start building with your own hands.
Insulated
The best is insulated laminated veneer lumber. It arose recently, but its popularity is growing every year. Insulated timber retains heat much more effectively than regular timber. There is no need to additionally insulate the walls of the house. Insulated timber shrinks by only 1%.
A special feature of such products is the thorough drying of the wood before production to 12%.
Slats 5 cm thick are cut from wood. They serve as the side walls of the beam. The lamellas are fastened with jumpers that have special grooves. All parts are firmly glued together.
Further processing is carried out using extrusion equipment. The voids are filled with polystyrene foam or polyurethane foam.
Then the product is processed on a machine, giving it the required configuration and turning the grooves. The insulation must extend beyond the timber so that the parts fit tightly together during assembly.
The insulation in such timber can also be ecowool. It insulates the room from the inside. Glued laminated timber with voids is made, the ends are closed. The voids are filled with ecowool using special equipment under pressure. The result is an insulated eco-wool beam.
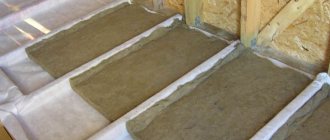
When insulating walls, it is important not to forget about insulating the floor, since up to 20% of heat loss occurs through the floor.
Project development
Before building a house, it is important to develop its design.
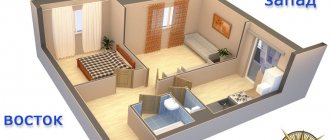
Design begins with drawing up a sketch of the future building. This is a drawing diagram of the location of the premises in it. When designing, one should take into account the climatic and natural conditions of the area: wind rose, groundwater level, depth of soil freezing. In the project, you should also note what type of timber is used and what type of wood it is made from. It is important to show how the wood is processed and how it is painted in order to predict the degree of its shrinkage.
In the process of developing a project, the stages of construction are taken into account, the time to complete the work is calculated, and an estimate is drawn up. A detailed drawing of the house is made. It notes the number of rooms, their sizes, and calculates the area of the stairs. The roof is being designed. Lastly, drawings of utility lines are drawn up. The project can be done independently or ordered from qualified specialists.
Top 10 programs for self-design
Of course, now special programs are used to create projects, at least their drawing part. They come in different varieties, from the simplest ones, where you can create a sketch, to advanced options for real professionals. Here are the main design programs and utilities:
Google SketchUp.
The program is designed for an inexperienced user who knows about design only by hearsay. Of course, you will need some knowledge, but there are enough tips there. The program is used for designing 3D models, sketches, general plans and general plans. Rather, it refers to design utilities, since the drawings there are very mediocre, not according to GOST. Such a program is quite suitable for those who know what they want from a design organization, but cannot explain - only show. In this program it will be very easy to do this, and with good PC skills, it will also be quick. The program can be both paid and free.
Revit.
This program is intended primarily for professional designers. At least that's what its developers say. It is a budget copy of AutoCad, but its advantages include the possibility of arranging furniture indoors (special blocks). The program is quite new and not very popular due to its relative crudeness. Their bold decisions - the opportunity to work collectively on a project. But there is no official localization, so knowledge of English is required to master it. The program is shareware: it provides a trial period (30 days), after which it requires activation. This will be enough time to master it. Also, during this period you can understand whether it is worth the money requested or whether it is better to switch your attention to other analogues.
AutoCad.
Perhaps one of the most famous and popular programs for both professionals and amateurs. There is no unnecessary information in this product, the training is very primitive. But the interface is intuitive and does not require a separate manual for each block. Starting from version 2011, it is possible to simultaneously design both an object in 2D and 3D. This is very convenient for those who are designing an entire building. The only thing that can cause difficulties is the bottom status bar with unclear symbols. Once you get used to them, you simply won’t be able to draw without using these functions. And since the 2012 version, each function is written in Russian, so it won’t be difficult to understand. Regarding the price, the product is quite expensive, but support for older versions remains after the purchase and release of a new one.
SweetHome.
A program that you won’t be able to master properly without special training and watching videos about working in it. Of course, it is quite simple and understandable, but its structure is made in an extremely illogical way, which is not typical for products in this segment: design and construction are areas of activity where there is a completely direct and rigid logic. One of the advantages of the program can be emphasized that it is quite suitable for designing the interior space of a room, that is, arranging furniture and equipment. To do this, just save the drawing from another program in a format in which SweetHome can read and arrange the furniture. In general, it is quite suitable for interior planning.
FloorPlan 3D.
An excellent program for drawing up preliminary designs, as well as for planning both external and internal. He also copes well with the task of creating territory improvement projects. Another advantage is that during design, certain materials are selected (for example, brick) and with continued use, the program remembers this. Of course, you shouldn’t expect drawings from her, but she copes with her planned tasks quite well.
ArchiCAD.
The product is very similar to AutoCAD. But only this program is more adapted for design. Unlike its “little brother”, it has visualization, in addition to drawings. One of the main features of the program is that at the end of the project, you can display almost all the necessary documents for this task, which will indicate both the materials and the dimensions of the project. Landscaping of the territory, including the surrounding area, is carried out perfectly by the product. Among the negative factors, it is worth noting the difficulty in mastering, since it is a product for professionals, as well as the very high cost. Just like other products of this company, there is a free trial period.
Arcon.
Another program for interior space planning. Unlike its analogues, the approach to design here is quite professional, but intuitive. Allows you to import blocks (for example, furniture) from other programs. Allows you to design the layout of not only residential premises, but also office and industrial facilities. There is no free or trial version, but there are 2 paid versions: with unlimited and limited functionality.
Autodesk 3ds Max.
Professional 3D modeling program. One of my favorite design programs. It creates not only sketches of construction projects, but also other models, including animations with pictures. Models of cars or some household appliances and machines are also made in the same program. The interface is complex; training in using this program is required. The price of this program is very high, and it also requires certain powerful technical characteristics of the computer.
KZ - cottage.
A specially created program for designing houses made of wood and timber. Therefore, it has a very extensive, but narrowly focused functionality, which is fully implemented. Just like in ArchiCAD, there is documentation for the project, including material consumption. The disadvantages include problems with the program itself (problems with saves).
Chief Architect.
Program for designing frame houses. Just like the previous one, it is highly specialized, therefore it has very extensive functionality in its field. The program allows you to make project drawings. Unfortunately, the Russian language is not there, although the developers promise to add it.
Budgeting
The estimate is compiled in the form of a table. It includes all materials, tools and equipment, construction work and their cost.
The estimate should include:
- wall construction costs. The amount of financing will depend on what type of timber you purchase and its diameter. Wall costs also include insulation, fittings and fasteners;
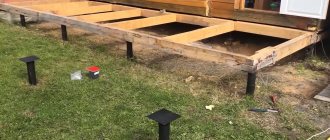
- costs for arranging the foundation and subfloor. They are sometimes reduced by using a lightweight type of foundation for the construction of a log house;
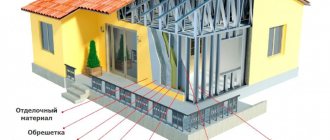
- costs for finishing materials inside and outside the building. To determine the financial costs of them, it is important to know the area of the external and internal walls;
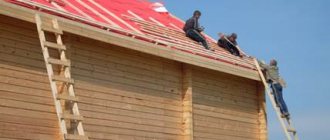
- roof installation costs. These include the costs of roofing materials, fasteners, insulation, waterproofing film, timber for rafters and sheathing. The amount is determined by the roof area;
- If you invite specialists for construction, then the estimate also includes financing for their work. If you do the house construction work yourself, then you can skip this section;
- communication costs: electrical wiring, sewerage, water supply.
Construction stages
A one-story house made of timber is built in the same way as houses made of other materials. But there are some nuances to its construction. Let's consider the stages of its construction.
Site preparation
To prepare a site for the construction of a new house
- dismantling old buildings;
- trees and bushes that interfere with construction are cut down. Trees growing near the foundation can cause damage to it;
- clear the construction site of debris and stones;
- remove the fertile layer of soil to prevent the growth of vegetation;
- The terrain is leveled for the construction of the house. Remove excess soil from the hills and fill in low-lying areas.
Purchase of materials
Materials are purchased according to the estimate. It is important to buy building material right away, because the moisture level of the timber may vary from one purchase to another.
In addition to timber, you will need:
- roofing materials;
- edged and unedged boards;
- insulation;
- it is important to purchase windows and doors;
- fasteners: staples, screws, nails;
- hand tools;
- waterproofing film.
Timber processing
The material must be prepared before starting construction:
- First, it is treated with antiseptic agents to prevent the appearance of pathogenic microorganisms, mold and mildew. It is important to wait until the product is well absorbed.
- Then fire retardants are applied to it. They have a greenish or yellowish tint, so they are used to cover materials for painting. Fire retardants protect against fire. When ignited, they foam and the wood burns more slowly. They do not wash off, so it is enough to treat the timber once.
- After this, coating materials are used: varnishes, stains. When they interact with air, they polymerize, forming a film that is durable and resistant to various influences. The building is thus protected from ultraviolet radiation and water.