A garage can be more than just a great place to store a car. A cellar and inspection hole are made in the garage. And many experienced car enthusiasts have at least a small area to work there. Even if a workbench is installed and there are shelves, we can already say that the workspace in the garage is equipped.
Today we will find out how to do everything as practically and rationally as possible, how to use every centimeter of space with the greatest efficiency. Let's find out what you need for a comfortable, functional workspace in the garage. Let's look at all the important points and lots of useful tips.
We start with cleaning the garage
First of all, it is important to take care of increasing the usable area of the garage. You will need to remove everything unnecessary, and also review the basic rules for storing things. For example, something will have to be removed completely, something will have to be moved to the cellar, and some items will have to be grouped and arranged correctly, freeing up additional space.
Here's what experienced garage workers advise: be bold when throwing away unnecessary things. If you do not use these items for a long time, they will not be useful to you in an important matter, for example, in car repair, you should probably get rid of these things. After all, they can lie like that for years, and you won’t even touch them. It is better to immediately remove such “dead weight”. Moreover, in the garage there is always a shortage of space.
We are renovating the garage
If you have already thrown away all the things that are not actively used and are not of particular value, and have thoroughly cleaned, it’s time to start repair work.
Please note: the garage needs to be repaired every year. If there are no serious problems, major repairs are not required; cosmetic repairs should be carried out in any case. This way you will make your garage cleaner, more comfortable, and will also significantly extend its service life.
It is imperative that you especially diligently repair the walls of the building. With a thorough inspection, you will be able to identify even minor cracks, chips, and gaps formed between the ceiling and the walls. Each defect must be corrected to ensure structural integrity, adequate waterproofing and thermal insulation. Try to do everything efficiently, and not just mask defects. Everything should become airtight and reliable.
Stage four - pouring the foundation
An affordable and simple foundation, optimal for pouring a garage, is rubble concrete. It is done very simply - rubble stone is laid in rows in a finished trench, after which each row is filled with cement mortar. And so on until the very top is filled.
A properly made foundation is the key to the durability of the garage, since the likelihood of cracks and the degree of shrinkage of the building itself depends on its quality. For this reason, when making a brick garage project and bringing it to life, you should not skimp on materials.
For the solution, the highest available grade of cement, water, plasticizer and sand are used. To make mixing easier and increase the speed of work, it is better to use a concrete mixer.
Approximate ratio of components for high-quality concrete:
- 10 kg of cement;
- 30 kg of sand;
- 40-50 kg of crushed stone or gravel.
Add water, focusing on the desired consistency of the solution.
You can fill the foundation without using rubble stones, but then you will need more mortar, and you need to add reinforcing mesh in the trench itself.
We insulate the garage
Of course, in order for your workshop in the garage to function adequately at any time of the year, regardless of the weather and air temperature, you will definitely need high-quality insulation. There are now quite a lot of materials for thermal insulation. You can choose the best option, taking into account the planned renovation budget, as well as the personal wishes of the garage owner. Car enthusiasts quite often choose foam plastic as the main insulation for walls. It is also necessary to insulate the garage roof and floor. Let's consider all the important points.
We insulate the walls in the garage
Let us briefly dwell on the most essential information. You will need special glue or fasteners for reliable installation, as well as the foam board itself.
- Take a more responsible approach to choosing foam. You need a dense material with good technical characteristics. For example, polystyrene foam 10 cm thick is suitable. You can make insulation in two layers.
- Reliability of installation will play a huge role. It is necessary to glue the slabs to the walls carefully, ensuring high quality adhesion. There is no need to save on the adhesive composition, since the final result of the work will largely depend on this. Try to minimize cold bridges.
- The protection of the insulating layer is of great importance. Polystyrene foam itself will not be able to cope with mechanical stress, as well as temperature changes and wind loads. It is necessary to protect the foam from all negative factors using a layer of plaster. The best solution is to install a plastic mesh on the insulating layer. It is this that will become a reliable base for plaster. You can also pre-prime the surface.
- When insulating the garage from the outside, it is worth thinking about the top layer. It is at the top end that additional protection is needed. A good option is to make special canopies to ensure tight connections.
If you do everything correctly, your workspace in the garage will be comfortable at any time of the year, even in the cold. Without high-quality insulation, even good heaters will not solve the problem. Therefore, thermal insulation is necessary.
Roof insulation
The roof must be insulated outside and inside. Of course, you need to ensure good sealing and waterproofing. Then the insulating layer will perform its functions well.
Let's dwell on the most significant features of the work.
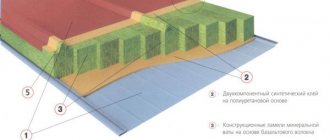
Select high-quality materials for arranging the internal insulating layer. Polystyrene foam and mineral wool are suitable. The materials are attached to the slabs onto a frame structure. A layer of waterproofing is required. Then they make the usual “layer cake” from insulating material, film and outer cladding.
When the roof has a standard structure, it is especially convenient to insulate it from the outside. First you will need to secure the polystyrene foam boards to the roof. Then you need to plaster it and wait until it dries completely. Then a layer of roofing material is rolled up. This is extremely important to ensure reliable waterproofing, otherwise the thermal insulation layer will begin to quickly deteriorate. During the work, you can also make end protection of the walls of the building using roofing felt and plaster.
Floor insulation
The garage floor also needs your attention. It is advisable to take thermal insulation measures during the construction of the garage. If this has not been done, you should think about installing a new insulating layer on the floor. As materials, you can use foam boards or spray polyurethane foam. Remember that insulation must be combined with waterproofing.
Insulating garage doors
Garage doors often become quite a vulnerable spot. It is on them that many cold bridges are formed, and even ice may appear. It is important to monitor the quality of the gate insulation. Here are some interesting points.
- When the gate is made on a frame with many ribs, you don’t even need to make a special sheathing. In other cases, it is necessary to additionally install the sheathing. A mesh made of wood or a metal corner is suitable. Of course, the insulating material can already be securely fastened to the sheathing.
- You don't even have to remove the gate structure from its hinges. It is quite possible to carry out all the thermal insulation work “on weight”.
- Once you've done the sheathing, it's time to attach the insulation. Mineral wool is attached to the adhesive composition. The foam can simply be pressed into the mesh, since then the surface will still be finished.
If the main work is completed, you can sheathe the gate. The material is needed with waterproofing properties.
Selection of building materials
The choice of materials is determined by several factors:
- climate of the region;
- the purpose of the future superstructure;
- load-bearing capacity of an existing building;
- financial capabilities of the property owner.
You can build a 2nd floor from foam blocks cheaply and quickly.
In most cases, preference is given to the lightest materials that have sufficient strength and level of thermal insulation.
- Wood. The timber and boards are used for the construction of frame walls, floor and ceiling beams, and the roof truss system. Excellent for residential extensions. Easy to process, but prone to rotting and fire.
- Metal. Profiled pipes and sheets are lightweight, presentable in appearance and easy to install. Rather, they are suitable for utility rooms or summer living rooms, as they are thermally conductive and transmit sounds well. Over time, iron rusts and needs to be replaced.
- Brick. An excellent operational solution. The material is strong, durable with high insulating properties. There are certain difficulties with financial costs and the masonry process, but the end result is worth it. In this case, it is necessary to have a strong foundation and brick walls of the first level.
- Foam block. The stones are light, large, with smooth edges. The level of thermal conductivity is close to natural wood. The large size of the blocks greatly simplifies construction and reduces its time. Please note that the material is fragile and hygroscopic. It is necessary to waterproof the surfaces and install an armored belt under the ceiling.
- Sandwich panels. Almost perfect solution. The products combine excellent insulating qualities, are strong, airtight, durable and easy to install. There is only one minus - high cost.
It is recommended to purchase materials with a reserve of at least 10% to compensate for losses during delivery, storage and errors in calculations and construction.
Cosmetic repairs in the garage
Of course, cosmetic repairs in the garage are also needed. The space can be made comfortable, cozy, pleasing to the eye. When a workshop is set up in a garage, the car enthusiast plans to stay there for quite a long time. And it is important to create a good atmosphere, to make the garage comfortable.
A good solution is to use practical materials. It is good to combine functionality and aesthetics. For example, having made the walls washable, it is quite possible to choose pleasant light colors. The garage will immediately become lighter and more spacious visually, because it is in this room that traditionally there is a lack of space and light. Don’t waste time on cosmetic repairs: with its help you can literally turn your garage into a second home, comfortable and cozy.
Fifth stage - laying walls
Scheme for creating a brick wall.
A month has passed - the foundation has completely dried out, and you can start laying the walls. Depending on the region, you can take a thickness of one and a half bricks for colder areas, and one brick for areas with a warm climate.
When installing, it is important to follow several rules:
- No distortions - the masonry must be extremely even.
- Having decided on the scheme for laying sand-lime bricks, stick to it until the work is completed.
- The mixing of the solution must be correct and the same throughout the entire work. Once you have chosen the ideal proportion, maintain it constantly.
- The thickness of the seam should not be more than one centimeter. For ease of laying, you can use a sample strip 8 millimeters thick when laying out the bricks.
To work you will need:
- shovel;
- buckets;
- a large capacity container for mixing mortar or a concrete mixer;
- pick;
- bricks;
- Master OK;
- fishing line or lace;
- plumb line;
- building level.
To build walls, chain masonry is used, when one row of bricks overlaps the seams of another row. In the outer row you can use facing bricks. It is necessary to start laying from the corners, laying them out using a building level.
Next, a fishing line is stretched between the resulting angles. It should be flush with the top of the brick. It is important that the lace is pulled tight enough and does not sag.
Now you can begin the laying itself. New rows of bricks are placed from the corners flush with the line, adjustment is carried out using a pick or trowel. After the row is laid along the perimeter, the lace rises to the level of the next brick and the work continues.
We pay special attention to the corners and the strictly vertical level of the walls, for which we use a plumb line.
If the roof is planned with one slope, it is necessary to ensure the required level of slope for water drainage. To do this, we make the height of the end walls different, and the upper cut of the side walls is inclined. For example, for a garage six meters long, the normal tilt angle is approximately 30 centimeters.
To do this, a slope of five centimeters is made on every meter of the slope. To maintain the normal level of the slope, you can use a cord.
The most important thing in arranging a workplace in the garage
To ensure that your workspace in the garage is truly functional, comfortable and practical, it is important to carefully consider its arrangement.
- Make your garage space overall comfortable. Take care of insulation, good ventilation and waterproofing.
- Think in advance about what types of work and repairs you will be doing in the garage. Make a clear plan for your workplace, write a list of necessary tools. Only after this do you start organizing storage systems and directly setting up a workshop in your garage.
- Remember that the workplace should be functional and comfortable. The main thing is that you always find everything you need easily and quickly. Parts and tools, accessories, electronics - everything needs to be kept at hand, in free access.
It is these moments that experienced garage workers advise you to pay attention to.
Dust collectors
Installing a dust collection system will be a real lifesaver for your garage. It will keep your workshop tidy and extend the life of your tools. With such a dust collector, wood dust will not settle on electrical parts, interfering with their operation, and on the floor, which will prevent you from slipping and falling.
Dust collection devices of various modifications are sold in hardware stores. The simplest one can be done even with your own hands using a powerful vacuum cleaner.
Garage storage systems
The proper placement of numerous storage systems in the garage plays a huge role. Everyone knows that it is shelves and cabinets that “eat up” the main space in a room, which is not very large anyway. Seasonal tires, large equipment, and bicycles are also stored in the garage. In addition, there are also many different little things that are difficult to find if necessary. Let's find out how best to arrange everything.
- Shelves can be placed literally anywhere: above shelving and above tables, directly above the workbench. A good solution is to hang shelves from the ceiling. It is worth putting away those items that are not needed so often. All shelves allow you to perfectly store many things. The main thing is to fasten them securely.
- You can make one large storage system by combining several shelves and cabinets. Some people prefer closed shelving, while others prefer open storage systems.
- Small items should be stored in containers and jars. It is better to label all storage containers.
- Some garage workers dedicate a wall to storing tools and parts on hooks and brackets. So everything is as accessible as possible, clearly, always at hand.
- Seasonal tires are best stored on brackets. This will ensure the safety of the tires themselves and save space.
- Bicycles should not be parked, but hung on hooks.
If you use space rationally, your garage will seem quite spacious and roomy.
Floor Design Ideas
Arranging a garage floor with your own hands is a difficult task, but doable. Many garages have bare concrete floors. Constantly working on cold concrete floors can harm your back and joints. Therefore, it is worth considering a different coating.
Photos of equipped garages often show wood, vinyl, epoxy resin and linoleum floors.
Wood and vinyl will protect you from slipping and hypothermia. However, the most practical will be a floor coated with epoxy resin.
In construction stores you can now buy epoxy flooring that does not accumulate dust, is non-slip and is easy to clean. Plus, epoxy is much stronger than paint, so your garage floors won't have to be repainted every year.
Lighting and ventilation in the garage
A workplace in a garage will be comfortable only with normal ventilation and good lighting. Be sure to take care of this. Ventilation is needed to eliminate harmful compounds and chemical fumes. The air is fresh and the garage is safe if the ventilation system works well. In addition, only ventilation prevents condensation from forming.
It is advisable to make ventilation holes on both sides of the gate. They should be located at a low height. Remember that the openings must be covered with fine bars to prevent pests from entering the garage through them. Air ducts are also made on the opposite wall, but already high, almost under the ceiling. This way you will ensure natural ventilation with outflow and inflow of air.
Lighting also deserves special attention. A certain level of natural light can be provided. To do this, they simply make a window. This option is quite economical and requires virtually no investment. Artificial lighting is also necessary so that the workplace in the garage can always function. Portable lighting devices are used, but it is better to carry out electrical wiring. Make the lighting directional, in certain areas. It's more practical.
Second stage - marking
The drawing of the future brick garage is ready, now its dimensions need to be oriented on the ground. For this you will need:
- long tape measure;
- sledgehammer or heavy hammer;
- 10-15 pegs about 40 centimeters long;
- about 40 meters of durable cord.
All the tools are ready - we clear the place for construction. Next, focusing on the garage drawing, we hammer stakes into the corners of the future building according to the dimensions, and then connect them with a cord. The result obtained will become a guideline for the construction of the garage.
Arrangement of an inspection pit in the garage
Pay attention to a number of important points when you need to equip a viewing hole.
- It is better to additionally strengthen the edges of the inspection hole with a metal corner.
- It is advisable to make the walls and bottom of the inspection pit concrete.
- If you do not use the inspection hole, it is better to cover it. A very good modern solution is to use a roller shutter that will easily and simply cover the hole.
- Make a drainage hole at the bottom of the inspection hole. To do this, the floor should have a slight slope towards the corners. Consider how you will scoop water out of the hole. To avoid getting your foot in it, cover the hole with a grill.
- The pit also needs good lighting. Someone does the wiring, but you can get by with portable stand-alone lights, or even a couple of large flashlights.
There are special niches in the walls for storing the necessary tools and parts.
Gates
“Sectional structures can be considered the most suitable for arranging a modern garage”
This structural element is important in arranging a garage not only from the point of view of ease of entry, but also in terms of heat conservation, as well as protection from unwanted intrusions.
automatic gates
Garage doors can have various design features. The cheapest solution is conventional swing models. For sliding gates, the doors work identically to wardrobe doors. Lift-and-turn views are opened by lifting the sash leaf towards the garage ceiling.
The most suitable for arranging a modern garage are sectional structures, in which the shutters can be refracted like an accordion, and roller shutters made of aluminum, which resemble roller shutters and function on the same principle.
gates with frosted glass coating
Video: learning how to make a carpentry workshop in the garage
Do you want to have a small but quite professional carpentry workshop in your garage? You will learn a lot of useful things from the following video. Experienced garage workers will tell you how to properly arrange a workplace and place tools.
There is another informative video. In it, experts tell you how to make the most of space in your garage. It turns out that storage systems can be made useful, very spacious and convenient. They will take up little space, but will be very easy to find everything you need.
If you take a closer look at the algorithms, step-by-step instructions, study the video and remember the recommendations, you can create a very comfortable, functional and practical workplace in your garage. Car enthusiasts succeed in this, even despite the lack of space. Everything can be arranged compactly and rationally.

