In residential buildings with cold roofs, an insulated attic hatch is a necessity. An ordinary uninsulated door, no matter how beautiful it may be, is a hole in the thermal insulation circuit of the house. A lot of heat will be lost through it, not to mention condensation due to the temperature contrast between the heated room and the cold air outside. And condensation is future mold, mildew and insulation that has become wet along the contour of the hatch.
Therefore, a warm hatch into the attic is a must. In any home where the entrance to the attic is located indoors and not outside. And we will tell you in detail how to do it.
Choosing a location for the attic entrance
The place for the manhole should not be located outside the living room. Ideal options for such a room would be a corridor or a storage room . The entrance to the attic should be designed as practical and convenient as possible, without posing a danger to human life. Thus, there are many options for stairs that provide a comfortable climb to the upper floors of the room.
Sometimes the staircase to the attic space is made permanently, in which case you need to make sure that it does not create inconvenience , but more often a manhole with an extension or retractable ladder is used. Folding staircase constructors, which unfold only when the entrance is opened, have gained particular popularity.
Before making a manhole, you need to decide on the design ; it must match the design of the room where it will be located. The lid should open well and freely. Please note that the entrance may require insulation.
When installing a manhole, it is unacceptable to remove part of the supporting structure; this leads to a decrease in the strength of the entire ceiling.
Let's look at the components of the manhole manufacturing process
Door
First, we decide on the location of the future opening. It is advisable to cut it closer to the landing, but at the same time not next to it, otherwise inconvenience may occur during the subsequent manufacture or installation of the staircase. Of course, it is unacceptable to plan to make a manhole in the bedroom. An important point that should be taken into account is the slope of the roof of your roof in the place of the future hole, because for the convenience of subsequent use of it, the space above the opening must be large enough.
Next, we proceed to the manufacture and subsequent assembly of the frame. It is best to use boards with a thickness of at least 30 mm. It is clear that your hole should be quite compact, so it is better to make it rectangular rather than square. The frame must have equal corners.
Door for hatch to attic
In order to insulate the manhole, a sheet of fiberboard should be cut to fit the internal size of the frame, to which you can additionally attach a sheet of polystyrene foam. glue another sheet of fiberboard to it , the resulting “sandwich” will provide the necessary temperature conditions in the interior of the house. A sealing rubber band is glued along the inner perimeter of the attic hatch.
Insulation of the attic hatch can be done using another option. For this purpose, a vapor barrier film is fixed inside the finished lid, on top of which insulation is installed, which is usually used for interfloor ceilings (foam plastic or mineral wool will do). Fastening is done with glue or wooden planks.
The manhole door is ready, now it needs to be attached to the frame using hinges. The hatch will be much more convenient to open if its door is equipped with a handle and a latch.
Cutting an opening
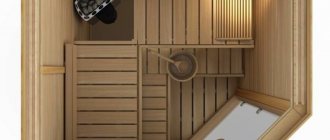
Attic hatch with ladder looks simple and stylish
It remains to think about the issue of getting into the attic through the hole. You can purchase an aluminum ladder, or you can make it yourself.
Despite the fact that the main goal of decorating a crawlspace in the attic will be to give this structure a more aesthetic appearance, there are a number of requirements that will need to be taken into account when choosing a design option. There are not too many of them and following these recommendations will not be difficult:
Hatch design requirements
Before you make an attic hatch with your own hands, it is important to remember a few key rules:
- The design must be strong and reliable.
- Installation should be convenient.
- The design must be safe.
- The design must provide for the possibility of insulation.
- Before starting work, you need to decide on the type of hatch and its design.
You also need to remember that access to the hatch should be fairly free. It is necessary to take into account the safety of the work itself and the final result. To ensure safety and reliability, it is best to draw up a design drawing before starting work. It is also necessary to provide for strengthening the opening. For this, boards are used, and if the ceiling is concrete, then metal corners are used. If the design involves a retractable staircase , then there must be free space under it.
Manufacturing stages
Cutting the opening
Cutting an opening for the attic
If a roof access hole was not provided during the construction of the house, you will have to cut it out yourself. Of course, if such a hole for installing the door already exists, this stage of work is skipped.
To begin with, markings are carried out with the expectation that the hole should be 5–6 cm larger than the dimensions of the hatch frame. In the future, the gap will help compensate for the thickness of the boards from which the frame will be made. The material from the sawn piece of the ceiling can be used for cladding the lid, of course, if it has a normal aesthetic appearance.
Assembling the opening frame
Assembling the opening frame for the attic
Making a lid
Hatch with lid to the attic
We do insulation and finishing
Attic insulation scheme
As you already understand, this is how the simplest hatch leading to the roof of the house is installed. More complex solutions include a design with a retractable staircase. The installation process here is carried out according to a similar scheme with only some differences.
The presence of a manhole in the attic allows the owner of the house/cottage to acquire additional usable space, which can subsequently be used in various ways: for example, if there is a manhole, it is much more convenient to install heating or ventilation equipment in the attic, to arrange an attic floor there for summer recreation, etc.
Types of products and their designs
Structurally, hatches can be of several types. This is due to the location and design features.
Types of attic hatches:
- Horizontal.
- Vertical.
- Angular type.
In addition, hatches are also distinguished according to other parameters:
- Hidden structures;
- Designs with folding stairs.
Such structures are also distinguished by their diameter. He considers the standard size to be 120 by 60 cm. However, the sizes are completely different, it all depends on the specific conditions and capabilities of the owners. The design of the room itself also plays an important role. For example, many people make the entrance to the attic a real highlight of the house. In this case, the entrance to the top is designed as creatively as possible, and the size of the passage can vary depending on the wishes of the residents.
Today, factory-made hatches have become widespread. There are a great variety of their designs. Just go to any construction hypermarket and you can find dozens of options there. The most popular designs are those with retractable stairs. There are variations here for every taste - metal, wood, plastic, combined. The length of these ladders is usually adjustable, however, most often varies from two meters to two and a half. The staircase design can be chosen from ready-made options , and it is also possible to make it to order.
Dimensions
You can make an insulated attic hatch with your own hands, based on the existing opening, which in the standard version is 120 cm long and 60 cm wide. There are cases when the opening has the shape of a square with dimensions of 100x100, 80x80, 70x70, etc. This plays a significant role only in the case when bulky indivisible objects have to be dragged into the attic.
secret (Fig. 5)
with folding ladder (Fig. 6)
with wooden stairs (Fig. 7)
hatch with folding ladder (Fig. 8)
The attic hatch should:
Insulated attic space
The access to the attic space is almost always made at the construction stage, but there are exceptions. In this case, you will need to cut out the passage yourself. The easiest way to do this is on a wooden ceiling, but it can often be a concrete ceiling. When cutting a hole into the attic, it is important not to damage the supporting structures. In concrete slabs, it is best to make a hole at their junction. To work on concrete, you will need a hammer drill and a grinder with discs for metal and stone.
The work must be carried out carefully and slowly . The most correct way would be to mark lines on the concrete and make cuts along them, and then use a hammer drill to extract the concrete composition. After the hole has been made for the manhole, it is carefully processed around the perimeter for further work.
An example of making a hatch can be seen in the example of a wooden product (wood is a good heat insulator and very easy to process); let’s look at the step-by-step process:
- Load-bearing parts of the manhole frame, boards or metal corners are installed.
- The manhole opening platbands are being installed. Options for attaching platbands may be different and depend on specific conditions. The easiest way is to attach platbands to wooden structures. To do this, it is best to take self-tapping screws. It is better to avoid using nails, as they can split the wood and, in addition, fastening with nails loses strength over time. If the platbands need to be attached to concrete, then dowels are best suited here. Platbands can be made from boards or fiberboard. After installing the platbands, you must carefully check all the elements. The structure must be reliable, since it performs a load-bearing function.
- To make the hatch frame, boards with a thickness of 25-30 mm are suitable. The hatch frame should be 40-50 mm smaller than the opening. Such allowances are necessary for covering the opening in the ceiling with a frame on which the lid will later rest. Next, you need to sew up the hatch on one side.
- Thermal insulating material is placed in the frame. The best option would be mineral wool. The insulation is attached to the frame. Wooden planks are used for this. Next, the frame is carefully sutured. This creates an insulated sandwich.
- The finished hatch is attached to the opening using hinges.
- A rubber seal is installed on the perimeter of the hatch, which will prevent drafts and serve as insulation.
- The side of the manhole cover facing the room is decorated to match the design of the room in which it is located.
This is the general scheme of work. It is important to remember that it will definitely differ depending on the layout of the house, the wishes of the residents and financial capabilities.
A popular solution for an attic hatch would be to install a finishing mechanism. Ready-made mechanisms are sold in many hardware stores. Using this mechanism will greatly simplify the use of the hatch. So, it can be opened and closed with one hand, without much effort. Installing the door closer is quite easy to do with your own hands.
An insulated attic hatch can also be ordered from manufacturers, who can also offer quick installation.
Short description
Those who plan to purchase a ready-made attic crawl space should know how to properly install this product. In addition, you can try to make a hatch yourself, but you need to adhere to some nuances. Absolutely all manholes perform a number of functions:
- blocking access to the house to various rodents and insects, which quite often live on the roof;
- high-quality thermal insulation;
- unhindered human access to the attic;
- excellent vapor barrier for living space;
- blocking smoke and fire from lower rooms in case of fire.
Each point is important in its own way. But fire safety needs to be addressed separately. The attic hole prevents the free spread of open fire, due to which poisonous gas cannot penetrate the house. A high-quality hatch is made of several insulating layers.
Experts recommend using different materials that have the ability to expand when exposed to high temperatures. Thanks to this, the product will not burn or break into pieces during a fire.
Good vapor barrier is also extremely important, since it is this property that allows you to retain valuable heat in the house. Otherwise, evaporation will escape through the cracks, causing moisture to be absorbed into all roofing insulation.
Safety precautions
It is quite possible to make and install an attic hatch with your own hands. This work may take a couple of days, depending on the experience of the builder and the availability of the necessary tools and materials.
Safety precautions when creating an attic crawl space with your own hands are extremely important. It is necessary to ensure that there is no electrical wiring running through the work site. When working with a grinder and hammer drill, you must use safety glasses. The work will be carried out at a certain height, so a reliable ladder or stable stepladder is required. By following these simple rules, you can quickly and safely add new space to your home.
The attic hatch, although not used often, is a noticeable part of the interior. Therefore, with some effort, you can not only expand the square footage of your home, but also add some zest to it.
Schemes of folding stairs
Such designs do not require more space for arrangement; they can be organically integrated into the interior or hidden in the attic. The suggested options will help you arrange your home ergonomically.
Drawing No. 1
This type is a device of two folding sections.
This option is suitable for attic openings located near the wall.
When developing a drawing, take into account the following points:
- To calculate the length of the stairs, the height is taken not to the hatch, but 50 mm below the ceiling level.
This staircase is not particularly aesthetically pleasing, but when assembled it takes up virtually no space.
Drawing No. 2
This option, like the first, is attached to the wall, but through one bowstring. The requirements for it are slightly different:
- The assembled position is secured using a hook and loop. One part is installed to the wall, the other to the movable sidewall.
This staircase is a little more complicated than the previous version. But the following type of device has gained great popularity.
Other arrangement methods
For convenient and silent opening of the lid, it can be equipped on the sides with special closers and a practical handle. In this version, as in Fig. 4, the portable ladder can be placed with the lid closed and resting on the frame. The version of a secret manhole, as in Figure 5, 6, requires a special opening device (using a special cable, stick, button) and a complex ladder system. This arrangement of the door to the attic space completely hides the staircase and makes the opening in the ceiling not too noticeable. But you will have to work extra hard on it and will get different options.