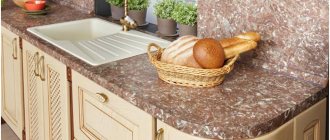
Hi all! When buying a kitchen set, we try to adapt it to the shape and area of the kitchen. At the same time, the main task is to make the room practical and comfortable. An impressive part of the space is occupied by countertops. And they don’t always go in one continuous pattern. This raises the question - how to connect the tabletop to each other.
The easiest headsets to install are straight ones, which are located along the wall. There is no need to connect anything here. But U-shaped and L-shaped structures are more difficult to install.
You can install the same cabinet or shelf without any problems. But the tabletop needs high-quality joining. It is necessary to ultimately obtain a solid canvas.
What is Eurozapil
With the use of patterns, hidden joining of a euro saw , which will require the presence of a milling machine tool. You can replace it with a cutting machine , which also has its advantages and disadvantages.
The main feature is considered to be lower cost, but this can have a negative impact on quality. The joints may not be perfect and may vary by 1-2 millimeters .
There is a negative aspect to this that will affect the overall appearance of the countertop.
Articles on the topic (click to view)
- Rating of the best steamers of 2022
- Photos of curtains for kitchen design 2022
- Choosing curtains for the kitchen
- Metal kitchen rack for appliances
- Instructions for the electric stove "classic plus"
- How to choose an electric stove with 4 burners and an oven for the kitchen
- Sofa in the bay window for the kitchen
a reliable connection of its parts can guarantee long service life for a kitchen surface . It can be joined at right angles, 90 degrees, and, if the size of the kitchen allows, placement along one wall.
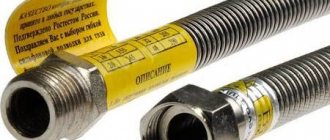
The tabletop can be connected not only using a euro saw, but also using an aluminum profile . To install it, silicone sealant is used, which can qualitatively connect the two parts and make them airtight.
This prevents the accumulation of moisture in the seam and, as a result, does not allow germs to spread across the kitchen surface.
Docking with a segment
A tabletop segment is essentially the top table for a segmented base cabinet. The standard dimensions of the segment are 900 by 900 mm, with a width of 600 m. Along the front, the edge of the segment can be straight or semicircular.
Related article: How to choose a chipboard countertop for the kitchen: types of chipboard countertops
Since the ends of the joining of the table tops are sawn off smoothly, wood glue is used for joining. If such fastening seems insufficient, use special metal connectors for countertops (see photo).
By the way, similar parts are used for household trimming of countertops.
pros
- Aesthetic appearance . The main advantage of the euro saw is what the kitchen looks like after it. It takes on more expensive features, and quality work will immediately catch your eye. Of course, even small gaps will not go unnoticed, so you will need the help of a professional.
- Easy to care for . It will be a pleasure to care for a kitchen surface that is connected to the correct technique. Due to the fact that there will be no gaps at the joints, dirt and grease cannot accumulate between them, which greatly simplifies kitchen maintenance.
- No dampness . When installing the countertop, a sealant is used, which provides protective properties to the joints, preventing moisture and microbes from entering there. This way there is no dampness at all.
- Smooth surface . Achieving this is not at all easy, especially if you perform Euro sawing on your own and without experience. But a high-quality connection at a professional level will make the kitchen surface smooth.
- No edges . With a high-quality euro-sawing, the edges will not be visible, especially if the work was done on a dark-colored kitchen surface.
Stages of work
When performing a Euro joint, you should not rely only on a photo, drawing or video instruction. It is recommended to carefully study this issue, look at reviews, recommendations of experienced people who have already walked this path. When you have received enough information on how to perform a euro saw, you can get to work.
In the case of joining elements with ties, it is recommended to initially secure all parts.
The process is divided into several stages.
If you do the Euro joint yourself, you must first buy a tabletop that will have a small margin in length. This need is explained by the installation features of the kitchen surface. Once the joint is formed, the slab will need to be cut.
When all the work is completed, you should let the sealant dry, and then remove dirt from the joints and finish the white or dark surface.
How to get EUROZAPIL countertops
The manufacturer of cabinet and upholstered furniture “MebelArt” invites you to familiarize yourself with the EUROSAPILA method. You can see samples of our work here.
Eurosawing is the joining of surfaces at right angles. The first tabletop is sawed deep, the second - from the end.
An unusual treatment for assembling an L- or U-shaped kitchen, when the surfaces are tightly connected without the use of aluminum strips. The gap in this case is tenths of 1 mm.
On the back side of the tabletop, recesses are made for the screeds. Where there is a cut, it is coated with glue or sealant of a similar shade to the front color.
All that remains is to tighten the tabletops. (Catalog of kitchen countertops)
Docking is not an easy process. To do it smoothly, you need tools. We have German equipment FESTOOL APS 900. If you order the docking separately, you will have to pay about 1500 UAH for it. And if you order a kitchen wall from us, then this technological operation will cost much less.
The headset is included in the total price and costs the client much less. (see Tools for kitchen assembly)
The Euro sawing technique is as follows. We do, as mentioned above, trim the tabletops, observing the exact value of the angle. In our work we use a Festool TS 55 EBQ saw. Jigsaw lovers should be warned that their tool will create a wavy edge. The sawn-off side of the tabletop will become a limiting stop for the rods (“fingers”) of the APS 900 template.
They can be seen in the figure. Using clamping clamps, it is possible to reliably press the template to the workpiece due to the existing groove. Shown here is only the area for obtaining a corner connection between the panels of the kitchen unit; the device makes it possible to make round and rectangular cutouts. In this case, very little time is spent on rearrangements.
Expert opinion
Mikhailova Maria Vasilievna
Furniture store manager. Knows everything about comfort and interior design
In the process we use a router, a groove cutter with a shank (12 mm), a copy ring (30 mm), D14 mm. These dimensions correspond to the guide groove parameters in the APS 900 template.
Photo of the router, where you can see the cutter and copy ring.
Ring in guide groove.
We make the 1st small pass, the template is in a stationary position. The excess is removed with a jigsaw or you can work right through with a cutter.
Pay attention to the corner: smooth edges, no chips.
When starting to work with the second tabletop, we do everything in the same way, only we first lay the panel with the back side up. We stick to the basics: the cutter should touch the surface of the finishing coating .
Internal groove for corner joint
Let's deal with the mounting recesses for the ties. We use countertop ties QUICK 35, Italliana Ferramenta. The work will take a few seconds if you use a 6-point wrench and use a screwdriver with a hex head. A decorative plug is installed in the hole.
The groove turned out very smooth and beautiful.
Let's see how the countertops will connect to each other. It turned out great! The ends matched as if they were “native”. Gluing and screeding will be done when the kit is assembled. The result is a beautifully assembled connection without connecting metal strips.
Cutting to size and joining kitchen worktops
Problem For accurate and high-quality production of a tabletop corner joint (Fig. 1), in addition to a special template and cutter, you will need a high-performance vertical router. It is not profitable for a craftsman who rarely has to join tabletops to purchase such an expensive special tool.
Solution In such cases, both parts can be cut at an angle and connected to each other. Using this method, you can easily cut workpieces at almost any angle. This is especially convenient if an angle of not only 90, but also 135 degrees is required (Fig. 2). Another advantage of this method is that the fibers of the texture of solid wood panels or wooden panels with decorative finishes converge exactly at an angle. When processed using the method shown in Fig. 1, the fiber texture of the two workpieces is perpendicular to each other. If the surface of the countertop has a small pattern or is finished with stone, then even such a joint at an angle of 90 degrees is almost invisible. But still, in this case, an exact corner connection is more difficult to distinguish than a joint at an angle of 90 degrees. The only drawback of angled connections: the length of the workpiece for making a tabletop 60 cm wide must be 60 cm longer.
To connect the worktop you will need the following tools: – circular saw: e.g. Festool TS 55 R – saw blade Z 48 HW with fine teeth – guide rail FS 1400 or longer with two threaded clamps – end stop for the stop strip – router for making sockets flat studs and flat studs size. 20 – drill press and Forstner bit ø 35 mm – router OF 1400 and groove cutter ø 8–10 mm – worktop connectors – silicone (color: transparent)
When carrying out work, it is always necessary to ensure dust removal, so we will need a CTM series dust extractor for industrial use in carpentry and carpentry workshops. These vacuum cleaners can be connected to all Festool hand-held circular saws.
Preparation/setup:
First, secure the tabletop to trestles or a workbench by placing blocks underneath it. In this case, the excess part to be sawed off should not hang; it should have supports over the entire surface.
What is Eurobutt
Euro-sawing is one of the methods of hidden joining with the preliminary creation of a pattern. The work uses a milling machine. The manufacturer, in an effort to save money, performs the work on a cutting table.
The price is getting lower, but the quality still needs to improve. The difference in the height and radius of the ends reaches a millimeter or more.
It is almost impossible to disguise such a seam. If a manufacturer or seller unjustifiably reduces the price of a countertop, you should take a closer look at it.
It is possible that for the next 5-10 years you will have to admire not the smooth surface, but the jagged and uneven joints visible from afar.
If the ends are processed properly, a drawing is drawn up in advance, a pattern is developed, the surface will be almost uniform and smooth. The width of the gap will not exceed tenths of a millimeter. It will be difficult to find it on a dark or bright stove no matter how hard you try. The main condition is the use of a milling machine, not a cutting machine, and new patterns.
Disadvantages of Euro saw
Everything is clear about the advantages of the Euro junction. The owner receives a perfectly smooth surface without nicks, cracks, or discrepancies. But do not forget about the disadvantages:
- The tabletop is given a certain shape. You won't be able to change its configuration depending on your mood. It will not be possible to rearrange the set along another partition. Even laying a new apron won't help. The exception is absolutely identical walls;
- partitions and apron should be smooth, corners should be correct. Otherwise, the slab will not adhere closely to them. It will not be possible to eliminate the gap by moving the furniture. A small discrepancy is masked by the cornice, a large discrepancy will be visible.
Attention is paid to the alignment of the walls if the set has the shape of the letter “P”. A lot of time and money are spent on eliminating gaps.
If the walls have significant unevenness and it is not possible to obtain smooth surfaces, choose other types of joining parts that are not so demanding on the environment, for example, using an aluminum profile and silicone sealant.
The advantage of this joining method is water resistance. This is important when installing a sink.
And after 10 years the surfaces will not swell and will retain their original appearance. Eurozapil is not the best option for rooms with high humidity.
Expert opinion
Mikhailova Maria Vasilievna
Furniture store manager. Knows everything about comfort and interior design
Plastic or acrylic are not afraid of water, but chipboard or MDF will swell very soon. This can be avoided by treating the ends and cuts with plumbing sealant before assembly.
Trapezoid - the best way to design a corner
Important : making a trapezoid yourself without sufficient experience is almost impossible, and factory modifications are expensive. But this is practically the only acceptable way to design and develop a working angle.
Doing Euro-sawing at home with your own hands, as experts say, is possible, but only if you have the necessary tools and the appropriate skills. Installing an aluminum profile is a simpler option.
No professional skills are required for installation. The main thing is not to rush, look at different methods of joining.
Before cutting an expensive slab, make a model from cheap material.
If you don’t want to have protruding elements on the work surface, you’ll have to work on a Euro joint or cut. On one of the parts to be joined, the end is processed, on the other, the longitudinal edge is processed. The main problem is that the seam is not even, there is a corner with a smooth rounding. For a strong connection, the sections are covered with a layer of sealant, preferably colorless.
Important : if you are planning a tabletop with curves, it is better to initially purchase parts with a ready-made cut. Refinement is always more difficult; you will have to spend time looking for a good specialist who can work according to patterns and templates.
Surface joining options
It’s good when a solid canvas is used for the table covering. It has no seams through which moisture gets in. This inevitably leads to damage to the material. And a seamless fabric looks better than one that has joints. But in some cases it is impossible to do without docking. It has to be done for corner kitchens and for long surfaces. The latter are “assembled” from two, and sometimes more parts. In any case, you can use one of three options.
Simple splicing
The two parts are adjusted to each other, coated with sealant and installed in place. The resulting joint is almost invisible. This technique has several advantages.
pros
- Simplicity and speed of execution.
- No special tools required.
- Attractive appearance of the finished panel.
Minuses
- Short-lived results. The sealant protecting the joint deteriorates over time, the slab absorbs moisture, swells and deteriorates.
- The docking station cannot support the weight of objects placed on it. You cannot place household appliances, heavy dishes, etc. on it.
- Splicing is possible only for perfectly even fragments. Even a slight deformation will ruin the result.
Professionals do not recommend using such a connection for kitchen countertops. It quickly collapses under the influence of temperature changes, moisture, and mechanical stress.
Instagram shkafpotolok
Docking with Euro saw
This joint is made after preliminary pattern processing of the ends. It's called Eurozapil. The parts are processed by a milling machine with high precision. The result is an interlocking connection; after its assembly, a seam less than a millimeter thick remains.
Advantages
- Low processing costs. No additional materials are required.
- Aesthetic appearance. On stone-like coatings, variegated and dark colors, the Euro joint is completely invisible.
- A sealant is used for the Euro connection, which protects the surface from water. However, a large amount of moisture is still undesirable.
Flaws
- Since a large amount of moisture is still undesirable, connecting the tabletop through a euro saw in the sink area is not recommended.
- The area where light parts are spliced is always noticeable, since it is impossible to cover the darker ends.
- Eurozapil is done only in production. To perform it, you need a machine that will process the ends of the workpieces exactly according to the pattern. At home, making such a connection is hardly possible.
Euro docking is only suitable for furniture that is intended for a room with smooth walls. Even a slight deviation from an angle of 90° gives a gap between the parts. This is unacceptable for a Euro saw.
Instagram arturkucherov
Finishing materialsHow to paint tiles in the kitchen: detailed instructions
With connecting strip
The connection is made using a T-shaped aluminum profile. In this case, both end parts of the joined fragments are pre-treated with sealant. The connecting strip is inserted between them and closes the seam. Let us list the advantages of the technique.
pros
- The splice is reliable, strong and durable. Additional reinforcement is possible if necessary.
- The seam is protected from moisture. It is allowed to be placed in “wet” areas of the kitchen, including near the sink.
- If the material is not joined exactly at a right angle, the resulting gap closes the profile. This is true when installing furniture to uneven walls.
- The docking technology is simple. If you wish, you can do all the work yourself.
Minuses
- The upper part of the metal strip protrudes above the surface, so it is impossible to make the seam invisible.
- The choice of colors for aluminum strips is limited. It is not always possible to select an element to match the coating.
All shortcomings can be considered conditional, because they do not affect the strength and durability of the resulting seam.
Instagram modulpro_irk
Connection using a euro saw - the joint is almost invisible
Euro-sawing is a method of pattern processing of the ends of joined parts. A high-quality milling machine is used to make patterns.
There are cases when eurosawing is carried out on a cutting machine. This option is more budget-friendly, but the gaps between the ends are formed by a thickness of a millimeter or more. For this reason, when purchasing, you need to pay attention to the machine for making countertops.
Correctly manufactured ends after installation form a canvas on which the gap is not visualized at all - its width does not exceed a fraction of a millimeter. On dark countertops the joint is especially invisible.
Parts for countertops of the highest specifications are made exclusively on a milling machine, taking into account that the patterns must be relatively new.
Euro-sawing – flawless connection of tabletops without seams
The guarantee of long service life of a kitchen work surface is the reliable connection of its parts. It is possible to connect the tabletop at a right 90 degree angle or in a straight line, if the kitchen footage allows for placement along one wall.
There are three main methods of merging, but you should always adhere to one result - the surface should give the impression of a single whole:
- joint to joint without euro-saw;
- using a T-shaped metal profile;
- joint using a euro saw.
You will have to familiarize yourself with all the methods, not only with the euro saw. After this, you can decide how to connect the countertops to each other and make a choice among these options.
We do European tabletop sawing at home.
More than 90% of all kitchen countertops on the market are made of chipboard. This material is available on the market, has an attractive design, has good performance characteristics and makes the kitchen more practical. If you have a smooth countertop in a straight line, then no problem arises; you create holes for the built-in stove and other accessories, and then carry out installation. If you have an L or U shaped kitchen, then problems arise at the corners. It is necessary to join different parts of the tabletop at a certain angle (usually 90 degrees), but this is quite difficult to do.
Joining a table top with a Euro saw
Previously, different parts of the tabletop were cut at a certain angle, joined together, and a special strip was installed for tightness. Today, euro saw
, because the first option did not show its best side.
Food particles got under the bar and water flowed in over time, which led to damage to the aesthetic appearance and performance characteristics of the countertop in these places. Today, Euro-sawing
at home, which completely solves the problem.
reviews about
, you will begin to understand that everyone leaves them only in a positive way.
This can be understood, because the procedure itself is quite simple; the master uses special templates and a cutter to create an accurate and invisible joint. Once the two parts are joined to each other, it will be very difficult to notice the joint with the naked eye. A transparent sealant is added to it, so the euro-cut
tabletop becomes airtight and its service life increases significantly.
The work can be done at home, it is not accompanied by a lot of dirt and does not create discomfort. The master takes precise measurements down to a fraction of a millimeter, so you will be satisfied with the result. The joint remains invisible, the angle is beveled and smooth, creating the impression of solidity of the entire structure. That is why euro saw or plank
is in such high demand in the market.
What are the pros and cons of euro saw?
One of the advantages is that this method of connecting two parts of the tabletop leads to a monolithic structure. You do not see a connecting seam or cut, which, of course, has a positive effect on the design of the created kitchen. In addition to its attractiveness, the client is also pleased with the process of creating such a cut, because it is done at home, takes a minimum amount of time, and does not create a lot of noise and debris. An experienced craftsman will quickly make precise replacements and create an invisible countertop joint. It is also worth noting the advantages of the euro saw
and the fact that moisture, dirt or food particles do not penetrate into the joint, which extends the life of the chipboard.
Of the minuses, it should be noted that the Euro-saw connection
still does not create the same rigidity as a monolithic structure.
It is necessary to make sure that there is a strong support under this cut; the tabletop should not sag when pressing on it in the place of the euro-saw
.
But these are all the disadvantages of the euro saw
, you get an attractive and durable solution.
Advantages of the euro saw:
- The quick connection of tabletops using a euro saw
saves time. - The procedure is performed at home.
- The joint becomes invisible to the naked eye.
- The tightness ensures long service life of the chipboard.
Tabletop connector - euro saw: hidden docking (photo)
A method of processing ends that uses patterns. To create it you need a milling machine. Only with high-quality equipment it turns out flawless.
Sometimes euro-sawing is produced on a cutting machine - this significantly reduces the cost of production, however, with such economical production, the ends are obtained with fluctuations of a millimeter or more. Therefore, when purchasing, you should check this point very carefully, especially if the price of a prefabricated kitchen surface is significantly reduced.
A poorly made joint will not connect as it should, leaving gaps.
Correctly executed ends after assembly form a surface on which the gap is not visible at all - it is there, but its width is a fraction of a millimeter. If the coating is dark in color, it will not be easy to find where the euro-cut table top was cut (photo).
Such ideal quality can only be obtained using a router, and the patterns must be new or at least not worn out.
Protecting the countertop from moisture
The first thing you should pay attention to is the processing of the ends. When making custom tabletops, be sure to order plastic stickers on all ends, including the joints of the tabletops.
In addition, it is necessary to provide a drip tray; this is a strip of plastic 4-5 cm wide glued to the bottom of the tabletop. This element will prevent moisture from entering the chipboard and causing it to swell.
If the tabletop is standard, then naturally you won’t be able to glue the plastic edge on yourself, so you need to use special strips. However, the planks themselves will only partially protect the untreated end; additional treatment with a sealant is required.
The sealant is applied to the strip and screwed to the countertop. You should not immediately remove the protruding sealant, it will simply smear and erasing it in the future will be very problematic. You should wait until it hardens and carefully cut off the excess with a stationery knife.
Laminated chipboard countertops, due to their practicality, variety of colors and low cost, have become extremely widespread. Most kitchen sets are equipped with countertops of this particular type. The choice of countertop is primarily related to the design of the kitchen unit. If you have a limited budget and the kitchen unit will be located along one wall, then it is advisable to consider a standard countertop option. Otherwise, it is worth considering the option of having a custom countertop. However, regardless of how the countertop is made, it is important to protect weak areas with edging or caps. This way your countertop will last a long time and will delight you every day.
Disadvantages of Eurosaw connection
The positive side of the euro saw is its smooth surface, on which the joint is not visible.
There are also disadvantages, they are few, but they are quite noticeable. Eurozapil is a lock that requires a clearly defined arrangement of parts of the tabletop; they cannot be moved.
Placing a headset with a top panel requires an absolutely flat wall and correct angles. If the walls are uneven, then the countertop will not adhere to it, and there will be a gap between it and the wall.
Expert opinion
Mikhailova Maria Vasilievna
Furniture store manager. Knows everything about comfort and interior design
It cannot be closed by changing its position. You will have to cover it with a table plinth.
If the curvature is significant, then the gap will still remain. You'll have to level the wall.
If you plan to install a set with the letter “P”, then the curvature of the walls will disrupt the arrangement - there will be gaps along all the walls.
In this case, small irregularities will have to be covered in this way: the installation is carried out as close to the wall as possible, and the surface should be worked on separately. The gaps in it will have to be sealed with special planks, and the sides adjacent to the wall will have to be filed down.
Therefore, in addition to the question of how to connect a tabletop without a joint, you can immediately figure out how to quickly make the walls straight and even.
For a kitchen with uneven walls and corners that are far from correct, it is better to make a connection using a different type of connection.
Basic fasteners
To install the countertop you will need several types of fasteners. Their number depends on the dimensions and shape of the plate attached to the table. The master must prepare in advance:
- Tongues. These are elongated parts with locks that connect several elements into one monolithic structure.
- Metal or plastic corners with self-tapping screws - two thin plates connected perpendicular to each other. Used to prevent deflections when working with chipboard.
- Eccentrics. These are cylindrical bushings with plugs for screwing the tabletop to the base.
- Eurobolts are long screws used for tightening corners.
Also, fastenings can be combined. To do this, two types of connections are used simultaneously - mechanical and adhesive. In this case, tongues are used together with corners. This method is considered one of the most reliable when working with chipboard. It is what is most often used by professional furniture repair and installation specialists.
Tongues
Corners with self-tapping screws
Ex class=”aligncenter” width=”1240″ height=”650″[/img]Eurobolts
What is the best way to connect two countertops at a right angle of 90 degrees?
L-shaped arrangement of furniture in the kitchen is a common option for most apartments, especially in older houses. To arrange the set, connecting the tabletops at an angle of 90 degrees with a small room area is the only option that allows you to fit everything you need.
This leaves room for a dining table if the rooms are not combined.
The best solution to the problem is to level the wall before installing the furniture and achieve right angles and a flat wall surface.
A connection using an aluminum profile may be more practical than a Euro saw. During installation, the aluminum profile is treated with silicone sealant, which makes the connection airtight. The connection becomes impervious to water, so its location near the sink will not affect its service life and appearance.
In this case, the euro saw may begin to swell from water entering the gap. If the coating is plastic, then water will not spoil it, but more often chipboard or chipboard is used for kitchen countertops.
When moisture gets on it, especially with regular exposure, it begins to increase in size. To prevent this, before installation, you need to carefully cover the ends with a waterproof sealant; a colorless plumber's sealant will do.
Everything needs to be processed, all cuts.
In principle, you can make a euro-sawing tabletop with your own hands - by purchasing a solid slab, but for this you need to have a special tool and solid skills in working with it. In this sense, self-assembly of the surface for the plank seems more accessible - normal connections can be made by a person who does not even have professional skills, if he puts in the effort and figures out how to connect two tabletops together.
Eurojoint (photo) looks more neat and forms a surface without protruding parts. The end of one part is processed, and the longitudinal edge of the other. The difficulty is that the cut goes straight along almost the entire length, and then smoothly turns to an angle.
All cuts are treated with sealant on two parts. On plain surfaces, especially dark ones, the connection between the tabletops will be almost invisible, but if there is a textured pattern, then you can determine the place of the joint.
If you do not buy parts with ready-made cuts for joining, then you can order modifications to the joint at the place where you purchased the slab or find a production facility with the appropriate equipment.
Sequence of work
Before you start assembling it yourself, it’s worth watching a video and photo of the euro-cut tabletop, which will help you understand the details of joining the slabs.
When buying a tabletop, you need to choose the length of the slab with a margin, since after a successful connection it needs to be cut. The first thing to note in the work is the uniform arrangement of the main elements.
Note!
- Ventilation in the kitchen: basic rules for creating natural ventilation + design options and installation diagrams
- How to hide a gas pipe in the kitchen: 120 photos of successful examples from designers on how to beautifully hide a gas pipe
- Kitchen designer: how to use the program and make your own kitchen design, tips on planning in the online designer
Throughout the entire assembly process, care should be taken to ensure that both tabletop slabs are strictly horizontal and remain at the same height. When connecting elements with special ties, it is worth pre-fixing all parts involved in the work.
The docking procedure itself can be divided into several stages:
Appropriate cuts are made on both parts of the tabletop using a special template. After this, the slabs are joined together and the quality of the future joint is checked. If the result is satisfactory, you can proceed to the next step. If necessary, the slabs are adjusted to the desired size by cutting off the edges. Next, using a router, grooves for the screed are cut out on both halves
It is important to follow some rules; the depth of the finished grooves should be more than three-quarters of the thickness of the tabletop. After cutting, you need to check the practicality of the grooves by inserting ties into them
If everything is fine, you can proceed to sealing. Before the joint is finally formed, the edges of the slabs are coated with a special sealant (most often it is silicone with adhesive properties). This will protect the connection from moisture. After applying the composition, both halves are joined and pulled together.
After all the procedures performed, it is necessary to wait until the sealant has dried and carry out final processing and cleaning of the surface.
Assembly: eurojoint kitchen countertop
The assembly of the tabletop parts is carried out using ties-clamps, as is the assembly under the plank.
However, in the case of connection with a euro saw, you will have to carefully control the relative position of the parts being connected until the nuts are completely tightened - they must be strictly at the same level. It is better to connect the table top with ties after first fixing both parts.
If there is a displacement of the planes, this can be corrected using self-tapping screws - simply by pulling the protruding part to the desired level.
Plates with this type of connection are difficult and time-consuming to install, but there is an advantage - you can order a design of almost any configuration, in which the joining of the tabletop at an angle is not limited to anything: a complex shape, with smooth turns.
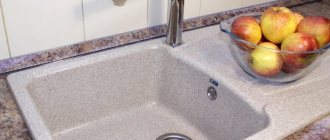
Countertops without joints: practicality and functionality
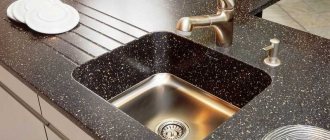
Due to their high performance properties and numerous advantages, the popularity of artificial stone products is constantly growing. Reliability, beautiful appearance, impressive decorative capabilities and variety of textures make the material suitable for any modern interior. In addition to the main operational properties, artificial stone has another undeniable advantage - the ability to manufacture solid parts of any shape, without seams or joints. Countertops without joints look beautiful and are functional to use.
Seamless production technology allows us to produce tabletops without seams of all shapes and sizes. They are not afraid of moisture, they are easy to clean, dirt does not accumulate on them, and germs do not multiply. Solid countertops look luxurious in any interior, be it a kitchen or a bathroom.
The process of creating seamless artificial stone countertops
Artificial stone slabs come in different sizes, so you can make kitchen countertops without seams without much difficulty. Seamless technology is especially often used when creating corner furniture for the kitchen. Depending on the chosen material - acrylic or quartz agglomerate - a certain technology is used.
1. Making a kitchen countertop without joints from acrylic stone.
One of the visible advantages of acrylic stone is the ability to create an almost invisible seam. The process of gluing an acrylic tabletop is quite simple:
- preparation of end surfaces (processing, grinding);
- installation of special ties at the ends;
- applying two-component glue and fixing parts of the tabletop until the glue dries completely;
- grinding and polishing the surface.
If all work is carried out at a high professional level with precise adherence to technology, the seam on the countertop is almost impossible to see with the naked eye.
2. Manufacturing of countertops from quartz agglomerate.
The process of preparing and gluing kitchen countertops without joints made of quartz stone is more labor-intensive and requires the use of specialized equipment. The entire surface preparation process is carried out at the factory:
- Machining the ends of parts;
- preparation of seats for screeds is carried out using high-precision equipment;
- application of polyester glue and installation are carried out directly at the installation site of the tabletop;
- Screed the surfaces to be glued as tightly as possible until the glue completely hardens.
The resulting seams can only be seen by carefully examining the surface.
The use of seamless countertops in the bathroom
Due to their high performance properties, durability and resistance to external influences, countertops made of artificial stone are used in the most difficult operating conditions. One of the most common options are seamless bathroom countertops. They are not afraid of water, are not susceptible to mold, and are resistant to chemical cleaning agents. Countertops made of artificial stone are not susceptible to changes in temperature and humidity. The absence of seams makes them practical and functional, and their impeccable appearance allows them to be used to solve any design problems in various interiors. Bathroom countertops that imitate various surfaces are almost as common as models for kitchens.
How to dock and do it yourself (video)?
If you purchased a solid canvas with the expectation of completing it yourself, then before purchasing it would be a good idea to assess the amount and complexity of the upcoming work. At the same time, you need to understand that a general idea of how to connect a countertop does not mean that it is a simple process.
To really assess whether you can solve the problem yourself, you need to find and watch a couple of videos that tell you how to make a Euro-cut tabletop with your own hands.
- Sawing requires careful marking and precise, strictly perpendicular cuts. Sawing should be done with a circular saw with a new blade, but it must be taken into account that chipping is unacceptable. You can also cut by hand, but using a file, even a perfectly sharpened one, will not allow you to achieve perpendicularity throughout the entire length of the cut. Any deviation from the vertical during sawing will affect the assembly - gaps will appear that will be noticeable.
- To make the task easier, you can attach a ruler to the slab, securing it with clamps (special joints for tightening - tabletop connectors), and lay the slab itself with the laminated surface down - this will reduce chipping.
- Euro-sawing is made according to a template, which is also pressed against the slab with clamps. The corner is milled with a straight edge cutter; on the second part, an internal cut is made according to preliminary markings. The rounded part is cut off with a jigsaw.
- To place the ties, you need to mark and drill blind holes and grooves - two for each joint.
- The distances from the edges to the clamp are from 70 to 150 mm, depending on the design of the lower tier (cabinets) and the installed reinforcement strips.
- The grooves for the clamps are milled; for this you buy a router, which is quite expensive.
- Before starting work on placing the fasteners, you need to carefully check whether the fastenings will interfere with the installation of built-in appliances, sinks, stoves or hobs. You can find videos online that clearly demonstrate how to make a euro-cut table top (video).
Despite the difficulty of doing it by non-professionals, you can do it yourself if you think about each stage of the work. There are a lot of tips online on how to join a kitchen countertop without a plank.
And one more thing - you should remember that this is not a solid canvas, so there must be a strong support under the tabletop. If you press on the joint, the parts should not change their position in any way. If possible, it is recommended to secure the seam with the euro saw with a chipboard tire on the bottom side.
Conclusion and recommendations
To prevent moisture from entering the seam, you should use a waterproof sealant and treat the joints with it.
If the walls are uneven, then a gap will form between them and the countertop. It will not be possible to close it simply by changing the position of the kitchen surface. In this case, you can try to close it with a table plinth, but this will only work if the curvature is insignificant. If the gap still remains significant, then you will have to level the wall.
If, when planning a set that will be installed with the letter “P”, there are uneven walls in the kitchen, then in this case gaps will be visible along all the walls. If the unevenness is minor, then they can be eliminated by installing it as close as possible to the wall. Work out all existing gaps on the surface separately and seal them with special strips, and file the sides adjacent to the wall.
Without professional skills, you can connect two tabletops with a euro saw, but you should take into account the following:
- The cut requires precise marks. For these purposes, you will also need to use a circular saw, when working with which you should try to avoid even small chips. Any gaps, even if they are minor, will eventually be visible.
- If the tabletop does not have a solid canvas, then there should be a support under it that will hold it. After the connection is made, you will need to press on the joint. When the surface remains solid and does not move, we can speak of a successful Eurocut.
- To ensure a smooth and high-quality cut, it is best to take a new cutter.
- If debris somehow gets into the seam, there is no need to try to get it out. The best option would be to wait for the sealant to dry and then clean the contaminated area.