Painting mesh is considered a convenient auxiliary material for installation of finishing and cosmetic repairs. It is used as a reinforcing base for putty, plaster, and paint. Why carefully level the surface if a mesh fabric does an excellent job of this function. Manufacturers offer a choice of rolls of different heights, cell size and fiber thickness vary.
Aerated block wall: features
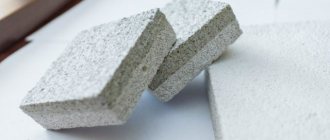
The gas block consists of 5 components:
- Quartz sand.
- Water.
- Aluminum gas generator.
- Lime.
- Portland cement.
When all the components are mixed, the lime reacts with the aluminum paste. Hydrogen bubbles form. After drying the aerated concrete, the bubbles turn into closed pores. They occupy 85-95% of the block volume. It is the porous structure that gives the gas block 4 advantages compared to other building materials:
- Low thermal conductivity - from 0.05 to 0.12 W/m*C.
- High sound insulation coefficient - 40-44 dB (depending on density and thickness).
- Low specific gravity.
- Due to this, the blocks are easier to transport and install; they do not create critical pressure on the foundation.
The porous structure also has disadvantages. One of them is the ability to absorb a lot of moisture. Although some aerated concrete houses have stood for decades without plastering, these are rather exceptions to the rule. We do not recommend taking risks. It is better to plaster the walls and protect yourself from problems with the facade.
Moisture trapped in closed pores turns into ice in the cold. Water has a density of 1000 kilograms per cubic meter, ice - 900. That is, with the same mass and reduced density, the volume of ice increases compared to the volume of water by at least 10%. If aerated concrete walls are oversaturated with moisture, even such a small expansion will cause ice to destroy the pores and cracks will appear in the walls. This must not be allowed under any circumstances! This is why it is so important to plaster aerated block walls.
Fiberglass product
This reinforcing material has all the qualities of the “plastic” mentioned above, but at the same time it is resistant to chemical influences. A fiberglass product is much stronger than its plastic counterpart and can withstand high tensile loads. Reliability and strength are determined by the surface density of the fiberglass product. Density is measured in grams per 1 m² - the higher the value, the stronger the reinforcement of the plaster mortar.
Based on density, the material is divided into three groups . This or that material is used for different types of work:
- Interior decoration. Density - 50−160 g/m². There is a plastering and painting option. The painting mesh has a lower density, and the cells have dimensions: 2×2; 2.5x2.5 and 3x3 mm.
- Facade and other external works. Density is 160−220 g/m², and the material is used for external putty and plaster. The cell size is usually 5x5 or 10x10 mm.
- Finishing of plinths and underground parts of buildings. Density - 220−300 g/m². These parameters characterize reinforced anti-vandal nets that can withstand heavy loads and are capable of performing their functions in extreme conditions. Because the production of these materials requires more raw materials, and their cost is higher.
Marking
Depending on the density, the product receives one or another marking. The following letters or combinations thereof are usually used:
- "C" - grid;
- “N” - external work;
- "SS" - fiberglass mesh;
- “Ш” – putty (painting);
- “B” - internal work;
- “U” - reinforced;
- “A” - anti-vandal (basement).
Density and tensile strength values are also often indicated on the packaging.
Let's decipher, for example, this marking - “SSU 200−4600”. According to it, we have “Reinforced fiberglass mesh”, with a density of 200 g/m² and a tensile strength of 4600 N.
During manufacturing, the material undergoes a special treatment that increases resistance to an alkaline environment, since most plaster and putty solutions for finishing are weak and medium alkalis. Fiberglass is impregnated with polyacrylic dispersion, which serves as protection against aggressive influences for a long time. The seams are sealed with this mesh. Reinforcement of corners is carried out using a mesh attached to plastic or metal corners.
Purpose and use
The material has become quite widespread. Fiberglass mesh is used for the following purposes:
- Strengthening the finishing layer with an internal frame that will hold the cladding over the entire surface, preventing cracks and peeling from the base from appearing.
- Increased adhesion of the finishing layer to the walls due to the relief. On sand-lime brick, polystyrene foam and a number of other materials, the solution can “creep”. So, for these surfaces, mesh plaster is a prerequisite.
- Treatment of joints and seams, which is done to level surfaces. “Fiberglass” is used in the installation of foam plastic, plasterboard and other block, sheet and panel materials.
- Strengthening the joints of window and door blocks with the wall.
- Strengthening heat and waterproofing coatings and reinforcing self-leveling floors.
If there are doubts about the quality of the material or its manufacturer is unknown, request a certificate or technical certificate confirming the main properties and the presence of impregnation against alkali. These documents are issued only by ROSSTROY.
Types of plasters for aerated concrete
When choosing plaster for aerated concrete, pay attention to the following criteria:
- Vapor permeability coefficient. It is desirable that this indicator coincide with that of aerated concrete, or be slightly lower.
- The amount of water to prepare the solution.
- Adhesive properties. The higher the better.
- Minimum and maximum layer thickness.
- Frost resistance. This applies to facade plasters for aerated concrete; for interior mixtures this indicator is not important.
There are several types of plasters for aerated concrete:
- Plaster.
- Cement-sand.
- Facade (including decorative).
Please note that gypsum plasters can only be applied indoors. They are not suitable for wet rooms such as the kitchen or bathroom. Gypsum quickly absorbs moisture from the environment in large quantities.
However, gypsum plaster has many advantages:
- Dries quickly.
- Easy and evenly applied.
- It is much easier to create a perfectly flat surface of the layer than with other types of plaster for aerated concrete.
- This is the cheapest option compared to other types.
- Economical and low consumption.
Cement-sand plaster is excellent for both external and internal walls. By the way, this is the most common type of plasters on the market - more than 1000 items. However, cement-sand plaster also has its disadvantages:
- Distributes less evenly than gypsum plaster.
- To prepare the solution you need more water than for other plasters. And the gas block quickly and abundantly absorbs moisture, so it can worsen the characteristics and properties of the plaster layer.
- After hardening, cement-sand plaster has a higher coefficient of vapor permeability than aerated block.
Therefore, cement-lime plaster was invented specifically for aerated concrete. The presence of lime in the composition improves the quality of the solution and the hardened layer.
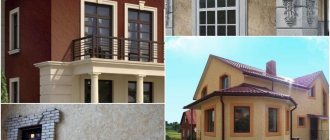
Facade plasters are distinguished by a wide range of subtypes specifically for aerated concrete and foam concrete. We recommend that you choose this option. The manufacturer selected the components so that the solution, after dilution with water, meets all the requirements without exception:
- Vapor permeability like aerated concrete.
- High adhesion to mineral substrates, including cellular concrete.
- Resistance to precipitation, ultraviolet radiation, high humidity and temperature changes.
- Attractive appearance.
Facade cement-lime plasters with additives are more expensive than standard ones. But the game is worth the candle.
Working with polyester mass
Separately, I would like to talk about the quality of the putty, because further finishing of the walls depends on this indicator. The polyester mass, which is sold in finished form, has proven itself well. It contains polymers that extend the service life of the coating, but the price of such material is much higher than that of conventional putty.
Polyester mass is used by professionals for:
- finishing;
- as a leveling layer and covering cracks;
- achieving smoothness and evenness of the walls.
The use of a polyester mixture sometimes allows you to avoid grouting and sanding the surface of the walls. It adheres ductilely and easily to walls, and is also easy to sand.
Among the polymer finishes, the following are popular:
- universal;
- finishing;
- fiberglass based;
- aluminum;
- pneumatic spray, etc.
As a coating for rough finishing, No. 40 to No. 80 is suitable, for finishing – from No. 100 to No. 180. Large numbers are used very rarely when it is necessary to prepare the surface for glossy paint. For more information on how to putty with mesh, watch this video:
Classification of reinforcement materials
Source
Application technology: is a mesh needed?
Plaster mesh increases the adhesion of plaster to mineral substrates. At the same time, it prevents possible peeling of the plaster and its crumbling under unfavorable environmental conditions. For interior plastering work, a mesh is not always needed. But when it comes to the facade, the picture is radically different. Temperature changes, high humidity, frost, rain, snow - all this can affect the adhesion of the plaster layer.
Plaster mesh is needed for any mineral bases for the facade. Aerated concrete is no exception. This does not mean that without a reinforcing mesh, the plaster is doomed to crack. Not at all! However, it is much safer to plaster with a mesh than without it. Moreover, the mesh both increases adhesion and protects against cracks. Why not?
There is a separate case when a grid is absolutely necessary. If the house has just been built, it will continue to shrink for some time. Because of this, plaster without a mesh will definitely crack. So in this case the grid is simply necessary!
Next, we will look at how plastering of aerated concrete facades is carried out.
Purpose of reinforcing materials on the wall for plastering work
Plaster reinforcement is an effective, time-tested technology for improving the characteristics of a leveling coating.
Painting mesh for plaster performs the following functions:
- Helps create a coating layer of greater thickness than specified by the manufacturer. This allows you to solve the problem of uneven walls. Sometimes, to create a uniform and smooth surface, it is necessary to apply more mortar than the structure can withstand.
- Creates conditions for the formation of a solid layer, protects it from shrinkage cracks and their consequences. This is especially important for finishing ceilings, door and window openings. The reinforced mesh helps prevent peeling and subsequent collapse of the finish.
- Increases the durability of the finishing layer. Thanks to the mesh, the coating can withstand heavy loads. For example, this is important if cabinets or heavy shelves for books and other items are mounted on the wall. Thanks to the reinforcing layer, the load on the wall is reduced.
Reinforcement is subject to a solution of any composition whose thickness exceeds 3 cm.
Cases when you need a façade mesh for plaster:
- when performing work with a large thickness of the mixture - partially or over the entire base;
- if the building is located close to other buildings and complexes, which, in turn, have a vibration effect on it;
- if neighboring premises have undergone redevelopment and the specific weight of the structure has been redistributed;
- to modify the initial durability characteristics of the coating - increases the load-bearing capacity for placing attached household equipment and furniture.
Preparing the base
If you carry out this step conscientiously, you will protect the plaster layer from the formation of cracks. Preparatory work includes:
- Removing stains of grease, dirt, mastics.
- Cleaning from dust. To do this, use a damp brush, roller or rag. The tool must be used in the same way as when applying a primer.
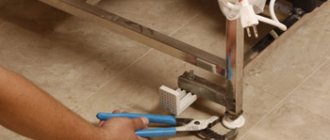
- Removing excess mortar if it remains in the seam area. To do this, use an Aeroc aerated concrete trowel, TRV or its analogues. By the way, it is better to remove excess mortar at the construction stage, while the glue is still wet.
Advantages and disadvantages
The advantages of the mesh include:
- light weight, which allows it to be used on any structure, including light interior partitions;
- ease of installation - different elements are used for mounting on the wall;
- affordable price - depends on the material, as well as the manufacturer;
- easy processing - easy to cut into pieces, which simplifies finishing work;
- Convenient packaging - available in rolls, which simplifies finishing;
- withstands significant weight of cement-sand mortar.
Each type has operational characteristics. Plastic does not rust, which prevents the formation of red spots on the finish. Metal cells are highly durable. Often used for finishing facades and structures with a large area.
The features also concern the weaknesses of the material. Metal mesh is susceptible to corrosion. You need to work with them carefully. Do not leave it outdoors for long periods of time.
Polymer materials are characterized by low strength. It is not recommended to use for applying a thick layer of plaster.
Applying primer
The primer increases the adhesion of other building mixtures to the base, and also protects the base from high humidity. Be sure to buy primers with antifungal, antiseptic and waterproofing effects. Remember that you are working with aerated concrete, which is vulnerable to moisture. A primer with such properties will protect the walls from the formation of fungus and mold. This is especially important for rooms with high humidity or for facades.
Apply the primer with a brush or roller in a dense layer. You cannot dilute the soil with water, because it will lose its properties.
When the primer has dried, proceed to installing the façade mesh.
How to use
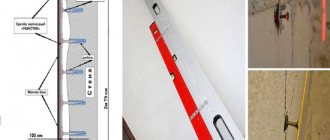
The reinforcing capabilities of painting grids are maximized when they are placed inside the processing layer intended for leveling. The probability of crack formation decreases in proportion to the approach of the mesh to the outer layer of the surface. Technological process for reinforcing the putty layer:
- Prime the plastered wall.
- After the primer has hardened, apply the putty base.
- While the putty is wet, place a fiberglass mesh on the wall and press it into the solution with a tool (trowel).
- Cover the network with an additional layer of putty, leveling it with a wide spatula.
When the reinforced layer has hardened, it is time to process it with a sanding mesh or sandpaper. In order to achieve an ideal aesthetic effect, a finishing compound is applied to the second layer of putty, which, after hardening, is sanded with fine-grain emery cloth. A completely flat plastered wall is coated with a finishing primer, after which it has hardened, painting can begin.
The technology for using mesh with an adhesive layer on drywall is somewhat different:
- The joining boundaries are expanded, cleaned and primed.
- Serpyanka is glued to the frozen joint.
- Putty strokes are applied with force so that the mass squeezes through the mesh and fills the space between the sheets of drywall.
- Without interruption, apply the second layer of putty, gradually leveling it with a spatula.
After sanding the surface and making sure that the primer has completely polymerized, you can begin painting and wallpapering.
The web is also initially glued to the primed surface: the glue is spread with a roller, the strips of fiberglass are leveled and pressed with the same adhesive roller. The putty mixture is applied after the glue has completely hardened. The following steps are identical to previous finishing technologies: sanding and priming.
Note! The next mesh for puttying fiberglass walls should overlap the previous one by at least 5 cm.
In order to reinforce the putty layer at the outer corners of the openings, you can use a specially designed corner with attached fiberglass. The corner forms an auxiliary barrier against careless chipping as a result of severe mechanical damage by a person carelessly leaning on these areas. Internal corners are often reinforced with a standard grille or fiberglass.
Creating a “fur coat”
Now you have to throw the plaster solution over the reinforcing mesh and beacons. To do this, use a ladle or trowel. Fill the space between the beacons, starting from the bottom of the wall.
Please note these rules:
- Portions of plaster should be placed close to each other.
- After treating an area 100 cm high, level the mixture with the rule, and only then apply the “fur coat” above.
- As a rule, swipe from bottom to top. Make oscillating movements from side to side.
- The rule should be tightly pressed to the beacons.
- If there are areas left that are not filled with mortar, be sure to apply plaster there too. Then go through the rule again.
Application
Before using the reinforcing fabric, it is necessary to cut it into fragments, and these fragments should be laid on the first layer of plaster. It is also important to overlap the mesh pieces. The reinforcing fabric is stretched across the plaster from the center to the edges. It is important to watch the edges of the canvas so that it does not peek out.
The puttying process using painting nets is almost the same for all types:
- it is necessary to prime the plastered surface;
- Apply the putty layer only after the plaster has completely dried;
- using a spatula, lay the painting mesh on the undried layer of putty;
- apply another layer of putty.
When using serpyanka, first you need to clean the joints and prime them, and after drying, apply serpyanka. After all these steps, a second layer of putty is applied and leveled.
There are two ways to apply serpyanka:
- Attaching the mesh to a surface on which glue has been previously applied. For better fixation, press the serpyanka well to the surface. After the mesh is attached, you need to apply another layer of glue, and after complete drying, apply putty. This method may reduce the quality of the finish;
- A putty layer is applied to the surface, and a mesh is placed on it. Immediately after attaching the mesh, it is necessary to apply a second layer of putty.
With fiberglass, all work is done using a roller. First, glue is applied to the surface with a roller, then fiberglass is applied so that the strips overlap each other by 50 mm. To level the mesh, you need to run a roller over it. Before using the spider mesh, it is necessary to prime the surface.