One of the most common ways to improve heating in an apartment comes down to installing additional radiators or increasing the number of registers. You just need to know the assembly diagram according to which you can connect the heating radiators to each other. The process is quite troublesome; you still need to be able to disassemble the old battery without damaging the fittings and pipes.
It is better to build sections together
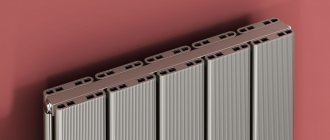
Radiator connection diagrams
Heating radiators are connected to the heating circuit according to several schemes, the choice of which must be approached very responsibly. The fact is that incorrect connection leads to loss of almost half of the heat. Incorrect connection of sections leads to uneven heating of the system, and violation of assembly technology leads to the formation of leaks and ruptures. Therefore, it is important not only to choose a suitable diagram for how to connect the heating batteries to each other, but also to correctly connect the radiator sections. In any case, the work requires attention and accuracy.
Radiators are connected to the heating system as follows:
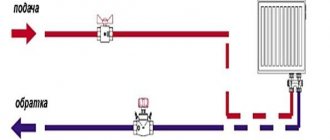
- Consistently . In this case, one heating circuit pipe is required.
- In parallel . The work involves two pipes; the radiators are connected to each other by means of an upper and lower outlet.
- A through connection involves the passage of coolant through the heating device system.
If we take reliability and the economic side as a basis, then we can say that parallel connection of heating radiators will be the most profitable option.
Purpose of the heating system
In a private house or apartment, the optimal temperature must always be set.
which varies from 18 to 25 degrees. In winter, this figure can only be achieved with a high-quality heating system. Its efficiency must correspond to the area of the building, and the radiator connection diagram must also be selected correctly. It is heating devices that compensate for heat loss, which is mandatory in any room, since heat escapes through windows, doors and even communication elements.
You especially need to pay attention to what heating radiator connection diagrams exist and choose the best option. It is advisable to make a choice at the stage of building a house or apartment, but often you have to change a low-quality system, so you can work on a ready-made private house or apartment
But in this case, the installation will be more complex and specific.
It is considered the most optimal to connect heating radiators to a central heating system, since in this case an effective and reliable system is obtained that provides uniform and constant heating in the winter. However, many private houses are located at a certain distance from the city, so using a connection to centralized heating is not always possible.
https://youtube.com/watch?v=olrD9qxCAhM
This is why you have to create your own autonomous systems in a private home. which:
- must have high efficiency;
- if you want to do everything on your own, you can watch a training video to avoid mistakes;
- numerous nodes must be correctly formed and adjusted;
- installation must be carried out in accordance with all requirements and conditions;
- Reliable and correct piping of the system must be provided.
What factors influence the efficiency of a heating system?
To ensure uniform and high-quality heating of rooms in the house, it is important to know what elements affect it. These include:
- correct network wiring, which affects the heating efficiency and how evenly the rooms will be heated, and the cost of heating depends on this;
- competently selected equipment for the system, for which it is necessary to make certain calculations that will determine what efficiency, power and other parameters the main elements should have, and even fuel consumption depends on this;
- correct installation of the main components and elements of the heating system, which include pipelines, radiators, fittings and even a boiler with a pump, since if any actions are performed incorrectly, the heating will either not work at all or function poorly, so it is advisable to view the training manual in advance video.
Therefore, before installation of all heating elements is carried out, you need to concentrate on calculations and selection of the heating radiator connection diagram. It is necessary to select the batteries themselves, which will have the required efficiency and other characteristics. Other types of products intended for installation must be purchased and they must be of high quality. The work itself should be done by hand only after carefully studying the instructions and videos with sequential actions.
Materials and tools for attaching an additional section
Before connecting a heating device, you need to calculate the number of sections required to effectively heat the rooms. In order to correctly and efficiently solve the problem of how to connect an aluminum radiator, you need to prepare the following tools and materials for work:
- Two keys: pipe and radiator.
- Nipples for heating system.
- Side plugs.
- Intersectional seal.
- Paronite gasket.
- Sheets of sandpaper.
Who to entrust the work to?
Since you will still have to pay, it is better to do everything at once. In any case, with all the radiators on one riser. And here the question arises: who will carry out this work. To get started, you can go to the housing office or departmental office and ask about their prices. As a rule, the prices there are rather high, and the quality of work is not up to par. To make sure of this, you can ask neighbors who have already dealt with them.
You can find a private owner. Just not from advertisements, but from the recommendations of acquaintances, colleagues, friends. Their prices are rarely higher than those of operators. And the quality is better - this is their bread: if they do a bad job, there will be no customers. That’s why they try (if they are sane) to do everything conscientiously.
Choosing a performer is not an easy task
There is still an opportunity to negotiate with the housing office employee by bypassing the cash register. But here the option is controversial. Firstly, they tend to ask for a price based on the client’s wealth and it is far from a fact that they will demand less than the price list. More likely - more. Why, tell me, should they pay more for the same quality of work (it is unlikely that they will work more diligently than at their main job)?
Another option is to contact a specialized organization. And again, preferably based on recommendations. Although, organizations are forced to monitor the quality of work for prosaic reasons: they need clients. If they have a bad reputation, no one will go to them
Therefore, if you don’t know the organization, there are no recommendations, you can pay attention to the period of its existence on the market. If it’s not a year or two, then they definitely know how to do something, otherwise they wouldn’t have existed for so long
Naturally, pay attention to the services they provide. Many people suggest that issues with permission and disconnection of risers should be handled by the management or operating organization. You just specify the list of works and time. How expensive will it cost? In different ways: organizations, like their leaders, are different. It may be more expensive than the work of a mechanic from the housing office, but at least you will have someone to file a claim with in case of problems: you sign an agreement that will clearly outline who is doing what.
And the most economical option: do everything yourself, with your own hands. It’s not an easy task, but it’s not the gods who burn the pots. Just first you need to find out everything down to the smallest detail, purchase everything you need, prepare tools and equipment, and only after that write an application to turn off the riser.
Preparatory stage
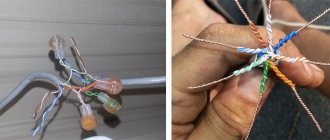
During the preparation process, the radiator is dismantled and sections that will be built up are disconnected. It is mandatory to clean the heating device from dust, dirt and rust. To understand how to connect heating radiators to pipes correctly, conduct a visual inspection of the threaded hole to which the heating circuit pipe is connected. If there are limescale or other types of deposits, clean them with sandpaper. Neglecting these steps may result in a leaky connection, in particular the intersection gasket, or a leak.
Direct connection of sections
The problem of how to connect sections of a bimetallic radiator is solved as follows:
- Additional sections are attached to the main part.
- Place the sealing element.
- Determine the distance to the nipple using a radiator wrench.
- In accordance with this distance, install the nipple into the radiator.
- The radiator key is turned using a pipe wrench.
- The nipple is wrapped into two sections located opposite each other.
- Turn the radiator key three turns.
- In the lower part perform similar actions.
After this, the paronite gaskets and side plugs are installed, and a pipe wrench is used during the work. Tightening is carried out as much as possible so that the connection is reliable and tight. The remaining sections are connected to the battery according to the same scheme.
How to open a ball valve
A ball valve refers to elements of shut-off valves that prevent adjustment of liquid pressure at any pressure. Its main task is to completely block the flow of liquid or vice versa. If the ball is not closed or opened sufficiently (until the lever stops), wear occurs on the ball, which quickly leads to its breakage.
How to correctly determine the operating condition of a ball valve. The design itself provides for the use of an L-shaped lever, about 10 cm long, as a handle. This is done so that the user does not apply much effort when turning the lever. Attention, when the lever is installed along the water pipe, the tap is open (water flows into the radiator). If the lever is perpendicular to the pipe, this is a closed position (no fluid flows into the battery).
Ball valves are often used in "passive" applications. Usually this is a drain, on batteries, to release air. Or central coolant supply in individual heating systems.
Checking the assembled structure
After completing the assembly of the heating device, a visual inspection is carried out for possible errors. If they are absent, a test filling of the heating system with water is carried out. The first start-up of the coolant is carried out without pressure in order to identify areas of poor connection between the radiator and the pipe. If such defects exist, they are eliminated immediately. Refilling the heating system is carried out at normal coolant pressure.
After connecting additional sections to the main radiator, it is necessary to conduct a test test of the system. To do this, leave the heating on for several hours. Then check the condition of the pipe parts, fittings and heating devices. If there are no defects or leaks, they move on to the question of how to connect the heating radiators to each other.
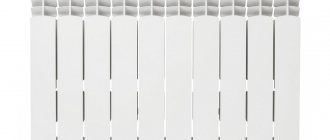
Selecting a battery connection diagram
To solve the question of how to connect aluminum radiators to each other, different schemes are used, so it is important to choose the most convenient and effective one.
In most cases, heating devices are connected in series, which ensures maximum system reliability. In addition, such a scheme does not require large technical costs and maintenance. Using a series circuit, it is possible to connect four radiators. The connection to the system is made at the bottom. If pipes or radiators begin to sag, then special spacers are installed.
The only disadvantage of this scheme is uneven heating of the room. This is due to less heating of the last batteries in the system. Moreover, the temperature difference between the first and last heating device can be about 18 degrees.
The solution to this type of problem is to install an electric boiler.
How to remove a heating radiator in an apartment - instructions, expert advice
How to remove a heating radiator in an apartment, correctly and without surprises ? The need to dismantle the battery may arise for various reasons - adding or removing a section, washing the insides, replacement. In this article you will learn how to remove a heating radiator so as not to damage it and not cause harm to yourself and your neighbors.
All the work described can be done independently without any special tools or equipment. The main thing is to adhere to the dismantling technology. We strongly recommend reading the expert advice at the end of the article.
Shutting off the water supply
If you remove a radiator during the heating season, you must turn off the water. Depending on the design of the heating system, this can be done in three ways.
- In new houses, each apartment has its own heating circuit. All you need to do is turn off coming from the main riser.
- In old buildings, especially those built during the USSR, the water will have to be shut off in the entire riser . Taps are usually located in basements.
- In recent years, during installation, a bypass has been installed on the heating radiator (see photo). To avoid causing inconvenience to your neighbors, open the bypass valve . Turn off the valve going into the battery, wait five minutes and turn off the outlet tap. This way you will disconnect the battery from the system and not cause inconvenience to others.
Quartz radiators: All the pros and cons Heating radiator with bypass.
How to drain water from a radiator
Be sure to stock up on rags and prepare a container to drain the water. The volume of water depends on the type of battery, the number and height of sections. For convenience, see the table:
Radiator typeHeight (mm) / modelMinimum section volume (l)Maximum section volume (l)
| Aluminum | 350 | 0,2 | 0,3 |
| 500 | 0,35 | 0,45 | |
| 600 | 0,4 | 0,5 | |
| 900 | 0,6 | 0,8 | |
| 1200 | 0,8 | 1 | |
| Bimetallic | 350 | 0,1 | 0,15 |
| 500 | 0,2 | 0,3 | |
| 600 | 0,25 | 0,35 | |
| 900 | 0,3 | 0,5 | |
| 1200 | 0,4 | 0,6 | |
| Cast iron | MS 140-300 | 0,8 | 1,3 |
| MS 140-500 | 1,3 | 1,8 | |
| MS-140 | 1,1 | 1,4 | |
| MS 90-500 | 0,9 | 1,2 | |
| MS 100-500 | 0,9 | 0,2 | |
| MS 110-500 | 1 | 1,4 |
Most manufacturers use their own standards and regulations. Therefore the numbers are approximate. But thanks to the data given in the table, you can calculate the capacity of water or coolant contained in the heating battery.
A Mayevsky tap is provided on aluminum and bimetallic radiators. It allows you to safely drain water. To unscrew it you will need a special key. Often on the protruding head of the faucet there is a notch for a flat-head screwdriver. If you don't have a key, use it.
Place the drain container under the tap and turn it off. When the water flows, you can adjust its pressure by turning the head.
On cheap models, instead of the Mayevsky tap, there may be a plug. To drain the water you will have to unscrew it. To do this, you will need a wrench of the appropriate size. An adjustable or gas one will also work.
Wrap a rag or rag around the plug and slowly unscrew it. Remember that the thread can be left-handed or right-handed. Hold the plug with your hand to prevent water from gushing out in a strong stream.
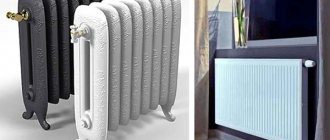
Cast iron radiators
Cast iron batteries have large plugs. They are usually painted and rusty. To unscrew it you will need a gas wrench with a long handle. To increase the force, you can put a piece of pipe of the appropriate diameter on it.
The thread on the plug may be left-handed or right-handed; this cannot be determined by eye. Try to turn it without jerking, applying even force. If you break the thread, trouble will follow.
When the first one or two turns are made, place a container of water under the drain. Unscrew the plug so that it is not knocked out by the pressure - the pressure in the system can be high.
If the plug is painted and paint gets into its joint with the radiator section, treat it with solvent and wait a few minutes. Repeat the process 3-4 times - it will be easier to remove the plug from its place.
If the plug does not budge, pour WD-40 rust converter or its equivalent into the joint and wait 5-10 minutes. After this it will be easier to unscrew it.
Radiators with bottom and saddle connections
Bottom or saddle connection of radiators is usually done with a two-pipe heating system. A valve or valve is usually placed on the incoming and outgoing pipes, which can be closed (see photo). They have a notch for a screwdriver or a hexagon socket (sizes may vary).
Steel radiator with bottom connection.
To drain the water from the radiator, simply close the valve and then disconnect the pipes. If the course of the pipes allows, you can move them down or to the sides. If this is not possible, you will have to remove the radiator from the brackets. To do this, simply pull it up and towards you.
If there are no plugs on the pipes supplying and discharging water, you will have to improvise. Wrap the valves with a rag and place a basin of water under the drain. Gradually unscrew the valve, disconnecting the battery from the general system.
When water begins to come out of the radiator, do not try to unscrew the valve any further. It's better to wait than to flood your neighbors. Wait until all the water has left the sections and only then proceed with dismantling.
How to remove a section from a radiator
Sections of any type of stacked radiators are connected by a nipple nut. It needs to be unscrewed to remove the section from an aluminum, bimetallic or cast iron radiator. To do this, you need a nipple wrench of the appropriate size.
The standard nut diameter is 3/4 inch (but there may be variations). On the outside there is a thread that is screwed into individual sections of the radiator. On the inside there are two small latches that need to be secured with a key. Next, strictly follow the technology for dismantling the radiator section:
- Place the nipple wrench on top of the radiator so that its head is opposite the place that needs to be unscrewed;
- Insert it into the upper channel of the section to the measured depth;
- Turn counterclockwise two turns;
- Insert it into the lower channel at the same distance and unscrew the nut two turns;
- Alternately move from one part of the radiator to another until you completely unscrew the nuts.
How to hide a battery in a room - 11 solutions to the problem
It happens that the nipple nut does not budge (this often happens with old cast iron radiators). In this case, wipe the joint with acetone, solvent or White Spirit. Remove any remaining paint.
Treat the joint with WD-40 rust converter or equivalent. Tap the joint lightly with a hammer (remember that cast iron is strong but brittle). You may have to process the joint several times and wait an hour and a half.
If the nipple nut is stuck tightly, you will have to work hard. The detailed process of separating sections is described in the article “How to properly disassemble a heating radiator: aluminum, bimetallic, cast iron”
Do not unscrew it more than two turns - the radiator may warp. The threads on the nut and sections may become deformed, causing it to leak. And a leak in an aluminum heating radiator is a headache and extra expense.
How to disconnect a heating radiator
There are three types of connection for heating radiators - welded, through a coupling and American. It is not difficult to determine this by eye (see photo).
Unpainted weld seam of a heating system. Coupling for heating system pipes.
If your house has convectors rather than radiators, most likely their pipes are welded to a common system. All that remains is to cut the incoming pipes with a grinder. To dismantle the convector, choose the most convenient place for you - in any case, you will have to cut threads on the heating pipes.
Removing the heating coupling
Couplings were installed during the Soviet Union; this is a simple but effective method of joining pipes. When twisting the coupling, adhere to the following recommendations:
- Treat the joints of the coupling and pipes with a solvent, wait until the old paint comes off;
- The coupling usually has two protruding ribs. It is convenient to grab them with a gas wrench;
- Unscrew the coupling towards you and downwards.
American shutdown
The American fitting for propylene pipes differs from the others in that it has a clamping nut. To disconnect the radiator from the pipes, unscrew it until the mating part is free. After this, you can remove part of the pipe from the radiator.
Old American models crimp the ends of the valve. Over time, the thread takes the form of the mating part and cannot be crimped again. If the radiator was installed more than five years ago, then it is worth changing the entire valve or conduit.
American fitting
How to remove a heating radiator in an apartment - expert advice
Some models of heating radiators, especially aluminum ones, may have a complex internal structure. After draining the water, some volume may remain in them. Do not disdain rags and keep them ready.
When arranging heating for a private home, a coolant is often used. Over time, it decomposes and releases toxic products. Therefore, take precautions when working. Wear gloves, goggles, and a respirator.
Do not neglect safety measures; always have rags, rags and anything that can absorb liquid ready. It’s better to play it safe once than to pay your neighbors for new repairs.
With a side connection system, perform all work as synchronously as possible. This is especially true for aluminum heating radiators - they are more susceptible to deformation. Unscrew the coupling on one side one or two turns and move to the other side.
With bottom and saddle connections, the pipes pass through the floor covering. To give them additional movement, you can remove a couple of parquet boards or laminate. This will protect both the pipes and the coating.
Never, I repeat, never, tear the thread with force or jerking! You can miss the direction, and using too much force can break off the edge. After this, it will not be possible to fix the plugs properly. And if it does, it won’t be for long. Uniform force is the best option. If you don't have enough strength, use a lever.