There is nothing better than relaxing in a country house or country house. Especially if this vacation includes such a pleasure for the body as a bath. When thinking through a bathhouse project, it is important to take into account many nuances. This is the choice of location, building materials, the question of how to carry out interior finishing work, how to install the stove correctly, and much more. In this article we have collected information for you that will be useful at the decision-making stage. With its help, you will decide how to arrange your individual place for relaxation.
When designing a bathhouse, the following factors should be taken into account:
- location on the site, whether it will be a separate building or acts as an extension to the house;
- heater power;
- how many visitors there will be;
- wall thickness, finishing, presence or absence of insulation.
Types of baths
The diversity of baths arises from the difference in cultures and traditions. Thanks to this abundance, we can choose the microclimate in the bathhouse that optimally suits us in terms of temperature, humidity and steam production.
The microclimate is most important for well-being, and according to it, baths are divided into types.
Steam bath: Turkish hammam
In such a bath, the temperature reaches 40-45°, humidity 90-100%. Due to such a low temperature, a soft microclimate is created. In the bathhouse you can not only have a good rest, but also take care of yourself, pleasing your body with cosmetic procedures.
Steam sauna: Russian bath
45-70° in temperature and low humidity - 40-65%. The steam condenses on the skin, forming a kind of film, and the body heats up much more due to the thermal conductivity of the water.
Dry air (Finnish) sauna
Low humidity, 8-20%, is combined with high temperatures of 70-110°. The lack of steam and high temperature contribute to maximum warming of the body;
Wet sauna: sports
Temperature 75-95° at 100% humidity . It is one of the subtypes of the Finnish sauna. The temperature is deliberately increased by watering the stones with water. Such a sauna becomes a place for endurance competitions and poses harm and even danger to the body.
Water bath: Japanese ofuro bath
A traditional bath with a temperature of 40-60° and a humidity of 100% is an exotic type of bath. This is usually a wooden barrel that is heated. Warming the skin under water promotes sweating and washing away toxins and sweat.
The method of heating and steam injection also differs in the baths . Knowing these features, you will choose a bathhouse with characteristics that will suit you and your family as much as possible.
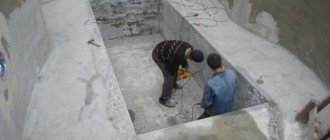
Laying the foundation
The reliability and longevity of a home depends on the foundation. In the place where the extension is planned, the foundation of the dwelling is opened. At the same level, a new foundation is laid.
The optimal foundation option for a 1-story wooden house is a monolithic strip foundation. Its depth is 0.5 m. The width is 300 mm.
Interior decoration of the bath
For a brick and block house, a full-fledged foundation is created that can withstand heavy loads.
The base parameters depend on:
- wall structures;
- bearing load;
- type of building materials.
The stages of foundation construction look like this:
- Determine the location of the bathhouse.
- Drive pegs around the perimeter.
- Using the pegs as a guide, stretch the construction twine.
- Set aside the width of the foundation.
- Install cast-off.
- Stretch 2 lines of twine.
- Check the diagonals and the accuracy of right angles (it is advisable to use a range finder and laser level).
- Dig a trench in accordance with the markings. If the house will have a central sewer system, then the trench needs to be drawn to the closest connection to the pipe. Otherwise, it is carried out to a drainage pit, which is arranged separately from the home.
- If the soil is sandy, install temporary formwork. It helps prevent the walls from falling to the bottom. The internal walls of the formwork are laid with roofing felt or film.
- Install a pipe into the trench under the communications and fill it with sand and soil. The trench under the base is filled with sand (coarse-grained) and crushed stone (2/3). Then you need to moisten the backfill with water and compact it well.
- Place tied rods of reinforcement into the trenches, secure the frame with clamps made of plastic.
- Pour concrete, level, dry. Waterproof with roofing felt or bitumen mastic.
It is advisable to lay the foundation in summer or early autumn. It should dry well and stand for 3 weeks.
In winter, screw piles are used to construct the foundation.
Main rooms in the bathhouse
Each type of bath includes the following functional premises:
- dressing room (dressing room);
- steam room;
- washing room;
- restroom.
Dressing room (locker room)
The dressing room is also called a vestibule. Here visitors leave their clothes, brooms and firewood are stored here. The dressing room performs a number of functions :
- is a zone with a buffer function that equalizes the temperature transition from the climate outside to the temperature inside the bathhouse;
- serves as a place for drying firewood;
- often also serves as a room in which to rest.
The dressing room door should open outward.
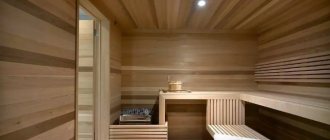
Steam room
This room is the main, base room of the building. This is where the highest temperature is maintained and where the furnace is located. In the corner of the steam room there are stones that create steam. There should be a heat-resistant coating underneath.
There are also benches arranged on steps. Two, as a rule, are intended for sitting, one for lying. When arranging a steam room, you need to think through the nuances:
- the material with which the ceiling and walls are sheathed is characterized by certain thermal insulation properties, taking them into account, the depth of thermal insulation of the rooms is calculated, and constructive techniques are used;
- The effective operation of the ventilation system is ensured by a special box or swinging window with double glazing. The location of the window is opposite the stove;
- the doorway is designed with a higher threshold: this way, cool air does not pass under the door and thermal efficiency is not reduced. The door itself swings outward;
- The steam room and washing room must be separated, otherwise the quality of steam and temperature decreases and fuel consumption increases.
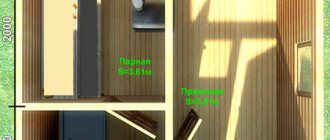
Wash room
The washing room, often a shower stall, is located near the steam room . If the size of the building allows, these zones are separate from each other; in small buildings they are combined. In large buildings, a swimming pool or plunge pool is also equipped here.
The average area of the washing room is 2000x2000mm, then there is a place to take water procedures and place containers with water, hot and cold.
The window is built one and a half times larger than the window in the steam room. The doorway has also been enlarged – 1800x800mm to provide greater comfort. The requirements for heat conservation are lower than in a steam room. The threshold is made high, and the floor is laid with special tiles to prevent slipping and related injuries.
Restroom
Designs of bathhouses with a relaxation room give room for imagination. When there is only one recreation room, it can be made multifunctional through zoning . Eating, drinking tea, watching TV, billiards - all this happens in one room. Zoning is done using partitions, windows, furniture, and finishing materials. Additional comfort will be created by a fireplace in the corner and a couple of armchairs in front of it.
Where to make a pool
Experts do not give specific recommendations regarding the placement of the bathing container. For each citizen, this opinion is purely individual. Inside, the water takes on the temperature of the structure, which means it is warmer than outside. You can place food, rugs nearby and relax with your family or friends.
Outside (especially in winter) there is colder water in the container. For many, it allows them to harden themselves culturally. Some people don’t like the idea of swimming in open areas. Both location methods have positive and negative aspects. But, nevertheless, 2 methods are good and have no particular complaints from civil engineers.
Choosing a place to build a bathhouse
The correct place for a bath should be at some distance from other objects:
- between the bathhouse and the fence of the neighboring area - 1 m or more;
- from any wooden building - from 15 m;
- be away from the garage, wells, swimming pools, children's areas;
- from a residential building - at least 8 m;
- from the roadway (street) - at least 5 m;
- do not cast a shadow on the neighboring area.
It is worth considering some more nuances:
- the optimal place to build a bathhouse is the backyard;
- you should decide in advance: the bathhouse is a separate building or an extension to the house;
- when designing, it is necessary to provide for ventilation and wastewater disposal;
- wind direction and cardinal directions should be taken into account. It is better to choose a location in the southern part of the site, the windows face west. Entrance is from the south to avoid snow accumulation;
- It is recommended to avoid slopes and damp areas;
- It is necessary to take into account climatic conditions and soil. The surface for construction is chosen to be flat.
In general, the site must comply with the requirements of regulations and legislation.
Video description
What are the features of building bathhouses and hand-built houses? How to choose the right materials and what to pay attention to? See the answers in this video:
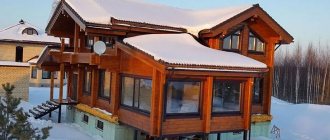
Frame
Frame baths are gaining popularity due to the comparative cheapness of the material and quick construction. Such a bathhouse can be built at any time of the year; the structure turns out to be warm, it can be used for its intended purpose immediately after construction. The disadvantage of a bathhouse is the need for high-quality insulation and finishing (which can offset savings on the foundation). It is advisable not to delay the insulation process and carry out it in dry weather.
Bath dimensions
The layout of the bathhouse is designed primarily taking into account the parameters of the site. There are several options for baths, differing in their sizes. Let's see what dimensions of the building exist and what is typical in such projects.
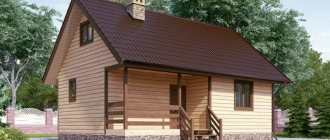
Bathhouse 2x2 m
This unassuming compact building consists of the most important things: a dressing room and a steam room. Sometimes there is a place for a rest room. Therefore, the stove must be placed so that it fits into both rooms. It is preferable to use a steel electric furnace. If desired, a washing room is located in the steam room.
This construction has its advantages:
- compactness;
- efficiency;
- ease of construction;
- little time for construction;
- The steam room heats up very quickly.
Such a bathhouse saves space and budget. The correct layout of the structure will make it comfortable and perform many functions.
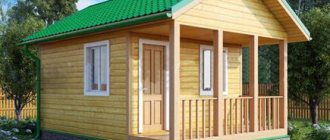
Bathhouse 3x3 m
The 3 by 3 bathhouse project allows you to do more serious planning. The relaxation room is planned separately, the washing room and steam room are combined. They can exist separately, occupying 1.5 m each.
The bathhouse is designed to serve 2-3 people. A veranda or attic can easily be attached to it.
Bathhouse 3x4 m
The interior space is divided into three parts. You can add a shower room or washing room to the building. Typically, such baths have a relaxation room occupying 4.5 m2. The stove firebox is located in the dressing room - this makes it easier to maintain the temperature in the steam room. The boiler for heating water is located at the maximum distance from the entrance door.
The design assumes the presence of a locker room. The terrace will increase the area of the building.
Look at the photos of 3x4 bathhouse projects with your own hands.
Bathhouse 4x4 m
The 4 by 4 bath design allows the steam room and washing room to occupy a larger area than in previous compact versions. Such buildings are usually built from logs, which reduces the space inside. Therefore, one room performs several tasks, for example, the dressing room also becomes a locker room and steam room. In such a room two or three shelves 0.5-0.6 m wide will fit. The corner is reserved for a wood-burning or electric stove.
You can create more comfortable conditions, for example, equip a rest room and an additional washing room. By installing a stove in the steam room, you can use it to heat the adjacent room, so it’s easy to set up a relaxation room there, combined with a locker room.
The attic, which can easily accommodate a recreation room or a place to play billiards, will help increase the usable area.
Bathhouse 5x4 m
This option allows you to set up a separate washing room and steam room. The rest room becomes more comfortable and spacious, and can be combined with a locker room or dressing room. Due to the direct absence of a dressing room, this design cannot be used on cold days. The rest room is located just outside the entrance door. Its spaciousness allows you to install a sofa, armchair, and TV. The washing room is equipped with a shower, toilet, and sink for washing hands.
Convenient and free access is provided to any room.
Bathhouse 5x5 m
Such dimensions of the building make the premises comfortable. These parameters are very popular for a bath. You can combine a bathhouse with a terrace under one roof.
Often 10-12 square meters are allocated for the dressing room. m, which is half of the total space. The rest of the room houses a sink and a steam room. This design allows you to comfortably take bath procedures and relax. The relaxation area is decorated with a sofa and an armchair.
In the attic attached to the bathhouse there is a bedroom or a children's room. Now the building is ready to receive guests.
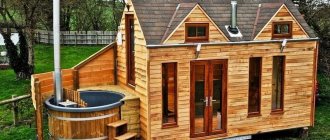
Bathhouse 5x8 m
The building effectively uses the first floor and allows for the addition of an attic. It can be divided into several zones, for example, a bedroom and a billiard room. You can add a balcony. However, the larger the premises and the total area, the more acute the questions arise about how to provide the premises with heat and how to waterproof them. The issue of fire safety is important. When installing a steam room, it is important to carry out all the work correctly, which will require expert advice.
Bathhouse 6x6 m
A 6 by 6 bathhouse design is considered optimal in size. The bathhouse will provide comfort in all functional rooms. It becomes possible to install all the necessary heating equipment and furniture without much space saving. There is an opportunity to arrange an attic, veranda, terrace, further increasing the usable space. A brick stove in a steam room will ensure longer heat retention.
The bathhouse can be used by 8-10 people at once. Each visitor accounts for approximately 1.1 m. The steam room is designed larger than the washing room, and the sewer pipe is located next to the drainage pit.
There is room here to place a dressing room, a steam room, a wash room, a bathroom and several rest rooms.
Bathhouse 8x8 m
Such a design will not fit into every area. This is a large spacious building, including everything you need and more. Here the construction of a swimming pool and hammam becomes available.
The complex includes four rooms: a dressing room, a steam room, a wash room and rest rooms. The steam room has several rows of shelves and a stove. The size of the room depends on the planned number of people. The recreation room is spacious, accommodates a group of vacationers, allows you to arrange furniture, a billiard table, and a TV.
There is space for a bathroom and a guest room. If you equip it with a kitchen, it will become an additional house on the site.
Peculiarities
Regardless of the design of any pool, not every steam room can accommodate one. The main task when preparing a bathhouse for placing a swimming pool is waterproofing the wiring, walls and ceiling. You can’t just take it and put it in a ready-made steam room.
Therefore, it is better to take it into account at the planning stage, otherwise adaptation to the premises will cost much more money.
Given the large volumes of water, the water supply system must also be fully prepared for the installation of a swimming pool. A regular foundation drain (which can be done in a small shower) will not work. Here you need a full-fledged drain and it must be equipped according to standard sewerage rules.
True, there are cases when the sewer system cannot cope with huge volumes of water.
The building is designed taking into account the location of the pool - on the street, under the same roof with a steam room, or in another room.
Another important issue is the placement of utility networks. These include ventilation, water filters, lighting, and drainage systems.
Material for building a bathhouse
When building a bathhouse, you can choose one of the types of buildings:
- from rounded logs (or timber);
- made of stone, brick, blocks;
- frame building;
- from wood concrete.
Let's take a closer look at each of these materials.
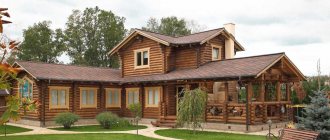
Wooden bathhouse
The advantages of wood as a building material are undeniable: availability, environmental friendliness, comfortable living, low price. Projects for bathhouses made of timber allow you to build a warm, durable structure. Such buildings do not require additional insulation. Walls can be erected from beams or logs. Wood creates a special atmosphere with a healing effect through its smell and appearance,
The following types of logs are taken for the construction of a bathhouse:
- debarked: a quick processing method that requires additional refining;
- scraped: a more deeply processed log that gives a durable structure;
- planed: gives the building thermal insulation properties;
- Lafetted: ensures tight, high-quality laying during installation;
- rounded: has the most attractive appearance, standardized dimensions, gives the building a long service life.
Bathhouse projects made from laminated veneer lumber are popular . The material retains the qualities of wood and is not prone to deformation in various climatic conditions. The material is well treated with a protective coating, due to which it lasts for a long time. Projects for bathhouses made of laminated veneer lumber can be purchased on a turnkey basis or thought out independently, with the support of specialists. Many designers and companies will provide designs and prices for a bathhouse made of laminated veneer lumber.
Bathhouse made of stone, brick, blocks
Stone and brick are used less frequently, since such a building requires a solid foundation, and the walls need to be heated for a long time. Brick as a building material for a bathhouse has many advantages:
- it is durable and does not require additional finishing work;
- has high thermal insulation properties;
- allows you to build a complex and attractive project;
- does not rot, is not susceptible to pests.
However, the bathhouse is more expensive, requires a complex ventilation system, and puts a greater load on the foundation. The appearance of a brick wall is inferior next to a log wall.
Bathhouse made of blocks
Heavy bricks can be replaced with blocks, which are much lighter and do not require strengthening the foundation . The blocks are easily cut with a hacksaw; special cement glue is used during installation. The material must be treated to reduce heat transfer to the outside.
Bathhouse projects made from foam blocks and gas blocks are cheaper.
Frame bathhouse
Inexpensive option with low weight, does not require a foundation . Construction is accessible even to beginners and is inexpensive. It does not shrink, so interior finishing can be done right away. Among the disadvantages: the building comes out with a low level of vapor barrier, the walls need to be additionally protected from moisture.
Arbolite bathhouse
Budget wood concrete is lightweight, retains heat well and is very durable.
All materials must be of high quality. Wooden parts need processing and impregnation.
Order a ready-made project or make it yourself
Nowadays, various versions of ready-made standard projects are posted on the websites of construction companies. It is not difficult to find the right one among them. It is only recommended to make sure that there is a schematic drawing of the object with a detailed description of the materials required for its construction and calculations.
If you want to build a structure according to an individual project, then the best option would be to seek professional help, since it is necessary to perform many calculations and take into account all the features of the object.
Unfortunately, such services are not very cheap (if you order only a project). If the company is engaged in turnkey construction, then all documentation comes as a gift. When constructing it yourself, you need to take into account that it will be extremely difficult for one person to erect the structure.
Options for interior design and layout
Previously, a bathhouse could consist of one room. Nowadays, a classic bathhouse consists of several rooms, each of which performs its own task .
Thanks to the zoning of the premises, the steam room warms up faster, while the rest room has a normal temperature. It should be easy to enter all rooms from the dressing room.
The interior arrangement of a bathhouse depends primarily on its type . The washing room and steam room can be equipped in the same room if it is a Russian bathhouse, and must be separated if it is a Finnish version. If the building has a swimming pool, then a steam room, a relaxation room and a washing room should open into the room with it - this option will be optimal.
The bathhouse, equipped with a veranda with barbecue, will become a favorite place for the family and its guests. The recreation room can accommodate not only a billiard room, but also a hookah room.
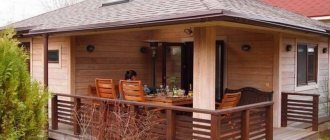
A successful design would be bathhouse projects with a relaxation room and a terrace . Here you can relax inside during the cold season or enjoy nature on the terrace in summer. We offer a mini review of bathhouse projects with a terrace.
The selected project for a bathhouse with a swimming pool will be a wonderful place to relax.
An interesting option would be a bathhouse with an attic and a balcony in it. A gable or sloping roof is suitable for such a project. It can be coated with ondulin, which will ensure the strength of the roof and the durability of the entire building.
When designing a bathhouse, you should consider some important points:
- room layout;
- water supply system;
- wiring of the electricity network;
- sewerage and drainage system.
A convenient option would be a bathhouse, in which there will be an exit from the dressing room or rest room to the terrace, and the stove can be located in the rest room and serve as a fireplace
Large-scale structures: levels, parameters, layout
Wider buildings allow you to place several separate rooms inside and install a spacious terrace outside. For example, the layout of a bathhouse with dimensions of 6x8 sq.m. includes a steam room, shower room, separate bathroom and a wide relaxation room.
Regarding the bathroom, we can say the following. Many summer residents like the layout of a bathhouse with a toilet. Thus, the problem with additional amenities is solved.
A spacious terrace is built outside. Similar planning applies to areas such as 6x6, 9x6, 8x8 and so on.
The functionality of the rooms may remain unchanged. Changes may be made to the arrangement of premises.
How to arrange the interior
Finishing materials are presented on the market in such a wide palette that their choice will allow you to realize any idea in any style. The main thing is to combine the originality of the interior with ease of use and not clutter the space with unnecessary details .
Wooden objects, ladles, brooms as decor, and hand-woven rugs on the floor are suitable for a Russian bath. The style of the chalet will be recreated by bouquets of fragrant herbs, tablecloths, tea sets, and hunter’s attributes. High ceilings and accent lighting deepen the contemporary style.
Furniture is chosen depending on the size of the bathhouse . The dressing room can be marked with a wooden hanger, and a small cabinet is sufficient to store cleaning supplies. Don't forget about a bench for easy changing.
A wooden table, sofa or soft chairs will be placed in the relaxation room. You can equip the walls with shelves for storing dishes and accessories for the bath.
The walls are wooden or painted in light colors. All items perform specific functions, nothing superfluous. The furniture and interior are in harmony with each other .
Which project you should choose depends on the type of bathhouse, since each requires its own conditions and materials . The traditional project includes a dressing room, washing room, and steam room. The remaining rooms and areas are planned based on the size of the site. The bath complex may include a swimming pool, an attic, and a veranda. The premises can perform combined functions. Popular wood projects require additional treatment and protection, and foam block buildings represent the most budget-friendly option. The style of the bathhouse is created using materials, furniture, and decorative items. The interior should be practical, environmentally friendly and safe.
Design ideas
Most often, many people decorate a bathhouse, especially if it is a small room, traditionally. They use wood in decoration, without tying it to any particular style. In this case, there is only one goal: to make the room as functional, cozy and comfortable as possible.
In the washing room there are benches, a container with clean water, washing accessories are placed in a cabinet, or a shower or shower stall is simply installed. A small room is allocated for the toilet. Ceramic tiles are often installed in the washroom.
The rest room is also usually not overloaded with details. It is also decorated with wood and contains a table with stools or a cozy sofa with a low table. An important piece of furniture will also be a cupboard. Textiles, samovars, and dried bouquets are used as additional decoration. But if you stick to a certain style, you can choose absolutely any one that suits your taste best.
Tile terrace
If you decide to make a platform not from wood, but from tiles, you can go in several ways. It all depends on how you imagine your terrace.
If you are satisfied with paving slabs as a covering, the technology can be greatly simplified. The process is very similar to installing a blind area around a house. The technology is similar, you can use the same techniques.
Simple option
The simplest, but very reliable and effective option is using profiled membranes and geotextiles. In this case, the soil is removed to the width of the future terrace, the depth is small - 20-25 cm is enough. If there is a roof on top, the site can be made level; if a roof is not provided, a slope of 3-5 cm is formed for every meter (from the foundation).
If precipitation in the region is heavy and subsoil water is close, it is better to lay a drainage pipe along the edge of the terrace. This is a special corrugated pipe with holes. A small recess is dug for it (about half the diameter), where it is placed. The end of the drainage pipe is led into a drainage well or into the sewer system.
One of the options for constructing a terrace (with a drainage pipe under the tiles)
To prevent plants from sprouting under the coating, they are treated with special chemicals. After processing, a profiled membrane is spread over the entire width. If you are laying drainage, the edge of the membrane should fit into the dug groove, reaching its opposite edge. A drainage pipe is placed on the membrane. Now all the moisture will roll down the film and get into it.
On the other hand, near the house, a membrane of 10-15 cm is placed on the wall. They fix it there. A layer of geotextile is rolled out on top. He is also lifted onto the wall. Both films can be secured with a clamping bar. The second edge of the geotextile ends above the drainage pipe (it is not fixed).
Now pour a layer of crushed stone of large and medium fractions. A curb stone is installed along the edge of the site (not above the drainage pipe, but closer to the house). The crushed stone is compacted well (preferably with a vibrating plate, but do not compact it over the pipe with a plate). A layer of sand is poured on top, leveled, spilled with water and compacted. You can already lay tiles on it.
What would such a terrace look like?
The thickness of the layers is 10-15 cm. The depth of the pit for the terrace is selected so that the tiles are laid at the required height. It is difficult to say exactly, since the tiles can be of different thicknesses. Based on the purchased coating, calculate the required depth of the pit around the house.
One “but”: the described method is suitable for the case when the foundation and base are insulated. If there is no insulation, half the sand is poured onto the crushed stone, slabs of extruded polystyrene foam are laid out, then sand is added, and then the tiles are laid on it. At the same time, the foundation of the house is also covered with expanded polystyrene slabs to the entire depth of the dug pit.
Frame extension: do-it-yourself step-by-step installation
Whatever the structure of the walls of the bathhouse, whether they are made not only of wood, but also of blocks or bricks, the veranda most often has a frame structure, it is easy to attach it to an existing building. A veranda attached to a bathhouse with your own hands will not only be a convenient place for relaxation, but will also make the building more attractive.
Option with attached veranda
Brief instructions in pictures will tell you how to do this:
| Photos, steps | A comment |
| Layout of extension axes | The location of the extension must be marked by driving in pegs and tensioning the twine. Since the foundation will be columnar, you need to draw all the contours of the holes for the pillars on the ground with a shovel. |
| Excavation for pillars | When constructing a shallow foundation, the bottom row of blocks is buried only halfway (15-20 cm). When digging holes, you need to add to this size the thickness of the drainage pad made of crushed stone and sand (at least 10 cm). This way the blocks will never get wet in water, because concrete doesn’t like that. |
| Laying crushed stone | Cover the hole with a piece of geotextile and fill it with crushed stone. |
Tamping | You can tamp it in any way possible - you can do it as in the photo. |
Laying sand | Now pour sand. There is no need to lay out the entire volume at once - after all, you need to level the base, adjusting its height to the desired level. |
| Determining the elevation of the top of the foundation | Mark the top of the foundation on the peg as a guide. |
Sand bed compaction | Compact each layer of sand well, measuring the desired height to the mark. |
Checking the horizontality of blocks | Wrap the ends of the geotextile inside the backfill, place the two lower blocks on them and check the horizontality with a level. |
Mixing glue | In this case, foam blocks are used to lay the pillars, so not ordinary masonry mortar, but special glue is used. They can also be used to install polystyrene concrete blocks. |
Applying glue to blocks | First, the surfaces of the vertical joints of the blocks are coated with glue, then the horizontal ones. |
| Laying the second row of blocks | The second row of blocks is laid out. |
| Installation of the bottom trim | When all the pillars are ready, a piece of roofing material is placed on each one so that the beam does not come into contact with the concrete. A frame is made around the perimeter of the veranda and floor joists are installed. |
Pairing the stand with the harness | The racks are attached directly to the framing beam, secured with angles, staples, miter bars and other methods common in construction. The racks are also tied with timber along the upper perimeter. |
The frame is ready, the roof remains.
Next, it’s a matter of technique: the roof rafters and roofing material are installed, the floor is sheathed, crossbars and window frames (if the veranda is closed) or decorative fences are installed.
Frame for a closed veranda
Such a veranda or terrace can be attached to a brick or block bathhouse.
Summer veranda with climbing plants
Open terrace with canopy