Ventilation in any room provides a comfortable microclimate. In this case, a duct fan is installed in an apartment or industrial enterprise.
Such a device is part of a forced ventilation system. It provides the necessary recirculation of air flows both in an ordinary apartment and in a factory.
The specific model is selected depending on the type of ventilation pipe and the size of the room. Installation of duct fans can be carried out by both experienced craftsmen and beginners.
Scope of application of duct fans
An example of the use of duct fans in office ventilation
Duct silent models are mounted in various types of air ducts.
Such special ventilation equipment is installed:
- in retail outlets and various supermarkets;
- at bus and railway stations;
- in cinemas;
- in small manufacturing enterprises;
- in warehouses and various storage facilities;
- in large office premises;
- in restaurants, etc.
These products are also installed in the toilet or bathroom, laundry room, basement or basement.
Basic technical aspects
Tools and materials:
- alcohol;
- zero sandpaper;
- primer.
There are several types of fans that are used in everyday life:
Overall dimensions of window axial fans.
- Internal. They are usually used for large buildings and structures where large amounts of air under pressure need to be supplied. They are very powerful and durable, but the pricing policy is quite harsh. Their only downside is that they are difficult to maintain, since to clean such a fan in case of dust, you will need to disassemble the entire segment in which it is installed.
- External. They are popular among the average person because they are very easy to install, easy to maintain and inexpensive. They almost always have low power, so that they are enough only for a small room, but they are quite justified in everyday life. The only negative is the weak material, which can burst if subjected to improper physical impact.
In both cases, the installation is different, but the preparatory work is very similar:
- The space is cleared of foreign objects. You can leave only the electrical wiring, but check it separately.
- If necessary, the area is covered with a protective material, be it waterproof paint or primer.
- The surface is degreased using alcohol or any similar liquids.
Now the preparation for the installation process of the axial fan is completed, but the most difficult part is yet to come.
Types of duct fans
Depending on the design of the device, there are 3 types of duct silent fans:
- axial (asynchronous);
- centrifugal;
- combined.
In axial models, air movement coincides with the direction of rotation of the fan shaft. The efficiency of such ventilation devices is 75%.
Centrifugal (radial) devices extract air from industrial and domestic premises. A fan is installed in the bathroom, the blades of which are bent against the direction of rotation.
The operating efficiency of this device is approximately 80% and does not produce much noise when operating.
Combined models contain structural elements of both axial and centrifugal ventilation devices. The operating efficiency of such equipment is approximately 80%. The body shape can be rectangular, round or square.
Combined devices have high performance. This figure is higher than that of axial products, which is why such models are installed not only in multi-storey buildings, but also in industrial facilities.
Duct fans are also divided into two large classes (types):
- traditional;
- wall-mounted
Wall-mounted devices are complex devices that are configured during production. However, their installation process is much easier and faster.
Also, duct ventilation can be single- or multi-speed. Most ventilation devices have 1 speed, although two-speed devices are often found on sale.
Common mistakes and additional tips
Fan connection errors can cause not only incorrect operation of the hood, but also a short circuit or fire. Do not forget that the bathroom is a room with high humidity, which means it is especially dangerous for electrical appliances and wiring.
In order to arrange ventilation without errors on the first try, consider these tips:
- The fewer bends and the simpler the design of the ventilation duct, the better the traction.
- With a single ventilation system for a separate bathroom, air should move from the bathtub to the toilet, and not vice versa.
- Use terminal strips, not electrical tape, for all wire connections.
- Strip exactly the part of the wire that will go into the terminal block.
- Check that there is a mosquito net in the fan. If suddenly it is not there, add it, because mosquitoes and other insects feel great in warm, damp ventilation shafts.
- In a private house, be sure to insulate the part of the ventilation duct or shaft passing through unheated rooms. Otherwise, there will be no traction in cold weather.
- Don't neglect grounding for metal fans.
In addition, to prevent the fan from interfering with natural ventilation when it is turned off, you can use double rectangular grilles, with a hole for the fan at the top and a regular grill underneath.
When connecting the fan power supply, do not mix up the contacts: N – zero, T or LT – timer, phase from the switch, L or Line – phase directly from the box
If it is not possible to install a double grille, you can maintain natural ventilation by placing foam plastic legs 1 - 2 cm under the corners of the body, in the places where they are fastened with self-tapping screws. As a rule, the ventilation window is square and the fan housing is round, and these gaps are enough for air circulation.
Please note that even an ideally installed and sufficiently powerful fan will not work effectively if there is not sufficient supply ventilation. Usually it is provided by a gap of 1.5–2 cm under the door to the bathroom, but for beauty it can be replaced with a special grille that cuts into the bottom of the door.
Also make sure that fresh air gets into your home at all, because after installing plastic windows and new doors, insulating the walls and concrete screed on the floor, the apartment turns out to be hermetically sealed, like a thermos.
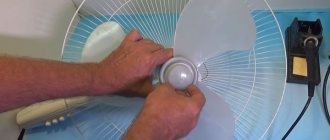
Additionally, the exhaust fan may need cleaning. Therefore, we recommend that you also read the step-by-step instructions for disassembling and cleaning the device. For more details, follow the link.
Design features and characteristics
In a long air duct, only a radial rather than an axial duct fan is installed. This is due to the fact that very often such devices are installed far from the exhaust opening of the ventilation duct.
As a result, the axial device, unlike radial models, does not effectively remove air flows from the bathroom and kitchen and does not eliminate unpleasant odors.
Duct fans have the following characteristics:
- productivity - up to 5330 m3/hour;
- power consumption - up to 3.5 kW;
- pressure - up to 900 Pa;
- flanges have a diameter of 100-400 mm;
- low noise level;
- the electric motor is equipped with an external rotor;
- equipped with speed regulators;
- Installing the device is a simple and quick process and does not require special experience.
It should also be noted that preventive inspection and cleaning of the ventilation device does not take much time.
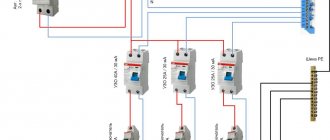
Connection via two-button switch
Another suitable option is to connect the fan through the same light switch, but with two buttons.
Here the diagram will look like this:
In fact, your hood will sit regardless of the lighting. But for this, most likely you will have to change the single-key model to a two-key model. Plus pull the extra cable from the junction box down.
There are also pitfalls here. Firstly, do not mix up the phase connection on the switch contacts.
And this happens all the time.
Secondly, do not forget that through this switching device, it is the phase that must be broken, and not the zero. Even with the correct initial connection, over time the circuit may spontaneously change.
It is enough for some local electrician, in the general switchboard or entrance wiring, to accidentally swap two conductors L and N. And in your entire apartment the “polarity” will automatically change on all switches.
What will this mean? Well, for example, when you turn on only one fan with the second button, your LED lights in the toilet may blink, flash and go out.
The effect is quite well known for LED lamps.
What is needed for installation
To install the fan in the ventilation duct, you need to prepare:
- air duct;
- the device itself;
- various shock absorbers;
- ventilation duct connectors;
- silicone inserts;
- several electrical cables.
Depending on the installation method of the product, the following tools are used:
- perforator;
- a hacksaw with fine teeth (for cutting the ventilation duct);
- electric drill, thin and thick drills.
In some situations, other devices are also used. This depends on the configuration of the ventilation ducts and the type of room (industrial or domestic).
Conclusions and useful video on the topic
The construction of a ventilation duct for autonomous ventilation of a toilet and bathroom with only one shaft is clearly shown in this video:
Connecting a simple fan is described in detail here:
To summarize, we can say that it is quite possible to independently arrange an effective ventilation system in an apartment, but you need to be careful and think through everything carefully in advance. If you are not confident in your abilities, entrust the job to a specialist, because mistakes in working with electrical wiring can lead to dire consequences.
Have you ever installed a fan in a bathroom or toilet? Please tell us what connection diagram you used and were there any difficulties in installation? Leave your comments, share your experience - the communication block is located under the article.
Installing a fan in the duct
Connections when installing a VK fan with square and rectangular air ducts of arbitrary sizes
Duct silent fans are easy to install. Products of this type are installed in several local ventilation systems, and not in one centralized branched ventilation duct.
In this case, the length of the air ducts is reduced and the financial costs of installing a ventilation system are reduced.
Similar models are installed:
- into a ruptured ventilation pipe;
- at the beginning of the ventilation system, if the device operates on inflow;
- at the end of the ventilation duct to ensure air removal.
The devices are installed on straight sections of the channel. At the same time, additional elements of the ventilation system (filters, distributors, etc.) are not installed in such places.
In order for the fan to be connected to the duct, they must match each other in equivalent diameter.
Its value is found using the following formula:
D=√4HB, where H is the height, B is the width of the ventilation pipe.
The distance from the fan inlet to the channel turn must be no less than the equivalent diameter of the device, and from the outlet to the next turn - at least three diameters. In this case, there are no aerodynamic losses in the pipe, and the ventilation system works normally.
During installation, first read the instructions for using the duct ventilation device - study the installation features and operating rules. If you cannot install the product yourself, it is better to contact an experienced technician.
When installing small models, no fasteners are used. Large ventilation devices, which are installed in industrial enterprises, are attached to the air duct using several hangers, supports and brackets.
The main thing in installation is to ensure a strong connection of all parts. For sound insulation, separate silencers are installed at the inlet and outlet of the ventilation device.
Duct fans work in any position!
When installing these devices, perform the following steps:
- an air duct with a length of at least 1.5 m is installed in front of the ventilation device;
- flanges with a diameter of more than 400 mm are secured to the air duct with bolts and special brackets;
- the ventilation device is mounted on steel brackets or separate hangers;
- leave free space around the device for future maintenance work;
- duct ventilation, which is installed in the kitchen, is installed with the socket (funnel) upward.
The air duct is connected to the ventilation device using special clamps. To output the electrical cable in such a situation, a cable channel is used.
Installation Features
Before starting installation, it is necessary to register and approve this project with the government agencies responsible for the operation of the building . It should list the conditions for using the entire future ventilation system, the procedure for performing the work, the materials used and the layout of the ventilation air ducts and shafts.
Duct fans can be installed anywhere in the air duct and at any angle; the most cost-effective option is the rectangular cross-section of all air ducts, which saves free space.
To increase productivity, several fans are installed in parallel, and to increase the operating pressure they are mounted in series.
For ventilation of any size bathroom, one duct product is sufficient. To ensure tightness, special components are used, and to eliminate unwanted vibration, gaskets made of a material that absorbs the negative effects of vibrations and reduces noise from the operation of the device are used.
To implement the necessary control over the parameters of the product, tracking systems are installed, if such actions are necessary. The control panel is placed in a convenient place; special thyristor-type devices are used to adjust the rotation speed.
Installation of fans in a square duct
Rectangular pipes of the ventilation system come in 2 types - ventilation ducts of equal cross-section and pipelines of arbitrary size. Duct silent fans are often installed in the first of them.
Installation of such a product is quick and simple. First, it is mounted inside the ventilation duct, and then, using flanges, sections of the air duct are connected to each other and the tightness of the joints is checked.
This installation ensures optimal air movement speed and quiet operation of the ventilation device.
During installation, the connecting steel flange of the ventilation pipe is gradually increased to certain dimensions. If the square cross-section of the ventilation duct is larger than the inlet opening of the ventilation device, then the air duct on this side is carefully narrowed to the diameter of the flange.
If the cross-section of the ventilation pipe is smaller, then the entrance to the pipeline is gradually expanded. This expansion is performed with an angle of up to 10 degrees on one side.
Before correctly installing a specific duct fan, first carefully study its installation diagram to find out what position the motor should be in - vertical or horizontal.
If installed incorrectly, the device will have zero efficiency.
Connecting a fan without a timer
This connection option is considered the simplest from a technical point of view. The switch is placed in front of the entrance to the bathroom or indoors. It is advisable to install it away from plumbing equipment, where splashes on electrical contacts are prevented.
Plastic axial fans do not have a terminal output for connecting a ground loop. Everything is limited to phase switching with a neutral conductor. Connections are made in a distribution panel or socket box up to 60 mm deep.
To a separate switch
This is the most common connection option.
You will need to perform the following wiring connections:
- the neutral conductors of the ventilation unit and the electrical network are connected and insulated;
- the hood and switch phases are paired in the same way;
- The phase conductor of the electrical network is connected to the input terminal of the switch.
An important condition is the connection of the ground loop.
To the switch shared with the light
It is convenient when the ventilation unit starts at the same time as the lighting fixtures are turned on. The most practical option is to combine it with a two- or three-key switch. A socket box is installed in the corresponding hole. Electrical switching is carried out in it.
The input terminal is connected to the phase conductor of the power supply network. The output contact closes to the phase of the climate control unit. After connection, it is necessary to check the reliability of the connection and the integrity of the insulation. Then the working mechanism is fixed in the socket box and the cover with keys is installed.
Installation of fans in a round duct
Installation of duct fans in a round ventilation pipe is often carried out using an adapter. Using this part, devices with a square flange are combined with the opening of round channels.
In this case, the length of the steel adapter is equal to 1⁄2 the length of the channel device. The diameter of the flange must match the size of the air inlet duct.
If the diameter of the ventilation pipes is larger than the dimensions of the device flange, then when installing a silent duct fan in the air duct, a conical transition is used. Its opening angle is 8-10 degrees.
A special collar flange is also installed in the air duct, which ensures a strong connection of all parts of the air duct.
content .. 41 42 46 ..INSTALLATION OF FANS
Radial and axial fans for general purposes. According to the degree of installation complexity, fans can be divided into three groups:
weighing up to 50 kg - radial up to No. 3(2, axial up to No. 8; the overall dimensions of such fans are small and there are no difficulties with their transportation and lifting to the installation site, so this work can be done either manually or using mechanisms;
weighing up to 1500 kg - radial fans up to No. 12.5, axial fans over No. 8 and all roof fans; Such equipment is supplied in the form of fan units, i.e. complete with an electric motor, frame, and V-belt drive. Installation of fans is usually carried out without disassembling ai regatta. Transportation and lifting to the installation site require installation openings and lifting mechanisms;
weighing over 1500 kg - radial No. 16 n above; supplied in separate enlarged blocks; fan casing consisting of several parts, drive, frame, shaft with impeller, vibration isolators. Installation of fans usually begins with the delivery of enlarged blocks to the installation site, where the unit is assembled directly on the foundation.
Before installing fans, it is necessary to: accept the ventilation chambers, platforms, foundations and other supporting structures for installation; inspect the fan near the electric motor; compare their data with the design data; prepare and install lifting devices and mechanisms in accordance with the instructions of G1PR; check the overall dimensions of installation openings and passages; deliver fans or enlarged units to the installation area.
When inspecting fan units, check the type of fan, the direction of its rotation, the number, design, type and brand of the electric motor, its power, rotation speed, and pulley diameters. If one or more parameters do not correspond to the design data, installation of the fan can be permitted only after the changes have been agreed upon with the design organization.
Radial fans of the 1st and 2nd groups up to No. 12.5 inclusive are mounted in the following sequence: sling the fan;
raise (lower) the fan to the level of the design mark as close as possible to the installation site and move it horizontally to the design position;
check the correct installation of vibration isolators and the uniformity of their compression, horizontalness, accuracy of connection to structures, horizontality of the impeller shaft;
Before connecting the air ducts, check the balancing of the impeller, the tension of the V-belt drive belts, and the fastening of the guard;
perform an inspection of the impeller shaft and electric motor bearings and determine the presence of lubricant;
check the insulation of the electric motor windings and connect the power supply; this work is performed by electricians;
check the operation of the fan, including the correct direction of rotation of the impeller.
Currently, pre-installation inspection and rotation of fans are being implemented at factories, installation organizations or customer warehouses.
Depending on the decision made in the PPR, local conditions and the availability of mechanisms, fans are lifted by various lifting mechanisms - truck, tower and bridge cranes, winches, electric hoists, forklifts. Horizontal movement of fans to foundations and platforms is carried out on rollers made from pipe scraps using winches or manually.
Fans can be installed on the foundation by rolling them using hand winches along joists laid on the foundation at a slight angle.
Radial fans are usually installed on spring vibration isolators. If the fan is installed directly on the floor, then DO type spring vibration isolators are not attached to the floor. When installing fans on metal structures or foundations, spring vibration isolators are bolted to them through the holes in the bottom plate of the vibration isolators. Elements of metal structures and embedded parts to which vibration isolators are attached must coincide in plan with the corresponding elements of the fan frame so that the position of the vibration isolators can be adjusted.
If the layout of the fan unit does not correspond to the design one and the center of gravity of the unit is shifted from the design position, then the location of the vibration isolators is determined experimentally. To do this, the fan is placed on vibration isolators and, by moving them along the frame, their uniform settlement and horizontal position of the frame are achieved. When adjusted, the more compressed shock absorbers are moved away from the intended center of gravity of the unit. Having marked the final installation locations of the vibration isolators, holes are drilled in the unit frame for their fastening.
High-pressure and dust fans are usually installed directly on concrete foundations and for fastening they use anchor bolts, which are inserted with the threaded part from below into the fan frame. The bolts are screwed with nuts and locknuts, lowered into their sockets and filled with cement mortar. After the solution has set, check that the fan is installed correctly at the level. If required, metal shims are placed between the frame and the foundation and the anchor bolt nuts are finally tightened. Then the foundation is filled with cement mortar to the level of the lower part of the frame.
When installing fans on a rigid base, in some cases sheet rubber up to 20...25 mm thick is placed under the fan frame to reduce the level of mechanical vibrations. In this case, rubber washers are placed under the nuts of the anchor bolts, and the holes for the bolts are made of a much larger diameter to prevent contact between the frame and the bolts.
Before connecting air ducts to an installed fan, check the static balancing of its impeller. To do this, remove the V-belts if the fan is equipped with a V-belt drive, and mark it with chalk on the impeller, which should rotate freely by hand. The same mark is applied opposite the one made on the inlet pipe. The impeller is turned so that it completes several revolutions, and the position of the marks is observed. If, during several such operations, the risk on the impeller occupies various arbitrary positions, then the wheel is correctly balanced. If the wheel stops in one specific position, then a weight should be attached to the top of the front rim of the impeller and all operations should be repeated. Having determined the mass and position of the load at which indifferent equilibrium of the impeller will be observed, a steel plate of the same mass is welded to it in the found place of the rim using a design seam.
Radial fans of the 3rd group No. 16 and above are mounted from separate enlarged assembly units in the following sequence:
individual assembly units, including a casing consisting of several parts, are delivered to the installation site, unpacked and unpreserved;
assemble the fan frame and install it together with vibration isolators on a verified foundation, placing temporary supports (wooden blocks);
install the lower part of the casing and drive parts on the frame on wedges;
the drive, including the shaft with the stand, is secured to the frame and the impeller is mounted on the shaft;
the upper part of the casing is fed and bolted to the lower part, using sealing gaskets;
install and secure the inlet pipe with a flange to the casing;
using wedges, check the location of the casing relative to the frame and stand and achieve the required gap between the fan impeller and the inlet pipe and secure the casing. This gap (Fig. 102) affects the characteristics of the fan and should not exceed 1.0% of the diameter of the impeller (node 1). If necessary, the gap size is adjusted by moving the inlet pipe along the flange;
After checking the gaps in the pipe, holes are drilled in place and the pipe is secured to the casing;
check the presence of lubricant in the bearings and install vibration isolators so that they are evenly loaded;
check the horizontality of the impeller shaft; deviation of the shaft from the horizontal position is allowed no more than 0.5 mm per 1 m; The horizontalness of the shaft is adjusted using the vibration isolator adjusting nuts;
after checking the tension of the V-belts, the quality of insulation of the electric motor windings, the free rotation of the impeller without jamming and the tightening of all bolted connections by briefly turning on the electric motor of the fan unit, determine the correct direction of rotation of the wheel;
carry out a test run and run-in with the flexible inserts of the suction and discharge pipes connected to the air ducts.
For fan units in which the fan is connected to an electric motor by a V-belt drive, a cord attached to the side edges of the pulleys is used to ensure that the pulleys are parallel and that the belts are not kinked. The V-belt drive must have a guard that prevents accidental contact with rotating parts.
The couplings with which the fans are coaxially connected to the electric motor must have a guard in the form of a curved metal sheet attached to the stand.
Radial fans can be installed on brackets if the fan number does not exceed 6.3. The brackets are mounted on the walls (Fig. 103) or on the columns of buildings.
Axial fans of the 1st and 2nd groups are installed directly in air ducts, on brackets, in wall and window openings.
Rice. 102. Alignment of gaps when assembling the fan
The installation height of axial fans usually significantly exceeds the height of the working area, and they are installed using forklifts, truck cranes or winches.
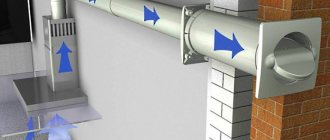
When installing axial fan 1 in the air duct (Fig. 104), the fan must be secured to the base or bracket 2, and the flanges of the casing are connected with bolts with a rubber gasket to the flanges of the air ducts 5. A hatch is made in the air duct located on the electric motor side to connect the fan to electrical network and preventive maintenance.
Rice. 103. Installation of fan V-Ts4-70 No. 4 on brackets: 1—strut, 2—console, 3—link, 4—rubber gasket, 5—bolt with nut and locknut
Cassock. 104. Installation of the main fan in the air duct: 1 - axial fan, 2 - bracket, 3 - ceiling, 4 - hatch, 5 - air duct
When installing an axial fan in a wall opening, it is bolted to the embedded metal frame framing the opening. To protect against precipitation, a semi-bend is installed on the outside. Axial fans mounted in wall or window openings are equipped with valves, the control of which should be located in the room at a height of 1.5...L.8 m from the floor.
Installation of axial fans is carried out in the following sequence: install and align the bracket, frame or hangers for attaching the fan; mount the fan in the designed position and secure the support bolts; check the gaps between the shell (cylindrical body) and the impeller (blades); the gap must be uniform and not exceed 1% of the impeller diameter; connect the electricity, check the correct direction of rotation of the impeller and run in the fan.
content .. 41 42 46 ..
How to install a duct fan in a pipe
Installation of duct silent fans in a pipe is carried out in the same way as the installation of these products in a round air duct.
However, in this case, the diameters of the elements being connected, as a rule, do not coincide. Therefore, steel adapters are most often used.
Sometimes these parts are made from scrap materials, for example, galvanized steel. The steel adapter is installed in the gap, and then the pipe joints are sealed.
Also, when installing a ventilation device, couplings and clamps are used.
Types of fans with sensors
Modern models are available with various additional elements. These include electrical appliances with or without a timer.
Fan without built-in timer
Equipment without a built-in timer deprives a person of some conveniences. When the device operates, a lot of electricity is consumed. The connection diagram is simple.
Fan with built-in timer
A fan with a built-in timer allows you to save electricity and works effectively for some time after turning off the lights in the room. Thanks to the exhaust fan with a timer, there is no excess moisture and mold in the bathroom. The timer also allows you to save electricity, since you do not need to leave the lights on in the room until the moisture disappears.
Device with built-in humidity sensor
There are products with a built-in humidity sensor that monitor humidity levels.
Electrical connection
The duct fan is connected to the home electrical network strictly in accordance with the operating instructions. In this case, electrical wiring elements such as cables and terminal blocks are used.
The instrument terminals have the following markings:
- “L” - phase conductor;
- "N" - zero core;
- “T” - signal wire (in models with a timer).
The neutral conductor is blue, the phase conductor is brown or white. When connecting a duct fan to the electrical network, the cable cores are connected to the device terminals.
When connecting the ventilation device to the power supply, perform the following steps step by step:
- unscrew the cover of the terminal box of the ventilation device;
- there is a latch in the cover where the wires are inserted;
- connect the wires to the “linear phase” and “zero” terminals;
- close the lid of the terminal box;
- check the connection - plug the device into the outlet.
In this case, they do not install a separate switch, since when using such a ventilation device, they often use a remote control that regulates the volume of air masses, and also turns the device on or off.
A silent duct fan is connected to a power supply with a voltage of 220 V. Today, various companies produce economical models with low power consumption.
As a rule, the engine of such a device is equipped with a built-in temperature sensor with the ability to restart. Thanks to this, the electric motor of the device does not overheat.
How not to connect and why
The first options have a lot of inconveniences, which are not entirely noticeable at first.
For example, let’s say you set up the hood to turn on using a door opening sensor. At the same time, it turns off according to a timer after 5 minutes. It would seem very convenient.
However, it is quite problematic to install such a sensor on an interior door. Not to mention other aspects of operation. For example, what to do if you stay in the toilet longer than the set time.
Open and close the door again? What if there are guests in the kitchen?
In addition, the cables will have to be routed under the tiles, several extra holes will have to be drilled, etc. Simple motion sensors are sensitive to humidity and fail very quickly.
You will have to select expensive models with appropriate IP humidity protection, depending on the zones in the bathroom.
Some people consider the most convenient option to be installing a switch on the hood directly inside the bathroom. However, the PUE prohibits this.
Why this is so, the relevant links and explanations from Rostechnadzor specialists will be given at the end of the article.
conclusions
Modern duct fans have the following advantages:
- don't make noise;
- compact;
- have high performance;
- they can be easily and quickly installed in the duct.
When selecting a device, the following indicators are taken into account:
- Operating temperature range;
- performance;
- noise level.
When purchasing and installing it yourself, you need to follow all the nuances that were listed above in the article.
WORK QUALITY REQUIREMENTS
Fans supplied by manufacturers must meet the requirements of GOSTs or technical specifications for their manufacture.
Design:
VO fans are manufactured according to:
— TU 4861-024-15185548-04;
— GOST 11442-90.
Terms of Use:
Axial fans
are designed for moving non-explosive gaseous media with a temperature not exceeding 50 ° C, containing solid impurities not exceeding 100 mg/m, not containing sticky substances and fibrous materials, in temperate climate conditions of the 2nd category of placement according to GOST 15150-90, with ambient temperature environment up to plus 40 °C.
Aerodynamic characteristics
Noise characteristics of VO 200-4E
Octave frequency bands, Hz
To determine the serviceability of equipment received for installation, a complete or incomplete audit is carried out; a complete audit is necessary if the storage conditions and period of equipment or transportation conditions are violated. During a complete inspection, all assembly units and parts are disassembled, washed and checked. In case of incomplete audit, perform:
— additional staffing of the ventilation unit (if necessary);
— depreservation of parts and assemblies from film coatings;
Which fan is suitable for the bathroom?
It should be noted right away that no fan will help if there is no normal passage in the ventilation shaft (duct). That is, you should start with just such an “inspection”. Traction is checked by holding a burning match or a strip of paper. By the deviation of the flame and the smoke trail or paper petal, one can judge with a sufficient degree of objectivity the presence of normal draft. It happens that such an experiment even shows reverse thrust. That is, air from the ventilation duct tends to penetrate into the room.
No fan will save you if the patency of the ventilation duct is impaired. Checking traction is easy using simple methods.
If there is no obvious outgoing air flow, or a reverse draft effect is observed, then there is no point in rushing to install a fan. You will first have to invite ventilation system maintenance specialists to clean the duct or identify other reasons for its inoperability.
If everything is within normal limits, that is, the device will be installed to assist natural ventilation, you can choose the optimal model for yourself.
By the way, you can immediately answer one important question that interests many. Will the installed fan interfere with natural ventilation? After all, the vent in the bathroom is one of the important ways of normal air exchange in the apartment.
The answer is this. If everything is in order with the ventilation ducts, then it won’t hurt. The fan does not completely cover the entire cross section. And if everything is in order with the mechanics, then the impeller will simply rotate slightly under the pressure of the natural air flow, practically without creating any significant obstacles to it. The narrowing of the channel due to the installed axial motor is very slight.
A working fan does not create any serious obstacles to natural exhaust ventilation.
Many experts generally state unequivocally - with a fan it is always better than without it. Let me explain. In winter cold, when due to the high temperature difference the thrust is maximum and even excessive, it somewhat “suffocates” it, which is only beneficial. But in the summer, the draft sometimes “overturns”, since it is hotter outside than indoors. And without a fan, it can be difficult to ensure normal, timely removal of odors and high humidity. So in any case, the installation will be beneficial.
What is assessed when choosing a bathroom fan?
When purchasing a fan for a bathroom, you have to rely on several criteria for evaluating this device.
- Fan performance . This parameter shows how much air the device can pump per unit time.
Typically, the performance of compact overhead axial fans ranges from 50 to 200 or even more m³/hour. If you look at the requirements of SNiP and SanPiN, the minimum capacity of exhaust ventilation in bathrooms and toilets should be 25 m³/hour. But since the vent in the bathroom also participates in the overall scheme of natural ventilation of the house or apartment, this figure should be higher. It is calculated using a special method, based on the norms of air flow into residential premises, which, in turn, depend on their volume and the number of residents.
In this article we will not dwell on this. We can only say that practice shows the following. For installation in a bathroom, a fan capable of pumping 80÷100 m³/hour is most often sufficient. This indicator should not be overestimated either. It may happen that an excessively powerful flow will disrupt the normal operation of the ventilation riser. And the elongated volumes of air, along with all the odors and vapors, will begin to be thrown to the neighbors.
Canons of natural ventilation
Correctly planning the operation of natural ventilation in a house or apartment is not as simple as it might seem. And yet this is a completely solvable task if you know what to start from. The article on our portal “Natural ventilation in a private house” contains all the necessary standards, explains the algorithm for calculating such a system, and includes a convenient online calculator.
- Installation dimensions. In bathrooms, as a rule, overhead models are installed. And first of all, the diameter of the fan outlet pipe is assessed. Standard values are 100, 120, 125, 150 mm. There is more - but this is not relevant for the bathroom. In general, it is probably most convenient to purchase a model with a 100 mm pipe. Such fans are compact, have sufficient performance, and are easily installed in a channel with a diameter of 110 mm, which can be used as a section of a regular polypropylene sewer pipe. If the performance is not enough, or there are doubts that there will be no obstacles to natural ventilation, diameters of 120 or 125 mm are suitable. Above is hardly justified for the case under consideration.
Prices for bathroom fans
bathroom fan
One model line can have fans of different sizes. The main parameter in this case is the diameter of the outlet pipe ØD.
The external dimensions of the housing, which will remain on the wall surface, and its design are selected individually by the buyer. This does not affect the performance characteristics in any way. It is clear that the device must fit in the space allocated to it. Well, with your appearance - do not spoil the planned interior of the bathroom.
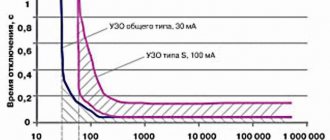
- Housing protection class. Since the fan is installed in a room with high humidity and with a certain probability of splashing water, it must have appropriate protection.
The protection class of the housing is indicated on the packaging and in the product passport as a two-digit number after the letter designation IP . The first number indicates protection from solid particles and dust. The second is protection from contact with water. In this case, we are interested in dust indirectly (although this degree of protection should not be neglected). But “by water” it should be at least IPX4 .
Fan with housing protection class IP45. It is quite obvious that it is suitable for installation in a bathroom, shower, or bathhouse.
- Noise level. Everything is simple here - the quieter the device operates, the better. Few people taking water treatments or staying indoors for other purposes will enjoy being next to a loudly humming fan.
Quiet operation is demonstrated by modern axial fans with a noise level of 25÷30 dB. Louder models that create noise up to 35 dB will not cause much irritation. But if the passport indicates a level of about 40 dB or higher, you should think about whether it is worth purchasing such a device.
- Functional equipment of the fan. This is something you should pay special attention to.
— Availability of a built-in switch. Some people find it convenient if the fan is turned on by a cord coming out of its body. Maybe it’s convenient - but probably not for the bathroom. In addition, such a built-in switch is always an additional vulnerable point, especially in conditions of high humidity. Its durability is not guaranteed.
A fan with a cord is not the best option for a bathroom. Here it is recommended to connect via a regular wall switch.
Almost all experts unanimously recommend switching exhaust fans for such rooms exclusively through standard wall switches. There may be several connection options - this is precisely the main issue of our article. We'll get there.
Conclusion - a built-in switch is not needed.
— Timer . A very useful function that allows you to organize the operation of the fan so that it remains on for a certain time after a person leaves the bathroom.
The time until a person leaves the room is most often clearly not enough for complete ventilation. Leaving the device on all the time is an unnecessary waste of its resources and wastes electricity. Turning it off manually after some time is probably often forgotten. So the timer becomes the optimal solution.
Expert opinion: Afanasyev E.V.
Chief editor of the Stroyday.ru project. Engineer.
The timer adjustment is accessible when the fan cover is removed. Typically this is an adjustment screw, which can be rotated clockwise or counterclockwise to increase or decrease the turn-off delay time interval. However, there is no scale provided, so the installation is not extremely accurate. But it is not difficult to achieve the desired interval experimentally. The fan often comes with a special plastic screwdriver for making such adjustments.
Timers in some models may also have different operating modes. This will be discussed in more detail below.
- Motion Sensor . This option can hardly be called useful in our case. There are models with this improvement, but it seems like an unnecessary waste of money. It will be difficult to achieve correct and efficient operation of the hood.
— Humidity sensor . If the humidity level in the bathroom exceeds the required level (it can be changed during setup), the sensor will give a command to automatically turn on the fan. After the humidity normalizes, the device will turn off automatically.
It seems to be good. But there are still nuances. For example, a fan that suddenly turns on on its own can frighten a person taking water procedures. Or another situation - in the bathroom they deliberately want to, as they say, “catch up the heat” while bathing. This often happens when bathing small children, especially those who are sick. At the same time, parents try to avoid any possibility of a draft. And turning on a fan that automatically reacts to increased humidity would be clearly inappropriate.
You can find such recommendations. The fan should turn on when the owners need it. But turning it off can be “tied up” through automation - and here the built-in timer will be sufficient.
Conclusion – the option is useful in principle. But it doesn’t always make sense to pay extra money for it. It is quite possible to organize the operation of ventilation with a time reference - using a timer.
Example of adjusting screws for setting the shutdown delay time interval (timer) and humidity level (HR).
— Check valve . A useful option that prevents the “backdraft” effect. That is, under unfavorable conditions, unpleasant odors and cigarette smoke from neighbors in the riser will not penetrate into the bathroom. It is important that the valve is reliable, but at the same time does not interfere with natural ventilation, that is, it is not too “tight”.
Such valves are usually located at the end of the outlet pipe. They come in film (membrane) type or in the form of plastic spring-loaded flaps.
Check valves of exhaust fans: on the left - membrane type, on the right - with spring-loaded flaps.
- Overheat protection . In principle, all modern electrically driven appliances should have this option. If the temperature on the motor windings reaches a critical value, the fan power is turned off.
— Availability of mosquito net . A very useful addition. Moreover, not only for protection against the penetration of insects. Inevitably, the fan will pump a lot of dust with air. It is better if it settles on a mesh, which is easy to remove and clean from time to time. It is more difficult to clean the impeller blades, since dust layers can form on them in humid conditions.
The table below shows several popular models of exhaust fans with an equal outlet diameter (100 mm). You can compare the approximate price level, depending on the functionality of the device.
| Model name, illustration | Brief description of the model | Approximate price level (May 2021) |
| "ERA SB D100 OPTIMA 4 polypropylene" | Surface-mounted axial fan for wall installation. The diameter of the pipe is 100 mm. Productivity – 97 m³/hour. Power consumption – 14 W. Noise level during operation – 35 dB. The body and impeller are made of polypropylene. Overheat protection. Mosquito net. There are no built-in timers or sensors. A check valve is not included. Splash protection is not provided. Product dimensions 150×150×70 mm. | 420 rub. |
| "VENTS 100 K" | Axial fan for universal (wall or ceiling) installation. The diameter of the pipe is 100 mm. Productivity – 95 m³/hour. Power consumption – 14 W. Noise level during operation – 34 dB. The body and impeller are made of high-strength ABS plastic. The engine is designed for long-term continuous operation and does not require maintenance. Overheat protection. Mosquito net. There are no built-in timers or sensors. A check valve is not included. Housing protection class – IP34. Product dimensions 154×154×105 mm. Weight – 530 g. | 490 rub. |
| "Domovent 100 C" | Axial fan for wall installation. The diameter of the pipe is 100 mm. Productivity – 94 m³/hour. Power consumption -14 W. Noise level during operation – 39 dB. The body and impeller are made of high-strength ABS plastic, resistant to ultraviolet radiation. Overheat protection. Mosquito net. There are no built-in timers or sensors. A check valve is not included. Housing protection class – IP34. Product dimensions 150×150×108 mm. Ultra-thin bezel. Weight – 500 g. | 500 rub. |
| "ERA D 100 E 100 SC" | Axial fan for wall installation. The diameter of the pipe is 100 mm. Productivity – 90 m³/hour. Power consumption – 14 W. Noise level during operation – 35 dB. The housing and impeller are made of high-strength ABS plastic, resistant to ultraviolet radiation. Overheat protection. Mosquito net. There are no built-in timers or sensors. Check valve. Housing protection class – IP24. Product dimensions 160×160×92 mm. Ultra-thin front panel - only 6 mm. Weight – 550 g. | 720 rub. |
| "Ballu Green Energy GE-100" | Axial fan for wall installation. The diameter of the pipe is 100 mm. Productivity – 120 m³/hour. Power consumption – 12 W. Noise level during operation – 30 dB. The housing and impeller are made of high-strength ABS plastic, resistant to ultraviolet radiation. Overheat protection. Mosquito net is not included. There are no built-in timers or sensors. Spring type check valve. Housing protection class – IPХ4. Product dimensions 158×155×104 mm. The pipe is equipped with a confuser - a ring for tightly connecting the air duct. Weight – 800 g. | 730 rub. |
| "ERA D 100 4C ET" | Axial fan for wall installation. The diameter of the pipe is 100 mm. Productivity – 97 m³/hour. Power consumption – 14 W. Noise level during operation – 35 dB. Overheat protection. Mosquito net is not included. Built-in electronic timer with two operating modes. There is no humidity sensor. Check valve. Housing protection class – IP24. Product dimensions 151×151×85 mm. Weight – 500 g. | 1300 rub. |
| "VENTS 100 Quiet-Style T" | Axial fan for wall or ceiling installation. The diameter of the pipe is 100 mm. Productivity – 90 m³/hour. Power consumption is only 7.5 W. Noise level during operation – 26 dB. The motor is on ball bearings, mounted on rubber inserts that dampen vibration and reduce noise levels. The special shape of the impeller and the presence of a flow straightener in the outlet pipe contribute to noise reduction. Built-in electronic timer with adjustable shutdown delay from 2 to 30 minutes. There is no humidity sensor. Check valve. Housing protection class – IP45. Stylish design, replaceable decorative front panels. Light indication of device operation. Product dimensions 200×200×130 mm. Weight – 660 g. | 2400 rub. |
| "Electrolux EAFM - 100TH" | Axial fan for wall or ceiling installation. The diameter of the pipe is 100 mm. Productivity – 100 m³/hour. Power consumption – 15 W. Noise level during operation – 33 dB. Built-in electronic timer with adjustable shutdown delay from 1 to 20 minutes. Built-in humidity sensor with adjustable permissible threshold from 40 to 100%. Priority in control is based on the humidity sensor. Check valve. Housing protection class – IPХ4. Stylish design, replaceable decorative front panel in different colors. Light indication of device operation. Product dimensions 144×162×75 mm. Weight – 525 g. | 4200 rub. |
Perhaps the information presented in the video below will be useful when choosing a bathroom fan:
Video: tips for choosing a fan for the bathroom.
Preparatory actions
Installing an exhaust fan is a fairly simple job and can be easily done correctly with your own hands. Its installation will be correct if the following rules are followed:
- ventilation of the room will be effective if there is a small gap between the threshold and the door, or the doors have slots;
- the air shaft should not be clogged; it is necessary to check whether there is air movement through it;
- installation is carried out only after connecting the mechanism to the electrical network;
- Sometimes it is necessary to widen the hole for the device, and if it is larger, a plastic pipe or similar gasket is inserted there as a seal. After this, the voids are filled with foam for installation;
- you need to check whether the plastic grill covers the area without finishing; if not, you need to putty and tint these areas of the wall;
When calculating the diameter of the fan, take into account that it is necessary to leave 5–10 mm around its circumference for reliable fixation with sealant, sealant, or polyurethane foam. Power is supplied to the device in advance; any lighting or switch will do. It is most convenient if the power cables are pre-placed in the ventilation duct when laying the tiles. External wiring is also used.
The air shaft must not be clogged
May need a gasket
If the fan has touched the finish, the area needs to be restored.
Ventilation hole inside a suspended ceiling
Moisture should not be retained inside suspended rack and tension structures, so a ventilation system is required there.
Stretch and slatted ceilings in some houses are mounted along the lower edge of the ceiling beams located at a height of 19–21 cm from the ceiling. The ventilation hole is located inside the hanging structure.
In this case, it is enough to equip a suspended or slatted ceiling with passive ventilation: cut a hole in the ceiling, decorate it with a decorative grille or a special lampshade. Several such holes can be made. An exhaust fan, installed in a wall opening, will draw air through the ceiling vents. This will allow you to choose a device of greater power and, accordingly, noise: the ceiling design will muffle sounds, and the air flow will be stronger, which will compensate for the small size of the ventilation grille in it.
Design and principle of operation of axial fans
Axial fans can be recognized by their blades.
A wheel with blades attached to the motor shaft is called an impeller. The plane of the blade forms an angle with the axis of rotation. Rotating, the front rib captures a portion of air and displaces it along the plane of the wing to the rear rib.
The impeller seems to suck in air from one side and push it out to the other. The result is an air flow directed along the axis of rotation.
This type of device received the name “axial” due to the fact that the air flow created by devices of this design is directed along the axis of rotation. It also has a second name - axial, which comes from the Latin word axialis (“axial”).
Components of axial fans:
- engine;
- impeller (impeller);
- frame.
What is needed to install forced exhaust
To find out whether forced exhaust is needed in the bathroom, the state of natural ventilation installed during the construction of the house is analyzed. To check the hood, remove the decorative panel from the ventilation shaft and remove accumulated debris from the ventilation duct, which in the bathroom is usually located close to the ceiling. Then bring a lit match or candle to the ventilation duct. If the flame does not deviate to the side or deviates very slightly, a decision is made in favor of installing forced exhaust.
It is necessary to ensure a flow of fresh air into the bathroom. Typically, air circulation is organized through a small gap under the door in the bathroom. Therefore, when the door frame is installed, the threshold in the bathroom is not installed.
When choosing a fan for the bathroom, you must carefully study the characteristics of the device. The device must fully comply with the conditions in which it will be used. The fan must have sufficient capacity to provide the required amount of fresh air. Important factors when purchasing a device will be price, design, and noise level.
Ventilation hole on the outside of the suspended ceiling
In houses where the air duct opening is located above the level at which a suspended slatted or suspended ceiling is mounted, an exhaust duct or axial fan is inserted into a standard air duct in the wall, and another hole is made on the ceiling sheet opposite it.
The standard width of the slatted structure is 84 mm, so the hole should have a diameter of 80 mm so as not to crush the slatted profile . A hole is drilled in the rail with a drill equipped with an 80 or 82 mm “ballerina” cutter.
You can take a larger grille, with a diameter of 100 mm, holes for self-tapping screws are marked on it. It leans against the markings, and mounting holes for fastening are drilled through it . It is not recommended to immediately screw a self-tapping screw into the ceiling (without pre-drilled holes for it): the slightest misfire, it will stick in the wrong place. The screw caps will be hidden by the decorative element of the grille.
In a similar way, you can do ventilation in tension fabrics with your own hands, only here the hole is carefully cut out and not drilled. The grille is attached to the ceiling with special clamps or silicone glue.