Most options for connecting one device to another will not require complex skills from the master, such as independently laying additional wires or installing grounding in an apartment where there is none. However, in this case, some restrictions are imposed on the operation of the connected sockets: certain types of electrical appliances cannot be connected to the network. To connect the outlet yourself, you need to understand the structure of the apartment's electrical wiring and be able to identify the functions of the wires located in the niche.
Installation of an apartment or house electrical network
During repairs, there is often a need to install a new electrical outlet.
To figure out whether it is possible to install an outlet from the switch, you need to have a good understanding of the structure of the home electrical network. Understanding its structure determines the possibilities for making modifications.
Main diagram of the apartment electrical network
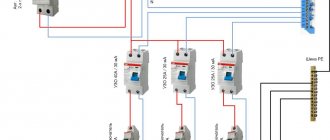
The path of apartment wiring begins with the input panel, which is powered by a cable coming from the external house electrical network. The panel device is located in the entrance of the house or at the entrance door of the apartment. Inside there is a circuit breaker, which receives power from the cable. In Soviet-built houses in which the electrical network has not been updated for a long time, switches perform the functions of an automatic device. Cables from the panel switch are directed to the electric meter and then to each of the machines serving the group. The groups do not communicate with each other, and their number is determined by how many loads there are in the apartment. They can be distinguished according to criteria such as ease of placement or type of load used. A strict rule is to separate appliances located in living quarters and those located in the kitchen and bathroom into different group connections. From each of the machines, the cables are pulled into distribution boxes (one or more), to which apartment light switches and sockets are connected. This design optimizes maintenance of the electrical network and masks utility networks.
Possible wiring diagram in the apartment
Connecting switches and sockets
Connecting an outlet
To understand how to properly connect an outlet to a switch or to a network, you need to remember the instructions from the Electrical Installation Rules. They establish that the process of connecting an outlet to the electrical network requires three cables with different functions. To simplify the visual determination of the functions of the wires, they should differ from each other in the color of the insulating material (in practice, electricians sometimes ignore this rule).
When connecting the socket, use the following cables:
- Phase, the function of which is to power the serviced outlet, carrying electric current to it. This is the only wire whose insulation color is not regulated by the rules: the main thing is that it differs from the colors of the other two cables.
- Neutral wire with a blue or light blue sheath. Like the phase, it is connected to the power contacts of the socket in the distribution box.
- Grounding, whose role is to protect residents from electric shock when touching the body of an electrical appliance, as well as to prevent short circuit situations. Its insulating material is yellow or green. The wiring is connected to special socket contacts designated for grounding.
It is practiced to combine sockets with each other with a parallel connection to the network or serial. In the first option, each of the combined elements remains independent.
Connecting a switch
In the case of connecting a switch, only two cables are required, and both of them are phase cables. One is placed at the input of the connected device and connected to the group line phase. The other is led from the light switch output to the junction box and connected to the phase of the lighting device. The neutral wire of the latter must be brought out into the box, bypassing the switch, to the power cable.
Recommendations for choosing wires
In houses made of brick, aerated concrete blocks, and cinder blocks, interior wall decoration is required, which means that a hidden method is used for laying wires.
To provide additional protection, and in case of repair to quickly replace the cable, it is placed in a corrugated sleeve of non-flammable polymer.
In houses made of timber or rounded logs, to preserve the retro style, they use an open method of laying wires, purchasing decorative products - twisted wiring, rollers, stylized switches and sockets
To select the correct wire cross-section, specialists perform calculations related to determining the load.
However, based on standard diagrams and many years of experience, qualified electricians adhere to the following parameters:
- lighting circuits – 3*1.5 mm² or 3*2 mm²;
- socket groups – 3*2.5 mm²;
- electric stove/oven – 3*4 mm²;
- air conditioning – 3*2.5 mm², for appliances more powerful than 5 kW – 3*4 mm²;
- heating boilers – 3*4 mm² or more (according to the manufacturer’s recommendations).
The optimal type of cable is three-core copper: VVGng, ShVVPng. It is impossible to use wires with a cross-section smaller than the specified one, as they will not match the load and will begin to melt, creating a dangerous situation.
Changing the purpose of an electrical point and connecting one to another
Knowing the features of connecting socket devices and lighting control boxes, you can replace one element with another or make a connection between them. When performing any connection work, it is first necessary to de-energize this line, as well as the cables of adjacent lines that may be unintentionally touched.
Replacing a socket with a switch
Replacing a socket with a switch is done without grounding.
Of all the operations reviewed, this procedure is the most simple. After removing the old socket, a trinity of cables remains - phase, neutral and ground. It is necessary to identify each of the elements by the color of the protective winding. For reliability, you need to use a multimeter (it will be able to show the phase - the cable through which the current flows when connected to the probes of the device), since during installation work the regulation of wiring colors is sometimes ignored. In apartments with an old layout, where the electrical network has not been modernized, instead of three conductors, there will most likely be two (phase and zero), since grounding was almost never used before.
Having determined which wire performs which function, you need to connect the phase component to the input of the switch, and the zero to the output. Then work is carried out in the distribution box: the zero, which was previously drawn to the socket housing, is turned off and then connected to the lamp phase. Grounding is not involved in the operation, regardless of whether it was used in the previous outlet or not. After this, the neutral cable of the chandelier or sconce is connected to the network.
Replacing a switch with a socket
Replacing a switch with a socket requires additional cables.
To carry out the operation correctly, installation of additional cables is necessary. To connect the socket, three wires are required, and after removing the switch housing, there are only a couple of them left. But it is quite acceptable to connect an outlet box to this place, and the socket will work, but during its operation you will have to come to terms with some restrictions.
Refrigerators, electric kettles, and heating appliances cannot be connected to an outlet without grounding. It is also necessary to take into account when choosing the rated current that thinner wires are usually used for lamps than for socket structures.
First, switches are made at the site of the future location of the outlet box. Two wires remaining from the switch need to be connected to its power contacts. One of them will have to be transformed from phase to zero: in the distribution box, turn off the cable that was going to the phase wire of the lamp before dismantling the lighting control device. It must be connected to the zero terminal of the group's power cable.
Remember the importance of following safety rules!
Whether you're working on an outlet or a light switch, remember that we're talking about electricity. Therefore, it is necessary to work with it, observing all safety rules, as well as having special equipment. If you are not confident in your abilities, then it is best to entrust the process to professionals.
Important! All wiring work must be carried out only when the electricity is turned off. As a rule, there is an automatic machine at the entrance or even in the apartment, where this can be done either for one room or for the entire apartment as a whole.
Connection from switch socket
You can solve this problem in two ways: by simultaneously connecting two devices to one wire, or by mounting a switch without manipulation in the junction box. Both options have advantages and limitations.
Connecting a switch from an outlet without a distribution box
Connection diagram without a distribution box
This diagram assumes that there are no additional twists between the distribution panel, chandelier and switch. A wire is sent from the shield - two-wire if there is no grounding and three-wire if there is one. It must be led in one piece to the lighting fixture, and then divided so that the zero remains there, and the phase goes to the switch. The phase from the switch button is brought to the contact of the chandelier up the wall, and then along the ceiling.
If the chandelier has many light bulbs and there is an intention to connect it to a two-button switch, the panel wire is cut as described above, and a pair of wires from both buttons lead from the switch to the lamp. For this purpose, a cable with two cores is used. They are connected to the outgoing contacts of the switch (they will act as phases when the device is turned on) and the wire is directed upward to the chandelier. The wires are again separated by several centimeters and connected to the phase contacts of the chandelier.
This installation method has a number of advantages - it minimizes faults due to ease of implementation and the absence of connecting additional conductors, and is accessible even to an inexperienced technician. The disadvantage of this type of connection is that when cutting the cable, there is no insulating material on the disconnected cores. To avoid this, you can use single-core conductors with high-quality insulation. Then one independent cable from the panel bus is directed to the contact of the chandelier, another wire (phase) from the circuit breaker is led to the light control device, and from the latter a cable is laid to the chandelier (from one or two cores - according to the number of buttons).
Connecting a switch and socket from one wire
Connection diagram from one wire
To install a box with one button, first connect the apartment panel to the distribution box using a double (with phase and neutral) wire. The lighting device is also connected to the distribution box with a two-core conductor. Then a trio of wires from the paired switch and socket are inserted into it, while a path must be laid from the phase clamp to the socket, and from the socket to the switch contact. The chandelier is connected with one cable to zero, the second - with an unoccupied switch terminal. If there is a grounding wire, it is connected in the junction box to the appropriate terminal.
To connect a two-key switch, five cables are led from the box to the block of two devices. A zero and ground are placed on the socket. A phase wire is supplied to the switch via a jumper in the switching unit. The two remaining cables are placed on the free terminals of the switch. In the junction box, the conductors that direct the phase and those that go to the light bulbs are twisted.
Cost indicators of combined electrical fittings
Study BPA16-242B
The cost of interlocked sockets and switches depends on their functionality. Of course, a multi-key unit with several sockets will cost significantly more than one socket combined with a single-key switch.
Most people who have a little knowledge of electrical engineering choose any fittings not based on price, but on reliability, which can indirectly be determined by the brand (manufacturer).
At the same time, the purchase should be made either in company stores or from dealers of electrical engineering companies, who guarantee the impossibility of selling counterfeit products.
Today, electrical products bearing the trademark “Legrand” and “Schneider Electric” (France), “Lezard” and “Gira” (Germany), “Viko” (Turkey) and some others are quite in demand.
Let's consider the cost indicators of interlocked installation electrical fittings using the example of the French brand “Schneider Electric”:
- A two-key unit with one Euro socket “Etude BPA16-242B” costs about 300 rubles. This fitting allows you to connect electrical appliances with a power of up to 3.5 kilowatts to the outlet. A similar model in a waterproof version, the socket of which has a protective cover, can be purchased for 400-420 rubles.
- A single-key three-outlet power unit will cost 1,100 rubles. The high cost is due to the presence of a built-in filter.
- A single-key unit with one socket with a grounding switch costs less than 200 rubles.
Legrand products are slightly more expensive. Typically, all electrical fittings of this brand are equipped with decorative overlays. A single-key unit “Legrand Valena”, complemented by two European sockets, can be purchased for 650-655 rubles.
Connection from socket switch
Connecting a switch from an outlet
This circuit is the most difficult to implement. Although connecting an outlet for temporary use is not so difficult, in order to ensure high-quality operation of both elements of the unit, it is necessary to lay additional cable paths. Therefore, the described connection can be implemented only as a last resort.
Two cables from the switch box are connected to the power contacts of the socket. In this case, it is necessary to disconnect them from the switch so as not to create a short circuit situation. Since there is no grounding cable, one of the wires coming from the switch must be turned to zero. This can be done in one of two ways:
- short-circuit the cables of the lighting fixture;
- Turn off the cable coming from the push-button device in the junction box and connect it to the neutral cable of the group.
Implementing a complete connection between the socket and the lighting controller is very problematic. This operation requires the installation of conductors from the distribution box to the outlet.
What tools do we need?
The list of tools is not very large: an indicator screwdriver, a socket (read more about purchases below), pliers (the presence of a rubber handle is extremely important), as well as a suitable wire. At the same time, for safety reasons, it is better to purchase rubberized gloves. Well, if the work is carried out without turning off the current (which should be avoided in every possible way), then a rubber mat under your feet will also become a critical factor.
How to connect a lamp through a switch from an outlet
Connecting a lamp through a switch from an outlet
Use conductors with three or four cores that perform different functions, and when separated, strip them of insulation to a few centimeters. Of course, the apartment must first be de-energized. Wires and individual cores are connected according to a pre-designed circuit, making sure that they are drawn in smooth, straight lines and do not form knots or interweaves. If the installation is carried out in a room whose walls are made of wood, it is necessary to lay out the paths in advance using plastic insulating plates. To lay electrical wiring routes hidden, you need grooves. Special channels are allocated for this option in reinforced concrete buildings.
When planning to replace a socket with a light control device or link them together, it is advisable to first evaluate the limitations imposed by the procedure appropriate to a specific task. Having decided to carry out installation work, you can purchase the necessary device with parameters suitable for the selected electrical circuit.
Installation features
It will not be difficult to install a combined unit without the involvement of a professional electrician, since connecting modern models requires a minimum of wires.
The installation process will have only a few features that need to be taken into account:
- You need to prepare the necessary tools in advance ; you won’t need many of them: an electric drill with a drill core; several screwdrivers of different sizes; pliers and wire cutters.
- To ensure safety during work , make sure that the handles of all tools are insulated.
- Some modern varieties are designed for external installation, that is, when installing them, you can completely avoid drilling holes in the wall surface.
- You can choose a variety with an increased level of protection from environmental conditions ; such models can be installed not only indoors, but also outdoors. Such devices also have an additional element in the design in the form of a special lid that helps prevent liquid from getting inside the device.
- All modern types of blocks are suitable for installation in walls made of any material and regardless of the type of finish.
Safety Basics - Mistakes and How to Avoid Them
Ignorance or inattention to details can lead to installation errors. With further operation, such wiring in the house will cause problems, damage to property, and sometimes a fire. There are simple rules that allow the master to act not at random, but according to safety rules:
- In a new building, before laying the wiring, a location for the distribution board is selected. It is installed close to the entrance, in a frost-free room. When drawing up a switchboard diagram, it is wise to immediately think about the RCD (residual current device), ground loop and other protective devices.
Wall-mounted switchboard
- All work on replacing electrical wiring (in an old home) must be carried out with the power supply turned off at the electrical panel. It is required to leave a warning sign on it to avoid an unpleasant surprise.
- Wiring in the house is preceded by drawing up a detailed network plan and connecting electrical appliances.
- Even if all circuit breakers are turned off, before starting work, check the presence or absence of voltage on the contacts or conductive surfaces with an indicator screwdriver.
A warning sign must be hung on the opening machine.
The most common mistakes
:
- Use of aluminum wires. According to the requirements of the PUE (rules for installing electrical equipment), in residential buildings it is allowed to use aluminum wires with a cross-section of at least 16 mm². Wires of this diameter are typically only used in cables that carry current to, but not inside, the home. When replacing wiring, a combination of copper and aluminum parts is unacceptable - at the point of their connection, the contact will burn out over time due to transition resistance.
- Insufficient waterproofing. For long and safe operation of the system, care must be taken to carefully insulate all wires in rooms with high humidity. Poor insulation most often shows up in the bathroom, pantry, kitchen or terrace.
- Stroba. The optimal depth is 2-2.5 cm. Grooves with a shallower depth are difficult to plaster.
Chasing a wall for wiring
- Working with cable. Diagonal laying is prohibited; The wire cross-section must be calculated in accordance with the system parameters.
- Distribution boxes. To avoid confusion and ease of maintenance, they are placed under the ceiling.
An example of drawing up an electrical wiring diagram in a private house
The future electrical wiring diagram is drawn up based on the plan of a private house. It consists of two parts, electrical and installation. The main elements are outlined schematically, “for yourself.”
- Electrical diagram
. The electrical wiring diagram in a private house shows how energy consumers are included in the circuit and their number.
An example of an electrical wiring diagram in a country house
- Wiring diagram
. Determines the installation locations of devices. This data will help you calculate the number of cables and additional consumables needed.
Installation version of the wiring diagram
The main elements of the network include wires, sockets, switches, meters, fuses and relays, distribution boxes, in addition:
- external power cable entry point;
- RCD;
- connection points for high power household appliances;
- ceiling and wall lighting fixtures.
The beginning of the electrical supply to a home is the electrical panel. A power wire is supplied to it from the outside (usually via an overhead line), supplying single-phase or three-phase current.
Serial and parallel connection
The daisy chain method is otherwise called serial connection of sockets. In contrast, the parallel connection method provides for powering each outlet with a separate line from the distribution box (for the most powerful devices, a line is drawn from the distribution board).
Advantage of daisy chain connection:
- less dirt and dust is formed: the groove is made in a short area between the sockets;
- for the same reason, labor costs are reduced;
- cable costs are reduced.
But there are also important disadvantages:
- low reliability: if the wire burns out, all subsequent sockets of the loop become inoperable;
- limited power: the maximum permissible current, determined by the cross-section of the cable cores of the first socket (at 2.5 sq. mm 16 A), is divided by all devices included in the loop (with a parallel connection, each socket can consume the maximum current);
- startup and shutdown of the device are accompanied by more noticeable voltage drops in adjacent sockets than with a parallel connection.
Laying the wires
First of all, let's connect the wire feeding the junction box. In our example, we use a wire of the VVGngP brand; a three-core wire with a cross-section of 2.5 squares is used as the power supply. The cross section was selected using the calculation method based on the load on the chain; you can easily perform these calculations on your own. Here you will find a detailed description of how to independently calculate the cross-section of a wire; I assure you there is nothing complicated here.
On both sides it is necessary to leave a reserve of wire for connecting electrical wiring elements (breaker, socket, switch) of 10-12 centimeters, in the junction box 10-15 centimeters. Wires that are too short will be inconvenient to connect and connect, so it’s better not to save much.
Next, let's connect the wire to the socket.
Here you will need a wire with a core cross-section of 2.5 square.
1.5 square meters per switch.
Now, let’s lay the wire for the lighting; for us it’s a light bulb with a socket.
We have laid all the wires necessary to complete the circuit, let's move on to the third stage.
We mount installation elements
For maximum clarity and clarity, we will analyze the full circuit installation cycle from start to finish. Thanks to this, we will give the most detailed answer to the question of how to connect an outlet with a switch. As an example, let’s take a diagram of hidden electrical wiring, something that is usually located under a layer of plaster.
We install the distribution box.
Next we need two sockets. Detailed instructions for installing a socket box (mounting cup) are described here.
We will install a switch in one, and a socket in the other.
Now let's mount the DIN rail, in our case it will act as part of the power cabinet; a circuit breaker will be installed on it, which will protect the electrical circuit from short circuits and overloads, which have such a detrimental effect on all elements of the circuit.
The preparatory work can be considered completed.
The last detail that completes the first stage of installation is the lighting element. In our example, it will be a light bulb with a socket, clearly, simply and clearly. Therefore, we will move its installation to stage number two.
How to choose a suitable block?
The wide range of models and modifications of such devices presented on the modern market often significantly complicates the selection process.
In order to buy a suitable unit and not regret your choice in the future, you must take into account the following important criteria:
- The required number of sockets and switch buttons that must be included in the design of the unit. Today, there are a large number of different options and it is best to immediately make an accurate calculation of consumers so that in the future you do not have to use extension cords.
- Installation method , which differs for external and internal devices. The first option is recommended for rooms with open wiring, since visually such a unit will look more noticeable and bulky.
- Design of the device , which will allow it to fit harmoniously into the overall interior design of the room.