Hello, dear friends! Today I’ll talk to you about how to attach the baseboard to the countertop. There are several options. But not all of them are worth using.
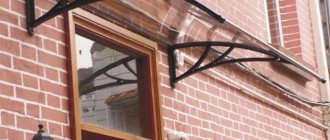
Skirting boards are used not only on the floor, but also in the kitchen when assembling a set. It covers the joint between the countertop and the wall. It is also possible to attach it to a tabletop or backsplash.
These elements differ from each other in shape, design, and materials of manufacture. The plastic and aluminum versions are mainly used. Wood, MDF and other materials are rarely used.
Functions of decorative plinth
Since furniture is usually made of MDF or chipboard, the cuts on the reverse side, according to the rules of furniture production, are not protected by any protective edges.
Therefore, as a result of moisture entering from the reverse side, its edges may swell and crack, or it may even begin to rot.
Therefore, the main function of a kitchen plinth is to protect the countertop (if it is made of chipboard) and furniture cabinets from moisture on the end cut, as well as to create an aesthetic appearance for the kitchen unit.
Rules of care
The main function of the baseboard as a barrier is to prevent liquid or solid household waste, which has the ability to decompose under the influence of the kitchen microclimate, from getting into hard-to-reach places. Therefore, if gaps appear between the tabletop and the baseboard, they need to be eliminated. Transparent silicone is suitable for this.
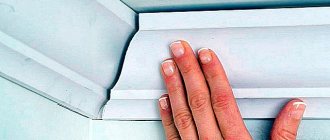
It is important to ensure that no gaps form between the baseboard and the wall. Otherwise, there are no special care rules (except for the obvious - avoid contact with hot objects if the profile is PVC).
Differences in design
The front side of the molding is a decorative profile. During the manufacturing process, a sealant is attached to the back side to fill the gap. Skirting boards are divided by design into two categories - monolithic and universal.
Monolithic products are those that are made from one piece. They have excellent rigidity, so they are not durable in use. And their long-term use is ensured by elasticity.
Moldings are universal and are mounted on a silicone seal. They are more plastic and, accordingly, have a long service life.
Differences in materials
- Wood. Typically, this type of molding is used for countertops made of the same material (chipboard or wood). Varieties of such skirting boards have a low cost, but choosing them in combination with the color of the tabletop is quite difficult.
- Aluminum. Such moldings are quite popular. They have a long service life and are not exposed to heating devices and are easy to clean. They can have different shapes and appearance.
- Plastic. This type is made of PVC. Accordingly, they are easy to change, so they are presented in various modifications.
- Stone. A type of molding from the “good” price category. They are installed using glue and are installed in a vertical position.
- Metal-plastic. This type of plinth can be used for any type of countertops. But installing them next to heating devices is not recommended.
Types of fasteners for baseboards
Kitchen moldings are divided into removable and non-removable. In the first option, the mounting rail can be dismantled when rearranging the headset, and in the second option it is firmly attached.
Removable ones are attached directly to the tabletop itself, and non-removable ones are attached to the wall. It is not recommended to fasten the plinth to the wall and to the tabletop, because in this case they will be deformed.
In addition, they can be collapsible or non-dismountable. However, they can be attached either with self-tapping screws or with glue. In the first option, the seal is fixed, and in the second, the monolithic rail is fixed.
Sealant or grout
This option looks as simple and expensive as possible, does not attract attention, but requires painstaking work. The tiles are laid on a perfectly flat wall after installing the kitchen unit and countertop, which is closely adjacent to the apron. With this solution, the tile must be selected before ordering the kitchen, and the builders will “adjust” the elements to the height of the apron.
The thickness of the tiles and tile adhesive will be approximately 1 cm, so there will be no joining seam left.
The joint is coated with sealant or epoxy grout. The second method is much more reliable: the composition does not absorb water, so the seam will not change its color and will prevent the appearance of mold.
Choose the option that suits you best to get a practical and visually attractive kitchen.
Installation (step by step instructions)
You should not try to install moldings made of artificial or natural stone yourself. It's better to invite specialists. But the instructions for installing skirting boards made of plastic, metal, wood and composites will be given below.
Required Tools
In order to cut the baseboard to the required size, you will need a hacksaw for wood or metal. A hacksaw is used when installing solid wood moldings. Soft PVC products are best cut with a carpenter's knife. You also need to prepare a tape measure, silicone sealant, screwdriver or screwdriver.
Screw mounting
Using a tape measure, you need to measure the distance of the tabletop plane on which the molding will be installed and cut it to size. Then, using a screwdriver, you need to drill holes for the screws, first attaching the plinth to the site of the intended installation.
The distance between the holes should be between 15 and 30 centimeters.
- Products made of fragile materials must be drilled with extreme caution, as they may crack. It's best to use glue.
- Before fixing the baseboard to the tabletop, the joint can be treated with silicone sealant to prevent moisture from entering.
- But do not forget that when rearranging it will need to be removed from the surface.
The outer part is secured with latches to the base installed around the perimeter. If the kitchen is corner, then a corner element is fixed at the junction. The outer part extends into the corner by 0.5 centimeters.
It is recommended to apply silicone glue to the joints. Plugs are placed on the edges of the molding, which are included in the kit upon purchase.
Adhesive connection
Before starting the procedure for gluing the molding, it is necessary to remove any dirt and dust from the walls and from the surface of the countertop. If there are grease stains, it is better to remove them with an alcohol solution.
It is also necessary to clean the base surface of the baseboard.
- Before installation begins, the outer surface of the baseboard must be removed and the base cut to fit the size of the countertop surface.
- Then coat the base with glue and press it to the place of intended installation, and then hold it there for the time specified in the instructions for the glue itself.
- If the kitchen is corner, then installation is done from the corner. At the end of the installation, it is necessary to install caps on the edges of the molding.
Ceramic border
An interesting solution for those who are not afraid to combine styles and a variety of materials. A slightly protruding border from the same collection as the backsplash tiles will become a barrier to moisture and beautifully decorate the joint with the countertop.
In order for the side to adhere as closely as possible to the elements, it is necessary to use silicone sealant - transparent or in the color of the material.
The border will decorate a kitchen in country and Provence style, and will be appropriate in eclecticism and even in a classic interior.