The arrangement of a hygienic room hides many subtleties and nuances. We are talking not only about the purchase and installation of plumbing fixtures and fittings, but also about externally almost invisible, but important devices. One of these devices is a bathtub drain and overflow, the operating and installation features of which are worth familiarizing yourself with.
The article we have presented describes in detail the principle of operation of a drain with overflow, and examines the varieties used in everyday life. We will tell you everything about the selection criteria and the leading manufacturers in the segment. Our recommendations for care and operation will help you avoid problems and extend your service life.
Types and principle of operation of equipment
The overflow drain removes used liquid and prevents the bowl from overflowing due to uncontrolled water supply. The structure provides two holes - at the bottom and in the wall of the bathtub. They are supplied with interconnected hoses connected to the sewer drain.
Features of mechanical devices
There are three options for drain and overflow systems on sale. The difference between them lies in the method of removing the plug blocking the drain hole. If you are planning to buy a bathtub drain and overflow and are not sure which one is better to choose, you should pay attention to the model of your bathtub and its location in the room.
The simplest type of device is determined by the traditional design, found in almost every apartment. It has no moving components or levers. Water is drawn in when the plug is closed, and released when it is opened.
Mechanical products rarely break down and last a long time. The plug is attached to the drain grate on a chain, removed and placed in the opening manually
Products in this category differ in the type of connection to the sewer, sealing of connections, and the shape of the pipe. Devices include the following elements:
- Drain neck . Installed in a hole made in the bottom. It consists of a chrome funnel that “catches” large particles of debris, and an expanding pipe with a built-in nut. The parts are joined with a reinforced metal screw. A rubber ring seal is responsible for the impermeability.
- Overflow neck . Inserted into the wall of the bathtub. The design is similar to a drain, but is adjacent to the general contour of the network through a lateral, rather than direct, drainage system.
- Siphon . An arched removable pipe designed to act as a water seal. Blocks attempts of unpleasant sewer odors to enter the bathroom. Connects mechanisms with each other and with the sewer network. Available in a variety of configurations. Models with a deep shutter that holds at least 300 ml of liquid are considered optimal.
- Connecting corrugated tube . Diverts water entering the overflow to the siphon. Connects to other components with pipes.
- Auxiliary pipe - soft or hard. Provides drainage from the siphon into the sewer pipe.
The kit also includes connecting parts that increase the tightness of the system. These are flat and conical gaskets used together with a union nut. Conical products are mounted from the nut with a sharp edge so that the thin part goes inside the opposite element.
Devices not equipped with mechanisms are produced in universal sizes and are designed for bathtubs with an average distance from the center of the overflow to the drain not exceeding 57.5 centimeters
Advantages of manual strapping: budget price, simplest assembly/installation algorithm, rare breakdowns, reliability. Among the disadvantages, rapid wear of the seals should be noted.
Characteristics of semi-automatic devices
A later modification of the traditional design is a semi-automatic system. It contains the largest number of components. It is supplemented by a control unit that raises/lowers the plug, a shutter valve, and a cable that controls its position.
The control unit is implemented in the form of a handle, valve, rotary ring, button. You can operate it by turning the lever 90 degrees or pressing a button without bending over to the bottom of the bathtub. Thus, the shut-off rod rises and falls, opening or closing the valve
The system is activated by tightening and releasing an auxiliary cable located inside or outside the overflow pipe. The first option looks more aesthetically pleasing, but is much more difficult to repair.
Advantages of semi-automatic machines:
- Convenience of closing the drain (without having to bend over or wet your hands);
- comfortable management and operation;
- stylish design.
The disadvantages of the device include a complex structure with a mass of moving and connecting components and the risk of the cable jamming over time. In semi-automatic systems, the overflow holes are hidden behind the control unit. Visible details perform a decorative function in the interior thanks to a thoughtful design.
What are the benefits of automatic drains and overflows?
A distinctive feature of automatic systems is their complex structure with a click-clack valve button, equipped with a latch and a built-in spring.
In automatic systems, the button, as in mechanical ones, is operated manually (or by pressing the heel of the foot while in the shower). When pressed, the plug lowers, closing the drain opening. If you repeat the manipulation again, it rises, starting the drainage of water
The buttons are designed in elegant high-tech, modern, and retro design styles. They are made from brass and copper, coated with chrome or nickel plating.
Advantages of automated devices:
- ergonomics and presentable appearance;
- compactness;
- convenient drainage.
There are also many disadvantages: the high cost of the proposals, the vulnerability of the spring holding the valve, difficulties in replacing the button, painstaking installation, often requiring professional intervention.
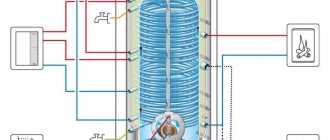
The automatic drain can be equipped with the functionality of collecting water. It is considered if it is impossible to rationally place a faucet in the bathroom.
The diagram includes pipes for the liner, which are connected to the overflow hole. The bowl is filled through the top connector, which eliminates flooding, since the flow automatically stops when there is an excess of water.
In addition to the usual types of fittings, there are separate products adapted to the characteristics of specific bathtub models
Breaking down a cast iron bathtub for removal in parts ↑
If you need to dismantle an old bathtub and install a new one, then the easiest and fastest way to get rid of outdated plumbing fixtures is to simply break them apart with a sledgehammer. Cast iron is a strong metal, but it cannot withstand a series of strong blows from a heavy hammer and will definitely crack. After this, it will not be difficult for even one person to remove small pieces from the apartment.
The only significant drawback of this method is the extreme noise produced during the breaking process. To reduce the need for knocking, you can use a grinder. The procedure will be as follows:
- As in the previous case, disconnect the plumbing from the communications, cut or otherwise dismantle the drain pipe.
- Free the bathtub from cement mortar around the perimeter. If there is a decorative screen, then it is broken with a chisel and hammer.
- Move the bowl a little away from the edge of the wall. Using a grinder, make cuts on the curved edges in the middle on both sides. It is these edges that give the bowl the necessary rigidity, so you need to saw them completely.
Next, all that remains is to hit the bottom with a sledgehammer a couple of times, after which the bathtub will “fold” exactly in the middle. The only thing that should not be forgotten throughout the entire demolition of sanitary equipment is eye protection. Use special masks or goggles, otherwise chipped pieces of enamel or shavings can cause injury.
Video: How to break a cast iron bathtub ↑
The work of dismantling communications, demolishing and removing an old bathtub is not extremely difficult, although its labor intensity for one person is quite significant. The greatest difficulty is caused by dismantling a cast iron drain, the stuck nut of which is almost impossible to unscrew without the help of, for example, a hammer drill. Breaking will also require significant physical effort, so it is better to do the work with an assistant or immediately seek help from a specialist.
Video: Complete elimination of plumbing systems using an angle grinder ↑
What are drain systems made of?
In the production of devices, materials are used that are resistant to corrosion, alkaline and acidic substances, and hot water. In the last century, when the range of plumbing equipment was quite narrow, drainage systems were made mainly of ferrous metal.
Although this material quickly loses its original aesthetics, it serves well for a long time, bravely withstanding high pressure and temperature changes. Despite its advantages, now manufacturers still give preference to non-ferrous metals and plastic.
Plastic harnesses are attractive at an affordable price. They are appropriate in bathtubs equipped with a decorative screen. Their universal dimensions adapt to non-standard sewer outlets and drains.
Plastic products are light in weight, easy to assemble, and do not undergo deformation due to the interaction of moisture and impurities contained in it
Metal objects are significantly ahead of plastic in terms of strength, service life and design. The most common products are made of brass, bronze, and copper. Chromium or nickel is applied to the drain grids and certain parts in them using electroplating techniques.
Provided that the devices are cleaned in a timely manner and the washer joints are disassembled, unlike plastic, they are unlikely to fail even after decades.
You can understand what kind of metal the structure is made of by carefully examining the pipe connecting the drain and overflow holes. Copper is recognizable by its reddish tint, ductility and softness. Brass is a durable yellow alloy of zinc and copper. Bronze is a fairly hard, dark brown material containing copper and tin.
Bronze and brass trims look great in classic and retro interiors. They look very elegant and neat, which is especially valuable when the bathtub is in the center of the room
Materials for siphons
Now on sale you can find siphons made from three different materials. So, the main types of siphons for cast iron baths:
Plastic bath siphon
- plastic siphons. The most popular due to ease of assembly, low price and lightness of the material. But when choosing it, you need to carefully look at the height of the product so that it coincides with the distance from the floor to the bottom of the bathtub;
- copper siphon. It is characterized by durability, since it is made of copper-based alloys, which, as is known, are not afraid of water and, accordingly, do not rust;
- cast iron siphon. The most popular type of water seal is in the past, given the lack of alternatives. It is very inconvenient from the point of view of dismantling, since over the years it is firmly soldered: on the one hand - with the sewer pipe, and on the other - with the drain hole. So there are often cases when specialists use an angle grinder to dismantle them.
Accordingly, drain pipes can be corrugated or straight, taking into account the material from which they are made. Although plastic pipes can be represented not only by corrugation.
Main selection criteria
When choosing a device, buyers are guided by personal requirements and wishes. It is no less important to evaluate the product you like taking into account other serious criteria.
For example:
- Price category . For a low budget, plastic equipment with manual draining is optimal. A more expensive device with automatic/semi-automatic mechanisms is suitable for those who are looking for a solution with an original style and a convenient modern design.
- Material . The quality indicator of propylene is a dense shell, brass is a perfectly smooth surface, cast iron is the absence of the slightest cracks, since they cannot be repaired.
- Additional options . Siphons may have several inlets for connecting other consumers in addition to the bath. They may not be used by closing them with a nut. In the future, this thoughtful step will give you a chance to save money on branching drains under the sink, washing machine and dishwasher.
- The diameter corresponds to the siphon and sewer pipe. If the sections are incompatible, you need to select rubber or plastic adapters.
- Completeness . The kit of any system must include all elements for connection, O-rings, gaskets for pipes and overflows to prevent leaks.
Another criterion that is far from least important is the manufacturer of the plumbing fixtures. The service life and proper operation of the selected drain-overflow system depend on it.
Rating of the best manufacturers
In order not to get into trouble and not suffer with a problematic product of dubious quality, you should purchase products from well-known and trusted European companies. They produce equipment according to generally accepted international standards and norms.
Geberit . A high-quality Swiss brand with a wide range of products at mid-range prices. The product is easy to use and adapts well to non-standard sizes.
Most designs have an adjustment plug near the overflow hole that opens the drain plug
Alcaplast . One of the largest manufacturers of sanitary ware in Eastern and Central Europe. The Czech brand produces devices with a special design and simple construction, which stably and silently perform their functional tasks throughout their entire service life, regardless of the influence of aggressive environmental factors.
Kaiser . Manufacturer from Germany, producing trims for modern bathtubs. The company's products allow you to adjust the length of the siphon over a wide range, which makes it possible to easily install it, including in deep bowl models.
Viega . A German company that has established itself in the market as a manufacturer of safe plumbing products of the highest quality that can last about half a century. They successfully combine design and engineering ideas.
The assortment includes drain-overflow systems with different shapes, materials, and color variations. They are characterized by a relatively low price and simple installation.
Many Viega models have a water filling function. They are convenient for rooms where there is not enough space to install a faucet.
Hansgrohe . Another representative of good German quality. The company's harnesses are reliable, efficient, and feature a complex, high-tech structure. In interiors they are valued for their functionality and excellent decorative performance.
The procedure for dismantling communications and removing a cast iron bath ↑
The most difficult of all possible options is dismantling plumbing fixtures made of cast iron. The task becomes more complicated if the plans include removing the entire bathtub in order to use it later, for example, at the dacha. One person clearly cannot do this - a cast iron product can weigh up to 100 kg, so at least two people will have to work.
Dismantling the problematic old harness ↑
After removing all objects that interfere with the work from the room, the bathtub must be disconnected from all fittings, including the drain. Cast iron plumbing has been installed in many homes since ancient times, when drain lines were made of cast iron pipes. It is usually not possible to simply disassemble them after many years, so dismantling a cast-iron bathtub with removal will have to be done in other ways.
First you need to disconnect the overflow. If it is made of plastic parts, problems usually do not arise. But with old plumbing, you often have to deal with metal components, which are not easy to dismantle. Sometimes you can unscrew this element using pliers, simply by hooking them on the grille and turning it counterclockwise. If the overflow grate is very stuck, you will have to use an angle grinder:
- Make a deep cut on the overflow with a sander.
- Using saw cuts, knock down the overflow grate in parts with a chisel.
There are usually far fewer problems with plastic elements. You only need to unscrew the fastening element on the grille (bolt or nut), after which the overflow can be freely and effortlessly detached from the bathtub. The situation with the drain is similar - the siphon is easily disconnected after unscrewing the nut on the metal protective grille.
How to disconnect a cast iron siphon from a bathtub ↑
To dismantle the bathtub, you need to disconnect the drain from it. If the drain is made of cast iron, then difficulties may arise at this stage. There are several ways to disconnect a cast iron siphon from a plumbing fixture. The first is similar to that described above - an incision is also made on top of the plum with a grinder, but this time crosswise. The main thing here is to cut through only the drain grate without damaging the bathtub itself.
If you accidentally cut through the cast iron of a bathtub with a grinder, then you can no longer install a new trim on it in the future. Of course, if the surface layer of enamel is only slightly touched, nothing terrible will happen, but if a deep cut is made through negligence, the plumbing with the new piping will definitely leak. Next, you need to proceed in the same way as in the case of overflow:
- Place a chisel on one of the resulting cuts at an angle of approximately 45 degrees so that blows on the tool rotate the drain grate counterclockwise.
- Try to unscrew the drain in this way. If this is not possible, make the cuts as deep as possible and simply knock off the ribs of the grate. To do this, the chisel must be placed so that the blows are no longer directed counterclockwise, but inward - towards the center of the drain.
You can also use a chisel to knock out the crosspiece at the bottom of the grille. This will make it easier to get rid of the remaining parts after cutting. Upon completion of the dismantling of this element, the siphon will hang freely in the opposite area, being connected to the sewer lines. To remove it, you only need to break the coupling in this place.
An effective way to dismantle old trim ↑
Another way to remove the siphon to dismantle the bathtub involves using a hammer drill. The required element is secured under the bathtub with a large cast-iron nut, which is simply not possible to unscrew in the usual way after many years of operation. But if you use a hammer drill, the task becomes simpler:
- The tool must be switched to impact mode and a flat chisel attachment must be secured in the chuck.
- Loosen the large nut connecting the siphon to the drain, acting on the edges of the nut with a hammer drill in impact mode, so that it gradually unscrews, that is, counterclockwise. After which you can dismantle the siphon by hand.
There is nothing complicated about this method; in addition, there is no need to use a grinder, which can easily damage the enamel or even accidentally make a deep cut, rendering the bowl unusable.
Rules for installation work
Having experience installing a mechanical drain in a bathroom, you won’t need a circuit for a semi-automatic one - it is almost identical. Even without the skills, you can master it with your own hands, but first, it is advisable to read the instructions and documents that come with the kit.
The manufacturer's recommendations regarding the installation of the bathtub trim should be followed exactly. Otherwise, the device may not work or function incorrectly. It is not recommended to take on automatic systems: after installation without the participation of a specialist, the warranty on the device ceases to apply.
At the first stage, the old siphon, if any, is removed, and the insides of the pipe and the junction areas are thoroughly cleaned. Then the lower overflow is installed. A sealing collar is put on the outlet, after which it is placed against the drain opening.
Before installing the drain and overflow, it does not hurt to make sure that the bathtub is positioned correctly, stable and level and that the gap from the drain hole to the floor is at least 15 centimeters
Another gasket is placed on the inside of the hole, the lid with the grill is screwed on and secured with a screw. Cone-type cuffs are placed with the thick edge towards the nut, and the narrow edge towards the neck.
After checking that the connection is correct, tighten the screw with a screwdriver. The top overflow is installed using a similar method.
Tying under the bathtub is quite difficult. Most likely, you will have to take an awkward position to get to the right places. To fasten the inner and outer parts of the drain structure, it is advisable to work with a partner
The next stage is attaching the overflow to the drain. To do this, it is more convenient to use a flexible corrugated hose that stretches to a size that will easily fit into the pipe. Each joint is crimped with a nut and spacers.
Next, a glass is installed to form a water seal. Places for gaskets are first cleaned of defects with a file. The valve is also connected with a union nut with a flat or cone seal.
At the end, the siphon outlet is connected to the sewer with a drain pipe. This is done through the sealing collar or directly into the socket. To avoid leaks that occur due to cuff wear, they are treated with silicone lubricant.
When performing installation, do not use excessive physical force. Because of this, the strapping elements may burst, and you will have to buy new parts.
When the installation work is completed, you need to check the quality of the assembly by covering the drain with a stopper and opening the water. The floor under the bathroom is covered with paper, the drain and connections are inspected. When leaks are detected, the nuts are tightened.
Design Features
Despite the wide range, variety of designs, designs and capabilities. The operating principle of each product is the same and consists of several points:
- Neck. The element is installed at the bottom. During installation, attention must be paid to sealing, since durability and reliability depend on it. The kit should contain special seals; if they are not present, then it is better not to buy such equipment. The neck has a grille that prevents large debris from entering and accumulating inside the system. Therefore, the chance of clogging is minimal.
- Siphon. The product is designed to form a water seal that prevents the penetration and spread of unpleasant odors into the room. Often the product is compact in size, since the space under the bathtub is limited, which does not allow the installation of large models. Another useful feature is the connection of all pipes to the sewer main. When choosing, attention is paid to volume, since its effectiveness depends on quantity. It is recommended to buy products where this value is at least 300 ml, more is possible.
- To connect to the sewerage pipes are used. The diameter of this element is universal – 50 mm. However, there are models with different designs. There is a cylindrical section at the end.
- An overflow neck is installed on the top of the bathtub. The product is equipped with an elbow, which is directed downward during installation. When the user buys a ready-made version, this element is connected to all the main parts at once, which greatly simplifies installation and operation.
- For the interaction between the drain neck and the overflow, a pipe is used, which is made of various materials. It can be rigid (made of metal or durable plastic) or flexible (for example, corrugated, often made of PVC). Differences in curvature and length are permitted.
- Closing device. The element allows you to control the filling of the bath.
Tips for care and use
All drain and overflow systems require appropriate care. This is the only way to preserve their original condition and performance, ensure durability and high efficiency. Devices must be inspected regularly to ensure there are no mechanical damage or leaks.
Also, we must not forget about additional events:
- to prevent the accumulation of deposits and scale, the siphon is washed every three months with hot water with the addition of citric acid or suitable chemical oxidizing agents;
- approximately every six months, thin rubber gaskets that have lost their elastic properties are replaced;
- The water seal, which collects various contaminants and debris, is periodically cleaned.
If chips and cracks are detected during a visual inspection, the siphon must be replaced. Such malfunctions provoke flooding of premises and cannot be repaired.
The following article will introduce you to the intricacies of installing a conventional siphon on a bathtub, the contents of which we recommend that you familiarize yourself with.
Smells
- Why does sewer smell appear and how to deal with it?
Sources of odor can be either leaky connections of siphons with a comb, or outlets of bathtubs and sinks. In the latter case, the cause of odors is a breakdown of the water seal: if for some reason the ventilation outlet of the riser on the roof does not suck in air, when flushing one of the toilets along the riser, a vacuum is created in the pipe, which literally sucks water out of the siphons.
What can be done to combat odors?
- Seal all siphon connections to the sewer system;
- Install siphons with maximum water seal height;
- If the smell of sewerage appears during the winter cold, do not be too lazy to get out onto the roof and pour a bucket of hot water into your riser . Freezing of the snow cap most often renders the ventilation outlet inoperative.
Frozen snow in the sewer riser.