Home / Types of ceilings / Wooden / Shingled ceiling - how to repair?
Long before the advent of modern materials, the method of plastering over shingles was widely used for finishing ceilings. Such coatings are encountered by those who have apartments in so-called “Stalin buildings” or who live in their own old houses. Until a certain time, the shingles hold up the plaster perfectly, but over time everything becomes unusable and the ceiling is no longer pleasing with its appearance, which means repairs are necessary.
Basic principles of plastering work
The quality of plaster application depends on the preparation of the base and the prepared mixture. It is necessary to follow the manufacturer’s recommendations and be guided by SNIP. The human factor is also important: the qualifications of the master.
As a result of treating walls with plaster, the surface should be smooth and free of cracks. The mixture recipe largely depends on the base material: brick, wood, concrete. An important factor is the operating conditions of the structures: the exterior decoration or the interior of the room. Plastering various surfaces involves applying the mixture in several ways:
- By throwing method.
- Spreading method.
Causes
To protect yourself from such unpleasant surprises in the future, you need to understand what caused the plaster to lag behind the surface and eliminate the cause.
Most often, falling off plaster is a consequence of a violation of its application technology. If the work was carried out by builders, you can try to force them to eliminate the shortcomings, but, as practice shows, this is extremely rarely possible. Usually, getting them to redo the work is very problematic. If you laid the composition yourself, then you should blame yourself for what happened, since something was done incorrectly.
Sometimes the material is of poor quality, but this happens much less often than violations in technology. However, to avoid this, you should purchase all materials only from trusted places.
Quite often, the reason lies not even in violation of plastering rules, but in improper preparation of the base. If a solution was mixed next to a surface prepared for plaster and primed, it could easily become dusty, which led to further peeling of the material.
Major construction work, such as chiselling or drilling holes in the same room where the plaster was applied, could also lead to cracks and pieces of plaster falling off. There is no consensus on when such operations should be performed. But, in order to protect yourself, it is better to carry out all such work before the final finishing of the surfaces.
Well, the last option for the reason that led to the appearance of cracks in the coating or its peeling may simply be shrinkage of the house. If it was built recently, it is quite possible that there may be some deformation of the ceiling slab or walls, which caused such an unpleasant phenomenon.
Modern methods of plastering wooden walls
The plaster shingles are first filled across the entire width of the working surface - this is the beginning of the process. The name speaks for itself. The shingle is a kind of base on which the second layer of shingle is attached at an angle of 450 relative to the floor. In this case, you can use curved and narrow dies.
Note!
The thickness of the working dies should be less than 3 millimeters. Using a material of less thickness will not allow the shingles and mortar to bond well; we need adhesion.
The second layer is filled with the exit shingles at the same angle as in the first case. And in relation to each other, the location should be perpendicular: the contact angle is 900. The distance between the dies should be 450 mm. These indicators must be maintained in the second row. As a result of the work carried out, a mesh with cells of 450/450 mm should be obtained. This will give rigidity to the entire structure.
When arranging wooden buildings, thick, even dies up to 5 mm thick and 15 to 20 millimeters wide are selected for the second layer.
Take note!
It is important to observe the specified dimensions, since the use of material less than 10 millimeters wide may “fail” when driven in: it will simply crack.
If you use material more than 20 mm wide, this may cause the dies to bend and not have time to dry.
Benefits of use
Laying shingles is a long and labor-intensive process that requires professional skills and certain financial investments. At the same time, shingles have a number of advantages compared to many modern types of finishing:
- is a pure natural material that allows air to pass through, perfect for interior decor in any room, including bedrooms and children's rooms;
- simple and accessible, does not burden the structure of the house, installation does not require complex equipment or additional materials;
- resistant to winds, precipitation, ultraviolet radiation, provides sound and heat insulation;
- can be installed at any time of the year due to its resistance to temperature changes, suitable for unheated rooms.
Also worth adding:
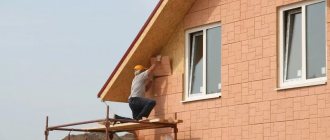
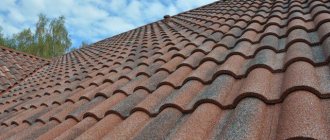
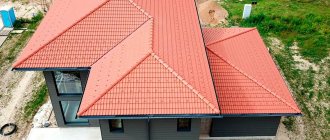
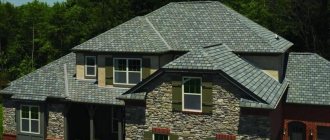
- Versatility. Shingles can be used not only when cladding the roof, but also when decorating the façade of a building, walls and enclosing structures.
- Long operational period. Such a roof will last you from thirty to fifty years. If you treat the materials with a primer and varnish before use, this will extend their service life by another ten years.
- Light weight. Wooden plates are lightweight, so they can be mounted on any structure, regardless of the type of base.
Shingles look organic and natural in any application; the variety of shades and textures of wood allows you to create original compositions indoors and outdoors and give homes a unique look.
Author: A.N. Ivanova
What is shingles
Plastering on shingles involves the use of natural materials - wood. Shingles are a narrow plank 2-5 mm thick with a length of up to 1-2 meters. The most common material for covering a plastered ceiling and not only is coniferous trees. They contain large quantities of resin substances, which, as a natural antiseptic, resist the development of mold and bacteria.
You can make plaster slats yourself, but this is not cost-effective: it’s a lot of hassle. The cost of slats, which are made from third-grade wood in finished form, is small. Therefore, it is better to buy a ready-made mesh with cells in the form of diagonal diamonds. They are always on sale and sold in packs of 50 or 100 pieces. The use of shingles in plastering work facilitates the process and allows us to talk about reducing the cost of surface treatment.
Features of care
Facade shingles, as this material is also called, does not require complex maintenance if it is made of larch. But pine products are not so durable and require periodic treatment with protective compounds. At the same time, it is possible to refine the shade of wood using stain or special paint.
Sawn dies, unlike chipped ones, have a rough texture and absorb moisture more strongly. Therefore, to increase their service life, they are treated with protective compounds. And they do this before attaching them to the facade.
PDF - top 10 mistakes when choosing a contractor
Take
Loading a timer
How to choose material for shingles
To fasten the mortar of the walls of a wooden house, thin plaster shingles with a thickness of 3-5 mm and a length of 1.5-2 meters are used. Experts recommend these particular material parameters, since it is convenient to attach a narrow strip in several layers. They are usually used on small work areas.
When finishing large areas, it is better to use a shingle panel. This is a ready-made structure of large dimensions, which, after fastening it to the work surface, is ready for use.
There is one inconvenience: transporting the assembled shield is problematic.
In addition to wood, thermal insulation materials are needed for work. It can be felt, matting or burlap. The material must be laid out under the structure and treated with an antiseptic.
Request a call
Search for "shingles" : Google Yandex
Comments
0 RE: Shingled roofing, wooden tiles, shindle and shingles. Finishing with shingles. — Alexander 05/04/2021 08:19 I quote Ivan:
Tell me, you have written that shingles can be used for the facade. But she will probably turn black later? Or is there a special technology here?
It won't turn black.
There is a special treatment of wood, after which it does not turn black for many years. We can advise you in more detail by phone. Quote 0 Shingles for the facade - Ivan 04/26/2021 08:11 Tell me, you write that shingles can be used for the facade. But she will probably turn black later? Or is there a special technology here?
Quote
Update list of comments RSS feed of comments for this entry
Preparation for plastering
Working with wood involves the use of certain fasteners. Experts recommend abandoning self-tapping screws and using ordinary nails.
Their length can vary from 25 to 40 millimeters. It all depends on how many layers of shingles are used. Usually this is two layers, although it can be more. The diameter of the products is 1.5-2 mm.
Those who want the thermal insulation functions of a wooden house to be at a high level should use the simplest thermal insulator, which is felt.
It is rolled out along the entire perimeter of the wall, nailed, after which the felt must be treated with antiseptic compounds. Before putting shingles on it, the felt is allowed to dry a little.
About the work order:
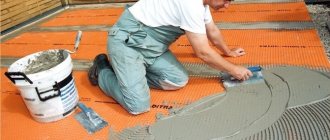
- Forgive is stuffed onto the prepared wooden surface. The first layer of planks is mounted at an angle of 450 relative to the floor. The distance from plank to plank (step) should be 45 mm. At the initial stage, you can use curved and narrow dies. It is important that the hollow of the element does not exceed 3 mm.
- The stuffing of the sheet shingles is the base on which the second layer is stuffed. Higher quality wood is used here. The design should be in the shape of a diamond with cells of 45/45 mm.
- Stuffing the output shingles completes the job. The thickness of the narrow exit shingles should be within 4-5 mm. Now you can apply the prepared solution and perform finishing work.
To plaster shingles correctly, you need to use a special tool, which you can read about below.
Installation
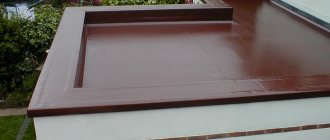
The technology for installing wooden planks is carried out according to the principle of manufacturing ventilated facades. It's necessary:
- for natural ventilation of wood;
- moisture removal;
- maintaining the thermal insulation properties of the material;
- to maintain a healthy indoor microclimate.
See also: Façade construction
The planks are fastened over the lathing in 2 layers, and care must be taken that the rows on adjacent walls coincide. The dies are attached to nails or staples, which are covered with elements of the outer layer.
When installing sawn planks, the planks are shifted strictly by half their width relative to the bottom row. The installation step varies depending on the length of the strip.
| Length of the bar, mm | Mounting pitch, mm |
| 120 | 50 |
| 150 | 65 |
| 200 | 90 |
| 300 | 140 |
| 400 | 180 |
| 600 | 280 |
| 800 | 375 |
How to apply the solution
To get a high-quality surface, it is important to work with good plaster and primer. The process involves applying three layers of solution.
- At the initial stage, you should slightly wet the felt.
- Next, mark using a marker. Determine the irregularities of the sheathing. Apply the first layer of mortar no more than 1.2 centimeters thick. Experts recommend keeping the thickness of the rough layer to no more than 9 millimeters.
- Spray is the first layer of clay mixture. It must dry and only after that a layer of soil is applied. If gypsum-based compositions are used in the work, then the layer should be within 7 mm. When using cement-sand mortars, the working layer is up to 5 mm.
- When applying the spray, it is important to fill all voids. At this stage it is not necessary to level the work surface. Approximately the same level of applied solution is sufficient.
- Next, it takes some time for the primer to dry a little: the second layer is applied.
- The third layer is applied using the same technology. Here it is important to pass the solution through a sieve with small cells and prevent the appearance of lumps. The finishing layer is applied to the ground. The work uses a rule and a grater. The working area must be rubbed with a plastic float. The movements are circular and measured.
At this point the work can be considered completed, and the plaster on the shingles needs to settle: time is needed to dry the finishing layer.
Lonely Master
Recent Entries
Popular articles
| Mon | W | Wed | Thu | Fri | Sat | Sun |
| « Jan | ||||||
| 1 | 2 | |||||
| 3 | 4 | 5 | 6 | 7 | 8 | 9 |
| 10 | 11 | 12 | 13 | 14 | 15 | 16 |
| 17 | 18 | 19 | 20 | 21 | 22 | 23 |
| 24 | 25 | 26 | 27 | 28 | 29 | |
Tools needed
Installing suspended ceilings is not new. Almost everyone can do the work themselves. The process will require the following tools:
- roulette;
- level;
- drill;
- square;
- hacksaw;
- pencil;
- special knife;
- fishing line;
- putty knife;
- emery;
- putty;
- reinforcing tape.
The step-by-step instructions described above will help anyone without special construction skills to finish both a square and rectangular ceiling. It is important to prepare the necessary tools in advance so as not to be distracted during the process by purchasing goods.
The following video presents options for decorating walls and ceilings using plasterboard:
Reasonable planning and preparation will help to avoid unnecessary costs for the work of an invited master. If you buy materials and tools in advance, the installation can be completed in a few days. A beautiful ceiling will delight the residents of the house and invited guests for a long time with the comfort and warmth it creates.
The tiles are mounted on the ceiling using heavy-duty adhesive, which will firmly hold the coating on the ceiling surface even if there are uneven surfaces. To make the ceiling more original, experts recommend installing tiles diagonally.3. A chemical method that involves the use of a special solution to remove paint, after application of which it will come off easily.
Current manufacturers
See also
Installation of roofing sandwich panels: technology features and prices
There are not many companies that produce these panels.
I will highlight a few well-known ones:
- TZK Tekhosnastka
. Russian company. There is only one line. This is oak chips. Sold since 2009; - Nailite
. American company. One of the first in its market. The panels are also suitable for the plinth. The only downside is the high price. But the quality is exemplary; - Foundry
. Another company from the USA. Not as popular as the previous one, but their siding sells well all over the world. Has a wide range to suit every taste; - Novik
. Manufacturer from Canada. The panels are durable, reliable and also durable. Externally they perfectly copy the bark of a tree; - Certainteed
. Again a company from the USA. A young company, but with ambitions. The line includes about 20 bark imitation options.
If you know any other famous and good companies, then write in the comments.
By the way, siding shingles are also often used for roofing.
Manufacturing algorithm
So, in order to ensure reliable adhesion of the plaster mixture to the wood surface, the latter must first be prepared by filling it with a kind of fixative - plaster shingles.
To prepare the shingles yourself, you will need the following tools:
- rubbish;
- knife with a sharp blade;
- construction level;
- nails from 2 to 4 cm long, 1 – 1.8 mm in diameter;
- hammer.
The shingles are applied in two layers. The first is prostrate, made of thin (up to 3 mm) and uneven slats placed to the wall surface at an acute angle relative to the floor in increments of fifty centimeters. The second layer is the output layer, and more even strips are chosen for it. Their installation is also carried out at a slope of forty-five degrees, but in the opposite direction. Stuffed crosswise, the slats form a mesh.
Repair stages
The complexity of the work is due to the fact that it is necessary to thoroughly clean the ceiling. In brick and concrete houses you only need to remove a fairly thin layer of material and that’s it, but here more work will be required. The old coating is applied in a fairly thick layer and it takes a lot of time to completely remove it. A lot of garbage is generated.
In addition, it is necessary to gain access to the upper part of the ceiling - from the attic side, to eliminate the causes of the leak. If your neighbors flooded you, then you need to make all the repairs on your own, which is always more difficult. Repair work is carried out in the following order:
- The first step is to eliminate the cause of the damage - leakage
- After elimination, all debris is removed from the upper side of the ceiling, and the gaps between the floor beams are sealed with mastic or other composition that provides protection against leaks
- From the side of the room, loose pieces of plaster along with damaged slats are removed
- In their place, either new slats are attached, or a plasterboard sheet of a suitable shape and size is mounted