How to strengthen plaster that is falling off walls
Plaster is a very important element when building a house or renovating. This mixture performs many important functions, for example:
- Thermal insulation. It closes microcracks through which cold air from the street passes.
- Improving the appearance of the wall. After plastering, the walls look smoother.
In general, this mixture has many more functions that can be listed for a very long time.
However, sometimes it happens that the plaster begins to collapse. This is a rather annoying problem. Fortunately, there are several methods to harden the surface.
Double skin technology
In addition to those listed, there is another effective way to strengthen the frame. It is used if you are not satisfied with the strength of a 75mm product. In this case, double cladding is usually performed when installing a profile with a width of 50 mm. Of course, the thickness will be greater (100.0 mm), but the strength will also be significantly enhanced.
The technique of double skinning with intersecting seams strengthens a plasterboard partition quite well. Also, this technology contributes to good sound insulation of rooms.
To guarantee a barrier to noise, it is recommended to lay a layer of mineral wool. The wall is already a good obstacle to sounds, but the internal cavity still contributes to resonance and their propagation. Filling with insulating material will additionally perform a thermal insulation function.
Recommendation! It is more convenient to place mineral wool after finishing covering one side of the partition!
Plasterboard slabs are fixed to the profile with self-tapping screws, which must be tightened with a small recess to prevent defects in subsequent finishing. Screw heads that are not tightened enough will interfere with quality puttying. When performing installation, it is important not to overdo it, since screws that are too deep into the drywall will not provide a proper connection.
Causes
First, you need to figure out the reasons why it crumbles. The reasons are errors when plastering the walls. Here are the most common ones:
- No primer. The presence of a primer is a prerequisite for plaster. Most people don't use primer because it prevents the wall from absorbing moisture. However, for such cases there is a special primer that improves adhesion and holds back salts. These salts come out of fresh concrete and over time reach the plaster, almost completely tearing it off.
- Violation of drying time. The plaster mixture dries from 7 to 28 days. Most people decide not to wait, but to apply the next coat ahead of time. Consequently, after some time it begins to fall off and crumble. The room where the mixture is drying should be well ventilated, this will speed up drying.
- Adding water to the mixture rather than slowly pouring the mixture into the water. Because of this, all sorts of lumps appear, which will greatly interfere with further work, since they are difficult to break. Consequently, the surface will be processed poorly, and this will provoke further destruction.
Wooden beam inside the profile
Another way is to place a wooden beam inside a metal profile. They are also secured with self-tapping screws every 200 mm. But first, make sure that the internal width of the profile and the bar match each other, and you want the bar to be slightly narrower. Watch for changes in the shape of the support - it should not deform or bend - this is necessary for the precise fit of the beam to the horizontal supports.
These two options are the results of improvisation by builders of past years, which have proven themselves well, but they are most often used only for constructing a frame around the doorway. To strengthen walls, proven methods are still recommended.
How to strengthen crumbling plaster
There are several ways to strengthen the surface:
- Use a deep penetration primer. A deep-penetrating primer designed for old and loose surfaces. Its particles penetrate deep into the plaster mixture and bind it. In addition, this material has an antiseptic effect. This method is the simplest and does not require much effort or money. Despite this, it is quite effective.
- This method is very radical. In most cases, plaster crumbles due to mistakes made during the work. In this case, you will have to completely tear it off and make a new one. It is best to leave this work to experienced craftsmen. Unlike the first method, when the material deteriorates due to age, nothing will help here as much as replacing the mixture.
Ready-made reinforced profiles
The maximum load that a profile can withstand depends on two factors: the width of the profile and the thickness of the metal. The greater the width, the stronger the profile will be. Therefore, to strengthen a plasterboard wall, you can purchase a reinforced profile specially designed for this purpose. It is wider and made of thicker metal. There are three types of profiles:
Another important characteristic is the thickness of the metal from which the profile is made. It can be different, it is better to use one with a thickness of 0.55 mm, ideally if you can find one with a thickness of 0.6 mm. This will provide the necessary strength, even if the frame is sheathed with only one layer of plasterboard sheets.
It is best to use a profile with a width of 75 millimeters. The structure will not look so huge, and the strength will be quite good. The 100 mm profile is used only where the loads are really large, but then the partitions will be very large. But behind them you can hide any engineering communications, not to mention electrical wiring.
You need to remember or mark exactly where the reinforcing element is located, so that you can then hang a shelf, cabinet or heater there.
How to strengthen crumbling plaster - 2 simple ways
Plaster – the coating itself is quite durable. But over time or if technology is violated, its strength may be compromised. In such cases, the plaster begins to crumble, peel off, and unpleasant cracks and other defects appear on it. Of course, every homeowner wants to stop this process of destruction.
There are two ways to do this, quite simple:
- use a strengthening special impregnating composition;
- secure the collapsing surface with a reinforcing mesh followed by putty.
Choose one or the other option depending on the situation.
Ready-made reinforced profiles
The values of permissible load indicators for a metal profile depend on factors: the thickness of the metal and the width of the structural elements. The thicker and wider the profile, the stronger it naturally becomes.
Therefore, when there is a need to strengthen a plasterboard structure, you can buy factory-produced, certified parts that are specially designed to withstand increased loads.
There are several varieties of particularly strong partition profiles. It is worth noting that the height parameter is the same for everyone. Products are classified into categories by width:
— 50.0 mm – multifunctional standard;
— 75.0 mm – the most popular profile;
— 100.0 mm – especially durable elements for partitions with high requirements.
Regardless of the profile width, it is better to use a profile made of sheet metal with a thickness of half a millimeter or more. The ideal option is 0.6 mm, which allows you to install very strong partitions even with sheathing in one sheet of plasterboard.
Very often, it is enough to install a 75 mm profile, with which the reinforced plasterboard partition will not be overly bulky. 100 mm rack profiles are an option for walls that can be loaded to the maximum. Such partitions are the thickest, with good soundproofing characteristics and the ability to accommodate various utilities.
Strengthening impregnation for the plaster layer
Today you can buy wonderful impregnations , which are called “strengthening”. Their main purpose, as you might guess, is precisely to strengthen various surfaces. Including plaster.
These products can be purchased in plastic containers of various sizes. Use is simple: the product is poured into a more suitable container, and then applied to the plaster with a brush, roller or spray.
It may seem that saturating the plaster layer with some substance is not a sufficient measure. However, surprisingly, such compositions cope very well with the task. Some types of strengthening impregnations are capable of penetrating a layer of plaster (and even concrete) by more than 1-1.5 meters. All along the way, they bind microparticles of material and close the pores. The plaster strengthened by impregnation stops crumbling, existing cracks do not expand, and new ones do not form.
Related article: Size of silicate block for walls
All that remains is to eliminate visible damage to the surface. You can see how to do this here.
Recommended Posts
Recently viewed by 0 users
No registered user is viewing this page.
5 Kitchen Storage Tricks You Can Borrow From Chefs
Kitchen interior with urban photo wallpaper
Instead of cabinets: 7 stylish kitchens with open shelves
The best articles on the IVD website
Are you a professional architect or designer?
IVD. Repair and finishing
Are you a professional architect or designer?
The IVD.ru website is a leading Internet project dedicated to the issues of reconstruction and interior design of residential premises. The main content of the site is the archive of the magazine “Ideas for Your Home” - exclusive author’s articles, high-quality illustrations, practical tips and lessons. A team of professionals is working on the project in close collaboration with famous designers, architects and leading publishing experts.
On our website you can choose comprehensive design solutions; view detailed reviews of the market for construction and finishing materials, furniture, machinery and equipment; compare your own ideas with design projects of leading architects; communicate directly with other readers and editors on the forum.
Are you a professional architect or designer?
Source
Strengthening the plaster layer with reinforcement
If the plaster are complex, that is, the coating is quite damaged, it makes sense to use a reinforcing mesh.
It can be plastic, but if the damage is great, it is better to use metal and, if possible, stainless steel. Rust can break through even a significant layer of plaster. After this, instead of the problem of a weakened coating that needs strengthening, another problem will appear.
The reinforcing mesh is attached to the surface using nails or dowels (if it is metal) or with a solution (for plastic). After this, another layer of plaster is applied to it, not too thick. The main thing is to close the reinforcing mesh.
The grid should be a monolith. That is, to strengthen the plaster, you need to choose a solid mesh. Large pieces of reinforcing mesh are tied together with strong steel wire. If this condition is not met, the strengthening will not be sufficient.
Actually, these two methods of strengthening plaster can solve almost all possible problems. Most often, it will be enough to apply a strengthening impregnation. In the same case, when the plaster is in very poor condition, you will have to use a mesh.
Trying traditional methods
Ask your father or grandfather how to secure a dowel in a loose foundation. You'll probably get a lot of good advice. We have collected some of the most popular ones that people have been using since Soviet times. After all, back then there was not such a wide selection of fasteners, and any means were good for home repairs.
Wooden cork
Helps strengthen the dowel in a large hole. Take a cork or a small piece of wood and cut several thin strips the length of the fastener. Place two to three strips into the hole and then drive in the dowel. Wooden seals will hold it in the material. By the way, sometimes a match is used for this purpose. Only it is inserted inside the plastic element, and not into the hole itself - it acts for wedging.
This method is suitable for attaching lightweight objects, such as paintings or lamps.
Insulating tape
No renovation has ever been done without it! Savvy users began to use it to seal dowels in the wall. You need to wind the tape in the direction of the fastener thread and install it in the hole. By the way, if this material is not at hand, you can replace it with cellophane.
The method is suitable for fastening structures that will not be subject to large weight or dynamic loads.
Plaster bandage
A more reliable seal option. You can buy such a bandage at the pharmacy. First, they wrap the dowel with it, then moisten it and install it in the wall. When the gypsum hardens, the element will be further strengthened at the base. This is an excellent option compared to putty, which can spill out of the hole.
The fasteners are protected from free rotation, so large elements, such as shelves or an aluminum profile, can be mounted in this way.
Liquid Nails
Perhaps this is the most expensive and time-consuming method. But very effective! You will need a gun and liquid nails. The adhesive composition is introduced into the hole, filling it until it stops, and the dowel is inserted. You can also attach a self-tapping screw without screwing it in completely. Then leave for a day until the composition completely hardens. And only then they screw in the hardware until the end. In this way, it is possible to securely fix the fasteners that will support the brackets and guides.
All of the above methods are successfully used in home repairs. They are good if you need to seal one or two holes, or, in extreme cases, five. What if you need to install about 1000 fasteners? Is it really necessary to perform such manipulations with each of them? In addition, a more serious load requires a different approach. Let's look at some professional solutions.
Repair of plaster in separate places
Plaster is not an eternal thing. Owners of houses and apartments are faced with a problem when it begins to crack or fall off in places. What to do? We will look at the reasons for this phenomenon, as well as how to repair plaster walls in individual places and surface restoration technology.
Defects on the surface, causes and method of restoration There are a number of defects that are formed when the proportions of the components of the composition or the technology of its application are violated. The list is as follows:
- Formation of tubercles on the surface and swelling.
- Sedimentary cracks.
- Fresh plaster is peeling off the wall.
- Formation of cracks throughout the entire depth of the solution.
- Efflorescence, spots and stripes appear on the wall after the plaster layer has dried.
What is the reason for such defects? Bulges and bumps may appear if the limestone composition is unseasoned and has unslaked particles. How to repair lime plaster in this case? It is necessary to withstand the plaster until the lime is completely extinguished. The defects are exposed, abundantly moistened with water and filled with plaster mortar. All that remains is to wipe the surface.
Sedimentary cracks are formed when the composition is poorly mixed and when there is an excess of binder. Precise adherence to proportions and dosage in accordance with the packaging will help solve the problem. All that remains is to thoroughly mix the plaster and level the surface.
When the base has not been prepared, cleaned, rough, too dry and dusty, fresh plaster may flake off when applied. To solve this, you will need to pause work and start preparing the surface. The application technology is as follows: notches are made on the surface for better adhesion (or shingles are made), the wall is cleaned of dust and dirt. In addition, it is moistened with water. Then the mixture will not peel off, and repairs to the plaster and surfaces inside the building will not be needed for a long time.
If the problem is cracks throughout the entire thickness of the plaster layer, then there is exactly one reason - there is no reinforcing mesh between the wall and the plaster. The base material is not rigid and is not reinforced in any way. The technology for applying the mixture is that the subsequent finishing layer should be less durable than the previous one, that is, it contains less binder. To prevent the intermediate layers from drying out, they must be moistened with water and reinforced with mesh.
The last defect is spots and stripes. They most often appear on walls from the outside. The cause may be a very damp or wet surface. Especially when the plaster is applied after rain. The solution is to treat the dried walls and waterproof them to prevent moisture from being drawn up from the ground. Local repairs of plastered walls are performed differently. The technology is simple, but requires careful consideration.
Improvised techniques
A fairly thin reinforced plasterboard wall will be obtained if each vertical post is made from two folded profiles. This design can withstand more weight than one profile. The parts are connected using self-tapping screws, which are usually screwed in increments of 150-200 millimeters. On the other hand, profiles are not designed to be used in such a non-standard manner, and a prefabricated support may not be very practical.
Another way to strengthen the structure is to insert a wooden beam inside the profile. Both parts are connected with self-tapping screws in increments of up to 200 millimeters. Before reinforcing the drywall profile with timber, it is recommended to make sure that their dimensions are suitable. It is necessary that the width of the beam be slightly less than the width of the profile. It is also necessary to ensure that the support does not deform during the process of connecting the fasteners. Then the reinforced profile for drywall will adhere to the horizontal planks with millimeter accuracy.
Both options are improvised and are most often used to create doorways. But you can install more durable profiles directly from the manufacturer.
Step-by-step instructions for eliminating defects
You can repair a wall with fallen pieces of plaster yourself. The work is not difficult. You just need to follow the instructions. Alternatively, you can completely remove the layer and apply a new one. But it is more profitable to plaster the damaged areas. It all starts with an inspection. It is important to identify areas that need repair. You will need a wooden mallet. You will have to lightly tap the wall. If a dull sound is heard, then the train has moved away.
Related article: Long full-wall chest of drawers
Then the sequence is as follows:
- After the inspection, you need to remove the old plaster. We do not touch the places where it holds well.
- Next, the seams are cleaned if it is brickwork. The surface is cleaned of debris and dust.
- A primer is applied to the wall. It is needed for better grip.
- After the surface has dried, the wall is slightly moistened and the solution is applied. If a large part of the wall has peeled off, you will have to use beacons and a rule. This is the only way the surface of the wall will be perfectly flat.
- For minor damage, the plaster is removed in the shape of a square or rectangle. The area is processed according to the previously described method, and the recess is filled with the prepared composition. It is important to adhere to the proportions so that the mixture has the correct consistency.
- Another restoration option is restoration with corks. In the right places, a hole is drilled to the base, primed, filled with mortar and plastered.
Note! For wooden walls, use limestone mortar. However, it is not suitable for wet surfaces. It is better to resort to a cement mixture. It is recommended to treat corners with gypsum plaster, as it sets faster.
Video on the topic
How to plaster a ceiling with your own hands: 8 stages of plastering with and without beacons
How to properly plaster a wall with cement mortar: plastering technology
Do-it-yourself brick wall: 6 options for decorative plaster to look like brick and how to make an imitation
How to plaster aerated concrete inside a house: finishing aerated silicate blocks
Author of articles, expert in the field of construction. By education, hydraulic engineer, candidate of technical sciences. I have been designing engineering structures since 2011.
Source
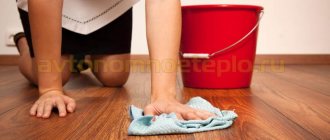
Restoration work
Plaster repair also involves removing stains from the wall surface. They appear during operation and can be caused by grease, soot or rust. It also happens that the stains formed before the finishing work. In this case, you will have to solve this problem before you start gluing wallpaper or laying tiles. Restoration work is as follows:
- For greasy stains, use a two percent hydrochloric acid solution. The entire surface with stains is treated with the composition until they disappear.
- As for rust stains, copper sulfate or a two percent solution of hydrochloric acid will help to deal with it.
- If the stains are deeply ingrained into the plaster and cannot be cleaned, then you will need to seal the area with dye or white.
Advice! Whatever surface you're cleaning, it's important to clear it of dirt and dust first. Only after this other manipulations are performed.
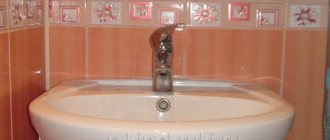
The restoration of the surface under the tiles requires special attention. The procedure is as follows:
- using a rubber mallet, tap the surface of the wall. This is the only way to identify a peeled or poorly fixed area;
- When the area is found, you need to knock harder so that the tile falls off. If it is not removed in this way, then you will have to act radically - break it. The process requires accuracy: the tile is broken from the center so that the adjacent one is not damaged;
- If after removal there is a strong layer of plaster left, then it is not necessary to knock it down. The new tile should be glued more securely using a special glue;
- when the plaster falls off, the area is cleaned, primed and plastered again. After drying, a new tile is glued.
Surface preparation
Preparatory work includes:
- removal of plaque (multilayer paint or whitewash formation);
- removal of exfoliated areas or the entire plaster coating;
- joining masonry joints, applying notches (a set of measures to increase adhesion);
- dust removal;
- bridging cracks;
- filling shingles or installing reinforcing mesh;
- removal of stains of various origins, efflorescence, excess metal parts, mold;
- installation of beacons;
- implementation of measures to protect against groundwater inflow;
- applying primer, drying.
Removing cracks
Removing cracks on the surface is much easier. Repair of plaster walls in this case consists of two stages: surface preparation and plastering. To begin with, the wall with cracks is cleaned of old facing material and dirt. After this, a primer is applied to the surface. When it dries, you can start cleaning it to give the wall a smooth finish.
Next, the plaster is mixed and applied to the surface in a thin layer. The composition is leveled using a spatula. If there are large cracks, it is better to strengthen the structure with reinforcing mesh. With it, the plaster layer will be much stronger and will not crack.
Useful tips
Before plastering work, you need to familiarize yourself with some rules:
Indications for strengthening the plaster layer:
When decorating walls, a special mesh should be used. Old beacons are removed and new ones are installed. All work can be carried out independently without the help of a specialist. When doing any work, it is important to take your time. Before completing the work, you need to check whether all actions were completed in the right order. If applied correctly, you can get a decent result.
Source
A solid foundation is the key to success
Before finishing, check the reliability of the old coating. In some cases, you will not have to completely remove the old layer, you will only need to repair it. How to clean plaster from a wall if the old one is cracked? Why can't you apply a new one right away? The base of the finish must be strong, otherwise the new coating will quickly fall off in pieces along with the old one.
Tap the surface of the masonry. If the sound is dull, it means that the layer is holding well and has not moved away from the brick wall. In places where the sound is loud, the finishing from the old masonry will have to be removed.
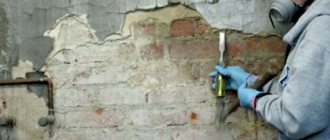
You will need the following tools to remove plaster:
- Wide spatula;
- An ax or any tool that has a V-shaped working surface;
- Hammer;
- Skins of different numbers;
- Spray bottle with water.
In addition to the tool, you need to buy materials:
We recommend a deep penetration acrylic or contact primer. Among the famous brands it is worth highlighting: Weber Veonit, Belinka, Lakra, Ceresit, Knauf. Price for 1 liter from 120 rub. The compositions have proven themselves to work well; user reviews of the coating are mostly positive.
Photos are enlarged, click!
Treating concrete walls for painting
We give as an example the most common base for paint - concrete. Its processing includes all the main stages of finishing and gives a comprehensive idea of the volume of work ahead. Let's look at the process step by step.
Stage 1. Leveling the walls
In front of you is a base that has been cleared of old plaster. If you cannot remove it in some places, tap it with a hammer. If the sound is dull, like beating a drum, a cavity has formed under the material. Break up the area to re-treat, otherwise over time the surface will become deformed and cracks will appear.
Assess the evenness of the walls. A visual inspection is not enough for this. The fastest way is to use a laser level. If this is not possible, you have two options
:
Walk along the wall with a rule or batten.
Hang plumb lines on threads along the edges of the wall. Stretch a horizontal thread between them, securing it so that you can move it freely up and down.
Both methods allow you to identify recesses and protruding places on the wall. Immediately mark them with a pencil or stick them on top with masking tape. You will plaster the holes, and the mounds need to be cut off with a hammer drill.
Now you need to choose the alignment method
. You have three alternatives:
Grinding
used for all types of concrete, including those with the addition of marble chips. This is a noisy and dusty process that requires a concrete grinder. The equipment is expensive. You can rent it, but it is better to hire a specialist to do the work in order to save effort and time, and be sure of the quality of the repair.
Using plaster
you can eliminate cracks and holes, and also stretch the walls, making them even. For internal cladding, a gypsum mixture is used. We will not go into details of the work, because its volume depends on the curvature of the base. We list only the sequence of actions: priming, installing beacons, plastering (twice if necessary), re-priming.
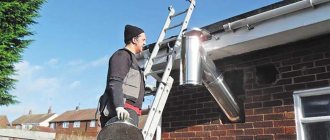
If the walls are very uneven, they can be covered
with plasterboard
. To do this, the base is treated with an antiseptic, then a frame is made from profiles and the sheets are fixed on them. The work is labor-intensive, but the surface will become perfectly smooth. All that remains is to putty it. When choosing this leveling method, keep in mind that the area of the room will decrease by 3-4 cm on each side.
Leveled walls are primed with a roller or spray. The primer enhances surface adhesion and prevents shedding and cracking of finishing materials. Before starting the next work, at least 5 hours must pass so that the base is completely dry.
Stage 2. Starting putty
Plaster and drywall are not suitable for painting. The first is too porous and grainy: the paint will not be distributed evenly. The second absorbs paint and varnish materials, which leads to a change in shade saturation and reduces the durability of the coating.
To ensure that the paint applies evenly, the base is puttied. They do this twice. In this section we will talk about starting putty. Its structure is finer than that of plaster, but larger than that of the finishing mixture. With its help, minor deviations of the wall from the level are leveled and cracks are sealed.
To work, you will need two spatulas: wide (from 40 cm) and narrow (up to 20 cm). Using small tools you apply the mixture broadly along the entire length. With a large one, distribute it along the wall. Do not try to make the starting coat perfectly smooth by reducing the edges of the layers. At this stage, these actions are inappropriate, you will waste your time. The main thing is to evenly putty the wall, leaving no gaps, and fill in any unevenness.
Cracks, external corners and places where walls meet door and window openings can be reinforced with reinforcing mesh (serpyanka). It enhances the strength of the coating, prevents shrinkage of materials due to temperature changes, and evens out corners and joints. To use it, apply a thin layer of putty and glue the serpyanka vertically. If several strips are needed, they are overlapped. Now move on to the main puttying.
Corner-forming tape will help give the inner corners a neat, regular shape. It is fixed in the same way as serpyanka, on a small layer of putty, then the transition between the tape and the wall is eliminated, then the walls are puttied in the usual way.
Wait for the finish to dry - at least 6 hours - and sand the surface. Use a 120 grit sanding sponge or mesh. This will remove imperfections and minor irregularities. But you can’t paint the wall yet: it has a coarse-grained texture, and the paint won’t apply well.
Stage 3. Finishing putty
To ensure that paint and varnish mixtures lay down in a uniform layer and do not change shade, use finishing putty. Its composition is devoid of large particles, so the coating is smooth. In addition, it prevents paint from seeping into the inner layers of the finish, which reduces material consumption and prevents color change.
The process is similar to the previous one, just try to distribute the mixture in a layer of no more than 2 mm, otherwise it will crack. At the end of the work, sand the wall with a mesh with a mesh size of 60-80. Do not overdo it so as not to remove the entire finish coat.
The quality of the final finish is checked using a lamp. Point it at an angle to the wall and inspect the surface. Even tiny irregularities provide shade. Sand them down.
Stage 4. Final primer
After the putty has completely dried, clean the walls from dust with a dry cloth or vacuum cleaner and apply a primer. The solution will protect the finish from moisture and reduce paint absorption. The coating will lie more evenly and last longer. If the area is humid, choose a mixture with anti-fungal additives to prevent mold from forming.
Six steps to the finish
Removal of plaster from the walls is carried out until the old finish leaves a layer that is firmly adhered to the masonry. All loose parts are removed. The work is painstaking and time-consuming, so we recommend being patient.
Below is a step-by-step instruction, following which a beginner can clean the walls of dilapidated finishes, and the video in the article will help you understand the work in more detail:
Before removing the old plaster, it is necessary to clean the surface of the old finishing coating. You can remove the paint using a wide spatula, after moistening the old composition with water. Since water is quickly absorbed and dries, the surface is constantly sprayed from a spray bottle. Readers ask how to remove plaster from a wall without dust or dirt. Use more water, so there will be less dust inside the room during work.
We take tools for removing plaster and walk along the masonry. Tap the brick surface with a hammer. In loose places, the plaster crumbles on its own; scrape off the remains with a spatula, after soaking them with water. In places where cracks form, tap more carefully. If the old layer is cracked, but the adhesion to the brick is tight, then widen the gap. To do this, tap its edges with a hammer and expand the hole with an ax.
If there are no cracks, but the layer of old finishing is too thick, then it is also better to remove it. A thick layer of old mortar will fall off due to moisture after you apply the new one.
- Third step.
Coat the cracks with two layers of primer and let them dry. We put new mortar inside and level it to the level of the wall. The remaining surfaces of the masonry are primed and covered with a thin layer of plaster.
After drying, we smooth the wall from minor defects using sandpaper. The sandpaper is taken first with large grains, gradually moving to the finest grains - polishing.
The finished walls are coated with two more layers of primer. The first layer must dry before applying the second. Each manufacturer's packaging indicates the primer consumption and drying time at different temperatures and humidity levels in the room.
We apply the finishing coat on top of the primer: paint, wallpaper.
Strengthening weak screeds with primer, liquid glass and silicate impregnations.
The reasons why the screed will be weak are different:
- Failure to maintain the proportions of water and cement.
- Old cement (with lumps).
- Increased clay content in sand.
- Improper preparation and care after installation when rapid dehydration conditions occur.
But if this happens, then something needs to be done about it - because with further finishing, difficulties are possible.
It is also impossible to leave it unchanged. Dust constantly forms on such a floor. The weak layer is easily destroyed by feet.
First way. Strengthening with primer.
The first thing most people come to is to strengthen it with a primer. The option is real, affordable and on everyone’s lips. But it rarely gives results:
A short comment on the video.
Judging by the nail test, the screed is quite suitable for tiling indoors. There are examples of a more deplorable state of the foundation, which they tried to strengthen with a primer:
For what reason did the tile bounce off the screed?
They tried to strengthen the loose screed with a primer. But primer, primer is different. Judging by the color and the resulting film, a concentrate primer was used in shock proportions. Or primed several times, allowing each layer to dry completely (as written on the canister). This gave a film on the surface. A tile with glue was attached to it. But under the film the same weak layer remained. The tile came off along it.
Alternatively, you need a deeply penetrating primer and pour it in buckets at a time. To consolidate a weak layer to a greater depth. Deep penetration primer (according to the manufacturers) has smaller particles and therefore can penetrate deeper without creating a film on the surface.
Strengthening the screed with a primer is difficult to come across as a recommended technology. This is the creativity of the masses. There is also a similar solution - strengthening with liquid glass.
Strengthening cement screed with silicates (liquid glass).
The idea of using liquid glass to repair weak surfaces did not come out of nowhere. Liquid glass has been used in construction for a long time:
- Additives to concrete and mortars to accelerate setting (1-15% by weight of cement).
- Production of fire-resistant paints, putties and putties with the addition of fillers (talc, marble dust, fine sand).
- Waterproofing of concrete and wooden structures.
- Fighting fungus and mold.
- In metallurgy, the roof of furnaces is laid out from fireclay bricks with a sodium silicate binder.
There are three main types (depending on composition) of liquid glass: potassium, sodium and lithium. They have different properties, which provide different benefits and different prices.
Sodium is more common. They use it to strengthen screeds in garages and basements:
You can experiment with this method. It’s useful to have at least some other people’s experience.
Below are the most interesting details of the use of liquid glass. It’s hard to call this quality material for drawing conclusions. But still:
One could call all this fuss with liquid glass a collective farm and forget about it, if not for such a detail as recommendations for strengthening loose screeds with silicates from many manufacturers of mixtures. One of them from “MAPEY”:
Important points in the video:
- The viscosity of the impregnation is more similar to a primer than to the liquid glass in jars that are used to strengthen garage floors.
- Impregnation must be applied continuously, preventing the top layer from forming a crust.
- Consumption can be significant, 3-4 liters per meter.