However, if the moment of inertia of the existing beams is 6000 cm 4, then you simply need to select the cross-section of the reinforcing beams, based on the fact that the missing moment of inertia is 2000 cm 4. For example, you can specify a beam width of 5 cm and then the required height of the beam will be. An example of calculating a reinforcing beam is given separately.
For example, if, according to the calculation for deflection, the required moment of inertia I tr is 8000 cm 4, and the moment of inertia of the existing beams is 4000 cm 4, then it is necessary to strengthen the overlap with beams of exactly the same section or beams with the same moment of resistance. When the cross-section of wooden beams is taken without calculation, either by eye or on the basis of the authoritative opinion of a neighbor, then problems may arise with the strength or deflection of such beams when calculating for all acting loads. As a rule, this is discovered already at the operation stage, when simply replacing old weak beams with new ones is too expensive, and technologically it can be quite difficult. In such cases, the question arises: how can you strengthen a wooden beam? However, a similar question may arise when redevelopment is being contemplated.
Install additional wooden beams
This method is good because it requires a minimum of calculations, and they are also quite simple (the basics for calculating wooden floor beams are given separately). However, from a financial point of view, this method may be the most expensive. For example, if, according to the deflection calculation, the required moment of inertia Itr = 8000 cm 4, and the moment of inertia of the existing beams is 4000 cm 4, then it is necessary to strengthen the overlap with beams of exactly the same section or beams with the same moment of resistance. However, if the moment of inertia of the existing beams is 6000 cm 4, then you just need to select the cross-section of the reinforcing beams, based on the fact that the missing moment of inertia is 2000 cm 4. For example, you can set the width of the beam to be 5 cm and then the required height of the beam will be h = 3 √ 12I/b = 3 √ 12 2000/5 = 16.87 cm Of course, the height of the beam should be taken larger, most likely it will be 20 cm, however, to order you they can make 17 cm. That’s the whole calculation in this case.
The use of overlays for strengthening and repairing floor beams is used when there is damage in a certain area. The point of restoration work is to install wooden overlays on both sides of the problem area, which are attached to entire parts of the beam with bolts complete with nuts and washers. If a section of the floor beam is damaged to such an extent that there is practically nothing left of it, overlays must be installed over the entire beam length: from one wall to another. Metal profiles should be used at junction points. In particular, a steel prosthesis, which is a metal strip or metal rod of the appropriate diameter bent at 90º.
Application of overlays.
The methods proposed in the article for strengthening wooden floor beams will extend the service life of structures where such beams are present. This process is very important, and in some cases simply necessary. After all, floor beams made of wood become completely or partially unusable over time, threatening the destruction of the entire structure. There are many reasons for this: dampness, rodents, sudden temperature changes, and simply natural wear and tear from carrying loads.
Content
- Application of overlays.
- Metal reinforcement.
- Increase in cross-sectional area.
- Carbon fiber reinforcement.
Beams and logs: what is common and what is the difference between these concepts
In private low-rise housing construction, two-story houses are quite widespread. As a rule, these are houses of separate two- and three-story projects and buildings converted by arranging an attic floor. In any case, such houses are equipped with an interfloor ceiling and flooring on the second floor.
For houses built using frame-panel technology, and, in fact, all other buildings, except those where reinforced concrete slabs are used as interfloor floors, the basis of the structure is beams and floor joists.
Beams are used as load-bearing structures for the ceiling , the floor itself and the basis for installing floor joists. But the logs are nothing more than beams of reduced size, onto which the plank flooring and the finished floor of the second floor or attic itself are attached.
Differences between beams and joists
Floor beams are usually installed perpendicular to the internal load-bearing wall; the beams are supported by the external load-bearing wall of the house and the internal load-bearing wall or pier.
The second floor joists are laid perpendicular to the interfloor floor beams. They can be laid directly on beams or have an additional structure that forms an additional volume of interfloor flooring.
The following beams are usually used:
- Solid wooden beams;
- Wooden beams;
- Metal beams made of T-beams, channels, pipes or I-beams;
- Metal beams in the form of composite trusses;
- Reinforced concrete beams from structures of different profiles;
as joists :
- Wooden beams;
- Beams made of glued laminated structures;
- Combined structures made of metal and wood;
Thus, despite the general similarity and the same principle of use in the construction of a building, beams and logs have different purposes, sizes and, accordingly, different, although largely similar methods of reinforcement.
Metal reinforcement
Continuing the topic of ways to strengthen wooden floor beams with the help of a steel prosthesis, it should be noted that metal is used not only in the places where the beam adjoins the wall.
It can also be successfully used as overlays instead of wooden ones. In this case, any metal profiles must undergo anti-corrosion treatment before installation. Simply put, they are painted. In addition to strips and round profiles, you can use a channel, a corner, or simply sheet metal as overlays. All metal profiles are attached to sections of wooden beams using the same kit: bolt, nut, washer.
When deciding in favor of reinforcing wooden beams with metal, it is necessary to take into account the fact that metal is more expensive than wood. In addition, it has more weight, which can be an additional load on the beam itself.
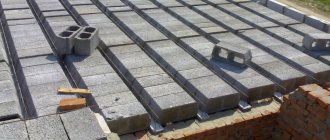
Another good solution is the construction of prefabricated beams from three wide boards of small thickness (25 - 50 mm). And in this case, the butt joints of the boards inside each beam and between adjacent beams are spaced apart; the boards are glued along their length and additionally tightened with pins. To determine the condition of the load-bearing beams, it is necessary to calculate the maximum permissible deflection of the element. The norm is 1/300 of the length of the beam. That is, with a length of 3 meters, the deflection in the central part should not exceed 10-12 mm. If the value is greater, repairs are required - strengthening and strengthening the load-bearing component of the floor.
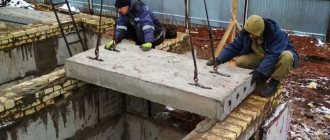
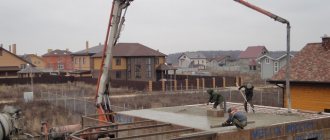
And one more important point: when making wooden attic floors, you do not need heavy lifting equipment, especially a concrete pump.
Today's:
- Flowers attract men to the house. Indoor flowers that attract men to the house; they have powerful love energy
- Why are window shutters needed? History. Why were shutters needed in houses in Rus': wowavostok
- And we are settling into our new kitchen.
- Dressing room with washing machine. Washing machine in the pantry/dressing room - to do or not to do?
- Two-room apartment in loft style, 60 m
- From our subscriber:
- The weight of one solid red brick is 250x120x65. Weight of 1 red solid brick.
- Strengthening wooden beams. When to strengthen wooden floor beams
- Repair of wooden floor beams. Attic flooring using wooden beams: a review of the best designs and tips for choosing beams
- Reinforcement of floor beams with plywood. Splicing and strengthening
- Strengthening a wooden beam with a corner. Strengthening wooden floor beams
- Reasons for weakening the load-bearing capacity of the floor
- Ways to strengthen a wooden floor beam
- What to do if strengthening floor beams is not possible?
- Video of simple strengthening of wooden floor beams in your home
Advantages and disadvantages
In a building, the beam is positioned horizontally (sometimes at an angle) and distributes pressure onto the supports, which are walls, columns, pillars and other load-bearing components of the structure. Accurate calculation of wooden floor beams guarantees the strength and stability of the entire structure. What is important here is the correct selection of certain indicators - length, thickness, spacing.
Wooden floors are used in the construction of cottage-type frame structures, private wooden houses, dachas and outbuildings, combined buildings (brick or block) - in this case, the choice is determined by reducing the load on the load-bearing structures.
Wooden beams are especially in demand in low-rise construction. They have a number of advantages:
- strength and durability - wood is resistant to shock loads, mechanical stress and, with professional processing, will last 100 years or more;
- relatively light weight, which reduces the load on walls, supports and foundations;
- simple installation compared to metal or reinforced concrete floors;
- installation does not require special equipment and mechanisms;
- aesthetics - the tree looks representative even without decoration;
- environmental friendliness - natural material does not harm health, but on the contrary, creates a healthy microclimate in the house;
- maintainability - if required, it is easy to strengthen wood in various ways.
- without special impregnation they are fire hazardous;
- less durable in comparison with metal and reinforced concrete floors;
- susceptible to moisture, fungus and insects (with low quality wood);
- may become deformed due to temperature changes.
Well-dried wood, treated with fire-resistant compounds and antiseptics, has almost no disadvantages and will be the preferred option for constructing floors in a private house.
Experts recommend choosing coniferous wood - it contains resins (a natural antiseptic) and is denser than deciduous wood. The ideal building material is made from pine or spruce, which grew in harsh conditions.
Increase in cross section
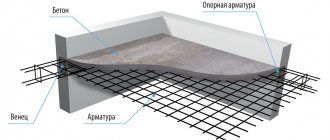
For this purpose, wood overlays are used. Use boards and timber. The cross section is selected depending on the degree of damage and the planned load. It is worth noting that increasing the section on the sides is not effective. To understand this, just look at the formulas by which the elements are calculated. The width in these calculations is taken to the first power, and the height to the second. When the dimensions are doubled in the first case, the load-bearing capacity doubles, and in the second it quadruples. Tightening an existing beam with an overlay using bolts, staples or studs. Professional craftsmen prefer the latter option. When tightening the nuts, be sure to use washers to avoid damaging the wood. An insulation layer is provided between the metal parts and the wood, for example, Technolast EPP. The damaged area is treated with an antiseptic before performing work.
Design norms and standards differ for reconstruction, redevelopment or other types of work. At the initial stage, the designer determines the following points: Specialist comment. The result of design and construction work depends on the completeness and accuracy of the surveys. Without objective expert conclusions, it is impossible to choose the necessary options and solutions for reinforcing floors. Therefore, the Smart Way company always pays special attention to the pre-design stage of the survey and involves all the necessary specialists in the work.
Design of project sections, description of solutions for strengthening floors. Reading time: 5 minutesWhat is a floor - this is a horizontal internal structure of a building, which has load-bearing functions, ensures the strength and reliability of the object. Consequently, the main purpose of strengthening floors is to increase the strength and permissible loads of this structure. Various methods of strengthening floors, as well as other structures, are used in reconstruction, redevelopment, redevelopment and major repairs of buildings. Read in this material how reinforcement of floors is carried out in practice, whether it is necessary to design and approve this type of work, what is examined in the building before developing a project .
Reinforcing joists using plywood or OSB boards
For logs made of glued material or structural wooden I-beams, overlays made of plywood or OSB boards are most often used. Such overlays are also installed in the form of double-sided overlays or one-sided lag reinforcement. This connection is fixed using self-tapping screws. The thickness of the plywood element or OSB board element should be no less than 10-12 mm. The size of the overlay for a structural I-beam must correspond to the height of the central part.
Reinforcing joists with plywood
Fixation with self-tapping screws is done on both sides of the linings. It is important that the screws pass through the thickness of all elements being fastened.
What kind of work and projects require reinforcement of floors?
If a building or premises undergoes cosmetic repairs, additional loads on the floors or other load-bearing structures will not arise. If the main characteristics or configuration of the object change, reinforcement of the floors may be required:
- when reconstructing a building, i.e. when replacing or restoring load-bearing structures, increasing area and height, constructing extensions and new floors;
- during redevelopment, when the configuration of a room or building changes, work is carried out on door and window openings, and other types of changes;
- during reconstruction, since changes in utility networks and equipment may also be accompanied by additional loads on the floors;
- during major renovations of buildings, when the project may include partial replacement or restoration of floors.
For each of these types of work, design is carried out. Also, to obtain initial data on the condition of the object and its structures, a commission inspection is required.
There are three ways to strengthen structures: replacing wooden beams, increasing their number, strengthening existing ones. It is necessary to change the supporting elements if there is damage along the entire length. Damaged beams are dismantled, and new ones are installed in the same seats. The carbon fiber layer should be from 1 to 5 mm. Its value depends on the condition of the crossbar and its future load.
Damaged wooden beams, worn out by loads and time, or not strong enough initially according to the design, are the first reason for the weakening of the load-bearing capacity of the floors, the appearance of vibrations and creaking floors on the upper floors of the house.
Our company is often asked the question of what to do with sagging wooden floors and how to fix and strengthen the floors in the house. This situation is mainly faced by the happy owners of ready-made houses and cottages built hastily, without respecting the dimensions of the house design. The fact is that unscrupulous builders try to save on materials and time, reducing the use of expensive wooden beams. The future owner of the house cannot visually assess the strength of wooden floors, since they are covered with floorboards and floor coverings. After the purchase, disappointment sets in - the floors creak, and vibration is felt when walking around the room. There are extreme cases when it is simply dangerous to be around, much less place heavy furniture, due to the threat of the wooden floor beams collapsing.
The main mistakes builders make when installing wooden floor beams:
1. Raw wood is used. In this case, after natural drying, the owner of the house begins to notice cracks in the floor covering and a squeak that gets worse every day. 2. The timber used is of insufficient thickness. In this case, increased floor vibration and creaking are felt. 3. Beams with an increased span (the distance between the beams) are installed. This is a fairly common mistake among builders and finishers. The floor without load (furniture, flooring, etc.) is quite stable and it is difficult to identify poor-quality floors. As soon as, say, parquet boards are laid and furniture is brought in, the wooden floors begin to sag and vibration appears. 4. Beams assembled from two or more parts are installed. The most unpleasant option. When the beam is knocked down with nails. With such installation of beams, there is a real threat of collapse of the cottage floors. If you are faced with the above problems, then think about strengthening the wooden floor beams. It is advisable that an experienced team of builders, finishers and finishers deal with the defects.
Necessary tools and materials for strengthening wooden floor beams in a private house:
A. Retractable construction jacks “telescopes” – minimum 4 pcs. Racks can be purchased at prices ranging from 400 rubles to 1000 rubles. You can look for a used one. racks priced from 200 rubles. The size of the rack depends on the height of the ceilings of the room being renovated. From 2 m - to b m. b. Several boards at least 4 m long and at least 3 cm thick - for lining the base and the top of the racks. Boards are necessary to distribute the load between the racks and prevent damage to the floor. V. Threaded studs, at least 50 cm, with a set of nuts and washers. d. A wood drill with a diameter matching the diameter of the tie rods and a length no less than the thickness of the beam. d. Chopped blocks for linings when leveling wooden floor beams. e. Sand-concrete cement mortar.
Eliminate sagging floors in the house by adding a wooden or metal beam.
So, let's start solving the problem. Decide which material to choose for installation: Wooden beam - additional beam 200X200 or 200X150 (on edge). This is the cheapest, but no less durable option. The metal channel is very durable and reliable. When choosing this option, prepare for the high cost of the material and the inconvenient “sewing up” of the ceiling, because... It is much more difficult to fix a ceiling in metal than in wood. The technology for installing reinforcement is identical, no matter which option you choose.
Procedure for strengthening wooden floors
1. Take telescopic stands and place them at an equal distance from each other, pointing towards the ceiling or beams. NECESSARILY! We place a board at least 3cm thick under them (on the floor).2. We rest the racks close to the sagging ceiling through the spacer board and begin to twist (jack) one by one. You must have an assistant to tighten the “telescopes” simultaneously and evenly. 3. We determine the installation location of the reinforcing beam. The ideal option is in the center, between the existing beams. 4. Using a hammer drill, we hollow out holes opposite each other with a depth of at least 100 mm in the places where our reinforcement is attached. 5. We lay the bottom of the prepared hole with roofing felt and lay a little 2-5 cm of mortar. We insert the prepared beam first into one hole, then into the other (opposite).
7. If the beam does not rest tightly against the ceiling, then we drive wedges under the beam in the holes.
8. The final moment, we remove the “tension from the ceiling.” We remove the jack stands. The ceiling should “lie” on the new beam. That’s all). We hope that our advice will help you solve problems with floors. Strengthening the floors of buildings. Projects of one-story cottages.
Strengthening the structure with additional lags
This method is applicable for strengthening the floor structure of the second floor, when the beams do not have a deflection, and the logs themselves, based on calculations, can withstand the design load. The essence of this method is to install additional logs in the central part of the room, thus ensuring the distribution of the load more evenly, over a larger number of supports.
Installation of an additional beam to strengthen the second floor floor
Most often, installation of additional logs is carried out in the center of the room by reducing the distance between the logs by 25-30%. So, if it is necessary to install logs every 0.5 meters, in the central part the distance is reduced to 0.4 - 0.35 meters.
For reinforcement, standard logs used in the structure are used. For strength, additional spacers are installed between the lags from solid sections of boards or metal rod prostheses installed crosswise.
Rod metal prostheses for strengthening joists
How to strengthen wooden floor beams
Damaged wooden beams, worn out by loads and time, or not strong enough initially “according to the design” are the first reason for the weakening of the load-bearing capacity of the floors, the appearance of vibrations and creaking floors on the upper floors of the house. Let's figure out how to strengthen wooden beams and make the structural elements of the floor stronger.
Reasons for weakening beams
The need to strengthen beams may arise in a number of cases:
- natural wear and tear of a correctly installed product;
- damage to the beam due to errors in manufacturing and installation;
- change in the purpose of the room associated with increased load on the floors.
Let's consider these reasons in more detail. So, the beam may fall into an unsatisfactory condition due to the influence of various factors, including increased levels of humidity, sudden temperature changes, as a result of pest activity, as well as simple physical wear and tear with the further appearance of cracks. The dishonesty or incompetence of the builders should not be discounted. The owner of the house is not able to check the quality and correct installation of hidden installation elements. Problems are identified later - already during the operation of the room, when walking on the upper floor, the floors vibrate or creak. The main errors at the stage of manufacturing and installation of beams include the following:
- using insufficient or incorrectly dried wood. After such beams dry, they become covered with cracks;
- using too thin timber, which leads to vibration of the beams;
- too large spans between beams;
- assembly of beams from several parts.
If we are talking about changing the purpose of the room - for example, the attic is planned to be turned into an attic or a residential unit, then in this case the load on the floor will increase. Obviously, this will require an increase in the load-bearing capacity of the beams. A non-specialist can determine the need to strengthen the beams. The main indicator in this case, in addition to the mentioned vibrations or visible damage, is the level of deflection that occurs both under load and under the beam’s own weight. Deflection can increase after increasing the load - installing parquet on the top floor or after the delivery of furniture. In this case, the beams begin to sag, which not only leads to vibration of the floors, but can also threaten their collapse. The maximum permissible deflection of the beam is easy to calculate independently. The simplest method is to calculate the indicator depending on the length of the beam. In particular, the level of deflection should not exceed approximately one three-hundredth of the length of the product. For example, if the deflection is 8–10 millimeters with a beam length of 2.5 meters, this is the norm. If it turns out to be large, then it is time to strengthen or replace the beam.
Increasing the cross-sectional area of a beam
One of the most popular ways to strengthen floor beams is to increase their cross-section by installing additional wooden overlays. This method is mainly used in cases where the material of the beams becomes loose due to natural aging or as a result of the activity of wood-boring beetles. An increase in the cross-sectional area is achieved by installing wood overlays with a thickness of at least 50 mm on the weakened or damaged area. Some experts argue that it only makes sense to increase the cross-section along the horizontal sides, that is, at the top and bottom of the beam, and increasing the thickness of the product along the width does not give a useful effect. Before installing the overlays, as in the case of other work on strengthening beams, weakened beams should be treated areas with antifungal agents. After antifungal treatment, it is necessary to reduce the level of deflection to a minimum using jacks. It is more efficient to directly install the linings along the entire length of the beam. Attachment is carried out using bolts or studs through and through. Not only wood, but also metal can be used as a reinforcing element. In this case, channels or metal strips are used. The latter are less reliable than the channel and can only be used to strengthen small areas of damaged beams. Reinforcing the span of a beam with the help of metal overlays is carried out according to the same algorithm as in the case of wooden overlays, but it has some features. In particular, before installation, metal linings are treated with an anti-corrosion compound. In addition, a waterproofing layer should be installed between the metal and wooden parts.
Rod prostheses
In cases of severe damage to sections of beams, it is practiced to remove such areas and install bar prostheses made from steel reinforcement in their place. This method is used mostly when replacing end elements, which most often become unusable. The role of prostheses is played by scraps of reinforcement with a cross-section from 10 to 25 mm. The length of the prosthesis is selected with the expectation that it should be 10% greater than the double length of the damaged section of the beam. There is also a limitation on the length of the prosthesis - it can be no more than 1.2 m. Before performing work, you should support the area that will be strengthened with a stand to prevent possible collapse of the structure. The racks and support run are placed at a distance of one to one and a half meters from the load-bearing wall. After such temporary strengthening, the ceiling is dismantled, and the rotted section of the beam is sawed off. The prosthesis blank is inserted vertically into the ceiling, and then rotated to a horizontal position. The structure is first slid onto the beam and then into the wall niche. It must be taken into account that beams restored using prosthetics will last for a long time, however, the strength of the updated structure will certainly be lower than in the case of a new beam. Therefore, load the restored ones beams should be kept to a minimum.
Reinforcement of beams with carbon fiber
In addition to traditional technologies, innovative solutions are widely used when strengthening beams, one of which is the reinforcement of structures with carbon fiber reinforced plastics. Attention: this method is the only possible way to strengthen beams if, due to extreme cramped spaces or for some other reasons, increasing the cross-section of structures is impossible or extremely difficult. The undoubted advantage of carbon fiber reinforcing elements is the absence of the need to operate with large and heavy metal or wooden components, as well as minimal labor intensity of work in general. Modern carbon fiber reinforced plastics, like any composite materials, are characterized by high strength and low weight. Carbon fiber reinforcing elements cope well with significant mechanical loads. They are available in different modifications - in the form of tapes, fabric, threads, plates or sheets.
Reinforcement of a beam with composites is carried out by gluing carbon fiber onto it in several layers. The attached layers of carbon fiber are applied to the surface of the beam, one above the other and along its entire length. The edges of the glued strips must be covered with transverse layers.
The reinforcing components are glued until the reinforced beam becomes rigid enough to withstand the loads. Installation is carried out using epoxy glue. After hardening, the layer’s strength characteristics are sometimes not inferior to metal.
What to do if strengthening beams is impossible
If the floor beams are not damaged, but have difficulty withstanding the load and bend, and their strengthening is problematic or impractical, you need to consider the option of installing additional beams or placing supports under existing ones. In this case, the load-bearing capacity of the structures will be strengthened by redistributing the load onto additional beams or racks. The latter, naturally, will transfer the load to the floors of the lower room. New backup beams, just like the existing ones, are fixed in a socket arranged in a load-bearing wall. Installing racks, although a simpler task, is often associated with additional undesirable effect - such supports can clutter up the space and interfere with unhindered passage through the room. The visual component is also important - it is advisable to decorate the supports so that they fit harmoniously into the design of the room. So, we have looked at several basic, most common ways to strengthen beams. The choice of a specific method depends both on the degree of wear of structures and the load on them, as well as on the skills of the builder, the availability of the necessary tools, financial capabilities and free time of the craftsman.
The most common of them are the following three. There are other, very rare options for strengthening existing beams with additional wooden or metal elements.
How to cut a block diagonally with a circular saw.
- poor condition of the beam structure. The result is wood damage. High humidity, temperature changes, the activity of various pests (bark beetles), cracking - all this leads to deformation of the floor beam;
- reduction in load-bearing capacity. Under their own weight, constant and variable load, floor beams can bend. According to the standards, if the deflection is within 1:300, then there is nothing to worry about. For example, if a beam is 2500 mm long. bent by 10 mm. this corresponds to the normal deflection value. If the deflection is greater, it should be strengthened;
- the need to increase the load-bearing capacity of the beam. Associated, for example, with the reconstruction of an attic into an attic or living space. Such a restructuring will lead to an increase in constant and variable loads on the floors of the second floor, which automatically requires a change in the cross-section of the installed wooden beams.
Within the article, several common methods of strengthening the ceiling (repair, reconstruction) will be given. But only a professional can accurately answer the question of how to strengthen wooden floor beams and only after analyzing the condition of the structure. After all, in each case the decision will be individual. Using the table, you can get an idea of what cross-section a beam should have under a certain load.
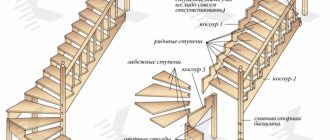
What types of beams are there?
Products vary in material and cross-section. They are made from solid timber (without gluing), as well as from laminated veneer lumber. The first option is preferable in terms of environmental friendliness - artificial resins are used in the production of glued building materials.
According to the type of section there are square, rectangular, I-beam and round. Let's look at the pros and cons of each option.
Square
This section is considered the least preferable and profitable - square beams distribute forces under load worse and are more expensive than other types of floors.
Rectangular
The best option when selecting wooden floors. When installing such elements, the short side is placed horizontally, the long side – vertically, since an increase in height has a positive effect on strength.
I-beam
The products have an original structure: there are widened elements at the top and bottom, and in the middle the dimensions are reduced to the maximum permissible values. In terms of strength, an I-beam wooden beam for floors is not inferior to other options, and during production, wood consumption is significantly reduced.
Such products can be successfully installed over long spans; they are light in weight and do not deform under loads. In addition, it is easier to secure communications on them.
However, such beams are difficult to manufacture - not every city has production facilities engaged in the procurement of such building materials.
Round or oval
Such beams are usually used for the installation of attic floors. They have maximum bending resistance and can withstand heavy loads. At the same time, the use of materials with round and oval cross-sections requires precise calculations. According to construction requirements, their maximum length should not exceed 7.5 linear meters.
Repair of wooden floor beams. How to repair a wooden floor beam yourself
In most old and some new houses, wooden beams were used to construct the attic (ceiling) or interfloor flooring. There are several reasons for this: wooden floor beams are lightweight, affordable, and easy to install. They can also be used in the construction of load-bearing walls from different materials. However, wooden floor beams have a significant drawback. Namely, an increase in humidity and operational load inevitably affect the quality of wood, and, as a result, its load-bearing capacity. In this case, repair work will be required.
Repair of wooden floor beams
Types of defects (damage) of floor beams
During a major renovation of a house, you need to inspect the floor beams for various types of defects. These include:
- rot and mold damage. It is especially common on attic floor beams. Mold on a ceiling beam is caused by a leak in the roof. The appearance of rotten areas is common where the beam is cut into the wall. The reason is insufficient waterproofing in this place;
Rotting and mold damage to wooden floor beams
- wormholes. The activity of wood beetles can significantly damage floor beams;
Wormholes on wooden floor beams
- cracking (delamination) - the formation of cracks. Initially, low-quality beams may, under the influence of temperature changes, delaminate along the length of the fibers.
Cracking of floor beams If any of the above are found, it is necessary to repair the wooden floor beams. In addition, it is necessary to eliminate the cause that led to the appearance of defects.
How to identify damage to wooden beams?
There are several ways to detect defects in beam floors:
- visual inspection of the beam. The simplest and most reliable way. Applicable if the beams are open. To make sure that the beam will last for many more decades, you need to run a screwdriver along it with pressure. If a slightly visible mark remains, then everything is fine. If the screwdriver leaves a groove, the beam needs repair. And the deeper the groove, the faster you need to start repair work;
- identification of external signs of deformation - subsidence (sagging) of the beam floor is noticeable even under the finishing;
- tapping. If a dull sound is heard from the impact, this means that the beam needs repair, i.e. it loses its load-bearing capacity. Suspicions can be confirmed by drilling a hole in the beam. Next, you can use it to evaluate the quality of the wooden floor.
It is especially important to assess the condition of wooden floors in areas adjacent to the wall. Most cases of damage occur in these areas.
Do-it-yourself repair of wooden floor beams
Restoration (restoration, strengthening) of beam floors can be performed in several ways:
- Repair of ceilings using wooden overlays.
A board or timber is used as an overlay. They should be equal in height to the height of the beam, and in width – equal to half the width of the beam. Since the linings are installed on both sides of the beam, it turns out that the linings are equal to the beam. The overlays are mounted close to the floor beam and secured with bolts. The length of the bolt is equal to the width of the beam and two overlays. To avoid damage to the overlays, they should be treated with an anti-fungal solution. It should be noted that it is better not to repair wooden floor beams at the junction with the wall using overlays. A steel prosthesis is more suitable for these purposes.
- Repair using a prosthesis - strips of steel sheet or steel rod. Their advantage is that they take up less space and are more durable. The steel plate should be treated with an anti-corrosion solution.
Important! The rotten part or the beam damaged by the bug should, if possible, be cut out and replaced with a whole one, and the cut points should be reinforced with overlays. Repair of wooden floors at the junction with the wall is carried out as follows: the damaged part is removed, and the remainder is extended using an overlay or prosthesis. Next, the beam is secured to the wall using bolts. If a significant portion of the beam is damaged (more than 2/3 of the length), the wooden floor beams are replaced. Otherwise, further use of the destroyed wooden floor may lead to the collapse of the house structure.
We recommend that you read a detailed description of the technology for strengthening wooden floor beams. All repair work must be carried out using dry wood. And the use of special protective solutions will significantly extend the operational period of the repaired floor beams.
Additional supports
If the floor beams are in generally good condition but have cracked - for example, due to heavy snowfall - the best option to strengthen them and restore their functionality is to install supports on either side of the fracture. Of course, if we are talking about the attic and other utility rooms. However, a beam equipped with additional support may well fit into a living space if it is designed in a designer manner. The support can be installed either wooden or metal.
Before and after reconstruction
The procedure for strengthening work can be reduced to the following points.
- Bringing together the ends of the damaged beam. You will need an analogue of a jack, which will allow you to connect the fragments. Or the coordinated and leisurely work of a team of three or four people.
- Fault fastening. You can use any option of prostheses and onlays: until the supports are installed, they will hold the split part.
- Calculation of the location of the support. It is likely that they will become places of schism. But it may happen that two supports are needed, in those places where the maximum load falls on the wooden beam. This is especially likely if the beam has a large cross-section.
The rest is a matter of technique. The only thing that is required from the repairman is to clearly check the perpendicularity of the support, otherwise strengthening the ceiling will definitely not be possible.
Room correction options
Logs are a universal tool that allows you to adjust and improve any home. They can be placed over the entire surface or partially, choose clear shapes or unusual designs. There are many styling options, you can always find your ideal option. European design is very popular these days, in which the joists are moved to the wall.
Floors are subjected to the following types of treatment:
Brushing. In this case, a realistic imitation of wood texture is created. They even make marks from the bark beetle. This method is used when you need to create a spirit of antiquity in a room.
Textured processing is another method of artificially aging wood. This effect is achieved by treating the wood with special brushes and a special planing technique.
Vintage style - ceilings are treated with paints and varnishes, also giving them an antique look.
Traditional style combines simplicity and lightness. A room decorated in this style is especially cozy and comfortable. For this effect, a varnish or oil-wax coating of the floors is done.
Necessary clarifications
For all its positive qualities, wood still has a number of negative parameters. Of the most basic:
- relatively low endurance of both the floor beams and the entire structure as a whole. The maximum load is 500 kg/m2, and in most cases it does not exceed 200-300 kg/m2. Therefore, deflection is very likely;
- low sound insulation performance, which is typical for all wooden floors. They transmit the entire range of sounds, from airborne noise (conversation, music, murmur of water) to percussion, which occurs during repairs, moving furniture and even steps;
- fire hazard, to combat which it becomes necessary to treat wooden beams with special compounds;
- defenselessness against bioattacks. Wood is susceptible to rotting and woodworm damage, so wooden beams need additional impregnation not only from fire, but also from natural enemies.
How to tighten ceiling beams. Is the ceiling in your house sagging? No problem!
This article describes a very common problem that often occurs in older private homes. So, you start to notice that the ceiling in your home is starting to sag. Don't be sad. There is a very simple, inexpensive and effective way to combat this construction misunderstanding.
Step 1. We go up to the attic and carefully examine the surface. We immediately pay attention to the trash (which, most likely, is there), which can be removed and lighten the load on the ceiling. Next, you need to find the beams that have bent. We count the number of beams and measure their length.
Step 2. Prepare the necessary material. You need:
1. Beam, preferably the same length and width as the sagging beams. The number of beams must correspond to the number of beams.
2. U-shaped studs 20 mm in diameter, the width of which corresponds to the thickness of the beams. The ends of the studs must be threaded. The number of studs is calculated based on the fact that 1 piece will be needed per 1 meter of sagging beam.
3. Tempered corner with holes, the diameter of which corresponds to the diameter of the studs, and the center distance is equal to the width of the beams.
4. Wooden linings that can be cut from prepared timber. The length of each lining is less than 30cm.
Step 3. Raise the beams into the attic. We place a beam on each beam so that they coincide. Next, under each beam we place wooden lining along the edges. Now, the bars seem to hang in the air above the beams.
Step 4. Next, we drill through holes in the ceiling so that we can insert studs into these holes. The free edges of the studs should be in the attic.
Step 5. Using a pneumatic jack and a piece of timber of the required length, carefully lift the ceiling.
Step 6. Fix the raised ceiling with studs and nuts, and then lower the jack.
After performing these simple operations, you will level the ceiling and protect it from further deformation.
Reinforcement of logs with metal overlays
Metal linings used to strengthen the joists of second-floor houses can be:
- Piece elements made of perforated sheet metal with a thickness of at least 5 mm;
- Made from metal strips of various widths with a thickness of at least 5 mm;
- From a shaped pipe of square or rectangular cross-section with perforation or welded fasteners;
- From a corner or brand.
Piece elements made of sheet metal are used to strengthen the joints of the joists. The dimensions of such overlays can be either standard or selected depending on the specific connection case. Fixation for the joints of beams of small height is carried out using self-tapping screws, and if the logs have a height of more than 10 m, then using a bolted connection. Metal plates are used for double-sided installation.
Reinforcement of logs with steel sheets
A metal strip usually reinforces long logs, and if the width of the strip used for installation is greater than or equal to 50 mm, then fixation can be either using self-tapping screws or bolts.
Reinforcement of logs with metal strips and channels on both sides
shaped metal pipes of square or rectangular cross-section are used as structural elements The installation location for such elements is the central joists of the premises, where the defects are most pronounced. The pipes are simply fixed to the joists along their entire length on one or both sides. Bolts are used to tighten reinforcement beams with a height of 80 millimeters or more. For smaller lags, fixation is carried out using self-tapping screws.
Shaped metal pipes can be used to strengthen wooden joists
Corners are most often used for installation at the bottom of the log, strengthening it from deflection on the bottom side. To do this, corners measuring 30*30, 45*45 or 60*60 mm are inserted under the joists from below and fastened with self-tapping screws into holes drilled in the corner.
Reinforcing joists with corners
A brand of various sizes can be attached both to the side and to the bottom of the joist. The fastening method depends on the width and height of the joist.
Taurus can also be used to strengthen lags
How to highlight lags
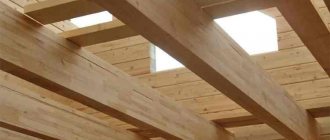
Often people try to hide the ceilings with some kind of cladding, because in this form the ceiling seems unfinished to them. However, any type of decoration eats up space. Plus, all these activities require considerable investment of money and time. It is much better to make a fashionable accent from open beams on the ceiling; this is an excellent alternative to a hemmed ceiling. Indeed, in this version of finishing the room, you especially feel the good quality and warmth of a home.
To emphasize the originality of the ceilings in the interior, various lighting options are used - LED strip, recessed and pendant lamps.
Interesting! An LED strip located along the top of the ceiling creates the effect of a structure floating in the air.
In interior design, it is important to think about the compatibility of all its elements. This must be taken into account when choosing lag decor. You can apply a pattern or color that prevails in the interior on them, or you can, on the contrary, play with contrast