Each owner of his own home tries to create all the conditions for a comfortable stay. In fact, it’s easy to do, you just need to use your imagination, and your home will sparkle with new colors. Repairs are always a big financial expense and a lot of problems, so most people are reluctant to start it. At the same time, many nuances should be taken into account to ensure that the interior design is not only beautiful, but also practical. This is especially true for the toilet and bathroom, since both of these rooms are associated with high humidity and temperature. This is where many questions arise. What materials and plumbing equipment to choose? What style should the room be designed in? How to save money without sacrificing quality? Let's look at all this in more detail and find out where to start repairing a toilet with your own hands. This article will be especially useful for people who have no experience in construction and finishing work. After reading it to the end, you will learn how to quickly and easily transform your bathroom beyond recognition.
Where to begin?
If you do not want to order a turnkey toilet renovation, but plan to handle everything on your own, then it is very important to have at least some idea of where to start. Many people think that the first thing they need to do is purchase building materials and plumbing, however, as practice shows, they later face many problems that entail extra financial costs. To avoid most beginner mistakes, it is recommended to first prepare the room for the upcoming renovation. This means not just removing everything unnecessary from the room, but preparing all working surfaces - walls, floor and ceiling for further work. This will be discussed in more detail below.
Combining a bathroom
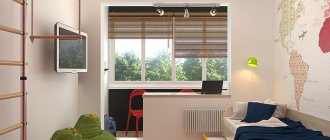
It is believed that if you combine a bathroom and a toilet, you can gain some space, which in some houses is especially important. This option is suitable for small families, otherwise such redevelopment will be inappropriate. After all, a queue may form of those who want to visit the shower. If you nevertheless decided to combine the bathroom, you need to dismantle the partition, as well as one of the door frames, fill in an unnecessary opening, and move the door to a new location. The bathroom renovation, photos of which are presented on the website, can be viewed in our gallery.
Preparing the premises
Let's look at this in more detail. So, where to start renovating your toilet and bathroom? First of all, you need to understand that in the vast majority of apartments the restroom has a very small area. As a rule, it is 1.2 x 0.85 meters. Such dimensions greatly limit the possibilities, so you need to immediately decide on an interior design project.
Carefully assess the condition of the room. What exactly does it need - cosmetic repairs or complete reconstruction. If the second option, then you need to start by dismantling the old finish.
In this case, everything happens in the following sequence:
- We disconnect the toilet from the communications, unscrew the fixing bolts and take it out.
- We assess the condition of the pipes. If it is deplorable, then we will also dismantle them.
- Most often, the walls in the toilet are tiled, so we remove them and then clean the work surface using a hammer drill and a special nozzle.
- If you want to carry out quality repairs, it is recommended to immediately start replacing the wiring. We remove the electrical cable from the groove and cut it.
It is worth noting that in some apartments the toilet is combined with a bathroom, so they are constantly damp, which creates ideal conditions for the growth of fungus and mold. To prevent this, you need to treat the walls with special antiseptic agents.
We have described the preparatory stage in detail, so now we can consider the further sequence of repairs in the toilet. Floors, walls, and ceilings require an individual approach, so below we will look at each of them in more detail.
Features of bathroom renovation
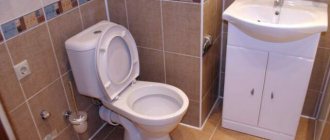
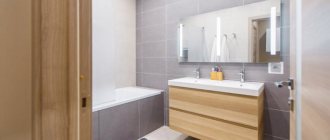
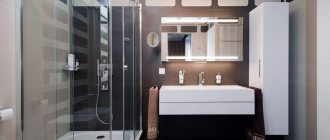
Typically, photographs of bathrooms after renovation demonstrate a fairly standard approach - the distribution of sewerage and water supply pipes is hidden under panels or boxes, the floor and walls are tiled, modern plumbing equipment and safe electrical wiring are installed, suspended ceilings are installed, as well as two sources of lighting - main and side or spot.
With this approach, the set of work performed will also be approximately the same, differing only in volume:
- installation/dismantling of the pipeline;
- putty, plaster of walls and ceilings;
- arrangement or alignment of the screed;
- installation of electrical wiring;
- tiling;
- finishing an existing ceiling or installing a suspended structure.
What is the difference between these works in the bathroom and, for example, in the kitchen?
The difference lies primarily in the operating conditions of these premises. It is known that in the bathroom there will always be increased humidity and steam formation, as well as a greater load on plumbing equipment, from faucets to drains.
Laying communications
What is she? Where to start repairing a toilet in a new building, when reconstruction is not needed, but only bringing the room back to normal? In this case, you will not need to prepare anything in advance, since the working surface is already suitable for finishing.
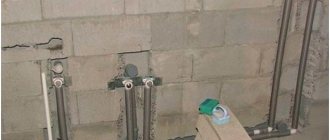
The first step is to connect water supply and sewerage, as well as electrical wiring to the toilet installation site. Without this, the bathroom simply will not be able to function. If you live in a panel house, which is most often built today, then the restroom will already have risers for hot and cold water. To minimize physical and financial costs, this is where it is best to install a distribution unit. To give the room a more aesthetic and attractive appearance, all pipes are hidden in a special box.
If you don’t know where to start renovating a toilet, then just follow the following sequence:
- The first step is to install the toilet and connect it to the drain riser. For this, a corrugated plastic pipe is usually used, laid at a slight angle.
- Next, the riser is connected directly to the sewer drain using the same pipe, which is connected at a slope of about two centimeters per linear meter. Clamps are used for fixation.
- A tee is inserted into the riser responsible for supplying cold water, through which water is supplied to the drain tank. If you want your bathroom to have a sink for washing hands, then immediately make separate outlets for hot and cold water. It is best to use hidden installation so that they are not visible.
- If the heating of water for the bathroom will be carried out using a water heater located in the toilet, then immediately make the piping to connect it.
- Electrical wiring should be laid exclusively in grooves. In this case, the cable is placed in a special corrugated box, which eliminates the possibility of mechanical damage and short circuit.
- The risers are hidden in special boxes, the frame of which can be made of a wooden beam impregnated with an antiseptic solution, or a metal profile. Then it is sheathed at the final stage of repair with finishing material, for example, clapboard.
This, in fact, is the entire sequence of repairs in the toilet, which occurs at the initial stage. Next, further work will be described in detail and tips will be given that will help you deal with everything much easier.
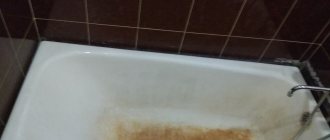
Cleaning the bathroom after renovation
A bathroom after renovation will not be able to acquire a finished look and produce the desired effect on the day the work is completed. Construction debris, dust and other contaminants will not allow you to enjoy the result.
In the bathroom, global reconstructions usually take place with the replacement of doors, dismantling, installing screeds, laying tiles, and attaching plumbing fixtures. After such work, the room needs general cleaning.
The main difficulties when cleaning a bathroom after renovation:
- large amounts of time spent removing construction waste;
- inaccessibility of some places (for example, under the bathtub, behind the sink or toilet);
- thorough cleaning of tiles and other interior items from dirt;
- To prevent aggressive chemicals from harming some surfaces, you should use special detergents, which are not always available;
- In order for the tile to be clean and shiny, dirt must be removed from it using special devices that the owners usually do not have;
- insufficient free time and the need for additional expenses to achieve the desired result.
Cleaning yourself during the week in the evening after work or waiting until the weekend is in most cases impractical. Special cleaning companies deal with this issue. By ordering their professional services, you can enjoy the finished renovation in a very short period of time. There are a number of advantages to using such services. A bathroom after renovation will only be perfectly clean if it is cleaned by trained personnel.
A few recommendations for those who decide to clean the bathtub with their own hands:
- Do not neglect protection during cleaning, especially when working with household chemicals. Gloves, a mask, goggles and a hat will eliminate harmful fumes, substances that irritate the skin and mucous membranes, as well as dirt and dust from getting on your head.
- Experts have proven that rhythmic music while working helps to achieve greater productivity. Use this simple and pleasant opportunity to complete your tasks faster.
- To make the process even more enjoyable and less monotonous, you can enlist the help of friends or family.
A bathroom after renovation should be cleaned as soon as possible, because stains from some building compounds can become embedded in the finishing surfaces. If there is no time for immediate cleaning at the moment, it is necessary to at least remove any remaining cement or foam from the surface of the tile. This is done using a spatula. If there are paint stains on the finish, it is better to remove them with a solvent.
If traces of glue, silicone or putty are found on the tiles, a store-bought or homemade product will help remove these stains. The second option is vinegar, soap solution or ammonia. The selected substance must be rubbed into the wall with a brush or soft cloth. However, before applying the product to a noticeable area of the tile, you should try it on some peripheral area. If no cracks or other signs of a chemical reaction have formed on the surface, the substance can be used, and then rinsed thoroughly with water and wipe the surface dry.
To prevent dust from spreading when wet and leaving marks on the tile, it must be vacuumed. If a white coating has formed on the surface, it can be washed off with water and a small amount of vegetable oil (without touching the seams between the tiles) and then rinsed with warm water.
Ceiling finishing
Where should we start? Redecorating a toilet room (photos of some interior design projects are simply breathtaking) is better to start from the ceiling, since this way you will not damage the wall decoration and you will not have to think about how to mask the defects later. Some repairmen may disagree with this, however, as practice shows, this approach is more appropriate.
The sequence of repairs in the toilet when finishing the ceiling is as follows:
- A straight line is drawn along the perimeter of the working surface at a distance of approximately 5-7 centimeters from the ceiling. The exact spacing is determined depending on what types of lighting fixtures you will use.
- According to the markings, a galvanized or wooden profile is fixed on the walls.
- Metal guides are attached to the ceiling using special hangers and dowels.
- When the frame is completed, electrical wiring is supplied to the intended location of the lamps.
- A ceiling plinth with special grooves designed for installing plastic panels is fixed to the profile.
When planning a bath and toilet renovation, it is recommended to decide on the materials in advance. Which ones to use depends solely on your preferences and financial capabilities. The best option in terms of cost and practicality is lining. It is cut to the required dimensions and simply inserted into the installed ceiling cornice. They also have holes cut in them for lighting fixtures, which are connected at the very end.
COST OF ALIGNING WALLS UNDER WALLPAPER, PRICE PER M2 IN ST. PETERSBURG
You can find out how much it costs to level walls in St. Petersburg, and also call a specialist to your home by phone
Before painting, the walls must be leveled, and this is done by applying a plaster layer with a thickness of 1 cm to 4 cm. The thickness of this layer depends on how crooked the walls were originally in the room.
Sometimes it is necessary to apply a layer of plaster even more than 4 cm. Then the walls are plastered with reinforcement, where a special mesh is used that will not allow the solution to slide down the wall.
Wall decoration
So where should you start? Many people do not want to order a turnkey renovation, because very often the craftsmen do not pay enough attention to the walls. It happens that the work is handed over, and later uneven working surfaces and other defects are discovered, which greatly spoil the overall impression. But you don’t need to hire anyone, because if you can handle the ceiling, then the walls won’t create any special problems for you.
It is best to use tiles as a finishing material. Firstly, it has excellent performance characteristics and durability, secondly, it is very easy and simple to care for it, thirdly, since the area of the restrooms in many apartments is small, you will not need a large amount of material, and therefore, repairs will not be necessary will require significant financial costs.
So, the materials have been purchased, you can continue repairing the toilet. The sequence of work when finishing walls is carried out according to the following algorithm:
- Carefully inspect the work surface and use a building level to check how level they are. If there are even slight curvatures, they need to be leveled to increase the tightness of the tiles. The permissible error is 5 millimeters per square meter.
- If leveling is necessary, you must first remove any protrusions with a hammer drill or sand them. This is a mandatory step, because if during the operation of the bathroom the finishing materials begin to be plastered, then you will not have any problems with it.
- Before gluing the tiles, the walls are treated with an antiseptic primer. It will not allow mold and fungi to multiply, so your toilet will always be clean and tidy.
- The frame of the box in which the pipes will be hidden is covered with plasterboard, which has increased resistance to moisture.
- To improve the quality of adhesion, the tiles should be placed in water approximately a few hours before working with them.
- Glue is being prepared. To do this, you simply need to dilute the dry mixture in water in the proportions specified by the manufacturer on the label. It is very important to stir everything well so that it is homogeneous and without lumps.
So, the above instructions answer in detail the question of where to start repairing a toilet. When all preparations are completed, cladding can begin.
It is performed according to the following scheme:
- Markings are applied to the working surface under the level. It is important to take into account that the thicker the tile, the wider the seam needs to be made.
- The adhesive is evenly applied to the wall with a spatula. It is very important to distribute it so that it is of the same thickness over the entire area. Don't try to cover a large area at once as it dries quickly. Do everything slowly and little by little.
- Based on the previously applied markings, the tile is applied to the wall and pressed firmly. Excess glue should be removed immediately.
- Plastic spacers must be installed between the tiles. This will allow you to maintain the same thickness of seams everywhere. The gluing is carried out in rows in the direction from the floor to the ceiling. If you want to give the room a more original appearance, then each next row should be applied with an offset of half the width. It is recommended to check the accuracy of installation using a building level and, if necessary, adjust the position of the tiles.
That's all, now you know where to start repairing a toilet in an apartment, as well as in what sequence all the work is performed. After the wall cladding is completed, the room is closed and left for at least 12 hours to allow the glue to dry completely, and then the seams are sealed with a special putty. It not only improves the attractiveness of the walls, but also prevents water from penetrating under the tiles, thus extending their service life. At the very end, all that remains is to thoroughly wash the walls, after which they will shine with their beauty.
Plaster
Bathroom walls are plastered using a cement or gypsum based mortar. In damp rooms it is not recommended to use gypsum mixtures such as Knauf Rotaband, because they can subsequently become deformed from constant moisture, although this is not prohibited by the manufacturer. Read more about the types of plaster mixture.
Required Tools
For plastering you will need the following tools:
- primer brush;
- level;
- trowel for applying mortar in corners and hard-to-reach places;
- wide spatula for applying plaster;
- usually to level the surface;
- grout grater;
- a bucket with a volume of more than 5 liters for mixing the solution;
- gloves to protect your hands;
- drill with a nozzle for stirring the mixture;
- roulette.
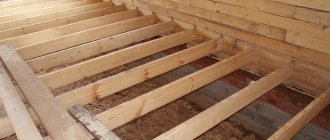
Floor finishing
So, the toilet renovation has already begun, but to complete it completely, the flooring still needs to be laid. Here, as in the case of other parts of the room, it is very important to assess its condition. As practice shows, waterproofing very often becomes unusable, so it needs to be replaced.
The work is performed in the following sequence:
- The base is completely cleaned of any debris and dust, after which it is treated with a deep penetration primer.
- Next, a special polymer mastic is applied, best made on the basis of bitumen, which will act as waterproofing. Thanks to this, the likelihood of flooding neighbors living on the floor below you will be almost completely eliminated. The layer thickness must be at least 150 millimeters.
- After waterproofing, a concrete screed 50 mm thick is poured. It is best to use quick-hardening mixtures for this. Of course, they cost more than usual, but their quality is much higher, and you will also save a lot of time.
- After the screed has dried, it usually takes 3-4 days, and the working surface is primed.
- It is better to use floor tiles for cladding. It has greater strength and durability, so it will be much more difficult to damage it, and it is also not so slippery when water gets in. If you choose wall tiles, be prepared to replace them just a few years after the renovation.
- The process of gluing tiles is the same as in the case of walls. First, an adhesive mixture is applied to the floor, after which the tiles are laid in rows. When it dries, the joints are grouted. The tiles can be laid either in rows or offset.
That, in fact, is the whole process of work. Now you have a detailed idea of where to start renovating a toilet and how to bring it to the very end. Now all you have to do is arrange the bathroom, and you can start using it.
Main options
There are two main types of repairs. In other words, there is simple design and finishing, and there is a major renovation. The first approach involves superficial replacement of some interior elements as necessary. It involves replacing the main parts with newer ones, as well as finishing. In the case of a major overhaul, a more serious and labor-intensive restoration will be required. With this approach, the following work is performed:
- providing waterproofing;
The process of waterproofing a bathroom - construction of partitions;
- installation of new pipes and communications;
- installing the floor, replacing doors, other important attributes, replacing the bathroom itself;
- floor finishing, ventilation installation.
It is necessary to use recommendations, be guided by the experience of professionals who already have knowledge and are also ready to objectively evaluate various redevelopment options. With an illiterate approach, the result will often not justify itself. Among the photographs, you can choose ready-made examples of bathroom renovations that suit you best. You can also find a style solution that will be most relevant for your room.
Bathroom after renovation
After all, when considering examples, you will more clearly understand the overall picture and look forward to a new style for your bathroom, which will be the best and unique for you.
And, in addition, from a variety of options, there is a chance to choose the most suitable solution in terms of money and style.
Plumbing installation
This article discussed the renovation of a toilet step by step. If you strictly adhere to the instructions described in it, then you will certainly be able to do everything at a high level. However, this is not the end, since you still need to install and connect the plumbing equipment, and this is also a very labor-intensive process.
It is performed according to the following algorithm:
- The toilet is installed in the designated place. At the same time, to prevent it from fidgeting on the tiles, it is recommended to place it on a special rubber lining.
- We make marks for the holes for the fixing bolts and drill them.
- We install the plumbing fixtures and fasten them with anchors, after which we connect them to the drain using a corrugated pipe.
- Next, screw the flush cistern to the toilet. The kit includes all the necessary fasteners, so you don’t have to buy anything extra.
- We connect the equipment to the water supply system.
- If you also planned to install a sink in the restroom and supplied hot and cold water for this purpose in advance, then there should not be any special problems with this. The sink is simply mounted on the wall and secured with anchor bolts. It is recommended to use an additional bracket, which will give the sink more stability.
- We connect it to the sewer drain through a siphon and install taps for hot and cold water.
When all work on the installation of plumbing equipment is completed, it is recommended to check the quality of all connections so that there are no leaks anywhere. After this, you can begin to install lamps in the ceiling and start using the bathroom. This, in fact, is the entire turnkey renovation, which you can handle yourself without the involvement of professional builders.
Some tips for renovating a bathroom in Khrushchev
Photos of bathrooms in Khrushchev after renovation look better if the walls are light-colored. Mirrored side surfaces will also help to visually expand the space. If ceramic tiles are chosen as finishing, you should pay attention to models of medium or small size, preferably without a pattern or with a small ornament that will not overload the space.
The small area of a bathroom in a Khrushchev-era building will also not make it possible to install all the necessary plumbing equipment: bathtub, toilet, shower, bidet, washbasin. In this regard, you should choose the most necessary ones. The best option would be to install a shower stall, which will not take up as much space as a full bath. If you want to install a bathtub, it can be not only a standard rectangular shape, but also a corner one. In the second case, you will also be able to get a small amount of free space.
The design of the toilet may also be different. For example, a hanging model requires installation, but will help save space.
Price issue
If you have read this far, then you are no longer worried about starting a toilet renovation. However, we still need to talk in detail about how much it will cost to decorate the interior of a restroom. It’s worth noting right away that by doing everything yourself, you save a decent amount of money, but you will still have to spend money, since these days construction and finishing materials are quite expensive.
To get accurate numbers, it is best to go to the store in person and do all the calculations yourself, since prices can vary greatly depending on the region. In addition, 30 percent should be added to the calculations obtained, which will go to cover rejection and possible additional costs. By the way, if you have been planning to update your bathroom for a long time, but did not know where to start renovating the toilet, then it is better to immediately decide how much money it will take and whether you can afford it.
The table below will make this task a little easier for you.
| Material | Quantity | Price in rubles |
| Waterproofing mastic | 5 kg | 1500 |
| Tile adhesive | 25 kg | 340 |
| Grout | 5 kg | 410 |
| Antiseptic primer | 5 l | 500 |
| Tile | Square meter | 50-600 |
| Floor tiles | Square meter | 300-2800 |
| Screed mixture | 25 kg | 300-780 |
| Drywall | 1 panel | 200-500 |
| Accessories for drywall | Set | 30-80 |
| Wooden beam | 6 m | 90-220 |
| Lining | Square meter | 160-260 |
| Corrugated pipe | 1 meter | 125-200 |
| Metal-plastic pipe | 1 meter | 70-120 |
| Compression fittings | 1 piece | 250-500 |
| Universal mixer | 1 piece | 1400-2500 |
In addition to all of the above, you will also need to purchase new plumbing equipment. It is very difficult to determine prices for it, since everything here depends on the individual preferences of each person. You can purchase both a budget option and luxury plumbing fixtures from world-famous brands. When choosing a toilet and sink, you should start from your real financial capabilities. If you used inexpensive tiles for tiling the room, then there is simply no point in having a European toilet. It’s better to do everything in unison so that everything in the interior harmonizes well with each other.
Difficulties of bathroom renovation
Among the main reasons for errors in repairs, two can be identified: hastily made decisions and insufficient practical experience in performing repair work. To avoid some mistakes, you can listen to the tips below.
- It is highly recommended to replace old sewer and water pipes. Communication systems have their own warranty period. And neglect of this feature can cause such unpleasant situations as leaking pipes in the bathroom immediately after renovation. Fixing this problem will require additional time and money. It is much cheaper to prevent force majeure than to eliminate the consequences.
- The electrical wiring diagram must be calculated and designed before starting repairs. The number of sockets should be calculated not only taking into account the existing equipment, but also add 1-2 pieces in view of the prospect of purchasing additional devices in the future. Cable parameters should also be selected taking into account the possibility of increasing the total power of electrical appliances.
- The bathtub should be placed in such a way that it is possible to subsequently install as many household appliances as possible in the room, to easily attach a sink, etc. It is advisable to leave one large free area near the bathtub rather than several small ones. The bath should also not divide the room into zones.
- When tiling walls, you should avoid an abundance of decorative elements: borders, internal and external corners, and others. These parts are unreasonably expensive, since they will take up no more than 15% of the space, and the financial costs may exceed the cost of the rest of the tiles. In addition, decorative fragments often have raised parts that prevent the correct installation of the equipment. After all, it has a flat surface attached to the wall. This means that the wall should also have no protrusions.
- You should make sure in advance that the dimensions of the door match the size of the opening under it. When installing doors of non-standard sizes, it sometimes turns out that the opening made for them turned out to be of the wrong format. And since the doors are installed at the last stage of repair, it becomes necessary to saw off part of the partition, and, accordingly, the tiles. It will invariably crack and the entire adjacent row will need to be replaced.
- It is important to carefully ensure that the position of the partition on which the door will be installed is level. In theory, it is possible to tile an inclined surface, although in practice it is better to avoid this. But attaching a door to a sloping wall will not work. A gap forms between the platband and the wall, which cannot be hidden.
- Even at the stage of marking the tiles, it is necessary to think about the placement and installation methods of inspection hatches. Experts do not advise buying cheap plastic options, even if the budget for repairs is minimal. Upgraded hatches with magnetic covers look much better.
It is not difficult to follow these instructions. It is better to weigh all important decisions in time and make quality repairs than to eliminate shortcomings later.