How to putty GVL for painting and wallpaper
Decorative painting and wallpapering are the most popular options for finishing surfaces lined with gypsum fiber board. Maximum smoothness can only be achieved by filling everything, the joints between the slabs, and the exposed screws. All work will be done in three stages:
- padding;
- preliminary puttying of the place where the sheets are glued;
- final puttying of the entire surface, finishing stage.
Do not forget that special dilutable compounds will be required for the installation of gypsum fiber board elements.
Is grouting of joints necessary?
After the joints on the plasterboard wall have dried, subsequent grouting is carried out. This is what you need to do:
- The remaining stones from the mixture will interfere with subsequent work and may ultimately ruin the appearance of the room.
- Grouting must be done to achieve a smooth surface.
Grouting is done on a dry surface with sandpaper or a sanding machine. For convenience, so that all defects are visible, use a lamp.
After the work, the surface remains smooth and clean.
Sequence of GVL putty for painting and wallpaper (putty secrets)
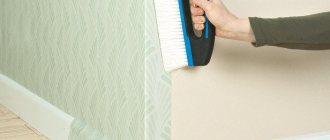
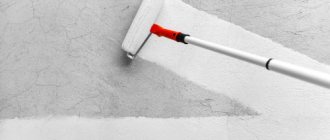
Before applying GVL putty for painting, the surfaces are primed. The procedure is necessary to improve the binding properties of the putty with gypsum fiber. The primer is applied using a roller with a small pile, carefully covering all seams and corners with the composition. Hard-to-reach places are treated with a paint brush. After the walls have completely dried, proceed to the next stage.
The places where the screws are fastened and where the gypsum fiber sheets are glued together are first covered with starting putty. To prevent cracks and better retain the mortar, apply a self-adhesive mesh to the seams. The putty solution is diluted according to the instructions and applied to the mesh using a spatula.
In the corners, treatment is carried out first on one side and then on the other. The thickness of the putty layer should not exceed 1.5 mm. To seal deep cracks or dents, the layer may be thicker. If minor roughness and irregularities remain, they can be eliminated using a grinding device.
The finishing putty for GVL is selected especially carefully. When painting walls, you will need a good quality polymer mixture to create a thin layer. If the pre-treatment of the walls is of poor quality, the lighting will show all the bad places.
The finishing putty mixture is carefully applied with a spatula, spreading in the direction from the stroke made towards the dry, untreated sheet.
Why do you need to putty?
The smooth surface of the slabs does not require additional leveling. But at the moment of assembling the structure, butt seams appear, fastenings with self-tapping screws create unevenness, and there are material defects. When leveling the surface with putty, all these defects are eliminated and a single plane is created.
The cardboard on the surface of the drywall sheet is not intended for painting; it can become deformed or destroyed, which will lead to the need to replace the material.
Using an open sheet of cardboard covering for wallpapering means that the next time you replace the wallpaper, you will have to replace the slabs as well, since the wallpaper is tightly glued to the cardboard, and you will have to peel it off along with the top layer of the slab, after which it will lose its strength.
Puttying drywall is necessary to:
- create a flat surface;
- protect the facing material from destruction;
- perform a single structure in mating places.
How to prepare a gypsum fiber board surface for puttying
Before starting work on puttying drywall, you should carefully examine the surface of the structure. Screws or self-tapping screws must be screwed in flush with the surface. If the head of the hardware is recessed, it should be replaced with another, longer one and screwed in again.
Joint seams should be cut. The sheet should have bevels along the seam at 45 degrees, allowing it to be sealed with putty. If the sheet of cardboard on the board has defects, they should be eliminated. Subsequently, all defects will become noticeable.
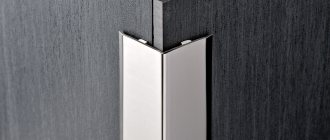
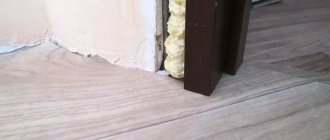
At the same time, slopes, corners and radially conjugate surfaces are prepared for further finishing. At sharp corners of slopes it is necessary to secure a metal or plastic corner. It connects two unfinished joints. At the installation site, cardboard and a little gypsum are removed from the gypsum plasterboard, the corner is glued or placed on putty, creating a geometric profile. For smooth transitions, special plastic pads are used, which are attached with a stapler. You can see these operations in detail in the video.
Which putty should I choose?
How to putty drywall is decided depending on the purpose of the room and the qualifications of the craftsman. A numerous range of building materials of this type is presented:
- cement;
- plaster;
- polymer putties.
However, in places with high humidity, gypsum-based putty should not be used. For professionals, the best material will be professional material from the German company Krauf. But since this is a quick-drying material, it is better to use Vetonit polymer material to putty drywall with your own hands. This is a plastic putty that does not lose its quality during the day.
The consumption of material per 1 square meter of surface is indicated on the packaging and calculating the required amount for puttying drywall with your own hands is not difficult. When sealing drywall joints, you cannot do without a self-adhesive sickle mesh. It helps create a durable structure.
Necessary tools and composition preparation
In order to make drywall putty you need:
- bucket;
- spatulas, large and small;
- mixer for stirring the putty mass;
- low speed drill;
- rule.
At the same time, you should know that not every drill can withstand the load of mixing, only a professional one. The amateur one can be used, including reverse.
In addition, you will need a comfortable, stable stand for working at heights.
Putty mixtures are supplied dry or ready-made. In order to use the finished mixture, you need to put it away from the storage container in a bucket, bring it to the consistency of thick sour cream by stirring with the addition of water. The rest of the composition should be stored in a closed container.
Dry mixtures are diluted in strict accordance with the recipe written on the package. If this requires holding time for the composition before secondary mixing, it will be properly maintained. But in the future the mixture should be used within the period of time indicated in the instructions.
The most effective are German Krauf mixtures, but their rapid hardening allows only professionals to work with them. For do-it-yourself putty, it is better to use ready-made Vetonit putty, which is plastic and does not dry for a long time. In addition to this mixture for skilled hands, we can recommend the ready-made mixture “Prospectors”. It lies flat on the surface, is flexible and easy to sand.
Painting work in Irkutsk, plaster, putty, wall painting
Plaster, screed, gypsum plasterboard and gypsum plasterboard, tiles, dismantling
Have time! Prices for work have been reduced, without sacrificing quality!
*SPECIAL* ALL INCLUSIVE*
Primer + Plaster + Putty for 2 layers 500 rubles
A set of works to level the overall geometry of the room (roughing and pre-finishing work): Dismantling (with garbage removal) + Suspended ceiling GKL, GVL, SML (with sealing and reinforcement of joints) + Plastering and puttying of the ceiling, followed by grouting and priming + Floor screed (filling cracks, preparing the base, applying mastic (waterproofing), primer...
Why is grinding needed?
The surface obtained after finishing drywall putty can hide imperfections invisible to the eye, which will appear during facial treatment. Therefore, grinding the resulting surface will create a perfectly flat surface. The operation is carried out after the surface has completely dried.
This will take from 4 to 6 days, depending on the temperature and humidity in the room. When drying the surface after puttying, drafts on the surface are not a problem. Therefore, you can open the windows.
The grinding operation is accompanied by a lot of dust. Therefore, you should use a respirator. After sanding and priming the surface, you can begin cladding.
When creating a design, you should understand that aesthetic design includes accuracy and professionalism in performing all work. Only then will the look be complete and pleasing to the eye. Plastering drywall is the most important step in creating a design.
"Knauf Uniflot"
Knauf Uniflot putty is a specialized super-strong waterproof mixture for plasterboard joints, its properties superior to all analogues.
- The increased strength brings it to the same level as the cement composition, however, the putty in question is significantly superior to it in ductility.
- Good adhesion, which brings this type of putty closer to synthetic glue, makes it possible to seal gypsum board joints with a semicircular thinned edge (PLUK) without the use of reinforcing tape.
- The composition does not shrink and does not crack.
- Perfect for sealing the most problematic transverse joints between gypsum boards.
- Suitable for rooms with any humidity. Despite the fact that the base of the mixture is gypsum, the putty does not absorb water after drying, acquiring hydrophobic properties.
For what purposes is the mesh used?
The mesh reduces the impact of vibration on the coating.
Made from glass fiber with a polyacrylic dispersion, it is used to avoid the appearance of cracks. The mesh for wall putty is inserted into the inner layer - this will help reduce the effect of vibration and reduce the deformation of the finish during mechanical impact.
It may happen that the putty from the mixture is prepared incorrectly and it peels off. In this case, a reinforcing mesh will come to the rescue - it will help retain the finish.
Conditions for carrying out work
There are a number of certain conditions, the use of which contributes to a positive final result:
- First of all, the temperature inside the room must be observed. This indicator should not be less than +10°C. In addition, the temperature level must be maintained throughout the entire period of work, preventing the possibility of temperature changes.
- Drafts are prohibited. Under no circumstances should windows and doors be opened while sealing joints.
- There are some conditions regarding indoor moisture levels that must be observed. For this reason, you can begin installing drywall and sealing its seams only after completing the pouring of the floor screed, leveling the ceiling and other wet work. This is due to the fact that increased dampness is the reason why the putty will not adhere well enough to the sheets of finishing material.
- Fixing drywall to a metal frame must be carried out in accordance with all rules. If the fastening is not strong enough, peeling of the sheets from the sheathing may occur, which in turn will lead to the formation of cracks at the joints even under light loads. In this situation, neither the serpyanka nor the putty mixture will help.
Technology for sealing seams between plasterboard sheets
The sequence of work will be as follows:
Working conditions: the room temperature should not be lower than 10°C, and the humidity should be within normal limits. Drafts are not allowed.
It is important that the container and tools are clean, otherwise the quality of the putty will decrease by 2 times, and its hardening will also accelerate. The properties of the solution are retained for no more than 40 minutes, and the required viscosity cannot be maintained by diluting with water, so small portions are prepared. After the putty mixture has hardened, the seam is rubbed with a float and sandpaper and primed again.
Sealing plasterboard seams on the ceiling and walls is done using the same technology. It’s just more difficult to process the ceiling, and all the defects are more noticeable.
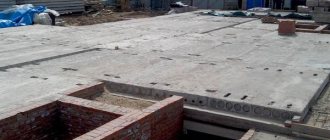
Construction of a partition
Structure and composition
Before starting work, we should determine what elements our partition will consist of.
Structure and composition of plasterboard walls:
- Frame made of galvanized metal profile
. Includes the following elements: rack profile (PS) for vertical frame parts and guide profile (PN) - for horizontal connections of the wall to the ceiling and floor; - Soundproofing filler
. For this purpose, non-flammable polystyrene foam or mineral wool (glass wool) slabs are usually used; - The frame covering is double-sided
. It is carried out with gypsum fiber sheets (GVL) by fixing them to the frame posts with self-tapping screws on both sides of the structure; - Filling seams and joints
. For these purposes, fast-hardening putties for seams such as KnaufFugenfuller or KnaufUniflot are used, as well as fiberglass reinforcement tape, which is popularly called “serpyanka”; - Leveling putty on the wall surface
. It is necessary to create a flat plane on the surface of the structure, it is performed by applying a solution to the walls in a thin, uniform layer; - Finishing putty
. Necessary if you plan to paint the walls. It is carried out with any finishing gypsum mixture, which is applied in a thin layer, and after drying, sanded with an abrasive float or emery cloth; - Finishing
. This can be wallpaper, panels, decorative plasters and other facing coatings. In this case, finishing putty is not performed.
To construct the frame, the following elements are used: PS and PN profiles. They come in different sizes:
| Sketch of PS profile section | Marking | Sketch of the section of the PN profile | Marking | Aspect ratio, axb, mm | |
| PS 50/50 | 50x50 | Mon 50/40 | 50x40 | ||
| PS 65/50 | 65x50 | PN 65/40 | 65x40 | ||
| PS 75/50 | 75x50 | PN 75/40 | 75x40 | ||
| PS 100/50 | 100x50 | PN 100/40 | 100x40 |
As you can see, in different brands of profiles only the size of side a changes, while side b remains unchanged. Therefore, when purchasing a set of profile elements, make sure that the a-dimension of the rack and guide rails is the same, otherwise their joint installation will be impossible.
Depending on the height of the structure, profiles of different sizes are used (side size a, mm is indicated):
- Up to 3 meters – 65;
- From 3 to 4.5 meters – 75;
- Over 4.5 meters – 100.
The maximum height of partitions that can be built using this technology is 5 meters. The work can also use auxiliary profiles with a side size of a = 50 mm for mounting horizontal jumpers, framing holes, etc.
As sound insulation, you can use polystyrene foam boards with a fire retardant with a thickness of 50 mm, as well as mineral wool boards with a thickness of 50–100 mm. These products fill the gap between the frame skins.
To cut GVL sheets, use a construction knife (for longitudinal and transverse straight cuts), a hacksaw for GVL (for cutting rectangular holes) and a drill with a circular saw (for cutting round holes with a diameter of up to 80 mm).
Important! Before installation, the sheets must be kept in the room where the work is planned for at least 4 days so that they acquire the same humidity.
Frame assembly
The instructions for assembling the metal frame are simple and clear:
- Using a coated cord on the floor, we beat off the line of the partition according to the project. The line must be strictly perpendicular to the opposite walls. Then, using a plumb line, we transfer the markings to the walls and ceiling;
- We take the PN and cut out two sections along the length of the line on the floor, cover them with sealing tape and fix them along the floor and ceiling using BS-K 8x50 mm dowels and galvanized screws 4.2x51 mm with a pitch of 50 cm, but not less than 3 per section profile. We make sure that the parts are located exactly according to the markings;
- We take the PS and cut out two sections along the height of the room minus 5 - 10 mm, which we cover with sealing tape and fix along the walls between the guides. The screw installation pitch is 100 cm, but not less than 3 per section of the rail;
- Next, we place the PS on the sides of the doorway, which we reinforce with wooden blocks inserted inside the profile. To work, we use a plumb line or a level; we connect the parts using special fasteners in the profile structure or galvanized self-tapping screws 4.2x14 mm.
- We make the upper border of the doorway from a section of PN, which we reinforce with a vertical crossbar (or two) made of PS installed between it and the ceiling guide;
- We install the PS with a pitch of 402 mm along the entire partition, except for the doorway. We maintain verticality, if the intended joint of the sheets is not on the PS, then we install an additional profile in this place.
We connect the profiles with screws after the PS is inserted into the PN:
Sheathing and sound insulation
After completing the assembly of the frame, it should be sheathed with gypsum fiber sheets. To do this, cut out the sheets and cut out the necessary parts. If the vertical size of the sheet does not overlap the height of the structure, then horizontal jumpers from smaller PN should be installed at the joining point, or holes for joining should be cut in the normal profile.
The sheets are attached to the frame with double-threaded self-tapping screws with a self-countersinking head measuring 3.9x30 mm in increments of 30 cm at a distance of 12 mm from the edge of the gypsum sheet. The length of the screw should allow it to extend into the profile by 1 cm. A gap of 10 mm is left between the sheets and the enclosing structures, and 5 mm between adjacent sheets.
Fastening is carried out from the corner in two perpendicular directions: vertical and horizontal:
After covering one side, the structure is filled with sheets of mineral wool, inserting them between the posts so that they are slightly compressed by them and do not fall. Then the other side of the partition is covered, thereby covering the soundproofing layer.
Important! Joining of sheets (horizontal or vertical) is carried out only on the profile. If there is no profile at the junction of adjacent gypsum fiber lines, it must be added.
Application of reinforcing tape
When doing renovation work in an apartment, sooner or later every master or owner is faced with the use of drywall, and also needs gypsum plasterboard tape for seams and joints. This building material is unique because its application is wide:
- for leveling walls and ceilings;
- creation of multi-level ceilings;
- the work of arches, partitions, bar counters;
- creating a fireplace, niche, box;
- production of furniture elements.
Drywall has a perfectly flat surface, which is practical for finishing work. But, in order to start painting or wallpapering, the drywall should be brought in.
GVL tape is used to cover joints of plasterboard sheets. At the border of the 2 sheets there is a small depression formed by a chamfer made in advance. This depression should be sealed with reinforced tape. It performs the functions:
- The joint is strengthened. During long-term use, drywall will not deform or crack. This is mainly due to temperature changes. Even if the temperature does not change much - only 5 degrees, the plasterboard surface is susceptible to this.
- Brings the plasterboard surface to a perfectly flat surface.
- If the plasterboard absorbs moisture, it will expand, and after drying it will shrink. Reinforced drywall tape maintains the integrity of the entire coating. Moisture changes can occur in private homes; when it’s spring or autumn outside, the house also becomes damp. GCR absorbs moisture. As the temperature rises, the surface dries out.
- Reinforced tape with a metal strip insert is designed for plasterboard corners. It protects corners from cracks, as well as from mechanical stress.
To seal large cracks on the surface, use Kurt tape under drywall. It is wider in size and accordingly has a higher percentage of strength. Reinforcing tape for plasterboard Kurt is also produced for reinforcing large joints.
Without the use of tape, a plasterboard structure will not last long. As a result, deformation will occur and the surface will become covered with cracks.
Serpyanka
Serpyanka goes on sale in rolls. It's a sticky bandage. The tape is made from threads using glass, which gives it strength and practicality. Knauf tape for drywall is of high quality, according to many positive reviews from craftsmen.
Serpyanka is applicable in:
- Sealing the seams of a plasterboard structure.
- Elimination of cracks that have appeared. To prevent the crack from increasing in length along the surface, tape should be used.
- At the boundaries of ceiling slabs.
- Strengthening the internal corners of the transition between wall and ceiling.
With all the positive characteristics of the serpyanka, there is one minus - when there is a large load on it, it stretches.
Sealing seams in gypsum boards
First, let's be clear, special gypsum putties with increased resistance to cracks are used for joints. The Knauf company recommends using Uniflot putty to seal cracks; it is durable and strong, but the cost is sometimes daunting. Therefore, it is often replaced with Fugenfüller, whose price is several times cheaper.
Putties that are used for drywall joints.
How to seal joints on drywall? By following the step-by-step instructions, sealing the joint will not require a long time, special skills or the cost of hard physical labor.
The surface must be carefully prepared. The joint should be cleaned of dust and small pieces of drywall. Next, a dry and clean surface must be coated with a primer.
How to apply tape to drywall? There are 2 methods of installing serpyanka.
If the tape is sticky, then:
If the tape does not have an adhesive layer, sealing joints on drywall occurs as follows:
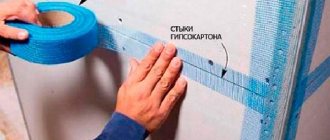
- A layer of putty from Knauf (Uniflot or Fugen) is applied to the primed surface. Layer thickness 1mm.
- Serpyanka is placed on the wet putty so that its center coincides with the joint.
- The serpyanka is slightly trampled into the putty. This can be done using a narrow spatula. At the same time, when the edges of the tape are pressed, the remains of the putty “climb out.” They need to be removed immediately.
- After gluing the tape, the putty should harden a little. Another layer of putty is applied on top of the tape; it already covers the tape and the places where the plasterboard sheet is fastened.
When installing reinforced tape, it is required that the humidity in the room be moderate. If the humidity is high, the drywall will absorb water and if this moisture is released, the tape may not be able to withstand stretching.
Serpyanka at the junction of plasterboard foxes
After drying, the entire putty surface is polished with fine sandpaper, all imperfections are removed.
Paper tape
Paper tape for drywall seams has not lost its relevance even now, when there are many other reinforcing materials for drywall on the construction market. The tape is used in repair work because it has many advantages:
- The thinness of the tape allows you to quickly level the surface after gluing it.
- When installed on a putty surface, the wet tape retains its functionality.
- Craftsmen consider paper tape to be budget-friendly because its price is relatively low.
- To use the tape, you do not need to use special mixtures or materials.
The temperature regime during installation work must be maintained within the range from +18 to +25 degrees. If the temperature is too high, the air in the room is dry, and if the temperature is too low, there will be high humidity.
How to apply paper tape to drywall joints?
Paper tape is used for finishing plasterboard seams, for... To prevent the crack from growing larger, it is cleaned by making a small depression. Afterwards they prime. After drying, apply a thin layer of putty and apply paper tape. If air gets inside, the bubble should be pierced with a needle, the air will come out.
Before you start attaching the tape, you need to check the strength of the plasterboard structure. At the slightest movement of the plasterboard, the tape will not help in strength.
To reinforce gypsum board joints:
- All drywall seams must be coated with primer.
- After drying, the tape needs to be wetted for strength.
- A thin layer of putty is applied to the joint, and tape is glued on top using a narrow spatula.
- All work done is left until completely dry.
- After the time has passed, you need to check how the tape has stuck and apply another layer of putty material on top.
- The final action will be to smooth out excess roughness and get rid of excess putty.
When installation work is carried out with reinforcing tape, there should be no drafts. It is better to close open windows and doors.
The procedure for installing the tape on the solution
Knauf paper tape is strong and durable. It does not tear or stretch under certain loads.