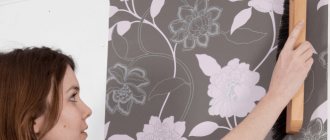
The choice of wallpaper is huge in terms of colors and colors; they are easy to glue on prepared walls. Wallpapering is one of the final stages of interior decoration. But sometimes the wallpaper wrinkles, air bubbles and other troubles appear that confuse even experienced craftsmen. The problem is completely solvable and you just need to show calm and restraint. There are several ways to troubleshoot problems.
Causes of bubbles
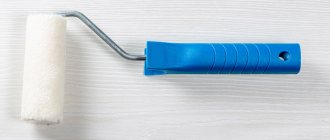
There are special construction tools that help to thoroughly smooth the canvas, expelling excess air. Among them are a roller and a spatula.
If you know the reasons for the appearance of bubbles on wallpaper after pasting, you will be able to avoid their appearance. Most often, the problem arises due to the mistake of inexperienced people who decided to do the repairs themselves, without the help of painters. In this case, it is necessary to initially control the entire process.
Absence or poor preparation of walls
Many people start wallpapering without preparing the walls. After removing the old coating or plaster, clean the surface and level it with putty.
Loose adhesion to the base due to the presence of tubercles, unsealed joints, and a large layer of paint causes air to accumulate in these places.
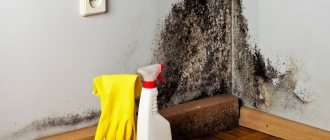
Insects can multiply in air bubbles, mold can appear and fungus can grow, which leads to poor health of a person.
Professional craftsmen use a primer for better adhesion to the wall. After applying the putty and special composition, you should wait until they dry completely.
Too much glue on the wall, canvas or its absence in some places
The glue must be applied evenly to both the canvas and the wall, if specified in the instructions. It is better to use a thick roller for this. You can buy a product with a tinting agent (usually pink) to control the presence of unpainted areas. After drying, the composition restores transparency and does not leave any stains.
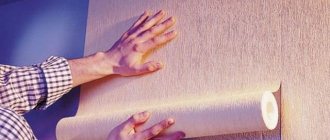
To avoid the appearance of bubbles, leveling the canvas with a spatula from the center to the sides will help to expel air through the joints.
When choosing, pay attention to the manufacturer. It is better to buy glue that is recommended on forums, or that has received approval from friends and relatives.
Incorrect indoor microclimate
Another condition that is better to monitor is the microclimate in the room. You cannot paste wallpaper on cold walls in winter, as this will cause condensation and wrinkle the entire length of the canvas.
Optimal conditions for work:
- humidity from 50% to 60%;
- the thermometer in the room should show from 18 to 23 degrees;
- complete absence of drafts.
In summer, on hot days, it is recommended to install a bucket of water to avoid instant drying of the product, and in winter, thoroughly warm and dry the room.
You should not turn on the air conditioner for several days after wallpapering, which also causes a draft.
Incorrectly chosen glue or its dilution
Each roll contains instructions indicating the gluing method and suitable glue. The same information is printed on the packaging of the binder composition.
The instructions indicate:
- Suitable density and type of wallpaper.
- Exact amount of water for dilution. For example, non-woven wallpaper will require a thicker composition than paper wallpaper.
- Waiting time for the glue to allow all components to react.
- The time required for absorption into the canvas after application.
- Is it necessary to cover only the walls with glue?
Do not stir the glue intensively and for a long time after swelling to avoid saturating the composition with oxygen, which can then swell.
What an ideal wall should look like
In Soviet times, when changing decorative coverings, it was often practiced to apply new wallpaper directly onto old ones or onto newspapers. Thick wall layers can be found in many “aged” houses and apartments. Modern society rejects the “it will do” principle, offering instead a rational approach and verified calculations. Competent and beautiful decoration of the room with new canvases depends on the condition of the walls. The quality of the base and the scope of repair work can only be determined by first removing the previous coating. Experienced craftsmen put forward the following requirements for surfaces for wallpapering:
- The base must be clean and free:
- from previous paintings, paint and other possible coatings;
- from screws, nails, etc.;
- from fungal infections is a very important factor that greatly influences not only the appearance of the home, but also the health of its owners.
- Without cracks and numerous pores, which will contribute to reliable adhesion of the material to the surface.
- The base must be level and smooth. The assumption that a new trellis will hide all defects is completely wrong.
- The wall must be well dried. Otherwise, wallpaper glue, which contains water, will not be able to firmly attach the canvas to the wall. Increasing the temperature in the room will generally lead to peeling of the trellises.
- The same color of the base is of great importance when choosing thin wallpaper in light colors, otherwise the difference in color schemes will be noticeable even after repairs.
Taking into account the above criteria for preparing the surface for gluing, you will create a solid, high-quality foundation and the most comfortable conditions for further work.
What to do if the wallpaper bubbles after hanging
If there are concerns that the bubbles will not disappear on their own, you can resort to proven methods shared by professionals.
- Smoothing . This action is suitable when the canvas has not yet dried. Remaining air or large amounts of glue are easier to remove around the edges. But if the width of the canvas is more than 52 cm, it is better to start correcting the defects immediately by tearing off the still wet side from the wall, gluing it again, intensively smoothing it with a spatula.
- Piercing and leveling . Sometimes it is enough to pierce small bubbles with a needle and expel air or glue through the resulting hole. It happens that this is not enough and you will have to make a small cut with a stationery knife at an angle to level the surface.
- Getting rid of bubbles with a syringe . They make a puncture in the problem area and pull out the contents. It will also come in handy if a bubble has formed on a dry area due to poor-quality application of the wallpaper fixing compound. A syringe without a needle is inserted into this place after a preliminary puncture and glue is injected. You will need to wait a little while for the wallpaper to smooth out.
You must follow all the rules for decorating walls and ceilings with wallpaper. It is better to glue them in daylight, which does not distort the view, and immediately take measures to eliminate the swelling.
Have you encountered the problem of bubbles forming on your wallpaper?
Yes
No
Where to apply wallpaper glue: on the wall or on the wallpaper
You can glue the wallpaper correctly and fully enjoy the beautiful appearance of the decorated walls, provided you follow certain gluing rules.
Those who are faced with the process of decorating walls with wallpaper for the first time often wonder: should glue be applied to the prepared wall or directly to the canvas?
The answer to the question is simple: the method of applying glue is determined by the type of wallpaper used.
Let's take a closer look at the main options.
The nuances of working with wallpaper
The fight against bubbles will differ significantly in each case, which is due to the different density of the wallpaper and the composition of the glue.
Non-woven wallpaper
For production, non-woven materials based on cellulose are used. Polymer additives make them the most durable, resistant to soaking and loss of shape.
Solution to the problem:
- removing the first sheet and leveling the wall;
- smoothing new canvases from the middle to the edges to expel all the air;
- If bubbles are detected after drying, filling the void with thick glue will help.
Blisters on such material are extremely rare and are caused by poor wall preparation. In some cases, when dismantling is impossible due to severe unevenness, additional decoration is used with stickers, frames with photographs or paintings.
Vinyl
Vinyl wallpaper comes in 2 types:
- Paper based . In this case, glue will need to be applied to the canvas and the wall. Let it sit for a while, and then fasten it, starting from the top.
- On a non-woven base , which does not require pre-impregnation. Such wallpaper is immediately glued to the oiled wall.
Non-woven fabric is a rather heavy material that requires special thick glue.
Paper
This option of budget material is often produced with a minimum width of 52 cm, convenient for gluing, but still requires care.
After applying the adhesive, the canvas is allowed to sit for a while so that it is saturated with the composition, becomes obedient and easier to lay on the wall.
This material is more susceptible to swelling and damage. You should carefully attach the canvas first from above to the ceiling, then lightly move the roller from bottom to top, from the middle to the edges, to expel excess glue and air.
Wallpapering on non-woven backing
This type of decorative wall covering is very easy to apply. Non-woven wallpaper does not shrink, tear or stretch.
They perfectly mask minor flaws on the surface of the walls, tolerate sudden temperature changes and high humidity. And most importantly, non-woven wallpaper can be glued to any surface.
It is enough to apply the adhesive composition to the wall with a roller and glue the canvases cut to the required length.
Why does this happen when gluing?
Most often, the reason for the appearance of air bubbles or wrinkles on wallpaper occurs due to inappropriate quality of the material. Nonwoven fabric tends to expand when wet. On good canvases it is almost imperceptible, but low-grade wallpaper strips can go “accordion-like” not only in the corners, but also along the even plane of the walls.
When sticking to the wall
There is only one way to check what quality of material you have found - by gluing a test strip.
If it lays down perfectly, and no visible defects appear within 24 hours (while the glue has completely dried), then feel free to use the remaining rolls. If the canvas is swollen or very noticeable wrinkles appear, then it is better to exchange the remainder in the store for others, but of the same quality. The only drawback of this method is that it takes a lot of time. But it is possible to get by with existing rolls if you glue the sheets using a special technique that reduces the likelihood of defects and prevents their occurrence.
On the inside and very rarely due to tension on the outside corners, the appearance of wrinkles is possible due to poorly sealed joints between panel slabs or due to hidden cracks. Air passes through them, the temperature of which differs significantly from the microclimate established in the room.
As a result, part of the adhesive composition dries a little faster and peels off from the wall, and part of it holds on more tightly. This uneven distribution of sizing areas results in the formation of wrinkles.
Poor quality wallpaper results in uneven gluing due to stretching of parts of the canvas even at the moment of joining the strips, which can be corrected during gluing. But the wrinkles that appear on the glued wallpaper require a different approach to eliminating them.
The wallpaper does not swell, and when applied, the bubbles are vertical, like wrinkles.
The wallpaper does not swell, and when pasted, the bubbles are vertical, like wrinkles. It is impossible to smooth it out, the non-woven wallpaper is 106 cm. The walls are prepared, primer, volma layer, sanding, primer. My work experience of 10 years has never encountered such a mess, colleagues, advise what can be.
If everything else was done correctly, then check the glue - most likely you need to add water to it, it is too thick. Or the wallpaper is defective.
the second time the wallpaper no longer wrinkles. Just reapply the glue
Although the wallpaper is oilcloth, it also tends to expand when wet from the glue. You need gluing speed (at the moment), which is achieved through experience. Or work with someone first who has entered into this topic. I learned from the 3rd sheet, but sometimes it’s tempting to apply glue the old way - on the wallpaper.
Try to apply glue to the wall first, then let the wallpaper sit for a couple of minutes, and then apply glue to the wall. Everything will be OK.
Why do they arise?
It is worth immediately reassuring readers - bubbles on wallpaper after gluing almost always form for everyone.
Another question is how large their number and size are, and how to quickly eliminate defects.
- The first reason is the expansion of the paper from the moisture contained in the glue. The wet fabric changes unevenly, hence the swelling in the most stretched places. Thin, inexpensive paper wallpapers suffer most from this “disease.” Heavy multi-layer strips swell less often and to a much lesser extent.
Immediately expel the air from under the wallpaper.
- The second most common reason why wallpaper bubbles after hanging is the haste of the owners. They ignore the need to carefully remove the air from under the canvases. Therefore, in order not to get a lumpy room the next day, you should immediately thoroughly smooth out the walls, even if it takes more time.
Choose the right glue.
- Another common mistake is a mismatch between the glue and the material. For example, you have glue for thin wallpaper lying around from a previous renovation, and you purchased a multi-layer or solid vinyl finish. Or vice versa - you are trying to glue a wall with inexpensive paper with a strong composition that is completely unsuitable for these purposes. Hence the bubbles when wallpapering.
- We often carry out repairs during the holidays, that is, mainly in the summer, in the heat. It’s clear that you want to work in comfort, so open windows and a draft make the process easier. But what helps us, to the detriment of wallpaper, is that they categorically do not accept changes in temperature and humidity.
Note! If you intend to do the pasting yourself, be patient and work only indoors. Even more important is to leave the room closed for a day or two, until the material on the walls has completely dried.
Otherwise, you will experience not only bubbles, but also partially fallen off stripes.
- Blisters can also appear from excess glue, as well as from keeping the canvas smeared with it for a long time. The longer the wallpaper lies wet on the floor, the more it gets wet and stretched. Therefore, do not cover the canvas with glue in reserve. Apply it only to each strip one at a time, immediately applying it to the wall.
Walls should be carefully prepared for wallpapering.
- An improperly prepared base often causes the finish to swell. Uneven dents on the walls, loose putty. cracks will definitely have a negative effect.
- When spreading the strip that is still lying, be careful to ensure that there are no dry gaps. A very convenient category of adhesives that change color upon application. In this case, you will see the missed areas and correct the situation in time.
- There are times when the instructions included with the material recommend gluing both the wallpaper and the wall. Carefully read the text on the packaging and follow this kind of advice, then you will reduce the risk of panels falling behind.